WP-config è uno dei file più potenti del vostro sito WordPress e svolge un ruolo importante nel funzionamento di WordPress dietro le quinte.
Esistono alcuni trucchi di configurazione di WordPress molto utili che la maggior parte dei principianti non conosce.
In questo articolo condivideremo alcuni dei più utili trucchi di configurazione di WordPress che vi aiuteranno a risolvere i problemi, ottimizzare e proteggere il vostro sito WordPress.
Come utilizzare questi trucchi di configurazione di WordPress?
WordPress è dotato di un potente file di configurazione chiamato wp-config.php. Si trova nella cartella principale di ogni sito WordPress e contiene importanti impostazioni di configurazione.
Per saperne di più, consultate la nostra guida su come modificare il file wp-config.php in WordPress.
Tutte le migliori società di hosting WordPress sono dotate di un’installazione di WordPress in 1 clic, il che significa che non dovrete mai modificare il file wp-config.php durante l’installazione. Questo è il motivo principale per cui molti utenti non conoscono le potenzialità di questo file.
Potete usare il file wp-config per risolvere i problemi, ottimizzare e proteggere il vostro sito WordPress.
Il file wp-config.php è uno strumento potente e un piccolo errore nel codice può rendere inaccessibile il vostro sito web. Dovete modificare questo file solo se necessario e creare sempre un backup completo di WordPress prima di apportare qualsiasi modifica,
Detto questo, diamo un’occhiata ad alcuni pratici trucchi di configurazione di WordPress che potete utilizzare sul vostro sito web WordPress.
1. Le impostazioni di base della configurazione di WordPress
Per impostazione predefinita, è sufficiente compilare le impostazioni del database durante l’installazione di WordPress. Se non avete un file wp-config.php, vi verrà chiesto di crearne uno inserendo le informazioni sul database.
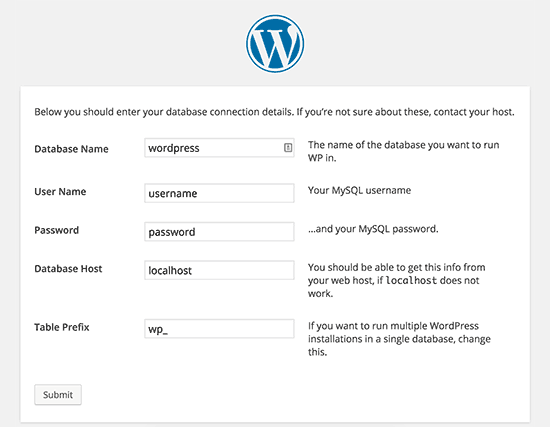
WordPress cercherà di salvare automaticamente queste impostazioni generando un file wp-config.php. Tuttavia, se non riesce, è necessario aggiungerle manualmente.
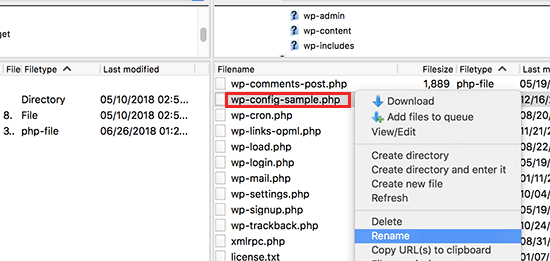
Per farlo, è necessario collegarsi al proprio sito web utilizzando un client FTP. Una volta connessi, dovrete rinominare il file wp-config-sample.php in wp-config.php.
Dopodiché, si può procedere a modificare il file wp-config.php appena creato. Sarà necessario aggiungere le informazioni sul database modificando le seguenti righe:
define('DB_NAME', 'database-name');
define('DB_USER', 'database-username');
define('DB_PASSWORD', 'database-password');
define('DB_HOST', 'localhost');
Non dimenticate di salvare le modifiche e di caricare il file sul server.
2. Aggiunta di chiavi di sicurezza in WordPress
L’installazione predefinita di WordPress aggiunge automaticamente delle chiavi di sicurezza al vostro file di configurazione. Queste chiavi di sicurezza sono utilizzate per aggiungere un ulteriore livello di sicurezza al login di WordPress e all’autenticazione dei cookie.
È sempre possibile rigenerare le chiavi di sicurezza se si ritiene che qualcuno possa accedere al sito web senza un’adeguata autenticazione. La modifica delle chiavi di sicurezza comporta la disconnessione di tutti gli utenti connessi.
define( 'AUTH_KEY',         'put your unique phrase here' );
define( 'SECURE_AUTH_KEY',  'put your unique phrase here' );
define( 'LOGGED_IN_KEY',    'put your unique phrase here' );
define( 'NONCE_KEY',        'put your unique phrase here' );
define( 'AUTH_SALT',        'put your unique phrase here' );
define( 'SECURE_AUTH_SALT', 'put your unique phrase here' );
define( 'LOGGED_IN_SALT',   'put your unique phrase here' );
define( 'NONCE_SALT',       'put your unique phrase here' );
Per ulteriori informazioni, consultate il nostro articolo sulle chiavi di sicurezza di WordPress e su come utilizzarle.
3. Cambiare il prefisso della tabella di WordPress
Una tipica installazione predefinita di WordPress aggiunge il prefisso wp_ a tutti i nomi delle tabelle del database di WordPress. Alcuni esperti di sicurezza di WordPress ritengono che cambiare il prefisso della tabella possa rendere più sicuro il database di WordPress.
Per farlo, è necessario modificare la seguente riga nella configurazione di WordPress.
$table_prefix = 'wp_';
Se si tratta di un sito web esistente, è necessario modificare anche il prefisso della tabella nel database di WordPress. Per farlo, consultate il nostro articolo su come cambiare il prefisso del database di WordPress.
4. Attivare il debug in WordPress
WordPress è dotato di un’interessante funzione di debug che consente di vedere o nascondere gli errori di WordPress in modalità debug. Per attivarla, è necessario aggiungere questa regola nel file di configurazione di WordPress.
define( 'WP_DEBUG', true );
È anche possibile attivare il debug, nascondendo gli errori sul sito web e salvandoli invece in un file di log. Per farlo, aggiungere le seguenti righe alle impostazioni di configurazione.
define( 'WP_DEBUG', true );
define( 'WP_DEBUG_LOG', true );
define( 'WP_DEBUG_DISPLAY', false );
Questo creerà un file debug.log all’interno della cartella wp-content del vostro sito web e memorizzerà tutti gli errori e gli avvisi di debug all’interno del file log.
5. Modifica dell’indirizzo del sito o di WordPress
Normalmente, è possibile impostare gli URL di WordPress e del sito dalla pagina Impostazioni ” Generale. Tuttavia, potreste non essere in grado di farlo se non avete accesso al vostro sito WordPress, se vedete errori di reindirizzamento o se avete appena spostato il vostro sito.
In questo caso, è possibile modificare gli URL del sito e di WordPress tramite il file wp-config.php aggiungendo le seguenti righe:
define('WP_HOME', 'http://www.example.com');
define('WP_SITEURL', 'http://www.example.com');
Non dimenticate di sostituire example.com con il vostro nome di dominio.
6. Annullamento dei permessi dei file
WordPress consente di ignorare i permessi dei file se il vostro host prevede permessi restrittivi per tutti i file degli utenti. La maggior parte degli utenti non ne ha bisogno, ma esiste per coloro che ne hanno bisogno.
define('FS_CHMOD_FILE', 0644);
define('FS_CHMOD_DIR', 0755);
Per saperne di più sui permessi dei file, consultate il nostro articolo su come risolvere l’errore dei permessi di file e cartelle in WordPress.
7. Modifica delle impostazioni di revisione dei post
WordPress dispone di un’utilissima funzione di revisione dei post che consente di annullare le modifiche apportate ai post e alle pagine tornando a una versione precedente o a un salvataggio automatico.
È possibile disabilitare o modificare le impostazioni di post-revisione attraverso il file di configurazione. Di seguito sono riportate le diverse impostazioni di post-revisione che è possibile utilizzare.
È possibile modificare la frequenza con cui WordPress memorizza un salvataggio automatico come revisione aggiungendo la seguente riga:
define('AUTOSAVE_INTERVAL', 120); // in seconds
Alcuni articoli del vostro sito possono avere decine di revisioni, a seconda del tempo impiegato per scriverli. Se questa caratteristica vi infastidisce, potete limitare il numero di revisioni per ogni articolo.
define('WP_POST_REVISIONS', 10);
Se per qualche motivo si vuole disabilitare del tutto la funzione di revisione dei post (non è assolutamente consigliato), si può usare il seguente codice per disabilitare le revisioni dei post.
define( 'WP_POST_REVISIONS', false );
8. Modificare le impostazioni del cestino di WordPress
WordPress è dotato di una funzione di cestino chiamata Cestino. Quando un utente manda un post nel cestino, questo rimane memorizzato sul vostro sito web per i successivi 30 giorni come cestino. Dopo questo periodo, WordPress li cancella automaticamente per sempre.
È possibile modificare questo comportamento cambiando il numero di giorni in cui si desidera conservare i rifiuti.
define( 'EMPTY_TRASH_DAYS', 15 ); // 15 days
Se non si gradisce questa caratteristica, è possibile disabilitarla aggiungendo la funzione sottostante:
define('EMPTY_TRASH_DAYS', 0 );
Nota: l’utilizzo di zero significa che i post saranno eliminati in modo permanente. WordPress non chiede conferma quando si fa clic su Elimina definitivamente. Un clic accidentale potrebbe costarvi…
Per saperne di più, consultate il nostro articolo su come limitare o disabilitare la funzione di svuotamento automatico del cestino in WordPress.
9. Aggiunta di costanti FTP/SSH alla configurazione di WordPress
Per impostazione predefinita, WordPress consente di aggiornare il nucleo di WordPress, i temi e i plugin dalla dashboard di amministrazione. Alcuni host richiedono una connessione FTP o SSH ogni volta che si cerca di aggiornare o installare un nuovo plugin.
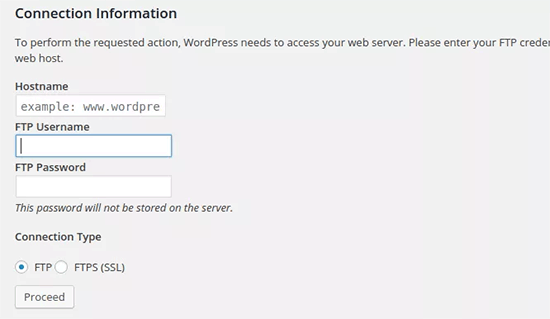
Utilizzando i codici, è possibile impostare le costanti FTP o SSH e non doversene più preoccupare.
// forces the filesystem method: "direct", "ssh", "ftpext", or "ftpsockets"
define('FS_METHOD', 'ftpext');
// absolute path to root installation directory
define('FTP_BASE', '/path/to/wordpress/');
// absolute path to "wp-content" directory
define('FTP_CONTENT_DIR', '/path/to/wordpress/wp-content/');
// absolute path to "wp-plugins" directory
define('FTP_PLUGIN_DIR ', '/path/to/wordpress/wp-content/plugins/');
// absolute path to your SSH public key
define('FTP_PUBKEY', '/home/username/.ssh/id_rsa.pub');
// absolute path to your SSH private key
define('FTP_PRIVKEY', '/home/username/.ssh/id_rsa');
// either your FTP or SSH username
define('FTP_USER', 'username');
// password for FTP_USER username
define('FTP_PASS', 'password');
// hostname:port combo for your SSH/FTP server
define('FTP_HOST', 'ftp.example.org:21');
Nota: non dimenticate di sostituire il percorso di WordPress e ftp.example.com con le informazioni del vostro host FTP.
10. Consentire la riparazione automatica del database
WordPress è dotato di una funzione integrata per ottimizzare e riparare automaticamente il database di WordPress. Tuttavia, questa funzione è disattivata per impostazione predefinita.
Per abilitare questa funzione è necessario aggiungere la seguente riga al file di configurazione di WordPress.
define('WP_ALLOW_REPAIR', true);
Dopo aver aggiunto questo, è necessario visitare il seguente URL per ottimizzare e riparare il database di WordPress.
http://example.com/wp-admin/maint/repair.php
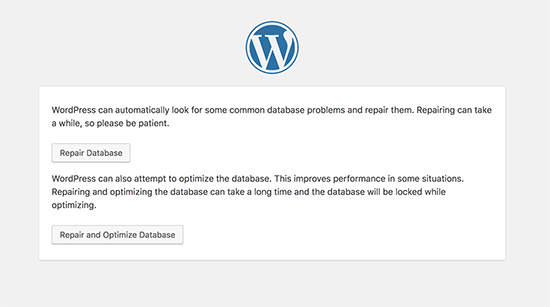
Non dimenticate di sostituire example.com con il vostro nome di dominio. Verrà visualizzata una semplice pagina con le opzioni per riparare o riparare e ottimizzare il database. Non è necessario effettuare il login per accedere a questa pagina.
11. Aumentare il limite di memoria di PHP
Alcuni degli errori più comuni di WordPress sono causati dall’esaurimento della memoria PHP. È possibile aumentare il limite di memoria di PHP attraverso il file wp-config.php. Incollate semplicemente il codice qui sotto:
define('WP_MEMORY_LIMIT', '128M');
12. Spostamento della directory wp-content
WordPress consente di spostare la directory wp-content. Alcuni esperti ritengono che ciò possa contribuire a rafforzare la sicurezza di WordPress.
È necessario aggiungere il seguente codice al file wp-config.php:
define( 'WP_CONTENT_DIR', $_SERVER['DOCUMENT_ROOT'] . '/blog/wp-content' );
define( 'WP_CONTENT_URL', 'http://example/blog/wp-content');
define( 'WP_PLUGIN_DIR', $_SERVER['DOCUMENT_ROOT'] . '/blog/wp-content/plugins' );
define( 'WP_PLUGIN_URL', 'http://example/blog/wp-content/plugins');
Non dimenticate di sostituire example.com con il vostro nome di dominio.
13. Utilizzare tabelle utente personalizzate
Per impostazione predefinita, WordPress salva tutti i dati degli utenti nelle tabelle wp_users e wp_usermeta. Utilizzando la funzione sottostante, è possibile specificare la tabella in cui si desidera che siano memorizzate le informazioni dell’utente.
define('CUSTOM_USER_TABLE', $table_prefix.'my_users');
define('CUSTOM_USER_META_TABLE', $table_prefix.'my_usermeta');
14. Abilitazione della rete multisito
Ogni sito WordPress è dotato di una funzione multisito integrata che consente di creare più siti WordPress utilizzando la stessa installazione. Per saperne di più, consultate la nostra guida completa su come installare e configurare la rete multisito di WordPress.
È possibile abilitare la funzionalità multisito aggiungendo la seguente riga al file di configurazione di WordPress:
define('WP_ALLOW_MULTISITE', true);
15. Proteggere il file di configurazione di WordPress
Come potete vedere, il file wp-config.php contiene impostazioni di WordPress molto importanti. Per impostazione predefinita si trova nella cartella principale di WordPress, ma è possibile spostarlo. Può essere spostato al di fuori della cartella public_html, in modo che gli utenti non possano accedervi. WordPress sa per impostazione predefinita di cercare in altre directory se il file non viene trovato nella cartella principale di WordPress.
È inoltre possibile aggiungere il seguente codice al file .htaccess per limitare l’accesso a questo file.
# Protect wp-config.php
<Files wp-config.php>
    order allow,deny
    deny from all
</Files>
Speriamo che questo articolo vi abbia aiutato a imparare alcuni utili trucchi di configurazione di WordPress che non conoscevate. Potreste anche voler consultare il nostro mega elenco di 55+ consigli, trucchi e hack di WordPress più ricercati che potete utilizzare sul vostro sito o la nostra selezione dei migliori plugin di WordPress per siti aziendali.
Se questo articolo vi è piaciuto, iscrivetevi al nostro canale YouTube per le esercitazioni video su WordPress. Potete trovarci anche su Twitter e Facebook.


Syed Balkhi says
Hey WPBeginner readers,
Did you know you can win exciting prizes by commenting on WPBeginner?
Every month, our top blog commenters will win HUGE rewards, including premium WordPress plugin licenses and cash prizes.
You can get more details about the contest from here.
Start sharing your thoughts below to stand a chance to win!
tareq khury says
hello and thanks for this important post .
my question is where i must add this codes , in the config.php file
but in which line exactly .
regards
WPBeginner Support says
There is no specific line but it is normally best to add the code to the bottom so it is easy to find and remove should you want in the future.
Admin
Ali says
Thanks alot. But i want to know something more detailed about point 9. Where to place this code and more?
WPBeginner Support says
The code would go into your wp-config.php file
Admin
Gurjit Singh says
Thanks for this useful post.
i was looking for this 10. Allow Automatic Database Repair.
Thank you very much.
Thanks and Regards,
Gurjit Singh
WPBeginner Support says
Glad our article could help
Admin
Sunday says
I rely on your tutorials for my website development. The problems here are that you did not state clearly where these codes will be pasted in the various environments. Looking forward to your response.
Sunny Sum says
I want to increase my server timeout limit, where I can find that code???
Stu Rader says
Wow really awesome. This helped so much.
I’m wresting with one thing setting up my own CDN (which the above took care of 98%:).
I’m trying to exclude a sub-folder on my CDN sub-domain as it’s throwing an access violation.
I’ve tried a half dozen NGINX CORS directives in a server block .conf with no joy.
I want to figure out how to use this file in the main domain rather than how it’s written below:
Access to Font at ‘https://cdn.mydomain.com/wp-content/themes/mytheme/includes/lib/assets/fonts/fontawesome/fontawesome-webfont.woff?v=4.7.0’ from origin ‘https://mydomain.com’ has been blocked by CORS policy: No ‘Access-Control-Allow-Origin’ header is present on the requested resource. Origin ‘https://mydomain.com’ is therefore not allowed access.
Thanks if you can point me to a fix or relevant info you may have !!
Stu
Hypez says
They can verufy the information in the wp-config.php if the password or database names correspond and change them if not.
Gopal says
My WordPress website adds weird numbers as suffix to every page URL. Why is it happening? I changed the permalinks settings to display post names; it didn’t help.
Could you please guide me?
Here are a few page urls of my site:
WPBeginner Support says
Try these WordPress troubleshooting tips step by step and see if it resolves your issue.
Admin
Alex says
I have this ‘issue’ – for me its down to backup buddy needing to be run in alternative WP cron mode. The backup buddy FAQ told me to add this:
define(‘ALTERNATE_WP_CRON’, true);
to my wp_config.php file which now adds random numbers etc to URLs.
Its this for me as removing it stops it but also stops backup buddy from working correctly.
David Pascal says
I have always enjoyed reading contents on this site. Thanks for sharing this awesome tricks.
ugwu victor says
I use useronline plugin…When am in the useronline dashboard I notice that some users want to access my default css, upload images link with their browser! So am scared may be they want to hack my site! Please any help on how to stop them
Exnius says
Hey, amazint tricks, thanks a lot. Very useful!
Garratt Campton says
WordPress Error Log –
How should I do this in a local environment?
I’m currently using DesktopServer (Xampp lite – Installs sites with .dev extension locally eg. “mysite.dev”) with SourceTree (Git) – However trying to figure out what the path I should be using to my error log file is proving difficult. Could I use a full URL path such as “http://mysite.dev/php_error.log” ? or does it need to be the system file path “C:/Users/Garratt/Documents/mysite.dev/php_error.log” ?
WPBeginner Staff says
Yes.
German learning Munich says
Hi thanks for the great summary!
I have a question: is any change in the wp-config immediately effective?
Angsuman Chakraborty says
Yes, it is immediately effective
Nathan Pinno says
Got a question: How do I transfer ownership of a site from one user to another? Like I set it up with my admin account, but I want to have another user be the main admin and do updates and posts. I doubt I can just set them as an admin and myself as a subscriber and be done with it, so what’s the correct route of doing so?
WPBeginner Staff says
Yes that’s one way to do it. A WordPress site can also have multiple administrators.
If you also want to transfer them the ownership of domain, web hosting, and database then you will have to create a user account for them in your web hosting control panel. After that you can give them the complete control on domain, hosting, and database as well.
Nathan Pinno says
They already have all that, I’m just helping them redevelop their website (cause it’s not a good look right now nor is it easy to update ATM). Found this awesome church theme for them (cause it’s my church’s website I’m working on), and wanted to see how difficult it would be to switch admins. Last time a site of mine had multiple admins, just the first admin (ID #1) could update the plugins, themes, and WP in general.
Anon says
Im not too sure but usually u have to do it in your Terminal like : sudo adduser sudo.
john says
After I got rid of the database error, now I dont have any errors but now I have just blank page with no source code ? Please help what to do now. Thnaks
Toufiq Hassan Shawon says
Thanks, It helps me lot, why dont you add
define(‘WP_CACHE’, true);
roger says
useful!
so, what about the Securing Your WP-Config File ? thank you
Oscar says
Just a heads up, that the indicated GoDaddy Hostname doesn’t work (maybe at least not for everyone) and the $_ENV option didn’t either.
I found instructions on where to find my specific Hostname here:
http://support.godaddy.com/help/article/39/viewing-your-databases-details?locale=en
Maganizo says
I can’t thank you more! You’ve touched on the heart of any online work in a very clear way! You’re great teachers indeed! It can’t be any better than this! Write more!
brad says
Hey Guys
Great site, great info just found it. with the secure
Securing Your WP-Config File
where is the code that we need? please
Brad
Bon says
is there any configuration in wordpress 3.5 so that the uploaded files will use the defined WP_HOME or WP_SITEURL? thanks
Heather Wood says
Awesome. There is so much stuff about wordpress I didn’t even know. Like the repair database define code. this is one great article. I will have to bookmark this for sure.
yadicemil says
Thanks for this useful tips.I!m a beginner and I have a wordpress.org web site.
I have followed your instructions and changed the wp-config file by copying the secure keys grabbed from the web site: https://api.wordpress.org/secret-key/1.1/salt/
After putting the new config file into the WP-Admin Folder in the server it gives an error “Parse error: syntax error, unexpected T_VARIABLE….”
That line is: “$table_prefix = ‘wp_’;” and it has never been changed.
How can I correct this error? Thanks.
wpbeginner says
@yadicemil You are not supposed to put this in the wp admin folder.
Mark Hedley says
Like it
marco says
you rock man, thanks for the info
Tony Cosentino says
Great information about such an important are as configuration. With all the pharma hacks going on recently the last tip is my favourite. Protecting that damn wp-config file seems to be the key to palace these days.
Thank you for the effort putting all of this information in one place for us all to benefit.
kind regards
Tony
Aidan says
Cool, this is informative and always a good flashback if I forgot any of them.
Thanks for sharing!
Aminul Islam Sajib says
What exactly does adding those # protect wpconfig.php… to .htaccess file do?
Do I have to do anything else after moving .htacess from public_html to root folder?
Editorial Staff says
You will never move the .htaccess file anywhere. That file remains in your public_html folder or the folder where WordPress is installed… The code in that file will disallow all access to wp-config.php file from the web.
You can move the wp-config.php file to the root directory (one above public_html) to add an extra layer of security. One or the other would be fine… doing both is an overkill.
Admin
Andrew Nacin says
For reference, 3.0 does not include more security keys, nor were 2.9 installs any less secure when it came to authentication.
The first four are keys. The last four are salts. The salts were missing from wp-config.php before 3.0, but we actually added salts a few versions ago. We added them to wp-config.php in 3.0 so we could easily populate them on install, but they are not necessary.
If salts are not defined (or remain the default, e.g. “Enter unique phrase here”), then WP simply generates random strings to use as salts and stores those in the database.
Also, for an error log, you should instead use these constants:
define( 'WP_DEBUG', true ); // Enables error reporting.

define( 'WP_DEBUG_DISPLAY', false ); // Hides the errors.

define( 'WP_DEBUG_LOG', true ); // Logs errors to wp-content/error.log (or use @ini_set('error_log') )
This has the added benefit of exposing PHP notices, which provide developers warnings about code that could be better or may have errors in it.
Editorial Staff says
Thank You Andrew. Didn’t know about the SALT keys. Just saw it in 3.0 and thought it was a new addition.
Admin
Adam W. Warner says
Very nice write up, and easy read for beginners. I’ll be sending people here to learn;)
Ozh says
$_ENV{DATABASE_SERVER} ??
Syntax doesn’t look correct to me ($_ENV[‘stuff’] maybe but {stuff} I don’t think so) and I’ve just checked, couldn’t find any host I have access to that has this defined. Definitely not something common.
Other than this, nice roundup. Note that WP doesn’t look “in other directories” to find wp-config.php, it just goes one directory up (which is in most case out of the server document root).
gopalb says
Thanks…. it’s really good tutorial…Can you write the detail step by step tutorial of “Securing Your WP-Config File” for us…
Editorial Staff says
The last two steps are pretty easy to follow, but sure will add that one to the list
Admin
Carlos says
Great article as always. I especially like the .htaccess file tip.
DaveK says
Wow plenty there to get my teeth into, thanks WPB
Angie Bowen says
Thanks so much for all of this great info. This is the side of WordPress I need to learn more about so I’m going to use this post as a springboard to really dive in.