Siete alla ricerca di alcuni utili trucchi .htaccess per il vostro sito WordPress?
Il file .htaccess è un potente file di configurazione che permette di fare molte cose intelligenti sul vostro sito web.
In questo articolo vi mostreremo alcuni dei più utili trucchi .htaccess per WordPress che potete provare subito.

Cos’è il file .htaccess e come modificarlo?
Il file .htaccess è un file di configurazione del server web Apache. È un file di testo che consente di definire le regole che il server deve seguire per il vostro sito web WordPress.
WordPress utilizza il file .htaccess per generare una struttura di URL SEO-friendly. Tuttavia, questo file può fare molto di più che memorizzare le impostazioni dei permalink.
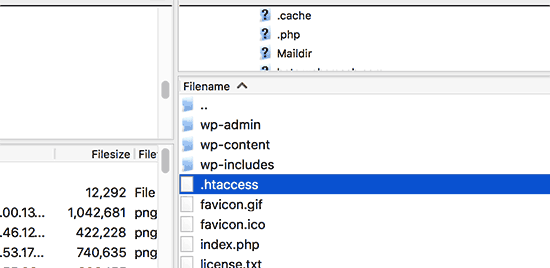
Il file .htaccess si trova nella cartella principale del sito WordPress. Per modificarlo, dovrete collegarvi al vostro sito web utilizzando un client FTP o il file manager cPanel.

Se non riuscite a trovare il vostro file .htaccess, consultate la nostra guida su come trovare il file .htaccess in WordPress.
Prima di modificare il file .htaccess, è importante scaricarne una copia sul computer come backup. Si può usare quel file nel caso in cui qualcosa vada storto.
Detto questo, diamo un’occhiata ad alcuni utili trucchi .htaccess per WordPress che potete provare:
- Protect Your WordPress Admin Area
- Password Protect WordPress Admin Folder
- Disable Directory Browsing
- Disable PHP Execution in Some WordPress Directories
- Protect Your WordPress Configuration wp-config.php File
- Setting Up 301 Redirects Through .htaccess File
- Ban Suspicious IP Addresses
- Disable Image Hotlinking in WordPress Using .htaccess
- Protect .htaccess From Unauthorized Access
- Increase File Upload Size in WordPress
- Disable Access to XML-RPC File Using .htaccess
- Blocking Author Scans in WordPress
1. Proteggere l’area amministrativa di WordPress
È possibile utilizzare .htaccess per proteggere l’area di amministrazione di WordPress limitando l’accesso solo a determinati indirizzi IP.
È sufficiente copiare e incollare questo frammento di codice nel file .htaccess:
AuthUserFile /dev/null
AuthGroupFile /dev/null
AuthName "WordPress Admin Access Control"
AuthType Basic
<LIMIT GET>
order deny,allow
deny from all
# whitelist Syed's IP address
allow from xx.xx.xx.xxx
# whitelist David's IP address
allow from xx.xx.xx.xxx
</LIMIT>
Non dimenticate di sostituire i valori xx con il vostro indirizzo IP. Se si utilizza più di un indirizzo IP per accedere a Internet, assicurarsi di aggiungere anche quelli.
Per istruzioni dettagliate, consultate la nostra guida su come limitare l’accesso all’amministrazione di WordPress utilizzando .htaccess.
2. Proteggere con password la cartella amministrativa di WordPress

Se accedete al vostro sito WordPress da più postazioni, comprese quelle pubbliche, la limitazione dell’accesso a indirizzi IP specifici potrebbe non fare al caso vostro.
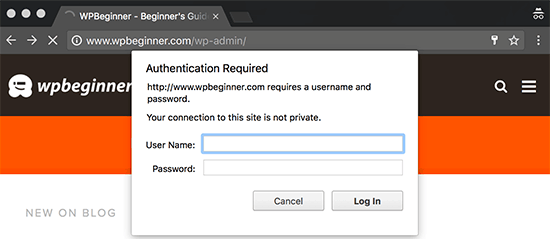
È possibile utilizzare il file .htaccess per aggiungere un’ulteriore protezione con password all’area di amministrazione di WordPress.
Innanzitutto, è necessario generare un file .htpasswds. È possibile crearlo facilmente utilizzando questo generatore online.
Caricare il file .htpasswds al di fuori della directory web accessibile al pubblico o della cartella /public_html/. Un buon percorso potrebbe essere:
/home/user/.htpasswds/public_html/wp-admin/passwd/
Quindi, creare un file .htaccess e caricarlo nella directory /wp-admin/ e aggiungervi il seguente codice:
AuthName "Admins Only"
AuthUserFile /home/yourdirectory/.htpasswds/public_html/wp-admin/passwd
AuthGroupFile /dev/null
AuthType basic
require user putyourusernamehere
<Files admin-ajax.php>
Order allow,deny
Allow from all
Satisfy any
</Files>
Importante: Non dimenticate di sostituire il percorso AuthUserFile con il percorso del file .htpasswds e di aggiungere il vostro nome utente.
Per istruzioni dettagliate, consultate la nostra guida su come proteggere con password la cartella di amministrazione di WordPress.
3. Disattivare l’esplorazione delle directory

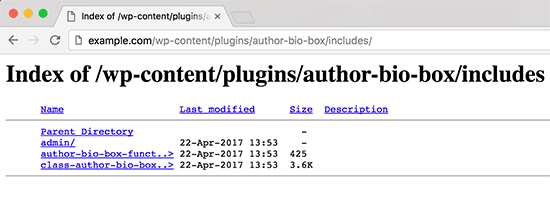
Molti esperti di sicurezza di WordPress consigliano di disabilitare la navigazione nelle directory. Con la navigazione nelle directory abilitata, gli hacker possono esaminare la struttura delle directory e dei file del vostro sito per trovare un file vulnerabile.
Per disabilitare l’esplorazione delle directory sul vostro sito web, dovete aggiungere la seguente riga al vostro file .htaccess:
Options -Indexes
Per saperne di più su questo argomento, consultate la nostra guida su come disabilitare la navigazione nelle directory in WordPress.
4. Disabilitare l’esecuzione di PHP in alcune directory di WordPress
A volte gli hacker si introducono in un sito WordPress e installano una backdoor. Questi file backdoor sono spesso mascherati da file core di WordPress e sono collocati nelle cartelle /wp-includes/ o /wp-content/uploads/.
Un modo più semplice per migliorare la sicurezza di WordPress è disabilitare l’esecuzione di PHP per alcune directory di WordPress.
È necessario creare un file .htaccess vuoto sul computer e incollarvi il seguente codice:
<Files *.php>
deny from all
</Files>
Salvare il file e poi caricarlo nelle directory /wp-content/uploads/ e /wp-includes/.
Per ulteriori informazioni, consultate il nostro tutorial su come disabilitare l’esecuzione di PHP in alcune directory di WordPress.
5. Proteggere il file wp-config.php di configurazione di WordPress
Probabilmente il file più importante nella directory principale del vostro sito WordPress è il file wp-config.php. Contiene informazioni sul database di WordPress e su come connettersi ad esso.
Per proteggere il file wp-config.php da accessi non autorizzati, è sufficiente aggiungere questo codice al file .htaccess:
<files wp-config.php>
order allow,deny
deny from all
</files>
6. Impostazione dei reindirizzamenti 301 attraverso il file .htaccess
L’uso dei reindirizzamenti 301 è il modo più SEO-friendly per comunicare agli utenti che il contenuto è stato spostato in una nuova posizione. Se volete gestire correttamente i reindirizzamenti 301 su base post-post, consultate la nostra guida su come impostare i reindirizzamenti in WordPress.
D’altra parte, se si desidera impostare rapidamente i reindirizzamenti, è sufficiente incollare questo codice nel file .htaccess:
Redirect 301 /oldurl/ http://www.example.com/newurl
Redirect 301 /category/television/ http://www.example.com/category/tv/
7. Vietare gli indirizzi IP sospetti
Vedete un numero insolitamente alto di richieste al vostro sito web da un indirizzo IP specifico? Potete facilmente bloccare queste richieste bloccando l’indirizzo IP nel vostro file .htaccess.
È sufficiente aggiungere il seguente codice al file .htaccess:
<Limit GET POST>
order allow,deny
deny from xxx.xxx.xx.x
allow from all
</Limit>
Non dimenticate di sostituire xx con l’indirizzo IP che volete bloccare.
8. Disabilitare l’hotlinking delle immagini in WordPress usando .htaccess
Altri siti web che effettuano direttamente l’hotlinking di immagini dal vostro sito possono rendere il vostro sito WordPress lento e superare il vostro limite di larghezza di banda. Questo non è un grosso problema per la maggior parte dei siti web di piccole dimensioni. Tuttavia, se gestite un sito web popolare o con molte foto, questo potrebbe diventare un problema serio.
È possibile impedire l’hotlinking delle immagini aggiungendo questo codice al file .htaccess:
#disable hotlinking of images with forbidden or custom image option
RewriteEngine on
RewriteCond %{HTTP_REFERER} !^$
RewriteCond %{HTTP_REFERER} !^http(s)?://(www\.)?wpbeginner.com [NC]
RewriteCond %{HTTP_REFERER} !^http(s)?://(www\.)?google.com [NC]
RewriteRule \.(jpg|jpeg|png|gif)$ – [NC,F,L]
Questo codice consente di visualizzare le immagini solo se la richiesta proviene da wpbeginner.com o da Google.com. Non dimenticate di sostituire wpbeginner.com con il vostro nome di dominio.
Per altri modi di proteggere le immagini, consultate la nostra guida sui modi per prevenire il furto di immagini in WordPress.
9. Proteggere .htaccess da accessi non autorizzati
Come si è visto, sono molte le cose che si possono fare utilizzando il file .htaccess. Dato il potere e il controllo che ha sul vostro server web, è importante proteggerlo dall’accesso non autorizzato degli hacker.
È sufficiente aggiungere il seguente codice al file .htaccess:
<files ~ "^.*\.([Hh][Tt][Aa])">
order allow,deny
deny from all
satisfy all
</files>
10. Aumentare le dimensioni di caricamento dei file in WordPress
Esistono diversi modi per aumentare il limite di dimensione dei file caricati in WordPress. Tuttavia, per gli utenti che utilizzano un hosting condiviso, alcuni di questi metodi non funzionano.
Uno dei metodi che ha funzionato per molti utenti è l’aggiunta del seguente codice al file .htaccess:
php_value upload_max_filesize 64M
php_value post_max_size 64M
php_value max_execution_time 300
php_value max_input_time 300
Questo codice indica semplicemente al server web di utilizzare questi valori per aumentare le dimensioni di caricamento dei file e il tempo massimo di esecuzione in WordPress.
11. Disabilitare l’accesso al file XML-RPC tramite .htaccess
Ogni installazione di WordPress viene fornita con un file chiamato xmlrpc.php. Questo file consente alle applicazioni di terze parti di connettersi al vostro sito WordPress. La maggior parte degli esperti di sicurezza di WordPress consiglia di disabilitare questa funzione se non si utilizzano applicazioni di terze parti.
Ci sono diversi modi per farlo. Uno di questi è l’aggiunta del seguente codice al file .htaccess:
# Block WordPress xmlrpc.php requests
<Files xmlrpc.php>
order deny,allow
deny from all
</Files>
Per ulteriori informazioni, consultate la nostra guida su come disabilitare XML-RPC in WordPress.
12. Blocco delle scansioni degli autori in WordPress
Una tecnica comunemente utilizzata negli attacchi brute force consiste nell’eseguire scansioni di autori su un sito WordPress e poi tentare di decifrare le password per quei nomi utente.
È possibile bloccare tali scansioni aggiungendo il seguente codice al file .htaccess:
# BEGIN block author scans
RewriteEngine On
RewriteBase /
RewriteCond %{QUERY_STRING} (author=\d+) [NC]
RewriteRule .* - [F]
# END block author scans
Per ulteriori informazioni, consultare il nostro articolo su come scoraggiare gli attacchi brute force bloccando le scansioni degli autori in WordPress.
Speriamo che questo articolo vi abbia aiutato a imparare i trucchi .htaccess più utili per WordPress. Potreste anche voler consultare la nostra guida sugli errori più comuni di WordPress e su come risolverli e la nostra scelta dei migliori plugin WordPress per far crescere il vostro sito.
Se questo articolo vi è piaciuto, iscrivetevi al nostro canale YouTube per le esercitazioni video su WordPress. Potete trovarci anche su Twitter e Facebook.


Syed Balkhi says
Hey WPBeginner readers,
Did you know you can win exciting prizes by commenting on WPBeginner?
Every month, our top blog commenters will win HUGE rewards, including premium WordPress plugin licenses and cash prizes.
You can get more details about the contest from here.
Start sharing your thoughts below to stand a chance to win!
Simeon says
Thanks so much for this. Very helpful!
WPBeginner Support says
Glad it was helpful!
Admin
Jackson Andrade says
I use password protection for wp-login.php. My customers cannot logout when login.php is protected. Is there a way I can allow customers to logout without calling wp-login.php?action=logout?
Admins too can’t logout, but that’s not an issue.
Woocommerce customer’s logut url is, domain.com/account/customer-logout.
Both call wp-login.php for logout. Customers are asked for htaccess id and password. If there is a workaround, let me know. Thanks
WPBeginner Support says
If your site has a login for users who are not your admins then we would not recommend password protecting your wp-login.php for the time being and we do not have a workaround at this time.
Admin
Jackson Andrade says
Thanks for that Info. Hope WordPress adds a feature in future where it won’t redirect to login.php for logging out.
HtaccessGuy says
Don’t password protect wpadmin if you use AJAX else it’l break stuff.
WPBeginner Support says
If you mean for 2 in this list, we’ve added code to allow ajax to continue to work.
Admin
Ana says
This resolved my issue with above code. Thanks.
Abhi says
Please Help Me.
when I paste the following code in .htaccess file it shows an error that is..
It appears you don’t have
permission to access this page.
403 Error. Forbidden.
WPBeginner Support says
For resolving the 403 error, you would want to take a look at our guide here: https://www.wpbeginner.com/wp-tutorials/how-to-fix-the-403-forbidden-error-in-wordpress/
Admin
Ben says
Great article!
Do I need to do this if I already have installed WordFence plugin?
Some people don’t recommend messing with .htaccess file.
Regards.
WPBeginner Support says
None of these tricks are required if you don’t want to use them, they are only helpful tools that you can use.
Admin
Sebastian says
I am not sure what does “Protect .htaccess From Unauthorized Access” mean exactly. Will I be able to access it if I make changes from point 9?
WPBeginner Support says
It means if someone knows where your htaccess is located and tries to view the file by putting that address in the url, the browser will not be able to view it.
Admin
reus says
how to use wp login user name and password (registered user) to access in your no. 2 topic (Password Protect WordPress Admin Folder).
hope to to find answer here.
thank you
WPBeginner Support says
If you wanted to use that, you would need to set the information in the htpasswds file
Admin
reus says
thank you for your response, how to set that information in the htpasswds? thank you
WPBeginner Support says
We show the tool to use under tip 2 in the article
Selvakumaran Krishnan says
Hai Syed Balkhi,
I have to open a URL which has query parameters and strings like this.
something.example.com/pagename.php?query1=string1&query2=string2&redirecturl=http%3A%2F%2Fsomething.example2.com/something&query3=string3
In the above URL, the problem is %3A%2F%2F. It shows 403 forbidden error. If I remove that part, the URL works fine.
I have searched and tried all the methods like mod rewrite, redirect, etc,. but nothing works.
Is there any way to remove (or) rewrite (or) redirect that encoded part using .htaccess file. That part is in the middle of so many parameters. There are a lot of query parameters before and after that part.
Please share your idea.
Kathrine says
This is a great article!! I followed your instructions and everything works fine. I tried to open my admin site using the different IP address and it works great. Thank you for sharing your knowledge.
Mohamed Adel says
When Protecting the directory to wp-admin (as explained in 2. Password Protect WordPress Admin Folder), wen I go to any page on the site the massage appears to put password.. How to fix that?
I tried from Cpanel and the same problem happens
Tony says
The tip in point 4 for disabling php execution has started to cause issues with the tinymce editor in pages & posts. A php file is included in the tinymce folder that loads the relevant js files. I’ve just removed the htaccess code from the wp-include folder to stop the issue. Maybe there’s another way around this?
Pankaj says
Point 5 is not working
(5. Protect Your WordPress Configuration wp-config.php File)
[05-Mar-2018 08:20:03 Etc/GMT] PHP Parse error: syntax error, unexpected ‘<' in /home/—–/public_html/xyz.com/wp-config.php on line 91
WPBeginner Support says
Hi Pankaj,
The code in the 5th trick needs to be pasted in .htaccess file and not in wp-config.php file.
Admin
Maximilian says
Hi there, thank you!
Is ist possible to see the whole .htaccess somewhere? Yes, i could read: “put one line after the other” but still I am not sure.
Is then “# END WordPress° sill the last line or is it somewhere on the top then?
And what do you think about putting “Options -Indexes” on the very end?
Thank you for your answer!
WPBeginner Support says
Hi Maximilian,
You can add new lines after the #END WordPress line.
Admin
yudi cahyadi says
good article..i have a question, after implementing the code in htaccess. Do I need to install a security plugin or not..??
yudi cb(beginner)
WPBeginner Support says
Hi Yudi Cahyadi,
Yes, you still need to install a security plugin. Please see our WordPress security guide for more information.
Admin
Mario von Gollaz says
Hi there, nice article. Is there a way to bulk redirect?
Mario
Kevin says
Hi,
Great article and just one question!
Should you place the extra code (especially speed opimisations) before or after the # BEGIN WordPress part?
Regards
Kevin
Brian Wohn says
Hi, my theme developer told me this might be in the htaccess, but I don’t know why my wordpress is adding this at the end of all my pages:
Any idea why its adding the “/?v=8f2564d40946”? I’ve checked my PermaLinks, Slugs, etc and nothing there?
Thanks for your help!
WPBeginner Support says
Hi Brian,
It lools like GeoLocation tag added by WooCommerce.
If you are using WooCommerce, then you can turn it off. Go to WooCommerce General Options page and uncheck option ‘Geolocate with page caching support’ option.
Admin
Adrienne Warden says
Another wonderful post from WP Beginner…Just one tip for all us newbies…While WP Beginner has some of the best tips and trick for WordPress, when it comes to protecting your site, if you are on a shared server, search “support” first. I’ve learned a lot about the backend from reading post on WP Beginner, but the truth of the matter is – I’m no backender and most shared hosting already have a fix in place for these sorts of things…I’m with InMotion and they actual have set up one click solutions for many issues that effect site security. I turned off the file Index right from CPanel…
Still WP Beginner is my go to for WordPress knowledge…You guys are awesome!
Fien says
That is a nice article about htaccess. But how to implement this in one file? Can I put all lines after another?
WPBeginner Support says
Hi Fien,
You can add them one after another.
Admin
Liew CheonFong says
Great list. Bookmarked!
Do you have same list for NGINX web server (which does not read .htaccess file) ?
Pattye says
There is a way to ban bots from crawling your site the this file. Any suggestions in doing that, besides banning the IP?