Volete personalizzare i vostri moduli Contact Form 7 e cambiarne lo stile?
Contact Form 7 è uno dei più popolari plugin di moduli di contatto per WordPress. Tuttavia, l’aspetto più negativo è che i moduli che si aggiungono sono molto semplici.
In questo articolo, vi mostreremo come creare uno stile per i moduli del modulo di contatto 7 in WordPress.
Perché creare uno stile per i moduli di Contact Form 7?
Contact Form 7 è uno dei più popolari plugin per moduli di contatto per WordPress. È gratuito e consente di aggiungere un modulo WordPress tramite shortcode.
Tuttavia, Contact Form 7 ha caratteristiche molto limitate. Uno dei problemi di Contact Form 7 è che i moduli hanno uno stile semplice. Inoltre, il plugin non offre alcuna opzione integrata per modificare lo stile dei moduli.
Questo rende difficile abbinare il design del modulo di contatto al tema del sito web o se si desidera modificare il font e il colore dello sfondo per far risaltare il modulo.
Se desiderate moduli più personalizzabili con funzioni avanzate, vi consigliamo WPForms, il plugin per moduli di contatto più adatto ai principianti. È dotato di un costruttore di moduli drag and drop, oltre 1200 modelli di moduli precostituiti e numerose opzioni di personalizzazione.
Detto questo, diamo un’occhiata a come creare un modulo Contact Form 7 in WordPress.
Come iniziare con Contact Form 7
Per prima cosa, dovrete installare e attivare il plugin Contact Form 7 sul vostro sito web. Se avete bisogno di aiuto, consultate la nostra guida su come installare un plugin di WordPress.
Dopo l’attivazione, è possibile andare su Contatti ” Aggiungi nuovo dalla dashboard di WordPress.
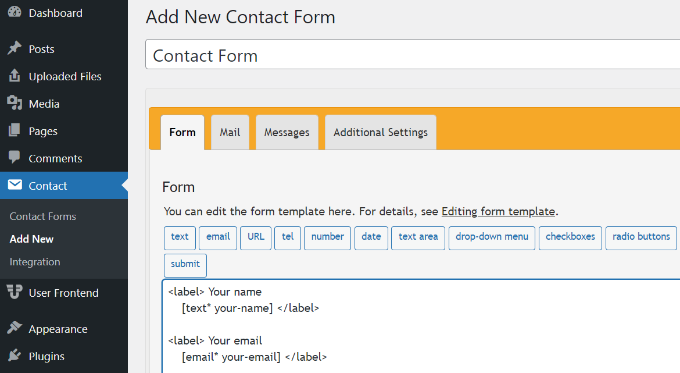
Ora è possibile modificare il modulo per il proprio sito web e iniziare inserendo un titolo per il modulo.
Il plugin aggiunge automaticamente i campi predefiniti del nome, dell’e-mail, dell’oggetto e del messaggio del modulo. Tuttavia, è possibile aggiungere altri campi semplicemente trascinandoli dove si desidera.
Una volta terminato, non dimenticate di fare clic sul pulsante “Salva” e di copiare lo shortcode.
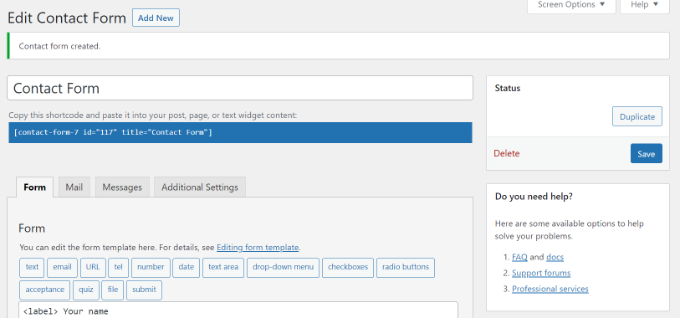
La cosa successiva da fare è aggiungerlo al post o alla pagina del blog.
Per farlo, basta modificare un post o aggiungerne uno nuovo. Una volta entrati nell’editor di WordPress, fate clic sul segno ‘+’ in alto e aggiungete un blocco Shortcode.
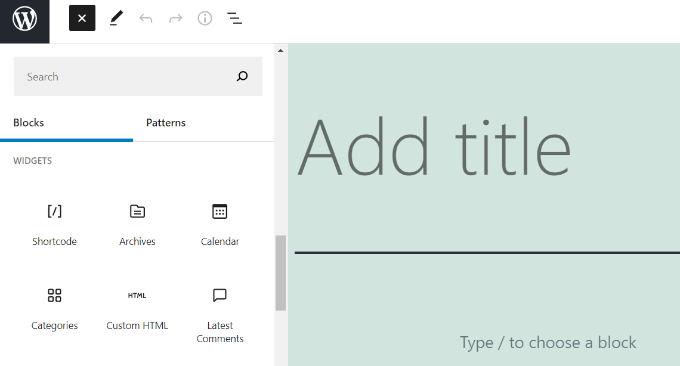
Dopodiché, è sufficiente inserire lo shortcode del modulo Contact Form 7 nel blocco shortcode. Il suo aspetto sarà simile a questo:
[contact-form-7 id="117" title="Contact Form"]
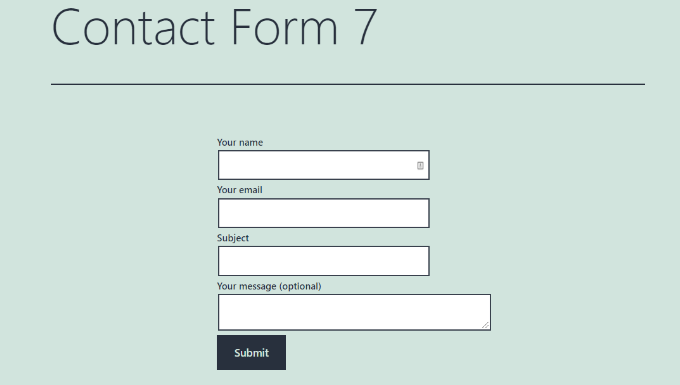
Ora, andate avanti e pubblicate il vostro post su WordPress per vedere il modulo di contatto in azione. Per questo articolo, abbiamo utilizzato il modulo di contatto predefinito e lo abbiamo aggiunto a una pagina di WordPress. Ecco come appariva il modulo di contatto sul nostro sito di prova.
Ora, siete pronti a personalizzare il vostro modulo Contact Form 7 in WordPress?
Stilizzazione dei moduli Contact Form 7 in WordPress mediante CSS personalizzati
Poiché Contact Form 7 non dispone di opzioni di stile incorporate, è necessario utilizzare i CSS per creare lo stile dei moduli.
Contact Form 7 genera codice conforme agli standard per i moduli. Ogni elemento del modulo è associato a un ID e a una classe CSS appropriati, il che lo rende facile da personalizzare se si conoscono i CSS.
Ogni modulo Contact Form 7 utilizza la classe CSS .wpcf7 che può essere utilizzata per lo stile del modulo.
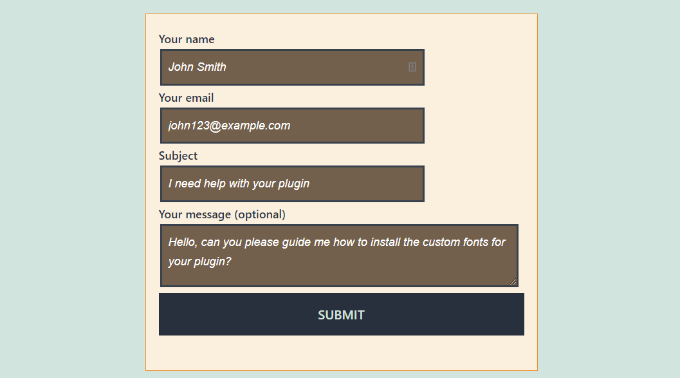
In questo esempio, utilizzeremo il carattere personalizzato Lora nei campi di input e cambieremo il colore di sfondo del modulo.
div.wpcf7 {
background-color: #fbefde;
border: 1px solid #f28f27;
padding:20px;
}
.wpcf7 input[type="text"],
.wpcf7 input[type="email"],
.wpcf7 textarea {
background:#725f4c;
color:#FFF;
font-family:lora, sans-serif;
font-style:italic;
}
.wpcf7 input[type="submit"],
.wpcf7 input[type="button"] {
background-color:#725f4c;
width:100%;
text-align:center;
text-transform:uppercase;
}
Se avete bisogno di aiuto per aggiungere il CSS personalizzato, consultate la nostra guida su come aggiungere facilmente CSS personalizzati a un sito WordPress.
Ecco come appare il nostro modulo di contatto dopo l’applicazione di questo CSS.
Stilizzazione di più moduli di Contact Form 7
Se si utilizzano più moduli di contatto e si desidera stilizzarli in modo diverso, è necessario utilizzare l’ID generato da Contact Form 7 per ciascun modulo. Il problema del CSS usato sopra è che verrà applicato a tutti i moduli Contact Form 7 del sito web.
Per iniziare, basta aprire una pagina contenente il modulo che si desidera modificare. Quindi, posizionare il mouse sul primo campo del modulo, fare clic con il pulsante destro del mouse e selezionare l’opzione“Ispeziona“.
La schermata del browser si dividerà e si vedrà il codice sorgente della pagina. Nel codice sorgente, occorre individuare la riga iniziale del codice del modulo.
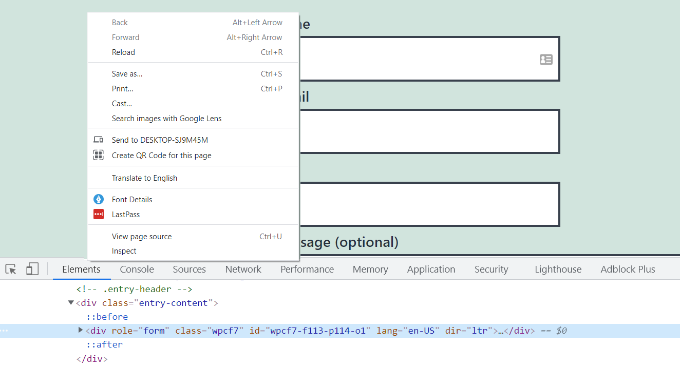
Come si può vedere nella schermata precedente, il codice del nostro modulo di contatto inizia con la riga:
<div role="form" class="wpcf7" id="wpcf7-f113-p114-o1" lang="en-US" dir="ltr">
L’attributo id è un identificatore unico generato da Contact Form 7 per questo particolare modulo. È una combinazione dell’id del modulo e dell’id del post in cui il modulo è stato aggiunto.
Utilizzeremo questo ID nel nostro CSS per creare lo stile del modulo di contatto e sostituiremo .wpcf7 nel nostro primo snippet CSS con #wpcf7-f113-p114-o1.
div#wpcf7-f113-p114-o1{
background-color: #fbefde;
border: 1px solid #f28f27;
padding:20px;
}
#wpcf7-f113-p114-o1 input[type="text"],
#wpcf7-f113-p114-o1 input[type="email"],
#wpcf7-f113-p114-o1 textarea {
background:#725f4c;
color:#FFF;
font-family:lora, "Open Sans", sans-serif;
font-style:italic;
}
#wpcf7-f113-p114-o1 input[type="submit"],
#wpcf7-f113-p114-o1 input[type="button"] {
background-color:#725f4c;
width:100%;
text-align:center;
text-transform:uppercase;
}
Ora è possibile ripetere il passaggio per tutti i moduli e sostituire l’ID del modulo per ogni modulo di Contact Form 7 che si desidera personalizzare.
Stilizzazione dei moduli di Contact Form 7 con CSS Hero
Un modo più semplice per modificare lo stile dei moduli di Contact Form 7 è usare CSS Hero. Consente di modificare i moduli senza dover scrivere i CSS.
È sufficiente installare e attivare il plugin CSS Hero sul vostro sito web. Potete seguire la nostra guida su come installare un plugin di WordPress.
Quindi, andare alla pagina contenente il modulo e fare clic sull’opzione “Personalizza con CSS Hero” nella barra degli strumenti in alto.

CSS Hero vi fornirà un’interfaccia utente semplice per modificare il CSS senza scrivere alcun codice.
Utilizzando il plugin, è possibile fare clic su qualsiasi campo, intestazione e altri elementi del modulo e modificare il colore di sfondo, il carattere, i bordi, la spaziatura e molto altro ancora.
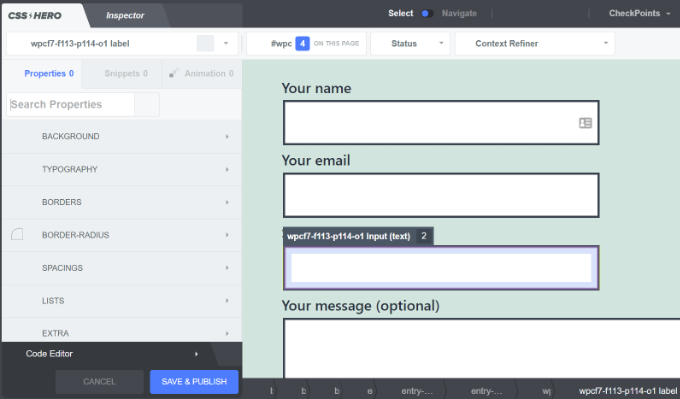
Dopo aver personalizzato il modulo, è sufficiente fare clic sul pulsante “Salva e pubblica” in basso.
Ci auguriamo che questo articolo vi abbia aiutato a capire come creare moduli Contact Form 7 in WordPress. Potreste anche voler consultare la nostra guida su come creare una newsletter via e-mail e il miglior software di live chat per le piccole imprese.
Se questo articolo vi è piaciuto, iscrivetevi al nostro canale YouTube per le esercitazioni video su WordPress. Potete trovarci anche su Twitter e Facebook.


Syed Balkhi says
Hey WPBeginner readers,
Did you know you can win exciting prizes by commenting on WPBeginner?
Every month, our top blog commenters will win HUGE rewards, including premium WordPress plugin licenses and cash prizes.
You can get more details about the contest from here.
Start sharing your thoughts below to stand a chance to win!
Alejandro says
Thanks!
Your instructions were very useful.
Thanks for taking the time to share them!
WPBeginner Support says
Glad our guide was helpful
Admin
hmi says
Hi sir, where can I find the css code of fields ?
Thank you
WPBeginner Support says
For finding the current CSS you would want to use inspect element:
https://www.wpbeginner.com/wp-tutorials/basics-of-inspect-element-with-your-wordpress-site/
Admin
Tony Tran says
i can’t change color background css button submit….please help
WPBeginner Support says
You may be targeting the wrong object, you may want to take a look at our article here:
https://www.wpbeginner.com/wp-tutorials/basics-of-inspect-element-with-your-wordpress-site/
Admin
Deshave says
Submit button in pdf no longer works since uploading form to WordPress website.
WPBeginner Support says
The pdf embed we’re recommending is for viewing content. For filling out forms we recommend using a form plugin
Admin
zeeshan alam says
Thanks for sharing Sir
WPBeginner Support says
You’re welcome
Admin
Steve says
Hello is it possible to ad a message if i dont filled out one ore more “Required fields” to get a Message ? Because i Only get the “red arrows” on the “Required fields” that I don’t filled out. In I want additionally a error Message like
“One or more Required fields have an error. Please check and try again.”
But i Only have the red arrows, and the Problem is on mobile Phones the red arrows are not in the window and the Client don’t see it.
WPBeginner Support says
You would need to reach out to contact form 7’s support for what they currently have available.
Admin
FRED_VERSATILE says
Hello,
Thank you for this tutorial.
I would like to add a custom image at the right of the “send” label, in the button.
I’ve done it with a :before for the other buttons on my website, but i can’t find the element in the send form to put the CSS…
WPBeginner Support says
Depending on your form ot would change what to target, if you use inspect element you should be able to see the ID or class of the object:
https://www.wpbeginner.com/wp-tutorials/basics-of-inspect-element-with-your-wordpress-site/
You could also use :after instead of :before as another option
Admin
Muhammad Tahir says
How to change response text color of SPECIFIC contact form
waqas says
Can we add a time field in contact form 7 without plugin?
Mary Lou Hoffman says
I’m a novice, but determined to figure this out! So, please – give me baby steps if you answer.
I have a contact7 form on my website. The font is showing up as white on a white background for the labels (Your name, Your email, etc).
How do I change the color – where do I go to tell it to change color?
I tried copying and pasting some of the codes ya’all had in your answers above, but they just showed up on my page, but didn’t change the font.
Karu Price says
You can target the lable area like this-
.wpcf7 form p label {
color: white;
background: black;
font-family: sans-serif;
}
Rita Accarpio says
Hi there!
I’m here struggling with modal headings. I changed the form background to a darker color but now I want to change the heading’s color. Doesn’t seem to change at all with all the different options I tried so far.
Do you know anyway to do this? Help me please!
Thanks!
Chris says
Thanks!
Abhijeet says
I want to reduce gap between name and email boxes…how to do it.
Naveen says
Thanks for a great post, was very helpful.
Josh says
This helped heaps. Thanks!
Joel Desrosiers says
My contact form has a dark image background so I need “your name”, “your email” and “your message” to be white. I can’t find a class or id for those elements, I tried with inspect element but I can’t find anything that works. This is the only contact form on this site. I’m using css on the stylesheet of my childtheme and I tried different options but can’t change the color. Can anyone help me?
Merriann Fu says
I’m pretty new to WordPress and Plugins in general but have this Plugin installed and everything is working correctly but instead of seeing the person’s message, it just shows [your-message] in the body of the email. I have everything set up like above and spelled correctly so i’m not sure what the problem is. Any help would be much appreciated! Thanks!
Don Walley says
I have the same problem. I’m only new to forms on WP but I’m stuck too. I’m trying to build a Registration page with business name, address, etc along with personal contact information and a drop down to make their choice and of course a comment field. After testing this numerous times I get the same as you; the content of the comment field.
Wish there had been an example or two on the Docs page of Contact 7; something besides only the default Contact Form.
Miguel Ceballos says
I don’t think Contact Form 7 is the most popular. It comes pre-installed with many themes and wordpress instalations, that’s the reason they have so many users. It is so frustrating to edit anything in this plugin.
Osama Ali Khan says
Hello if some one want contact form with transparent background or want to add contact form 7 on the big banner image with transparent background then add this code to your custom css.
.wpcf7 input[type=”text”],
.wpcf7 input[type=”email”],
.wpcf7 textarea
{
background-color: Transparent;
color: BLUE;
width: 100%;
}
div.wpcf7 {
color: white;
margin: 0;
padding: 0;
}
Deborah says
You are an absolute life saver. I’ve been battling with this for hours.
One point I’d make that others might find it useful to know, is that I was trying to style the submit button, which was on a contact form 7 I’d put on my sidebar.
This worked for the first page it was on but then wouldn’t on subsequent pages. However, I then noticed that the f2 code on the second page had a suffix of ‘o2’, and when I added this to my css, the styling on this page worked too.
Thank you again.
WPBeginner Support says
Glad you found it helpful.
Admin
Mikko says
Thanks for a great post, was very helpful. One thing still bothering me and it’s that i haven’t found a way to customize checkboxes. Have you found a way how it would be possible to change checkbox size for example so that it would work on every browser?
Seems like the input structure isn’t modified so no extra spans could be added to fake the checkboxes an i right?
Glad if you have time to help me out, cheers.
Wendy says
Oh my gosh! You have no idea how grateful I am for this post! THANK YOU!
I simply wanted to change the font used in the Submit button. I searched and searched for hours and tried various CSS code variations and nothing worked until I came across your code and then added a font element to it. Problem solved!
pranav shinde says
contact-form-7/includes/css/styles.css (inactive) this appears above my css edit file,,by which none of changes are applied to website help me how to make it active
WPBeginner Support says
You should not edit the core plugin files. Instead you should add your CSS to your theme’s stylesheet.
Admin
pranav shinde says
ya i understood then can you please help me how can i do it..please help me in detail
pranav shinde says
thanks a lot sir very much helpfull will suscribe your channel
pranav shinde says
means i hould copy this code in my themes css file righht??
Monique says
Hello,
I am wondering if any one can help me fix the contact form for mobile. I am able to see the form but it is too wide and gets cut off.
Thank you.
puneet singh says
this very helpful realy nice tutorial
Jiniya says
I find your website very helpful.just a suggestion it would be great if u could launch an app for your website soon…apps are more convenient than following emails
WPBeginner Support says
Sound like a good idea. Meanwhile, you can access WPBeginner using Feedly app on your mobile device.
Admin
Anee says
Top most features in WordPress you can own style easily no need deeply knowledge for manage your site in WordPress. In Contact 7 form, you can your own structure that you have already design in HTML or other one.
Neil Murray says
If working with CSS is a little beyond your current skill levels you might also consider using https://wordpress.org/plugins/contact-form-7-skins/ .
Contact Form 7 Skins which works right within the normal Contact Form 7 interface, making it easier for regular WordPress users to create professional looking Contact Form 7 forms using a range of compatible Templates and Styles – even if you don’t have HTML and CSS skills.
Sam says
thanks Neil
Andrew Wilkerson says
Thanks Neil, I think that’s just what I needed. I got excited and installed it then wiped out my existing form, so I had to restore a backup of my site to get it working again, I’ll look into it more when I have time, I guess i’ll have to copy my current form into it or start from scratch with a new one. Off to watch some tutorials. Hopefully this is still the best one to use. I know it’s an old post here but it does say it was recently updated on the plugin page.
Bhongo says
Fantastic article. I will use this to style one my website.
Mark says
Another good article where you do not end up using yet another plug in.