Suchen Sie nach einer Anleitung zur Verwendung von Mailchimp mit WordPress?
Mailchimp ist einer der beliebtesten E-Mail-Marketingdienste und kann problemlos mit Ihrer WordPress-Website verwendet werden.
In dieser Anleitung zeigen wir Ihnen, wie Sie Mailchimp einfach in WordPress integrieren und mit dem Aufbau Ihrer E-Mail-Liste beginnen können.
Hier ist ein kurzer Überblick über die Themen, die wir in diesem Leitfaden behandeln werden:
- Why Build an Email List?
- Why Use Mailchimp With Your WordPress Site?
- Getting Started With Mailchimp
- Adding Mailchimp Email Signup Forms in WordPress
- Adding Beautiful Signup Forms Using OptinMonster
- Creating a Custom Mailchimp Signup Form With WPForms
- Automate Anything in WordPress and Mailchimp
- Bonus Tips to Grow Your Mailchimp Email List Fast
Warum eine E-Mail-Liste erstellen?
Mehr als 70 % der Nutzer, die Ihre Website verlassen, kommen wahrscheinlich nie wieder zurück, es sei denn, Sie können sie dazu bringen, sich in Ihre E-Mail-Liste einzutragen.
E-Mail ist privat, persönlich und bei weitem die direkteste Form der Kommunikation im Internet. Viele Menschen überprüfen ihren Posteingang häufiger als ihre Social Media Feeds.
Außerdem verbleibt eine E-Mail im Posteingang, wenn der Nutzer nicht darauf reagiert. In den sozialen Medien wird Ihre Nachricht bald in einer endlosen Zeitleiste verschwinden.
Weitere Einzelheiten darüber, wie E-Mail-Marketing Ihr Unternehmen voranbringen kann, finden Sie in unserem Leitfaden darüber, warum Sie sofort mit dem Aufbau Ihrer E-Mail-Liste beginnen sollten.
Warum Mailchimp mit Ihrer WordPress-Website verwenden?
Mailchimp ist einer der beliebtesten E-Mail-Marketingdienste. Warum? Weil sie einen kostenlosen Plan für immer anbieten, bei dem Sie bis zu 1.000 E-Mails pro Monat an maximal 500 Abonnenten senden können.
Wenn Ihre Abonnenten auf mehr als 500 anwachsen oder Sie mehr E-Mails versenden möchten, benötigen Sie einen kostenpflichtigen Tarif, der recht teuer werden kann.
Neben dem E-Mail-Marketing bietet Mailchimp auch grundlegende Automatisierungstools, die für das Wachstum Ihres Unternehmens im Internet sehr nützlich sind.
Mailchimp ist jedoch alles andere als perfekt. Sie sind nicht mehr der einfachste oder kostengünstigste E-Mail-Marketingdienst auf dem Markt.
Einige Mailchimp-Alternativen wie Constant Contact, Drip und HubSpot bieten fortschrittlichere Marketing-Automatisierungstools, die einfacher zu bedienen sind.
Andere Unternehmen wie Brevo (ehemals Sendinblue) und ConvertKit bieten ebenfalls kostenlose Pläne an, mit denen Sie mehr E-Mails an mehr Abonnenten senden können.
Sehen wir uns also an, wie Sie Mailchimp mit WordPress nutzen können, um Ihr Geschäft auszubauen und Ihre E-Mail-Liste zu erstellen.
Erste Schritte mit Mailchimp
Um Mailchimp mit Ihrer WordPress-Website zu verbinden, benötigen Sie zunächst ein Mailchimp-Konto.
Um loszulegen, besuchen Sie die Mailchimp-Website und klicken Sie oben rechts auf die Schaltfläche „Sign Up Free“.
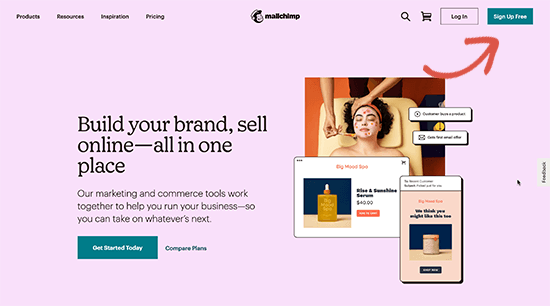
Geben Sie einfach Ihre E-Mail-Adresse ein, erstellen Sie einen Benutzernamen und ein Passwort für Ihr Konto und folgen Sie den Anweisungen auf dem Bildschirm, um die Einrichtung Ihres Kontos abzuschließen.
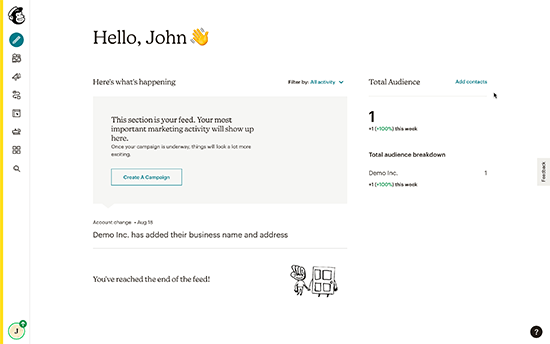
Sobald Sie Ihr Konto erstellt haben, gelangen Sie zu Ihrem Mailchimp-Dashboard, das wie folgt aussieht:
Hinzufügen von Mailchimp E-Mail-Anmeldeformularen in WordPress
Mailchimp verfügt über integrierte Anmeldeformulare, die Sie in Ihre WordPress-Website einbetten können.
Klicken Sie einfach auf die Schaltfläche Erstellen in der Symbolleiste auf der linken Seite und wählen Sie dann die Option Anmeldeformular “ Eingebettetes Formular.
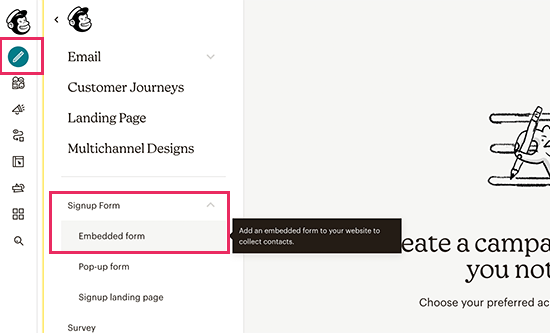
Dadurch gelangen Sie auf die Seite zur Konfiguration des Formulars.
Von hier aus können Sie auswählen, welche Formularfelder angezeigt werden sollen, und weitere Optionen für Ihr Anmeldeformular auswählen.
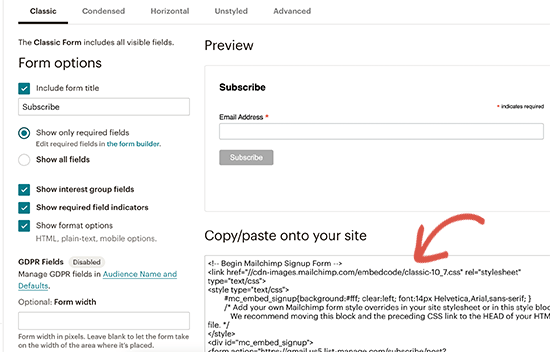
Wenn Sie mit dem Formular zufrieden sind, müssen Sie den auf dem Bildschirm angezeigten Einbettungscode kopieren.
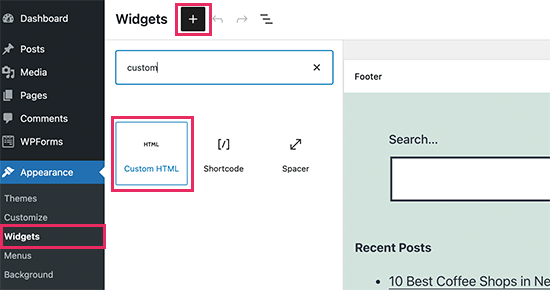
Als Nächstes müssen Sie in den Verwaltungsbereich Ihrer WordPress-Website wechseln und die Seite Erscheinungsbild “ Widgets aufrufen. Von hier aus müssen Sie den Custom HTML Widget-Block zu Ihrem Widget-Bereich hinzufügen.
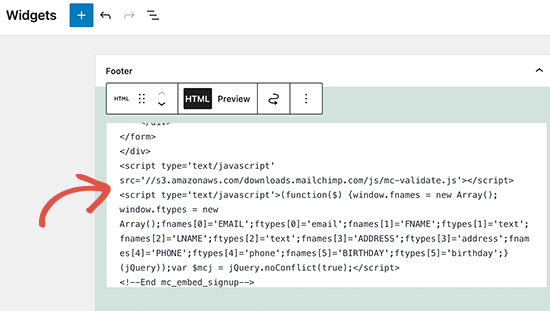
In den Widget-Einstellungen müssen Sie den Code einfügen, den Sie von der Mailchimp-Website kopiert haben.
Vergessen Sie nicht, auf die Schaltfläche „Aktualisieren“ zu klicken, um Ihre Widget-Einstellungen zu speichern.
Wenn Sie ein Blockthema verwenden, haben Sie keinen Zugang zu einem Widget-Bereich. Sie können das Mailchimp-Formular jedoch mit dem vollständigen Site-Editor zu Ihrer Website hinzufügen. Weitere Einzelheiten finden Sie in unserem vollständigen Leitfaden zur vollständigen Bearbeitung von Websites.
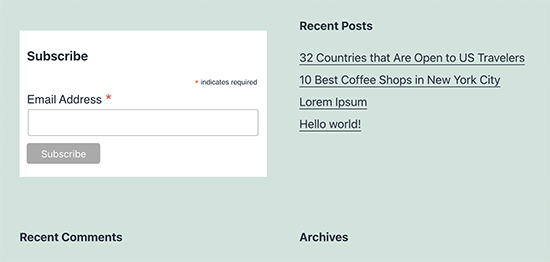
Sie können nun Ihre Website besuchen, um Ihr Mailchimp-Anmeldeformular in Aktion zu sehen.
So sieht es auf unserer Demo-Website aus.
Sie können den Einbettungscode auch mithilfe des HTML-Blocks in Beiträge oder Seiten einfügen. Weitere Einzelheiten finden Sie in unserer Anleitung zum Bearbeiten von HTML in WordPress.
Hinzufügen schöner Anmeldeformulare mit OptinMonster
Mit Mailchimp können Sie einfache E-Mail-Anmeldeformulare erstellen. Diese Formulare lassen sich jedoch nur schwer anpassen und bieten nicht viele Optionen für die Ausrichtung und Personalisierung.
Hier kommt OptinMonster ins Spiel. Es ist die beste Conversion-Optimierungssoftware auf dem Markt und hilft Ihnen, Website-Besucher leicht in Abonnenten zu verwandeln.
OptinMonster lässt sich in Ihr Mailchimp-Konto integrieren und verfügt über Dutzende von schönen Vorlagen und einen leistungsstarken Kampagnen-Builder.
Außerdem bietet es unglaubliche Targeting- und Anzeigeregeln, die es Ihnen ermöglichen, Ihre Anmeldeformulare zum richtigen Zeitpunkt anzuzeigen. So können Sie beispielsweise Nutzern, die Ihre Website gerade verlassen, ein Popup zeigen, Nutzern in bestimmten Regionen eine andere Kampagne zeigen und vieles mehr.
Zuerst müssen Sie sich für ein OptinMonster-Konto anmelden.
Danach müssen Sie das OptinMonster-Plugin auf Ihrer WordPress-Website installieren und aktivieren. Weitere Details finden Sie in unserer Schritt-für-Schritt-Anleitung für die Installation eines WordPress-Plugins.
Dieses Plugin fungiert als Verbindung zwischen WordPress und Ihrem OptinMonster-Konto.
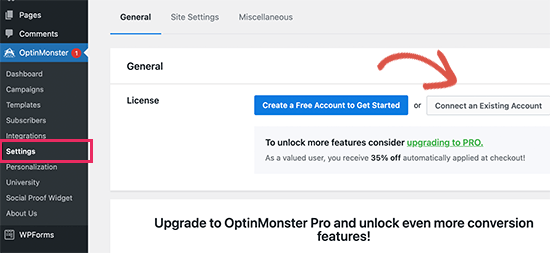
Nach der Aktivierung müssen Sie die Seite OptinMonster “ Einstellungen besuchen. Von hier aus klicken Sie einfach auf die Schaltfläche „Mit bestehendem Konto verbinden“, um OptinMonster in Ihre Website zu integrieren.
Jetzt sind Sie bereit, Ihr erstes Mailchimp-Newsletter-Anmeldeformular zu erstellen.
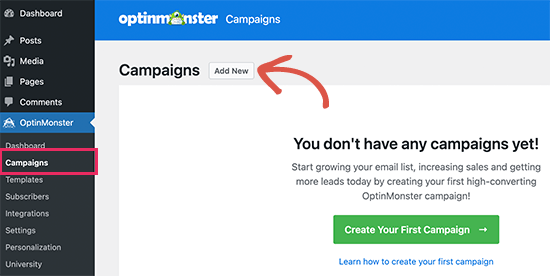
Um loszulegen, gehen Sie auf die Seite OptinMonster “ Kampagnen und klicken Sie auf die Schaltfläche „Neu hinzufügen“ am oberen Rand.
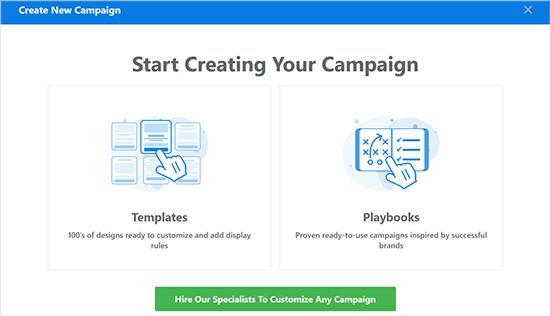
Als Nächstes werden Sie von OptinMonster aufgefordert, entweder Vorlagen oder Playbooks zu wählen.
Vorlagen sind Kampagnen, mit denen Sie Ihre eigenen Kampagnen entwerfen. Playbooks ermöglichen es Ihnen, Designs zu verwenden, die von erfolgreichen Kampagnen weltweit führender Organisationen inspiriert sind.
Für diesen Lehrgang werden wir uns auf Vorlagen beschränken.
Mit OptinMonster können Sie verschiedene Arten von Kampagnen erstellen, darunter Lightbox-Popups, schwebende Leisten, Inline-Kampagnen, Slide-In-, Fullscreen- und Gamified Spin-a-Wheel-Popups.
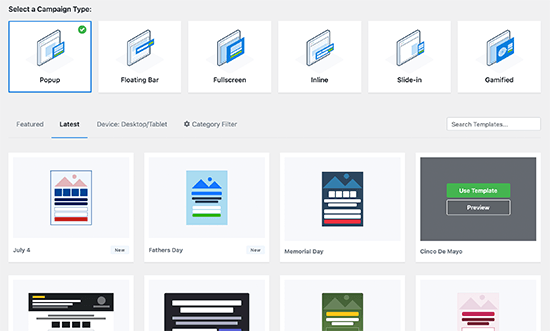
Danach müssen Sie eine Vorlage für Ihre Kampagne auswählen. Es stehen mehrere schöne Designs zur Auswahl, die Sie nach Belieben ändern können.
Nachdem Sie die Vorlage ausgewählt haben, müssen Sie einen Namen für Ihre Kampagne eingeben und die Kampagnenerstellung starten.
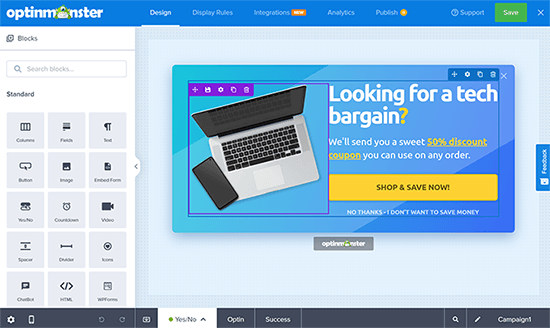
OptinMonster verfügt über eine intuitive Drag-and-Drop-Benutzeroberfläche, auf der Sie jedes Element durch einfaches Zeigen und Klicken bearbeiten können. Sie können auch neue Designelemente, sogenannte Blöcke, hinzufügen, um Ihre eigenen Bilder, Texte, Schaltflächen und mehr hinzuzufügen.
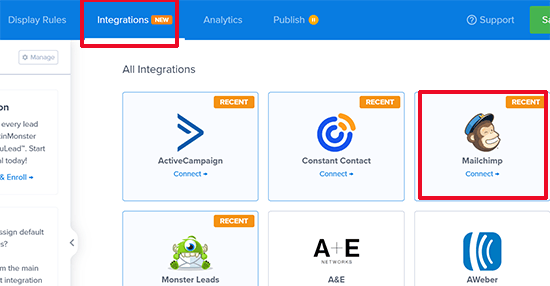
Sobald Sie mit dem Kampagnendesign zufrieden sind, verbinden Sie es mit Ihrem Mailchimp-Konto. Wechseln Sie einfach zur Registerkarte „Integrationen“ und klicken Sie unter der Mailchimp-Integration auf „Verbinden“.
Als nächstes müssen Sie einen Namen für diese Verbindung wählen.
Danach müssen Sie Ihren Mailchimp-API-Schlüssel eingeben.
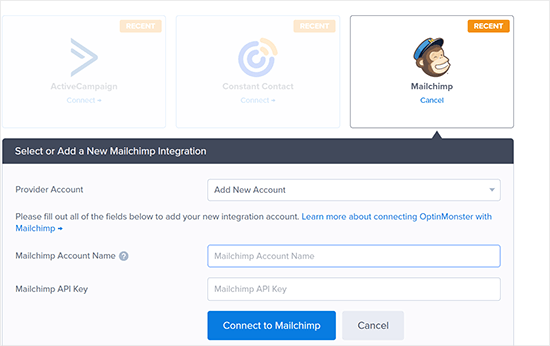
Sie können Ihren Mailchimp-API-Schlüssel in Ihrem Konto auf der Mailchimp-Website generieren oder ausfindig machen.
Klicken Sie in Ihrem Mailchimp-Dashboard einfach auf Ihr Profilsymbol unten links auf dem Bildschirm. Klicken Sie dann im oberen Menü auf Extras “ API-Schlüssel.
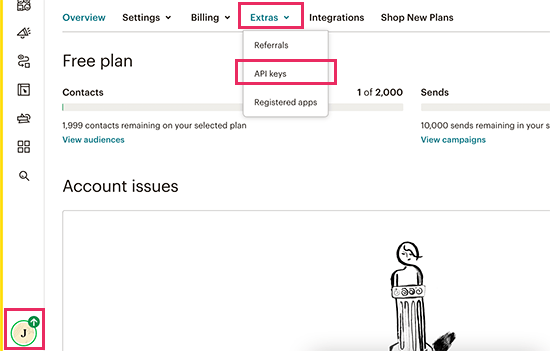
Nachdem Sie Ihre API-Schlüssel in den OptinMonster-Builder eingegeben haben, klicken Sie auf die Schaltfläche „Mit Mailchimp verbinden“.
Als nächstes müssen Sie Ihr Mailchimp-Konto und Ihre E-Mail-Liste auswählen.
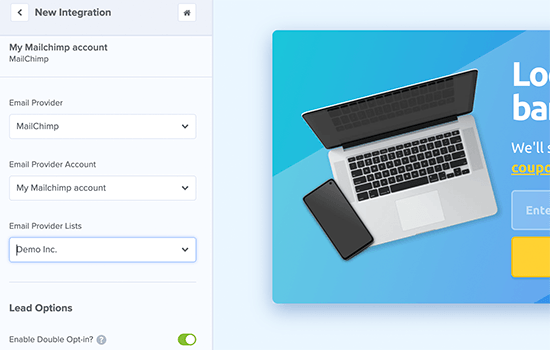
Sie können nun Ihre OptinMonster-Kampagne speichern und veröffentlichen.
Schließen Sie anschließend das Formularerstellungsprogramm.
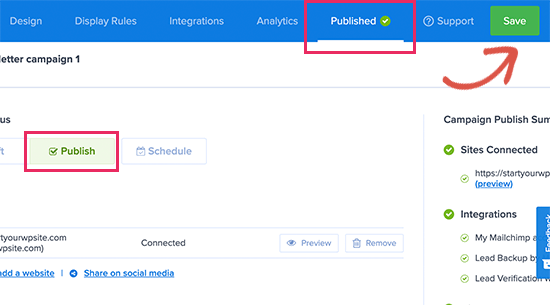
Dies bringt Sie zur Ausgabeseite der Kampagne auf Ihrer WordPress-Website.
Von hier aus müssen Sie auswählen, wo Sie die Kampagne anzeigen und veröffentlichen möchten.
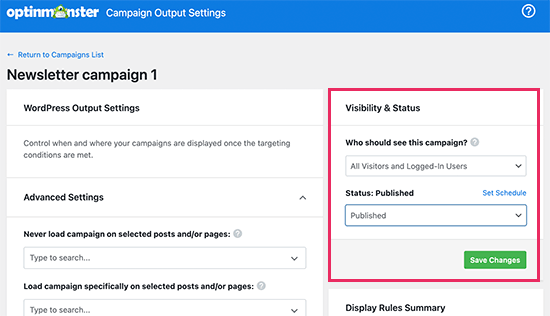
Sie können nun Ihre Website besuchen, um Ihr E-Mail-Newsletter-Formular in Aktion zu sehen.
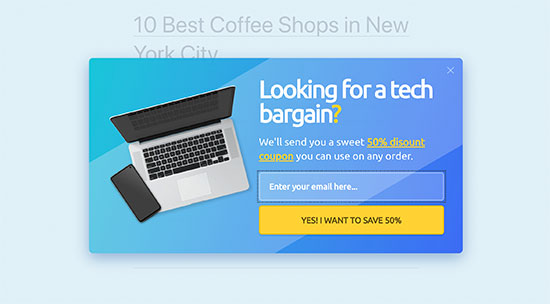
So sieht es auf unserer Demo-Website aus.
Erstellen eines benutzerdefinierten Mailchimp-Anmeldeformulars mit WPForms
WPForms ist das beste WordPress-Formularerstellungs-Plugin auf dem Markt. Es ermöglicht Ihnen, jede Art von Formular, einschließlich Newsletter-Anmeldeformulare, einfach zu erstellen.
WPForms ist auch eines der besten Mailchimp-Plugins. Es integriert sich mit Ihrem Mailchimp-Konto, so dass Sie Ihre Formulareinträge in Ihrer E-Mail-Liste speichern können.
Zunächst müssen Sie das WPForms-Plugin installieren und aktivieren. Weitere Einzelheiten finden Sie in unserer Schritt-für-Schritt-Anleitung für die Installation eines WordPress-Plugins.
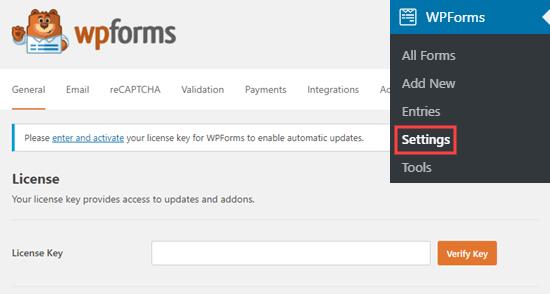
Nach der Aktivierung müssen Sie die Seite WPForms “ Einstellungen besuchen, um Ihren Lizenzschlüssel einzugeben. Sie können es in Ihrem Konto auf der WPForms Website finden.
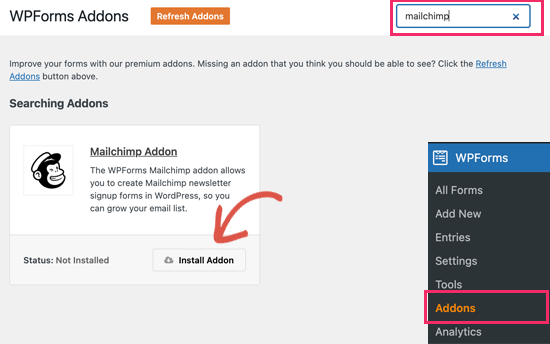
Als nächstes müssen Sie die Seite WPForms “ Addons besuchen.
Von hier aus können Sie das Mailchimp-Addon installieren.
Jetzt können Sie Ihr erstes Newsletter-Anmeldeformular erstellen.
Gehen Sie einfach zu WPForms “ Add New Seite, geben Sie einen Titel für Ihr Formular, und wählen Sie dann den Newsletter Signup Form Vorlage.
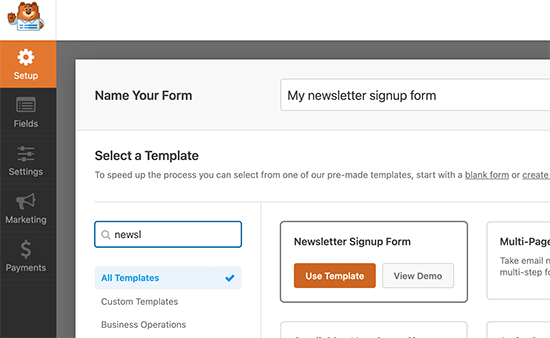
Dadurch wird der Formularersteller mit allen erforderlichen Feldern für Ihr Anmeldeformular für die E-Mail-Liste gestartet.
Sie können die Felder bearbeiten oder aus dem Formular entfernen, indem Sie sie einfach anklicken.
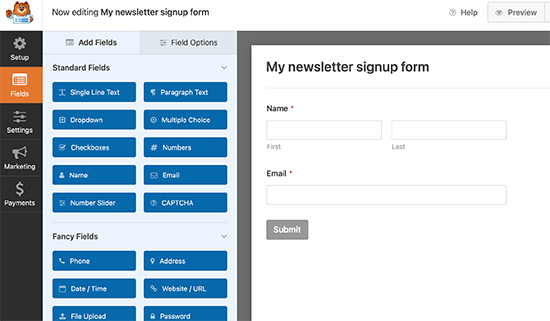
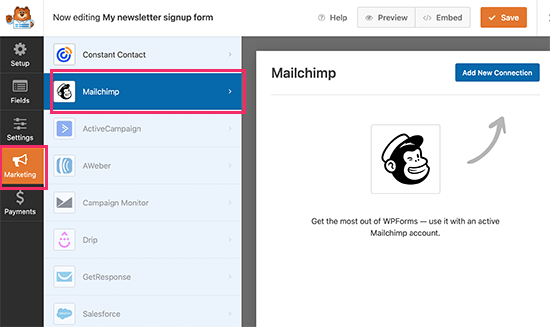
Wenn Sie mit dem Formular zufrieden sind, müssen Sie zur Registerkarte „Marketing“ wechseln und auf den Abschnitt Mailchimp klicken.
Hier müssen Sie auf die Schaltfläche „Neue Verbindung hinzufügen“ klicken.
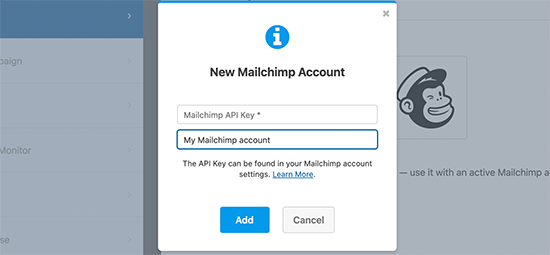
Als Nächstes werden Sie aufgefordert, die Verbindung zu benennen und den API-Schlüssel Ihres Mailchimp-Kontos einzugeben.
Sie können den API-Schlüssel in Ihrem Konto auf der Mailchimp-Website finden.
Als nächstes müssen Sie Ihr Mailchimp-Konto und Ihre Zielgruppe auswählen.
Sie können dann auswählen, welches Formularfeld dem E-Mail-Feld entspricht.
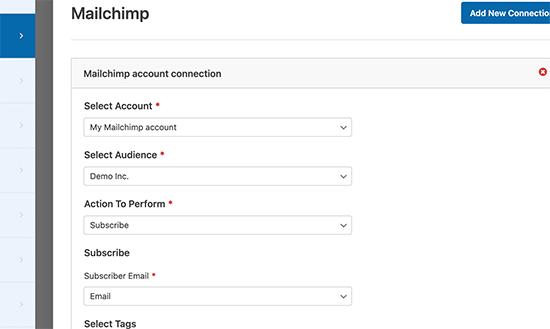
Sie können nun Ihre Formulareinstellungen speichern und die Formularerstellung beenden.
WPForms macht es sehr einfach, Ihr Formular überall auf Ihrer Website hinzuzufügen.
Wenn Sie das Formular in der Seitenleiste Ihrer Website anzeigen möchten, können Sie auf der Seite Darstellung “ Widgets den WPForms-Widget-Block zu Ihrer Seitenleiste oder einem beliebigen Widget-Bereich hinzufügen.
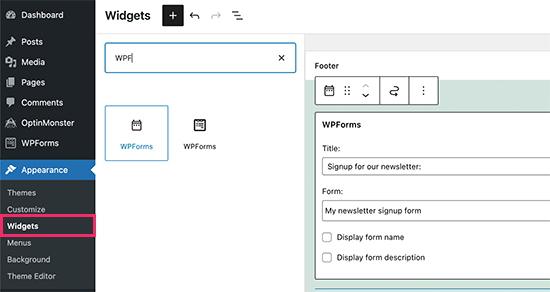
Vergessen Sie nicht, auf die Schaltfläche „Aktualisieren“ zu klicken, um Ihre Widget-Einstellungen zu speichern.
Wenn Sie das Anmeldeformular für den Newsletter zu einem Beitrag oder einer Seite hinzufügen möchten, können Sie den Beitrag oder die Seite bearbeiten und den WPForms-Block hinzufügen.
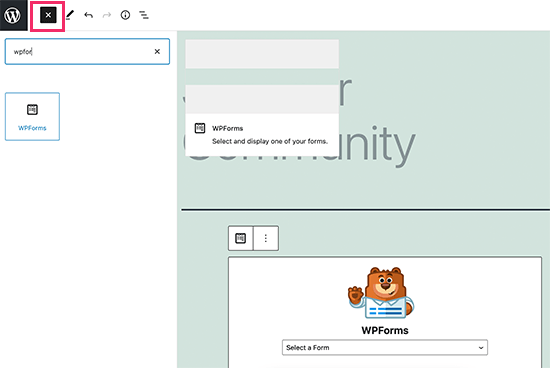
Vergessen Sie nicht, die Änderungen zu veröffentlichen oder zu speichern, um Ihren Beitrag oder Ihre Seite zu aktualisieren.
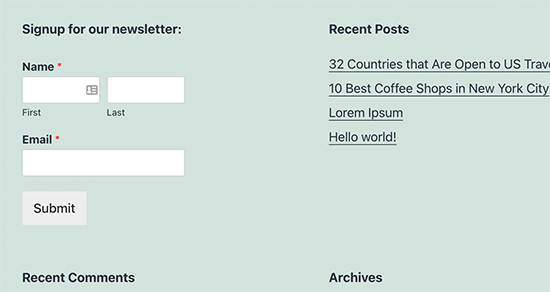
Sie können nun Ihre Website besuchen, um Ihr benutzerdefiniertes Mailchimp-Newsletter-Anmeldeformular in Aktion zu sehen.
Automatisieren Sie alles in WordPress und Mailchimp
E-Mails sind äußerst wirkungsvoll, vor allem wenn sie personalisiert und zeitnah sind. Mit den richtigen Tools können Sie ganz einfach hochkonvertierende E-Mail-Automatisierungen erstellen, die auf jeden Abonnenten zugeschnitten sind.
Sie könnten zum Beispiel eine automatische E-Mail senden, um Produkte vorzustellen, die denen ähneln, die Ihr Kunde bereits gekauft hat, oder Sie könnten Nutzern automatisch eine E-Mail senden, wenn Sie einen neuen Artikel auf Ihrer Website veröffentlichen.
An dieser Stelle brauchen Sie Uncanny Automator. Es ist das beste WordPress-Automatisierungs-Plugin, mit dem Sie automatisierte Workflows für Ihre WordPress-Website erstellen können.
Uncanny Automator arbeitet mit allen führenden WordPress-Plugins, eCommerce-Plattformen, Mitgliedschafts-Plugins und mehr als 3000 Apps über Zapier. Er lässt sich auch mit Mailchimp verbinden, was bedeutet, dass Sie mit nur wenigen Klicks intelligentere E-Mail-Kampagnen erstellen können.
Als Erstes müssen Sie das Uncanny Automator-Plugin installieren und aktivieren. Weitere Details finden Sie in unserer Schritt-für-Schritt-Anleitung für die Installation eines WordPress-Plugins.
Nach der Aktivierung müssen Sie die Seite Automator “ Neu hinzufügen aufrufen, um Ihr erstes Rezept zu erstellen. Sie werden aufgefordert, die Art des Rezepts auszuwählen, das Sie erstellen möchten.
Für dieses Tutorial werden wir eine automatische E-Mail an die Abonnenten senden, sobald wir einen neuen Beitrag veröffentlichen. Wählen Sie zunächst die Option „Eingeloggte Benutzer“.
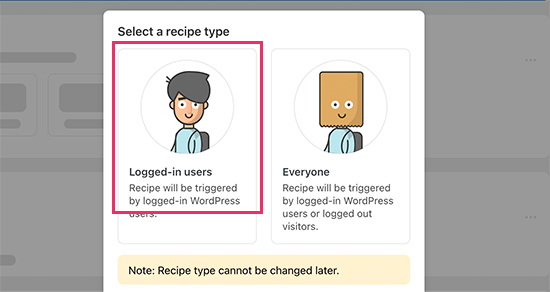
Als Nächstes müssen Sie WordPress als Ihre Integration auswählen, die die Aktion auslösen soll.
Als Auslöser können Sie wählen, wann ein Benutzer einen Beitrag veröffentlicht.
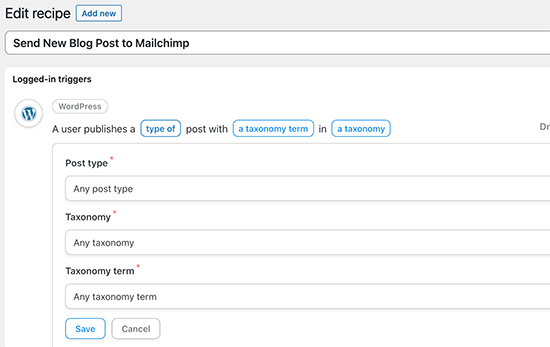
Als Nächstes folgt der Aktionsteil, in dem Sie festlegen, welche Aktion ausgelöst werden soll.
Klicken Sie einfach auf das Mailchimp-Symbol, um es mit Ihrer Website zu verbinden.
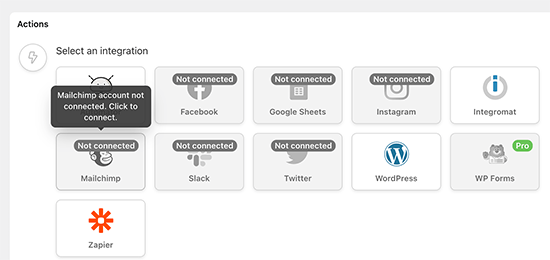
Daraufhin wird ein Popup-Fenster angezeigt, in dem Sie die Anweisungen auf dem Bildschirm befolgen müssen, um die Verbindung zu beenden.
Sobald Sie verbunden sind, können Sie auswählen, welche Aktion Sie für Ihr Mailchimp-Konto durchführen möchten.
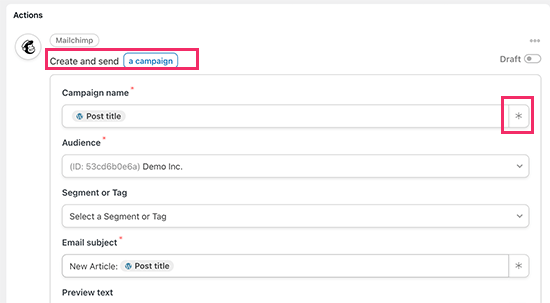
Hier haben wir es beispielsweise so eingerichtet, dass eine neue E-Mail mit dem Titel des Blogbeitrags und einer benutzerdefinierten Nachricht an unsere Zielgruppe gesendet wird.
Sobald Sie fertig sind, können Sie das Rezept von „Entwurf“ auf „Live“ umstellen.
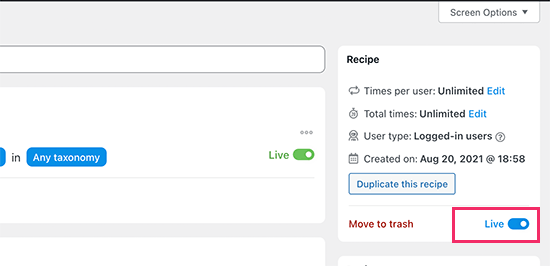
Von nun an wird Mailchimp automatisch eine E-Mail an Ihre Abonnenten senden, wenn Sie einen neuen Artikel auf Ihrer Website veröffentlichen.
Uncanny Automator ist ein leistungsfähiges Tool zur Verbindung von Mailchimp und WordPress, mit dem Sie Ihr Marketing automatisieren und Verkäufe und Konversionen steigern können.
Bonus-Tipps zum schnellen Wachstum Ihrer Mailchimp-E-Mail-Liste
Wenn Sie Ihre E-Mail-Liste nicht bei den Besuchern Ihrer Website bekannt machen, verlieren Sie potenzielle Abonnenten, Kunden und Umsätze.
Nachfolgend finden Sie einige der besten bewährten Tipps, die Ihnen helfen werden, Ihren Mailchimp-Newsletter schneller wachsen zu lassen.
1. Mehrere Anmeldungsformulare
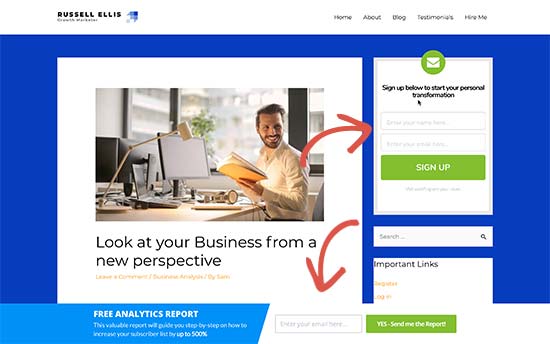
Fügen Sie nicht nur ein Anmeldeformular in der Seitenleiste ein. Geben Sie Ihren Nutzern stattdessen viele Möglichkeiten, sich mit mehreren E-Mail-Anmeldeformularen anzumelden.
In unserem Tutorial erfahren Sie, wie Sie ein Anmeldeformular für ein Website-Banner in WordPress erstellen.
2. Verwenden Sie Gamification, um Abonnenten zu gewinnen
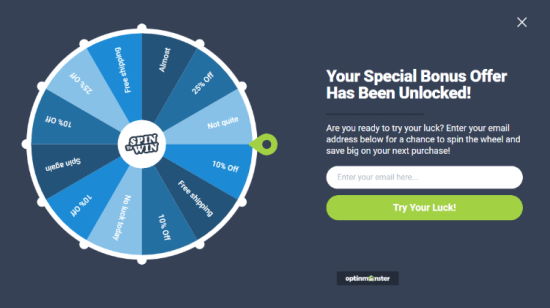
Gamification bringt Spaß und Interaktion in Ihre E-Mail-Formulare. Menschen geben ihre E-Mail-Adressen eher ein, wenn sie die Chance haben, im Gegenzug etwas zu gewinnen.
In unserem Tutorial erfahren Sie, wie Sie in WordPress Spin-to-Win-Popups hinzufügen.
3. Lead Magnete erstellen
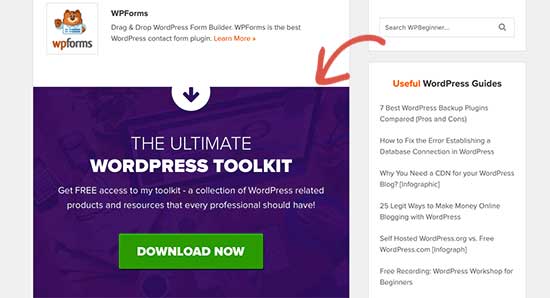
Lead-Magnete sind Anreize, die Sie Ihren Nutzern im Austausch für die Anmeldung in Ihrer E-Mail-Liste anbieten können. Sie können ihnen zum Beispiel ein Ebook, ein Beispielkapitel, einen Rabattcode und mehr schicken.
Erfahren Sie mehr in unserem Tutorial, wie Sie eine E-Mail-Adresse für den Download einer Datei in WordPress benötigen.
4. Verwenden Sie gezielte Kampagnen und Personalisierung
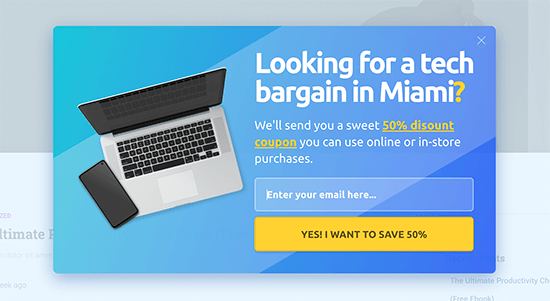
Ihre E-Mail-Anmeldeformulare werden mehr Abonnenten erhalten, wenn sie den richtigen Benutzern zur richtigen Zeit angezeigt werden.
So können Sie zum Beispiel Besuchern aus sozialen Medien eine Willkommensnachricht zeigen oder Käufern, die kurz davor sind, ihren Einkaufswagen abzubrechen, ein Rabattangebot unterbreiten.
Detaillierte Anweisungen finden Sie in unserem Leitfaden zur Anzeige personalisierter Inhalte für Benutzer in WordPress.
5. Verfolgen Sie Ihre Konversionen
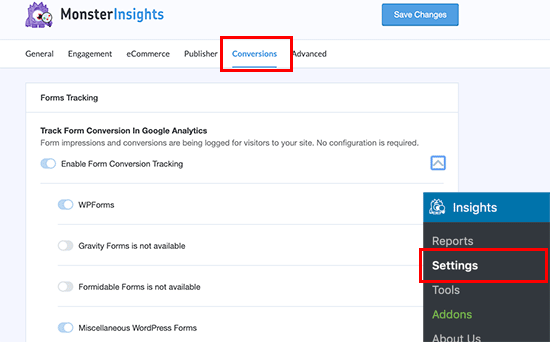
Sie möchten wissen, welche Formulare Ihnen mehr Abonnenten bringen? Dafür brauchen Sie MonsterInsights, das beste Google Analytics Plugin auf dem Markt.
MonsterInsights hilft Ihnen zu verstehen, welche Formulare für das Wachstum Ihrer E-Mail-Liste am effektivsten sind. Weitere Details finden Sie in unserer vollständigen Anleitung, wie Sie Konversionen in WordPress wie ein Profi verfolgen.
Weitere Informationen zu diesem Thema finden Sie in unserem Leitfaden zum schnellen Ausbau Ihrer E-Mail-Liste mit weiteren umsetzbaren Tipps.
Wir hoffen, dieser Artikel hat Ihnen geholfen zu lernen, wie Sie Mailchimp mit WordPress nutzen können, um Ihre E-Mail-Liste aufzubauen. Vielleicht interessieren Sie sich auch für unseren Leitfaden zu den besten SMTP-Diensten für den sicheren Versand von WordPress-E-Mails mit höherer Zustellbarkeit und unsere Expertenauswahl der besten Business-Telefondienste für kleine Unternehmen.
Wenn Ihnen dieser Artikel gefallen hat, dann abonnieren Sie bitte unseren YouTube-Kanal für WordPress-Videotutorials. Sie können uns auch auf Twitter und Facebook finden.


Syed Balkhi says
Hey WPBeginner readers,
Did you know you can win exciting prizes by commenting on WPBeginner?
Every month, our top blog commenters will win HUGE rewards, including premium WordPress plugin licenses and cash prizes.
You can get more details about the contest from here.
Start sharing your thoughts below to stand a chance to win!
Francesco says
Thanks for the post!!
Quick question..
Is it possible to create a newsletter that dinamically takes my last 3 post? Or I should put them manually everytime?
This is a features the plugin „Newsletter“ has native and it’s really useful.
Every helps is really appreciated
Francesco
Vana says
Exactly what I needed!
Thank you so much! You are the best.
Will says
Great article. Need help! Installed mailchimp subscriber form on my blog. I am getting notification the confirmation email is sent for double opt. Yet am not receiving the link and no emails are being added to the mailchimp list. Beyond frustrated! Any help appreciated. Seems to be a issue on many help forums.
Shelley says
I have two different opt-in forms on my site, both connected to mail chimp. I have some subscribers going to mail chimp email list and some on wordpress. Any idea why this is happening?
Mackenzie Waters says
This was exactly what I needed and walked me through the process so easily! Thank you!
Chris says
The only reservation I have about switching from FeedBurner is that if someone unsubscribes from the RSS driving posts, but they still want to get the newsletter (or vice versa), then there is no way to accommodate that (that I can tell).
I would like my readers to have control over which content they get but not be completely committed to „all of the above“ only.
MartinR says
Many Thanks! I just followed these instructions to create a free MailChimp account, create a Subscribe form for posts on my self hosted WordPress site, and start a „campaign“ which will email my latest post to subscribers. This is exactly what I was looking for. Again, thanks, great article!
Sunday says
I followed all the instruction, but I am asked to register a custom email account with an organisation to be paid before I can continue. Where did I missed it?
James Clewlow says
I followed all of the instructions correctly but when I copy and paste the link into the text widget in the sidebar it comes up as a massive link on my website.
Please help!
MartinR says
in that above writeup I typed:
…Code button to add a „“ at the beginning and a „“ at end of the pasted link/block, SAVE, then remove the beginning and ending „“ tags, SAVE again…
But the „code“ tags I typed in the 1st reply got interpreted as actual HTML – you would actually see the code tags without all the spaces – hope that makes sense…
MartinR says
This editor keeps interpreting what I’m trying to type as actual code tags so I’ll just say:
If you follow the first reply – what I did was add a beginning and ending code tag to surround the pasted link – via the Code button, SAVE, then remove them, SAVE again, all was well.
Camille says
Hi I followed these instructions and this morning I got the email but my latest blog post isn’t in it. It’s just the template but I though it would pull the latest blog posts into the email. Just curious if you have a resource that could help me on this. Mail chimp doesn’t seem to have anything on their website. Thanks!
John E. says
Hi, and thanks for a great article. I’m currently using Mailpoet but thinking of moving to Mailchimp. I want to use the RSS campaign feature, but I also want to include evergreen articles that I occasionally update, but don’t appear as new in the RSS feed. Is there any way to do this with Mailchimp? Or at least drop them manually into a template? Many thanks in advance
Dylan says
Thank you so much for this! Exactly what I needed!
WPBeginner Support says
Hey Dylan,
Glad you found it useful. You should also check out our YouTube Channel for WordPress video tutorials.
Admin
Stephanie O says
After pasting the Mailchimp signup code on WordPress ‚text‘ widget, half of the text is showing And the form appears as a text, as in you cannot click anything and the space to enter your email address/name is invisible!..
I have a wordpress.com website with the Textbook theme.
Andrew Gilbert says
I have this same problem! Do I have to have a premium account for this to work?
Ella says
Hi,
When you paste the signup code, a part of it dictates the style of the form which might clash with the style of your page, is easy just omit/delete this part:
#mc_embed_signup{background:#fff; clear:left; font:14px Helvetica,Arial,sans-serif; }
/* Add your own MailChimp form style overrides in your site stylesheet or in this style block.
We recommend moving this block and the preceding CSS link to the HEAD of your HTML file. */
Hope it help,
Ella
Nik Cree says
Do you know of any plugins or methods to send the full post to MailChimp rather than the Excerpt. I have ‚Full Text‘ rather than ‚Summary‘ selected in Reading Settings, but it is still the excerpt that is going to MailChimp. Any ideas how to get the Full Post instead?
Stef J says
Were you able to find an answer or solution to this? I’m struggling with the same issue.
Nik Cree says
Yes – it is a setting inside the MailChimp newsletter builder.
portia lambert says
I have copied and pasted my form code into the widget side bar etc and its not coming up on my website. help please!
Gerald says
i want my susbcriber to pay to my paypal before they subscribe
can i achieve this with mailchimp?
WPBeginner Support says
The default MailChimp forms do not have a payment option. You should check out WPForms it comes with payment options like Stripe and PayPal and also supports MailChimp.
Admin
Jim Farthing says
I am trying to get mailchimp and wp on the same page, so to speak. I can setup a form to have people sign up for my updates through mailchimp with no problem. I can get people to sign up for my forum with no problem.
Having people sign up for my site and add them to mailchimp at the same time, big problem. I just cannot seem to get that one down.
I really want to use one form so that my visitors do not have to fill out two forms, one to have access to my forums and one to get on my mailing list.
What am I missing? I have tried setting up the mailchimp for wp plugin with no success, I am using ultimate membership pro and have filled out the mailchimp info there with no success.
So at this point I am pulling my hair out so any suggestions will be greatly appreciated.
Jim
Sancheo says
I have that exact problem as well! Just so need to get this sorted already :/ May we find our answers soon
MPdev says
I am having this issue as well. Have you already checked out the Mailchimp site?
Anu says
Thanks a lot for this tutorial. I’m a mailchimp noob and this was very helpful.
Marisa Moon says
I’m new to this RSS Feed concept, but upon setting it up I began to wonder if the wordpress site will still be emailing my subscribers when a new post is published. I don’t want my subscribers getting two emails on the same post. Is there a way to disable the wordpress post emails so I can just use Mail Chimp?
Another question I have is about the mail chimp campaign design. After adding the RSS Header and Items, I’m still left with a rather short description and excerpt of the post. Do I have to update the campaign with a photo from the particular blog post each time before it goes out (if I want photos in it)? I use a lot of photos in my blog post, so this RSS campaign will fall flat without the photo content. But what’s the point of this auto-sending feature if I have to go in and add the content again.
Anyways, thank you for the info. I hope to find the answers, especially about the first question.
Jordan White says
Marisa,
Did you figure out how to stop WordPress from sending those automatic „new post“ emails? I am having the same problem. Now that I have mailchimp, I don’t want my subscribers getting too emails.
LM says
Great article and i looooove your site as I set up my new blog. I am planning to sign up for MailChimp. And although i know you recommend OptinMonster, I saw that Mailchimp also has a optin plug-in for WordPress. Do you have any thoughts on it? I’m at the stage where I don’t want to have to pay for anything else and OptimMonster has a monthly fee. I see that as an upgrade opportunity.
Marisa Moon says
I don’t remember many of the differences, but I ended up going with PopUp Ally which is a free wordpress plugin. I found it had more features than mail chimp was offering and, even though it had less than optin monster, it was free. Hope this helps! I think for us new bloggers, who don’t have thousands of hits a day, we shouldn’t worry about the „monster“ plugins out there just yet unless we’re ready to pay for it.
Andrea says
Thank you so much! I’m looking for a free pop-up plugin too, so I’ll try the one you suggested first
Marcel says
Good Tutorial. I have one problem though:
I have the double opt-in option enabled but when clicking the opt in link in the email the subscription is not directly confirmed but the user has the prove he is human. How can I disable that?
Many Thanks.
Marisa Moon says
I had this same problem. I don’t think you can change it or disable it (according to mail chimp). This is what I wrote two subscribers who complained about not being able to confirm: After trying the subscription myself on several browsers, laptops, and mobile devices, I found out that the trouble is really when using a mobile device. Were you using a mobile device when you had trouble subscribing? In the screen shot attached it shows you that I cannot edit the „robot“ test, so i am stuck with it. But the other image I attached is to help explain a few ways you might be able to overcome the issue. When you are asked to select images to prove you’re not a robot, the images can be blurry, they can also reappear once you’ve already clicked them, and you have to continue to click the photos even if new ones appear. Then, once you’ve clicked all of the photos that reappear (as you can see explained at the top and bottom of my photo), you click „verify“. But if you click „verify“ before letting the photos run their course, then you will have to try again. If you want to skip the photographs all together, then you can click the little headphone icon that is to the left of „Verify“, and you will be taken to a screen where you can listen to people speak a sequence of numbers that you have to type out and submit. It might be easier!
Tracy says
Great tutorial, as always!
I am the process of starting to use Mailchimp but was a little concerned that currently, my new blog posts are automatically sent out by Jetpack. Do I need to disable this to ensure there is no duplication?
Constance Sohodski says
This is a great tutorial, but I have a question it doesn’t answer. I am in the process of creating my account. MailChimp warns me against using a gmail account, and I understand why. However, I can’t figure out how to set up an email account associated with my wordpress site. Can anyone help?
April G says
Hi. I’m using Mailchimp to write a newsletter and I looked up how to embed a link to a website withtin text. But when I click on the text it doesn’t take me to the website in my code. Do you know what could be the problem?
Angela Dvorak says
Hi!
I used this article successfully to set up my RSS email campaign, but then it just stopped working. The feed URL appeared to be bad. I validated it using an RSS validator and it works, but Mail Chimp is still saying its not valid. Any ideas on why that might be? I checked for typos and syntax and just not finding the source of the issue.
WPBeginner Support says
We are not sure what could be causing this issue. Try disabling all your plugins and switching to a default theme. After that try to add your RSS in MailChimp. If the issue is revolved then this mean that a plugin or theme on your website is causing the issue. Alternately, you can also rechout to MailChimp support and see what they have to say.
Admin
Saeful says
Thanks for the tutorial
very helpful especially for me as a beginner blogger
regards
WPBeginner Support says
Hi Saeful, glad you found it helpful. Don’t forget to follow us on Facebook for more WordPress tips and tutorials.
Admin
Melinda says
I am following the instructions for setting up the embedded form but I’m not getting any kind of link to paste…I’ve tried several times using the set up as shown in the tutorial. What do I need to do to see this code to use on my WP site?
Pat Mingarelli says
Is there way to send an RSS email from MailChimp that shows a partial post and the featured image?
Thanks!
Pat M
Florine says
Hey, I have the same problem as Kate Armstrong and the suggested solutions did not work. I tried using a different form (slim/ naked) and also to disable Javaskript, still it only shows plain text or code, no subscribe button. Do you have any idea what the problem might be and how to solve it?
Thanks!
Kamran says
Sir i configure it as per your instructions , but post is not showing in the mail box , there are only facebook , twitter i cons are shown but Post is not , plz help what is the problem
Kathryn says
This post was so helpful! I’d been sending out blank emails because I wasn’t sure how the actual RSS heading and text was supposed to go into my campaign (total newbie), and this step-by-step was just what I needed.
Emily says
Hi! Thank you for such a helpful post! I have the mailchimp add-on and have made one form with it but now when i click through the tab (gravity forms: Mailchimp) it gives me the following error message:
You do not have sufficient permissions to access this page.
I am logged on as administrator of the wordpress page. Is this something that is typical?
Thanks again for sharing your knowledge with us!
Emily
wiziwiz says
How to set up daily and weekly option to subscribers?
Zaida Picazo says
Hello,
Great post!! Thank you!!
I have a question before set it up. Will the email sent all the post are in the RSS feed or it will know which ones were sent before and it won’t send them?
I have the doubt about if mailchimp will know which post were sent already and it doesn’t have to add them in the mail.
Hope you can reply me.
Thank uou very much in advance,
Zaida
WPBeginner Support says
It will send the latest post.
Admin
Jamil says
I am just missing the text fields showing on the blog being able to enter the words in them. Every other step has worked. This for wordpress.com, running on the intergalactic theme. Anything that may need to be edited in the code? Thank you so much!
John Campbell says
I have two different websites that I own and manage, and am thinking about creating two more.
Do I need a Mailchimp account for each one? Or will one account do? The two that I own a very niche content oriented, and don’t drive a lot of traffic, but I want to implement a consistent email campaign to change that, by not letting visitors leave the site without at least subscribing, and then keeping in touch with them on a weekly, or monthly basis.
So…Do I just need just one master account, and then separate my target recipients by website addresses? Or does each website need its own mailchimp account?
WPBeginner Support says
You can create multiple email lists under one MailChimp account.
Admin
Jan says
Help! I am a total newbie trying to set up an e-mail responder via mailchimp with an RSS feed. I can follow your instructions until I get through the RSS info above. Then the instructions say to click NEXT in the bottom corner. There is no NEXT in any bottom corner. I have a „Save and Exit“ drop down box at the right top of the screen, but the dropdown box takes me somewhere totally different than your tutorial. Can you please update your tutorial so I can follow it? Yours is the best tutorial I’ve found until this frustration & I’ve spent hours already trying to get past this step. Why is it what I see never matches the screen shots in tutorials?
Regina says
I am having a similar problem as Kate Armstrong. I manage to remove the code, but the box/es to sign up in don’t appear. All you get is the text.
I’m using the Edin theme. Please help, we’re about to launch!
Love your site, it has helped a lot!
Tarun Jagwani says
Thank you for this post, been struggling with the RSS feed.
Still had a question though
I have managed to get my rss feed working, but i want to send an entire blog post (with image) to the reader and am unable to to this?
For some reason on the excerpt is showing.
*|RSSITEM:CONTENT_FULL|* is the code that i am using.
Have I missed something?
Thank you for your help in advance.
Ruben Martinez says
A M A Z I N G tutorial,
Congrats, i can follow step by step with no problems. You are winning a new subscribers. Congrats again.
Diana says
Thanks for this article, great info. I’ve been working with the templates in MailChimp and testing the WordPress RSS feature to generate an email to subscribers when I have a new post.
Am I right to assume I’d have to always login to MailChimp and customize a different template if I want to show more post content than what the RSS description will display?
I was using the Newsletter WP plugin and decided I’d better work on building a mail list and decided to install Mailchimp for WordPress. I just want to show more copy from my post when I generate the email to subscribers.
Thanks in advance!
Kate armstrong says
Getting a problem with this: copying and pasting the html into the text widget results in seeing the html code on my website, not seeing the sign up form. Really grateful for help!!!
WPBeginner Support says
You shouldn’t have this issue. Can you switch to a default theme for testing and then add the form to a text widget? If that does not work try removing all unnecessary fields from form, disable JavaScript.
Admin
Robert Kezer says
I am having the same problem as Kate Armstrong. I copy the code over and get html showing not a signup link.
I have tried this with both my lists, and same results. Also with different forms and with java enabled and disabled. I have a basic default page. You can see the problem on right side at robertakezer (dot) com.
Thanks for the help!
Bob
Todd Mictchell says
I am having the same problem as Kate and Robert. Any help with clarifying this would be appreciated.
Thank you!
WPBeginner Support says
Try slim or naked embedded form code.
Brooke says
Is it possible to add mailchimp to a .com site? I’ve tried and researched with no success… Seems like it only works with .org
Thanks
Lara says
My blog posts come in different templates – some have a single image while some have blocks of image groups. Do I have to design a permanent template for my RSS email send-outs and can’t each blog post be sent out just as they look?
Thanks.
Vicki says
We have been using Constant Contact for several years now. However, it usually goes into the promotional tab for a gmail accounts. I have been considering a switch to MailChimp. Do you think the switch is worth a new learning curve or would you suggest remaining with Constant Contact?
WPBeginner Support says
You can try reaching out to their support and see if there is something you can do. Otherwise you can always switch. We don’t think that learning curve will be a big issue.
Admin
Timothy Marsh says
To Vicki, I am trying out Mailchimp at the moment, and it also went into the gmail promotions tab.
Error: I tried copy and pasting as instructed and nothing shows. So I created a second text widget and put in some basic HTML to check it and the test text widget appeared fine. I also have a twitter widget working fine.
Any idea why the mailchimp code fails? I used all default settings.
Daniel says
with reference to follow new Posts using the JetPack plugin . Do we argument this with say MailChimp emails . Dow we need both features enabled on a blog. I can’t make up my mind whether I need both.
Mike Foate says
Howdy,
I think Mailchimp is pretty good. I have used it for awhile and have under 100 subscribers.
I use the rrs feed to email feature.
One thing I do not care for is I can not tell which Mailchimp email templates are responsive. It seems to make sense to send responsive email in today’s world. I wish Mailchimp would either make all the email templates responsive or at least categorize them.
I also like the feature where you can have your email campaign automatically published to your Facebook page.
Happy trails, cowboy Mike
Jeff says
Thanks for the tutorial. You had everything I needed until it got to the RSS sending out either daily, weekly, or monthly. I was hoping there was a way to have the email sent immediately whenever I publish a new post. I imagine there must be.
Debbie says
I have this question as well!
`
Heather says
DEBBIE: Did you ever find a solution? I have same question.
Lisa says
Is there anyway I can import my MailChimp templates to WordPress so that I can email from there with my contacts lists?
abhishek says
Thank man I was looking for this guide for so long and finally you posted a tutorial thanx very much and keep the work going on
Howard Lee Harkness says
While MailChimp claims in their TOS that some affiliate marketing is permissible with their service, I have discovered that they will INSTANTLY and automatically shut down your account if you include a link in your email that they consider „spammy“ — and they are the sole judge of what is spammy. I got my account locked for including a link to a product which I gave as an example of something I did not consider worth buying.
I am planning to move to a different email service provider.
Patti Winters says
Howard – That is a bit scary. Do they consider Amazon links spammy? I’m using Constant Contact and was thinking of changing to MailChimp, but maybe should reconsider. Who else are you looking at?