Möchten Sie ein standortspezifisches Plugin zu Ihrer WordPress-Website hinzufügen?
Mit einem Site-spezifischen Plugin können Sie Ihrer WordPress-Website ganz einfach Codeschnipsel hinzufügen, ohne sich auf Ihr Theme verlassen zu müssen.
In diesem Artikel wird erklärt, wie man ein standortspezifisches WordPress-Plugin erstellt und warum dies wichtig ist.

Was ist ein standortspezifisches WordPress-Plugin?
Ein site-spezifisches WordPress-Plugin ist ein eigenständiges Plugin, mit dem Sie alle Anpassungsschnipsel hinzufügen können, die nicht themenabhängig sind.
Wenn Sie an Ihrer Website arbeiten, werden Sie in WordPress-Tutorials oft aufgefordert, Code in die Datei functions.php Ihres Themes oder ein Site-spezifisches Plugin einzufügen.
WordPress wird nicht mit einem standortspezifischen Plugin geliefert. Sie müssen Ihr eigenes erstellen und es dann installieren und aktivieren.
Warum ein standortspezifisches WordPress-Plugin erstellen?
Wie bereits erwähnt, stoßen Sie häufig auf Tutorials, in denen ein Code gezeigt wird, den Sie in die functions.php-Datei Ihres Themes oder in ein site-spezifisches Plugin einfügen können.
Diese benutzerdefinierten Codes können verwendet werden, um neue Beitragstypen, Taxonomien, Shortcodes und eine Vielzahl von Hacks zur Verbesserung Ihrer Website hinzuzufügen.
Wenn Sie den benutzerdefinierten Code in die Funktionsdatei Ihres Themes einfügen, verschwindet er, wenn Sie Ihr Theme aktualisieren oder wechseln.
Sie können ein untergeordnetes Thema erstellen und die Funktionsdatei des untergeordneten Themas verwenden, um Ihren Code zu speichern. Allerdings verschwindet Ihr Code auch dann, wenn Sie das Theme wechseln.
Mit einem site-spezifischen WordPress-Plugin können Sie Ihrer WordPress-Website ganz einfach benutzerdefinierte Codeschnipsel hinzufügen und sicherstellen, dass diese themenunabhängig sind. Es ist ein eigenständiges WordPress-Plugin, d. h. es ist nicht von Ihrem Theme abhängig, und Sie können Ihr Theme aktualisieren oder wechseln.
Schauen wir uns also an, wie Sie mit einem Site-spezifischen Plugin ganz einfach benutzerdefinierten Code hinzufügen können. Wir zeigen Ihnen zwei Möglichkeiten, und Sie können die Methode wählen, die für Sie am besten geeignet ist (Tipp: Methode #2 ist für Anfänger einfacher).
Methode 1: Manuelles Erstellen eines Site-spezifischen WordPress-Plugins
Wir wissen, dass dies für Anfänger etwas kompliziert klingen mag, aber wir werden versuchen, es Ihnen so einfach wie möglich zu machen.
Zunächst müssen Sie einen neuen Ordner auf Ihrem Desktop erstellen und ihn nach Ihrer Website benennen. Zum Beispiel: mywebsite-plugin.
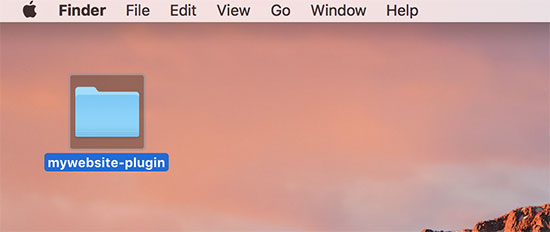
Öffnen Sie nun einen einfachen Texteditor wie Notepad oder TextEdit auf Ihrem Computer.
Sie müssen eine neue Datei erstellen und diese unter dem Namen mywebsite-plugin.php im Plugin-Ordner auf Ihrem Desktop speichern.
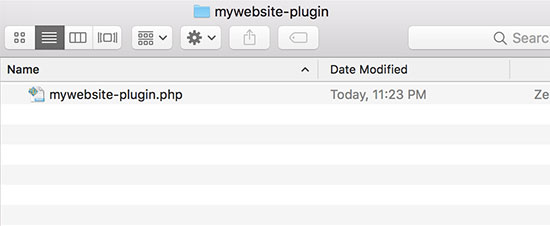
Ihre Plugin-Datei benötigt einen speziellen Header-Code, damit WordPress sie als Plugin erkennen kann. Fügen Sie den folgenden Code in Ihre Datei mywebsite-plugin.php ein:
<?php
/*
Plugin Name: Site Plugin for example.com
Description: Site specific code changes for example.com
*/
/* Start Adding Functions Below this Line */

/* Stop Adding Functions Below this Line */
?>
Sie können example.com durch Ihren eigenen Domänennamen ersetzen. Sobald Sie dies getan haben, ist Ihr standortspezifisches Plugin fertig.
Es gibt zwei Möglichkeiten, Ihr standortspezifisches Plugin auf Ihre Website hochzuladen. Sie können es entweder über Ihr WordPress-Administrationspanel hochladen oder FTP verwenden.
1. Installieren Sie ein standortspezifisches Plugin aus dem WordPress-Adminbereich (empfohlen)
Diese Methode ist einfacher und wird für alle Benutzer empfohlen.
Als Erstes müssen Sie eine Zip-Datei mit dem für Ihre Website spezifischen Plugin-Ordner erstellen.
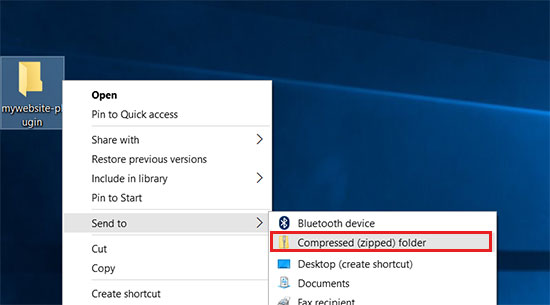
Windows-Benutzer können einfach mit der rechten Maustaste auf den Plugin-Ordner klicken und Senden an “ Komprimierter (zip) Ordner wählen.
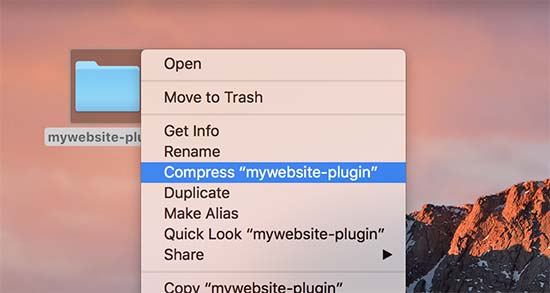
Mac-Benutzer müssen mit der rechten Maustaste klicken.
Wählen Sie dann „mywebsite-plugin komprimieren“.
Sobald Sie die Zip-Datei des Plugins haben, gehen Sie auf die Seite Plugins “ Neu hinzufügen in Ihrem WordPress-Adminbereich.
Klicken Sie dann auf die Schaltfläche „Plugin hochladen“ oben auf der Seite.
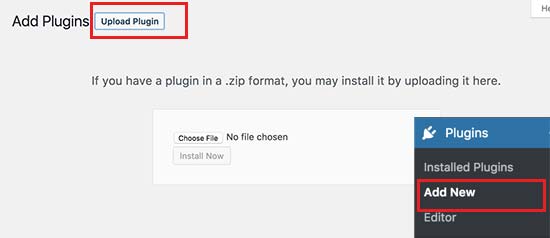
Klicken Sie anschließend auf die Schaltfläche „Datei auswählen“, um die zuvor erstellte ZIP-Datei auszuwählen, und klicken Sie dann auf die Schaltfläche „Jetzt installieren“.
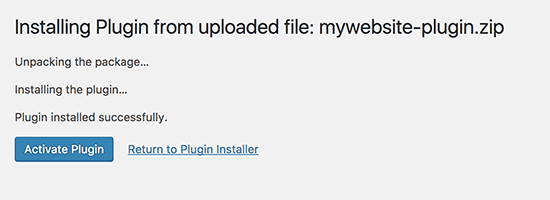
WordPress wird nun das Plugin für Sie hochladen und installieren. Sobald es hochgeladen ist, müssen Sie auf die Schaltfläche „Plugin aktivieren“ klicken, um Ihr standortspezifisches Plugin zu verwenden.
2. Laden Sie Ihr Site-spezifisches WordPress-Plugin per FTP hoch
Bei dieser Methode brauchen Sie keine Zip-Datei zu erstellen. Sie werden das Plugin per FTP hochladen.
Zunächst müssen Sie mit einem FTP-Client eine Verbindung zu Ihrer Website herstellen.
Sobald Sie verbunden sind, gehen Sie zum Ordner /wp-content/plugins/ in der Spalte „Remote Site“. Als Nächstes müssen Sie Ihren standortspezifischen Plugin-Ordner auswählen und ihn auf Ihre Website hochladen.
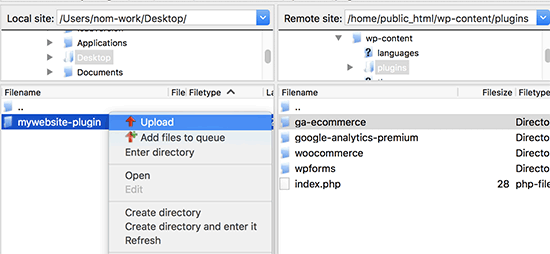
Ihr FTP-Client überträgt nun den für Ihre Website spezifischen Plugin-Ordner auf Ihre WordPress-Website. Dadurch wird das Plugin auf Ihrer Website installiert.
Sie müssen das Plugin jedoch noch aktivieren, um es verwenden zu können. Gehen Sie dazu auf die Seite „Plugins“ in Ihrem WordPress-Verwaltungsbereich und klicken Sie dann auf den Link „Aktivieren“ unter dem Plugin für Ihre Website.

Das war’s schon. Ihr standortspezifisches Plugin ist nun einsatzbereit.
Hinzufügen von benutzerdefinierten Code-Snippets zu Ihrem Site-spezifischen Plugin
Es gibt zwei Möglichkeiten, Ihr Plugin zu bearbeiten und ihm benutzerdefinierte Codeschnipsel hinzuzufügen.
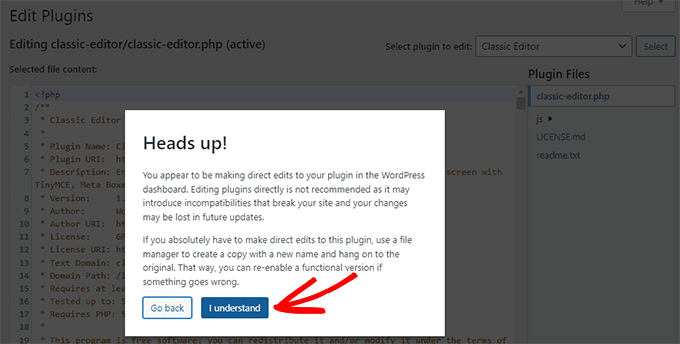
Die erste Methode ist, dies über den WordPress-Verwaltungsbereich zu tun. Sie können auf die Seite Plugins “ Editor gehen.
Es wird eine Warnmeldung angezeigt, und Sie müssen auf die Schaltfläche „Ich verstehe“ klicken, um fortzufahren. Wenn Sie die Dateien auf sicherere Weise bearbeiten möchten, können Sie auch mit der zweiten Methode fortfahren.
Als Nächstes müssen Sie Ihr Site-spezifisches Plugin aus dem Dropdown-Menü „Plugin zur Bearbeitung auswählen“ auswählen.
Der Editor lädt Ihre Plugin-Datei, und Sie können ihr Code-Schnipsel hinzufügen.
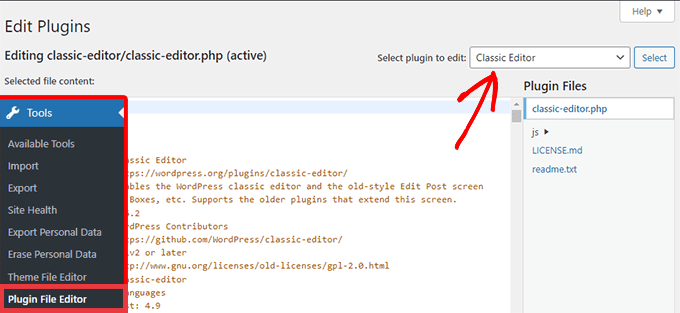
Wenn Sie fertig sind, klicken Sie auf die Schaltfläche „Datei aktualisieren“, um Ihre Änderungen zu speichern.
Wenn in Ihrem Code etwas fehlt oder Ihre Website dadurch beschädigt werden könnte, macht der Plugin-Editor Ihre Änderungen automatisch rückgängig.
Wenn der Editor jedoch fehlschlägt und Sie den weißen Bildschirm des Todes sehen, können Sie FTP verwenden, um Ihre Plugin-Datei zu bearbeiten und die Änderungen rückgängig zu machen.
Die zweite Methode besteht darin, die Plugin-Datei direkt per FTP zu bearbeiten. Rufen Sie einfach den Plugin-Ordner mit Ihrem FTP-Client auf. Klicken Sie mit der rechten Maustaste auf die Plugin-Datei und wählen Sie dann „Anzeigen/Bearbeiten“.
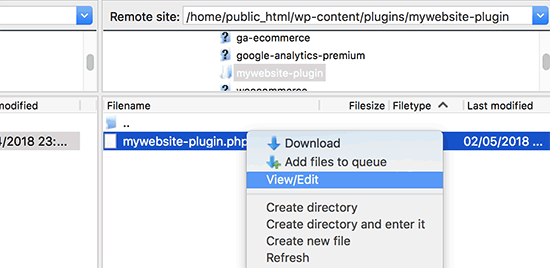
Sie können die Plugin-Datei auch auf Ihren Computer herunterladen, sie bearbeiten und dann wieder hochladen.
Methode 2: Hinzufügen von benutzerdefiniertem Code mit WPCode (empfohlen)
Diese Methode ist viel einfacher und bietet Ihnen eine bessere Möglichkeit, Ihre individuellen Code-Snippets in WordPress mit WPCode zu verwalten.
Als Erstes müssen Sie das kostenlose WPCode-Plugin auf Ihrer Website installieren und aktivieren. Weitere Einzelheiten finden Sie in unserer Schritt-für-Schritt-Anleitung für die Installation eines WordPress-Plugins.
Nach der Aktivierung fügt das Plugin einen neuen Menüpunkt mit der Bezeichnung „Code Snippets“ zu Ihrem WordPress-Administrationsmenü hinzu. Wenn Sie darauf klicken, gelangen Sie auf eine Seite, auf der Sie alle Ihre benutzerdefinierten Codes verwalten können.
Um Ihr erstes Codefragment hinzuzufügen, klicken Sie auf die Schaltfläche „Neu hinzufügen“.
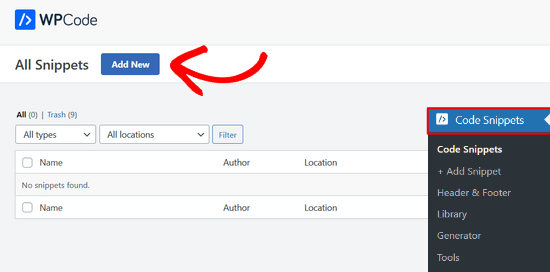
Dadurch gelangen Sie auf die Seite „Snippet hinzufügen“. Hier können Sie ein Code-Snippet aus der vorgefertigten Bibliothek auswählen oder Ihren eigenen Code hinzufügen.
Um benutzerdefinierten Code hinzuzufügen, navigieren Sie zur Option „Benutzerdefinierten Code hinzufügen (neues Snippet)“ und klicken Sie auf die Schaltfläche „Snippet verwenden“.
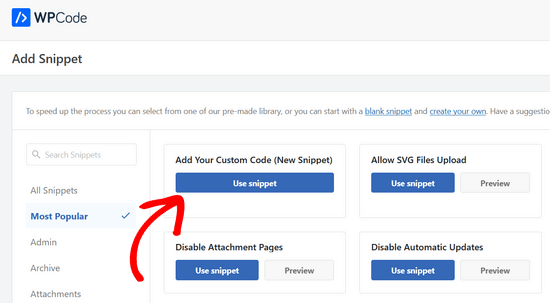
Jetzt können Sie einen Titel für Ihr benutzerdefiniertes Codefragment eingeben. Dies kann alles sein, was Ihnen hilft, den Code zu identifizieren.
Danach können Sie Ihr Code-Snippet in das Code-Feld einfügen. Sie müssen auch den Typ „PHP Snippet“ aus der Dropdown-Liste „Code-Typ“ auf der rechten Seite auswählen.
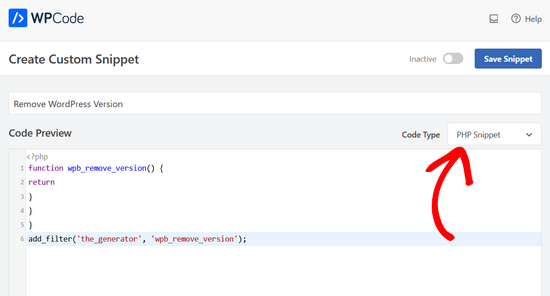
Sie können auch Notizen zum Code im Abschnitt „Basisinformationen“ hinzufügen.
Sie sollten diesen Bereich nutzen, um zu notieren, was dieser Code bewirkt, wo Sie ihn gefunden haben und warum Sie ihn Ihrer Website hinzufügen. Dies wird Ihrem „zukünftigen Ich“ helfen, sich daran zu erinnern, warum das „vergangene Du“ diesen Code hinzugefügt hat.
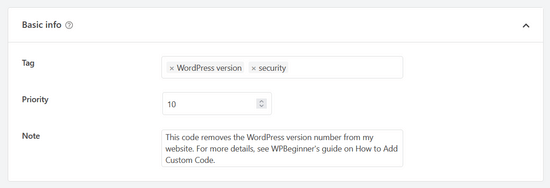
Sie haben auch die Möglichkeit, Ihren Code-Snippets Tags zuzuweisen, mit denen Sie Code-Snippets nach Themen und Funktionen ordnen können.
Mit dem Plugin können Sie auch auswählen, wie Sie das Code-Snippet ausführen möchten. Im Abschnitt „Einfügen“ können Sie die Methode „Automatisch einfügen“ auswählen, um den Code automatisch in Ihre Website einzufügen und auszuführen.
Sie können zwischen den Optionen „Verwaltungsbereich“, „Front-End“ und „Überall“ wählen. Wenn Sie unsicher sind, sollten Sie die Standardoption „Überall ausführen“ beibehalten.

Sie können auch die Methode „Shortcode“ wählen. Bei dieser Methode wird das Snippet nicht automatisch eingefügt. Sobald Sie das Snippet speichern, erhalten Sie einen Shortcode, den Sie manuell an einer beliebigen Stelle Ihrer Website einfügen können.
Sie können auch den Abschnitt „Intelligente bedingte Logik“ verwenden, um automatisch eingefügte Snippets auf der Grundlage einer Reihe von Regeln ein- oder auszublenden.
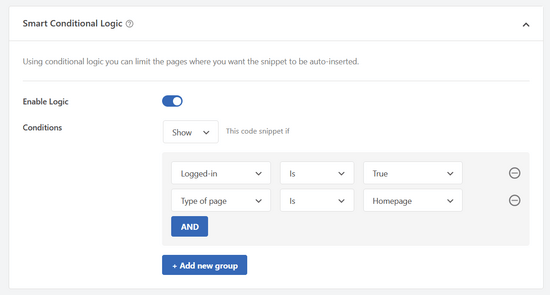
So können Sie beispielsweise Code-Snippets nur für angemeldete Benutzer laden, PHP-Code-Snippets nur bei bestimmten Seiten-URLs laden, Code-Snippets auf der Grundlage des Seitentyps anzeigen und vieles mehr.
Schließlich können Sie den Schalter von „Inaktiv“ auf „Aktiv“ umschalten und dann auf die Schaltfläche „Snippet speichern“ klicken.
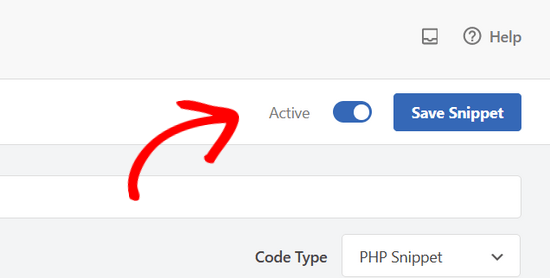
Wenn Sie das Code-Snippet speichern möchten, ohne es zu aktivieren, können Sie nur auf die Schaltfläche „Snippet speichern“ klicken.
Sobald Sie ein Code-Snippet gespeichert und aktiviert haben, wird es automatisch auf Ihrer Website wirksam, wenn Sie diese Einfügemethode gewählt haben.
Weitere Einzelheiten finden Sie in unserem Leitfaden zum einfachen Hinzufügen benutzerdefinierter Code-Snippets in WordPress.
Wir hoffen, dass dieser Artikel Ihnen geholfen hat zu erfahren, warum und wie Sie ein standortspezifisches WordPress-Plugin erstellen. Vielleicht interessieren Sie sich auch für unsere Liste nützlicher Tipps für Funktionsdateien und die beliebtesten WordPress-Hacks, um Ihr standortspezifisches Plugin optimal zu nutzen.
Wenn Ihnen dieser Artikel gefallen hat, dann abonnieren Sie bitte unseren YouTube-Kanal für WordPress-Videotutorials. Sie können uns auch auf Twitter und Facebook finden.


Syed Balkhi says
Hey WPBeginner readers,
Did you know you can win exciting prizes by commenting on WPBeginner?
Every month, our top blog commenters will win HUGE rewards, including premium WordPress plugin licenses and cash prizes.
You can get more details about the contest from here.
Start sharing your thoughts below to stand a chance to win!
Stephanie says
I’m getting the same error as Sonya above. Does anyone have a fix?
Parse error: syntax error, unexpected T_LNUMBER in /home/statisu0/public_html/wp-content/plugins/statisticshowto-plugin/statisticshowto.com-plugin.php on line 10
WPBeginner Support says
your plugin file name contains .com in it. It should be statisticshowto.php instead.
Admin
Susan says
Hi again. I’ve been reading through all of the comments above and, while some show your answer and resolution to the problem, many don’t. So it’s hard for me to learn from how others resolved their problems! Anyway, here’s what I’m wondering: if by following the instructions in this post to create a folder within my „plugins“ folder, how will I be able to see my new site-specific plugin file?
For example, I followed the instructions to create a folder called susansinthegarden-plugin. Then I put my plugin code in a file called susansinthegarden-plugin.php. I can’t see the plugin when I go to plugins on my dashboard.
Is this because the new plugin text file exists in a sub-folder under „plugins“? I can’t figure out what I’m missing but really need to resolve this. Is there anyone out there who can help me? Thanks so much!
WPBeginner Support says
No. Please make sure that your plugin’s header area is properly formatted.
Admin
emy says
Hi,
What is a plugin header and how do I format it?
WPBeginner Support says
Hey Emy,
The plugin header is the part that tells WordPress that this file should be treated as a plugin. It also tells WordPress the name of the plugin, version, and other information.
In the code shown above, the header part begins right after the first line and ends at line 5. It contains plugin’s title and description.
Susan says
OK, I resolved my program. Not being a code-writer, I didn’t realize that there was a separate header to wrap around the code I was borrowing. Duh. Thanks for your help.
Susan says
I followed your instructions to create a folder under wp-content/plugins etc. and put the file containing the code into that folder but I can’t see my new plugin when I go to my dashboard and look under plugins. Did I miss a step? Thanks in advance for your help!
Edgar Ramirez says
Hello
I created the directory and the php file but i cannot see the plugin at all
/wp-content/plugins/yoursitename-plugin/
Open a blank file and save it as “yoursitename-plugin.php”
dont see it on the dashboard plugin list and neither in the Plugin>editor
Can you please help me
Sonia Lacasse says
Never mind! Looks like I found the problem. Thanks for your awesome work!
Sonia Lacasse says
When I try to activate the plugin, I get the following error message:
Plugin could not be activated because it triggered a fatal error.
Parse error: syntax error, unexpected ’06‘ (T_LNUMBER) in /var/www/domain/wp-content/plugins/ETK-PLUGIN/ETK-PLUGIN.php on line 10
Can you please help?
Thanks!
Catherine Argyros says
hi there, when i put this in the directory
I received this error message
The plugin generated 2 characters of unexpected output during activation. If you notice “headers already sent” messages, problems with syndication feeds or other issues, try deactivating or removing this plugin.
but my plug in is activated….. please help me understand what is going on?
thank you
WPBeginner Support says
Most probable cause for this error could be an empty space after the last ?> closing tag.
Admin
error message says
wonderful, thats exactly what the problem was. Thank you for helping me create my first plugin!
WPBeginner Support says
Glad to help
xin a day says
„All you have to do is create a new folder in the plugins directory. Example: /wp-content/plugins/yoursitename-plugin/
Open a blank file and save it as “yoursitename-plugin.php”
Put the following code in the file:“
i hv few question on these .
1. i can’t create a folder onthe plugin directory.
2. where to open a blank file ?
3. the plugin diretory cant install that file.
thank you
Sacha says
Awesome idea! I’ve always found functions.php a pain, so this method works great!
Alan Shapiro says
This is a really useful post–thank you! Perhaps someone else asked this and I just missed it in all the comments, but: will a site-specific plugin override a function that is in the theme’s functions.php? For instance, if there is a „remove_action“ in the functions.php, will the same „add_action“ in the plugin take precedence?
WPBeginner Support says
Both functions.php file and site-specific plugin are treated as plugins. Functions.php file loads after plugins but they do not have precedence over eachother. This is why using the same function in both files can cause unexpected results. The best way to override pluggable code is by using hooks and filters.
Admin
Robert Masters says
I’m building a plugin at the moment for a multisite network and I need certain functionality available only in specific sites, so this is a perfect article for me right now.
I have one question though…..how do I name the site plugin folder for a site that is created as a subdomain? Example: subdomain.mainsite.com would it be subdomain-mainsite-plugin or just subdomain-plugin?
Hope this makes sense, question based on your tutorial.
hans says
very good. when you create a second instance don’t forget do give the „register and load“ function an own name, like i did
Eric Ellis says
That’s great. I always figured it was pretty simple. Thank you for the information.
Jide says
Nice one there. Kindly update the post to inform readers that after activating the plugin, they will have to click on the „edit“ link on the plugins page, to add their codes.
Most newbies might not know this…
WPBeginner Support says
Actually we do not recommend editing plugins and themes from WordPress admin area. Instead, we would recommend editing your plugins in a text editor via FTP client. This way in case of an error you would be able to quickly fix it without losing access to admin area for too long.
Admin
Mark Holland says
Thank you thank you thank you!! This has solved an issue that’s been puzzling me for weeks – and now solved in less than 1 minute.
Can’t express how grateful I am for you sharing your knowledge – thanks again!
Luca says
Thank you for the advice! But now I’m confused: what’s the difference between this method and the plugin „Code Snippet“? Is the result the same? Or do they accomplish the same thing in a different way?
Malcolm says
Three years later this post is still giving – It’s changed the way I think about customising wordpress – Thank you!
I tried this today and created a a site-specific-plugin with code to hide the wordpress menu bar for non-admins, and to add my latest post to a ‚Current issue‘ menu item. Both worked perfectly.
But the third snippet I added to the plugin failed to work. When I copied the code to the child theme’s functions.php it worked as expected.
Can you explain why this would happen?
I’m trying to modify the effect of the plugin „Restricted Site Access“ by allowing access to more than a single page. The code I tried in my site specific plugin and the functions.php was:
//
add_filter( ‚restricted_site_access_is_restricted‘, ‚my_restricted_check‘ );
function my_restricted_check( $is_restricted ) {
global $wp;
if (
$wp->query_vars[‚pagename‘] == ‚contact‘ ||
$wp->query_vars[‚pagename‘] == ’subscribe‘ ||
$wp->query_vars[’name‘] == ‚aplr-2013-volume-21-number-2‘
)
$is_restricted = false;
return $is_restricted;
}
Any advice or comment would be welcome. I’m confused!
harklord says
after trying this. My site is opening blank… Please help.. Av tried deleting the files i created but still blank
WPBeginner Staff says
Make sure that your stored the plugin’s php file in /wp-content/plugins/ folder and not in your theme directory.
Mohammed Amine says
Fixed, actually it is necessary to add that php comment in the php file, or else it wont appear on the admin panel.
That php comment is used to show the discription of the plugin in the admin panel.
Paolo Bergomi says
Hello,
This is Paolo, i am building my website and theme with WP last edition 4.1.1.
i Am trying to learn custom type fields and I found your website very useful. i hav ea issue, though: even if following this post i created the folder my theme plugin and with the related file .php you mentioned here, for the site specific plugin, copy all in localhost using WAMP server. i opened then my dashboard, went to plugins but my new plugin dont appear. what is going on? did i miss anything? thanks
paolo
WPBeginner Staff says
You can try and fit your modifications in site-specific plugin by using filters. However, since you had to edit specific files we doubt that all your edits can be implemented in a site-specific plugin using filters. In that case you should make those changes into a child theme. All your custom CSS should also go into your child theme’s stylesheet. You can also use your site-specific plugin to enqueue a custom stylesheet.
Bas van der Linden says
Hmm, looks like my last post went missing while registering for this annoying disqus plugin.
Anyways:
At first I’d like to thank you for sharing this information.
Secondly I do have several questions regarding this post.
1) Is it possible to also make site specific plugins for other .php’s where I’ve added some codes?
Such as front-page.php post-page.php and post-archives.php
2) Is it possible to do something like this for .css codes?
I run genesis as framework(Parent theme) and a child-theme that I’ve downloaded.
Now since there are no grand-child theme’s in wordpress I’ve made my alterations in the child-theme’s folder
This includes a lot of different .css edits, Is there a way to make site specific .css files/plugins like this, so I can maintain the origional child-theme (and perform an update if any updates are released)?
3) When I create a site-specific plugin to change the footer and activate it, I will see both the origional footer and my own footer on the site.
Is there a way to go around this?
My plugin looks like this:
Once again thank you for sharing this information on site-specific plugins, and I hope to hear soon from you guys.
Chelsey says
Thank you for your patience… I’m still trying to figure out how to ‚create a new folder to plugins directory‘
Rodney Lacambra says
Hi Chelsey. Consider this guide:
Go to „File Manager“. It will take you to „/public_html“ directory. Click on „wp-content >> plugins“ . This is where you will „create“ a folder called „yoursitename-plugin“. After that, create a file using some text editor(notepad++), paste the code given above and save the file as „yoursitename-plugin.php“. Upload it to „yoursitename-plugin“ folder and activate it in your wordpress admin area. Easy as that!
Hope it helps you a lot.
Regards,
NomadTech
Benjamin Mukasa says
This is a great post. I followed the instructions but the plugin is not appearing in my plugin list.
Paolo Bergomi says
me same..where did we make wrong? thanks in advance for any tips to solve this
WPBeginner Staff says
yes you can use it for multiple functions.
WPBeginner Staff says
Your code seems to be correct. Here is what you can do:
Make sure you have saved the plugin file in the /wp-content/plugins/ directory.
Make sure that your plugin file name is correct. We recommend using yoursitename.php format. For example if your domain name is black-circles then your plugin file name should be black-circles.php
SteveMTNO says
I originally had the plugin file (bc-plugin.php) in its own directory called blackcircles/wp-content/plugins/bc-plugins. That didn’t work.
Then I tried moving the bc-plugin.php file from that folder to the blackcircles/wp-content/plugins folder. Still doesn’t show up in my admin panel.
Do I have to „enable“ it first before it shows up or something?
Confused….
WPBeginner Staff says
If the file is correctly placed in your plugins folder then you will see it in your WordPress admin area under Plugins. If you see your plugin there, then you will have to click on the activate link below the file to activate the plugin.
Did you try renaming the file to something else?
SteveMTNO says
Tried renaming it 3 times – none of them show up….
I must be doing something wrong (or not doing something that I should be doing)…
SteveMTNO says
So can I use this one site-specific plugin for multiple functions, or is it best to do something similar to this for each one?
Michael Cuomo says
I’m having a similar issue with mine. I’ve created a site specific plugin to create a custom content type, but the custom content type is not showing up in my admin panel underneath pages like it should.
SteveMTNO says
I posted this yesterday, but it seems to have vanished…
Anyway, I followed the instructions above, but can’t see the site-specific plugin in my admin panel.
Here’s a link to my code:
http://pastebin.com/fbeGr8gh
SteveMTNO says
I followed all of the instructions above, but my plugin doesn’t appear in my admin panel.
Here’s my pastebin link:
http://pastebin.com/fbeGr8gh
Thanks!
SteveMTNO
WPBeginner Staff says
There were spaces in your PHP opening and close tags
is the closing tag there is no space between them. See the corrected version here and compare it with your code. Hope this helps
http://pastebin.com/JJ7WfpUR
UgochukwuEmmanuelAgbams says
i got this message while trying to install it.
The package could not be installed. No valid plugins were found.
WPBeginner Staff says
This usually happens when your plugin’s header is not valid. Please paste your code in pastebin.org and paste the link in a comment.
UgochukwuEmmanuelAgbams says
thank you for your response. here is the link of the code on pastebin http://pastebin.com/vksUVmCa
Rajesh Ghadge says
Very useful aticle it can help any novice in the designing field thanks a million
Joe Librizzi says
This is a fantastic post, thanks! Quick question – could this same method be used to modify an existing plugin, sort of like you can use a child theme to modify existing CSS? I know you can modify a plugin directly, but I’m trying to avoid losing the modifications when the plugin is updated.
WPBeginner Support says
Joe, yes this can be used to modify plugins. Another way to modify plugins safely is by changing their header information. You can use the header shown in the above code as an starting point.
Admin
Correen says
Successful! Thanks for showing me how to get this accomplished.
Chris says
I am new at this and learning as I go but I am confused as in the instructions both the singular and plural version of plugin was used. Am I to create one plugin file to put all snippets into or seperate plugins for each code/snippet/task?
For example – I found this article by gooling for how to create more than one custom post type. Would I put each custom post type into a seperate plugin?
Or could the code for custom post type go into the same plugin file as theme support for post thumbnails as I have it currently in my functions.php?
WPBeginner Support says
The code for all your custom post types can go in one plugin.
Admin
Shemul says
what about custom.css? can we made something like this. it is good to have child theme then.
WPBeginner Support says
A child theme is always recommended but there is a fine line as to how much functionality themes should have and what functionality should fall under plugin domain.
Admin
Sussie T says
Great article. I did this, and it was very easy. But now I am taking this further and made another file to my plugin for the site specific widgets. My first widget.
Have fully created 2 widgets, but only the last one is showing in admin. I guess is something with hooks or register_widget, but i cant crack this one.
Seams like an easy error to solve, if you got the experience. But for a beginner Google is not helping at all.
Resume of my widget file:
widget script
widget script
a function witch registers my 2 widgets
Outside this function is add_action(widgets_init, name of above function)
Please help
paul says
so when i read
Paste this code in your theme’s functions.php file or your site-specific plugin
i just create this site-specific plugin and add code to this rather than my functions.php
Duy Dang says
Thank you so much, it’s very useful!
Junior Godoi says
And what about mu-plugins folder?
Max says
Your site is god sent! I’ve literally been going through each of your tutorials, making a list of all the one’s I’m going to be implementing on my new site I’m developing. Some things you have covered, I would of never even have thought about, but now I am definitely dong them. Thanks for all the information you provide with your blog.
Editorial Staff says
Thanks a lot for the kind words Max. Let us know if you have any questions or suggestions by using our contact form.
Admin
Hamza Aid says
I’m managing a heavy loaded WP portal, and I found many problem when performing modifications because the developer made the same mistake, and put all the code (functions, etc..) in functions.php
Now, I re-designed the portal, and separated many functions to site specific plugins. Thanks for this great post
Mattia Frigeri says
It must be said.
This is a superlative post.
Greg says
I am not sure what it is I am doing wrong. I have done exactly as you have said and I can not get it to show in my WordPress Plugins.
I have FTP’s it in, zipped it and tried to upload it via the admin and activating it (wp actually recognized it, and when I clicked the „Activate“ link …. nada. It is like it was never there and when I FTP’d back in, it wasn’t there either.
So I am trying Brent Logan’s plugin he mentioned (Code Snippets).
Hopefully I’ll have better luck.
I appreciate the article though. Thanks.
(I am not that new to this. I have played with WordPress and Drupal and their plugins quite a bit. I am not sure why it is that I am having so much trouble with it.)
comment would be appreciated — and I will keep reading here as well.
Editorial Staff says
That is actually very weird. Even when you FTP this, the file goes away from the folder?
Admin
Billy Patton says
…I tried to keep this method a secret. hahaha
Brent Logan says
I was doing this until I found the Code Snippets plugin. This plugin makes it easy to add multiple snippets, with a place for easy descriptions, and then activate or deactivate the snippets individually. Quite slick.
b.nijhoff says
I always thought it was really hard but after seeing this I now know I could do it to. Thanks for sharing this, all your articles have been really helpful so far. Keep on the good work!
ericsavina says
What I don’t get is that I keep reading everywhere that I should modify the functions.php instead of adding plugins. It is supposed to make the site faster. So, who should I trust? The idea of having a separate file for a the changes I’m making to the funtions.php file seems very interesting. At least, I would be able to easily update my theme without having to check every time the customs changes I made.
CreativeBoulder says
@ericsavina From what I have been gathering, and I’ve been doing this for a good while, is that the speed and performance using a ton of PHP in your functions.php versus additional plugins that use the same code– I was not able to find much of a difference in speed. Now, anybody correct me if I am wrong and if anybody has different performance comparisons.
At this point, I’m using my functions.php file as I outlined to keep my functions organized along with a few custom plugins that I have designed with multi-site purpose. Hope that all makes sense.
ericsavina says
@CreativeBoulder Thanks for your answer. I will create this plugin and check if there are any differences in loading time.
CreativeBoulder says
@ericsavina Not a problem. Please let me know if you find out some different results than I did? Google Chromes Web Developer Tools have been more than helpful in performance and load-time and same with http://loads.in/.
CreativeBoulder says
I fully understand the reasoning behind this setup. I really like the concept. When WordPress Upgrades, then you might need to upgrade some of your functions instead of having to navigate a possibly unorganized file structure. I was thinking about this about a week ago when working on a client site and did this with my functions.php:
<?php
// Require Administrator Functions/Classes
require_once(„lib/php-classes/wp-admin-functions.php“);
// require Custom WP Plugins (By BusinessName)
require_once(„lib/php-classes/wp-general-functionality.php“);
require_once(„lib/php-classes/wp-register-sidebars.php“);
require_once(„lib/php-classes/wp-register-menus.php“);
require_once(„lib/php-classes/wp-register-customposts.php“);
require_once(„lib/php-classes/wp-load-jslibs.php“);
require_once(„lib/php-classes/wp-breadcrumbs.php“);
require_once(„lib/php-classes/wp-shortcodes.php“);
?>
Which allowed me to basically work on certain aspects and know where certain custom widgets or shortcodes were instead of a huge functions.php file. What do you think? Which method works better for you?
affanruslan says
@CreativeBoulder No, this function.php file is within your theme file, not the core wordpress file
CreativeBoulder says
@affanruslan I fully understand what the concept here is. Thanks for the reply. The goal of creating a Site Specific Plugin is to keep your functions, widgets, short-codes (etc) separate so that they are easier to work with and more organized. My concept of using your Theme Specific functions.php and „modularizing“ it into separate files is just as easy to stay organized. That’s what I was getting at. I appreciated this post. =)
tomdana says
At first I was confused on what this Post was about. Once I read it I realized the usefulness of doing exactly what you suggest. I named my plugin „site-specific-functions“. Thanks for the information and all you do.
tomdana says
At first I was confused on what this Post was about. Once I read it I realized the usefulness of doing exactly what you suggest. I named my plugin „site-specific-functions“. Thanks for the information and all you do.
fergusonsarah says
It’s really great to read such a valuable blog post here, thanks for sharing.