Avete problemi a inviare e-mail dal vostro sito WordPress?
Per impostazione predefinita, WordPress utilizza la funzione mail di PHP per inviare le e-mail, che alcuni server limitano. Un modo semplice per risolvere questo problema è quello di inviare le e-mail di WordPress utilizzando il server SMTP di Gmail.
In questo articolo vi mostreremo come inviare e-mail dal vostro sito WordPress utilizzando il server SMTP di Gmail.
Perché e quando è necessario il server SMTP di Gmail per le e-mail di WordPress
Il vostro sito WordPress invia e-mail per notificare la registrazione di nuovi utenti, la reimpostazione della password persa, gli aggiornamenti automatici e le notifiche dai vostri moduli di contatto.
Per impostazione predefinita, WordPress utilizza la funzione PHP mail per inviare notifiche via e-mail. Tuttavia, questa funzione non funziona come previsto per una serie di motivi.
La maggior parte delle società di hosting WordPress limita l’uso di questa funzione per evitare abusi e spam.
I filtri antispam dei più diffusi fornitori di servizi di posta elettronica controllano le e-mail in arrivo per verificare se sono state inviate da server di posta autentici. I messaggi di posta elettronica predefiniti di WordPress non superano questo controllo e a volte non arrivano nemmeno alla cartella spam.
SMTP (Simple Mail Transfer Protocol) è lo standard industriale per l’invio di e-mail. A differenza della funzione di posta di PHP, SMTP utilizza un’autenticazione adeguata, che aumenta la consegna delle e-mail.
Gmail fornisce un servizio SMTP che potete utilizzare per inviare e-mail dal vostro sito WordPress. Se volete solo inviare e-mail di notifica di WordPress a voi stessi e a pochi utenti del vostro sito, i server SMTP di Gmail sono l’opzione migliore.
Tuttavia, se avete intenzione di inviare e-mail di newsletter utilizzando WordPress o se avete un negozio online, allora dovreste utilizzare un fornitore di servizi di invio di e-mail di massa, come Brevo (ex Sendinblue) o Mailgun.
Servizio SMTP Gmail gratuito o a pagamento per WordPress
È possibile utilizzare l’account Gmail gratuito per inviare le e-mail di WordPress. Tuttavia, per una migliore deliverability, vi consigliamo di utilizzare Google Workspace a pagamento.
Con Google Workspace, si ottiene un indirizzo e-mail professionale con il proprio marchio, ad esempio (name@yoursite.com).
Google Workspace richiede l’aggiunta di record MX al vostro nome di dominio, il che significa che le vostre e-mail sembreranno provenire dal vostro nome di dominio, aumentando l’autenticità e garantendo una migliore deliverability.
Utilizziamo Google Workspace per WPBeginner e possiamo dire onestamente che è il migliore.
Video tutorial
Se preferite le istruzioni scritte, continuate a leggere.
Come inviare e-mail di WordPress utilizzando il server SMTP di Gmail
Se decidete di utilizzare Google Workspace, dovete innanzitutto impostare il vostro dominio per lavorare con Google Apps. Abbiamo un tutorial passo passo su come impostare un indirizzo e-mail professionale con Google Workspace.
Il resto delle istruzioni è identico, sia che si utilizzi un account Gmail a pagamento che uno gratuito.
La prima cosa da fare è installare e attivare il plugin WP Mail SMTP. Per maggiori dettagli, consultate la nostra guida passo passo su come installare un plugin di WordPress.
WP Mail SMTP è il miglior plugin SMTP per WordPress sul mercato. Permette di utilizzare facilmente qualsiasi server SMTP per inviare e-mail WordPress con una maggiore deliverability.
Sebbene esista una versione gratuita, vi consigliamo di acquistare la versione a pagamento, chiamata WP Mail SMTP Pro, che vi dà accesso a un supporto premium, a un maggior numero di mailer e a una configurazione in guanti bianchi da parte di uno dei loro esperti.
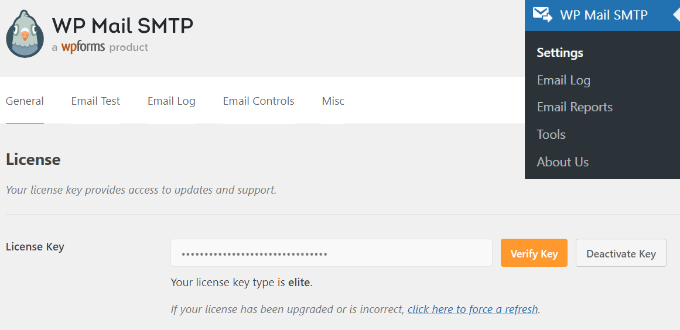
Dopo l’attivazione, è necessario visitare la pagina Impostazioni ” WP Mail SMTP per configurare le impostazioni del plugin. Quindi, inserire la chiave di licenza e fare clic sul pulsante “Verifica chiave”. La chiave si trova nell’area dell’account di WP Mail SMTP.
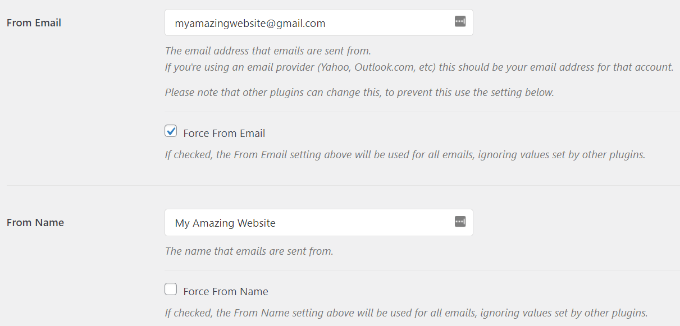
Nella scheda Impostazioni generali, è necessario assicurarsi di utilizzare il proprio indirizzo e-mail Gmail nel campo “Da e-mail”.
Successivamente, è necessario fornire il nome del mittente.
Il plugin WP Mail SMTP offre due modi per collegare il vostro sito WordPress ai server Gmail.
Il primo metodo utilizza l’autenticazione OAuth. Si tratta di un metodo più sicuro per inviare e-mail utilizzando i server Gmail.
Il secondo metodo consiste nell’inserire manualmente le impostazioni SMTP di Gmail. Questo metodo non è consigliato perché è meno sicuro.
Detto questo, impostiamo WordPress in modo che utilizzi Gmail SMTP per inviare le e-mail.
Metodo 1: Impostazione di Gmail per l’invio di e-mail di WordPress utilizzando il protocollo OAuth
Questo metodo è consigliato a tutti gli utenti. È più sicuro e, una volta impostato, non sarà più necessario farlo.
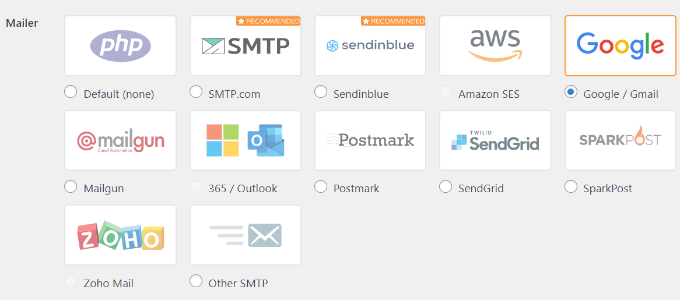
È necessario iniziare selezionando “Google/Gmail” come mailer.
Successivamente, si vedranno tre campi da riempire quando si scorre verso il basso.
È sufficiente inserire l’ID cliente, il Segreto cliente e l’URI di reindirizzamento autorizzato.
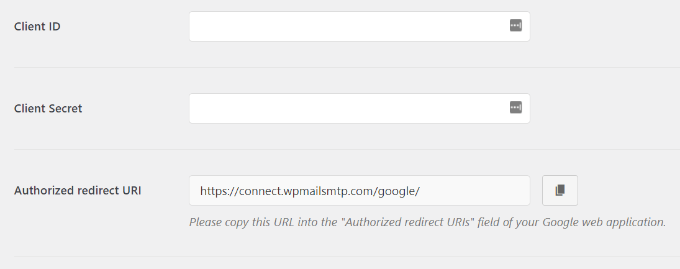
Impostiamo questi campi.
Creazione di un’app e generazione di chiavi API per Gmail
Per iniziare, basta visitare il sito web di Google Cloud Platform.
Quindi fare clic su “Il mio primo progetto” in alto.
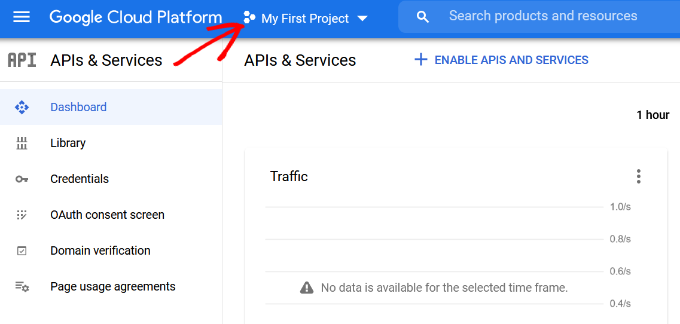
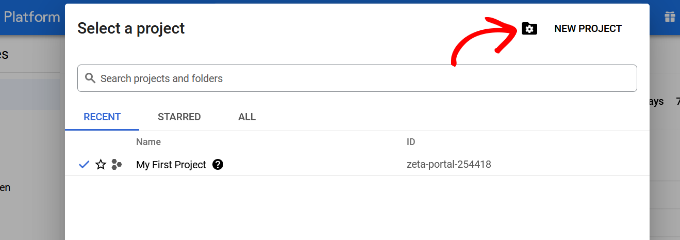
Si aprirà una piccola finestra a comparsa in cui è possibile selezionare i progetti.
Fare clic sull’opzione “Nuovo progetto”.
Nella schermata successiva, vi verrà chiesto di fornire un nome al vostro progetto.
Dategli un nome memorabile, in modo da poterlo riconoscere facilmente in futuro.
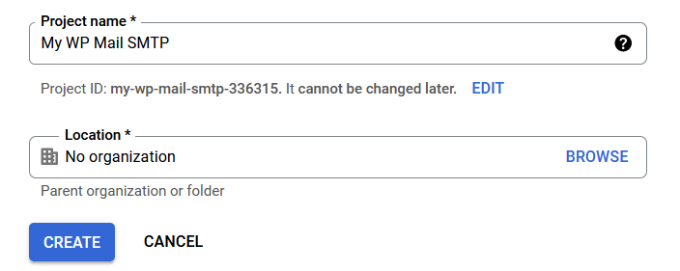
Quindi, fare clic sul pulsante “Crea” per continuare.
La console per gli sviluppatori creerà ora il vostro progetto e vi porterà alla sua dashboard. Google offre agli sviluppatori l’accesso a molte delle sue API e servizi. È necessario abilitare le API di cui si ha bisogno per questo progetto.
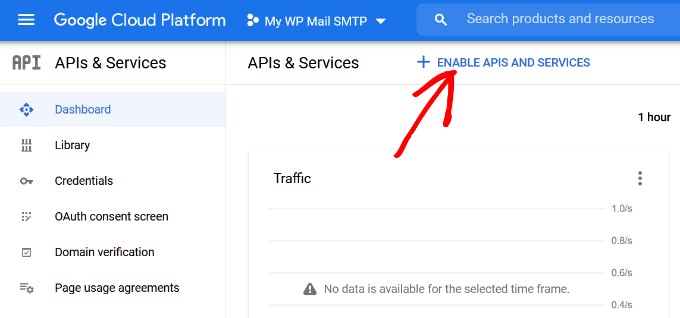
Fare clic sul pulsante “Abilita API e servizi” per continuare.
Si accede così alla pagina della libreria delle API. Quindi, è necessario digitare Gmail nella casella di ricerca per trovare rapidamente l’API Gmail e fare clic per selezionarla.

Ora viene presentata una panoramica dell’API e delle sue funzioni.
È sufficiente fare clic sul pulsante “Abilita” per continuare.
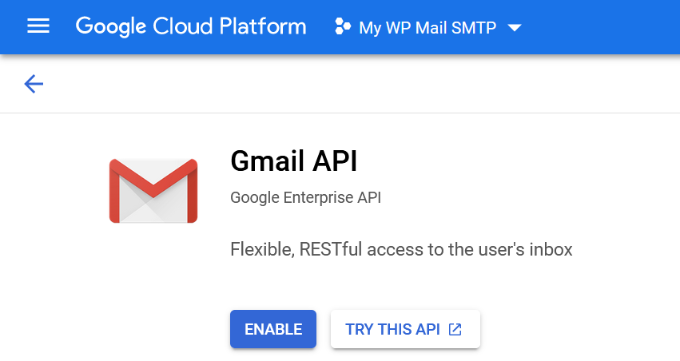
Ora che l’API è abilitata, il passo successivo è creare le credenziali da utilizzare nelle impostazioni del plugin WP Mail SMTP.
Fare clic sul pulsante “+ Crea credenziali” per continuare e selezionare l’opzione “Aiutami a scegliere” dal menu a discesa.
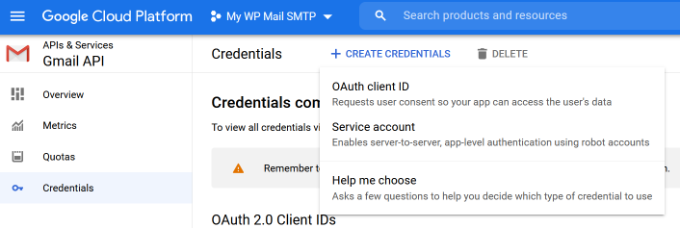
Nella schermata successiva, vi verrà chiesto quale API volete usare.
Selezionare “Gmail API” dal menu a discesa per Quale API si sta utilizzando.
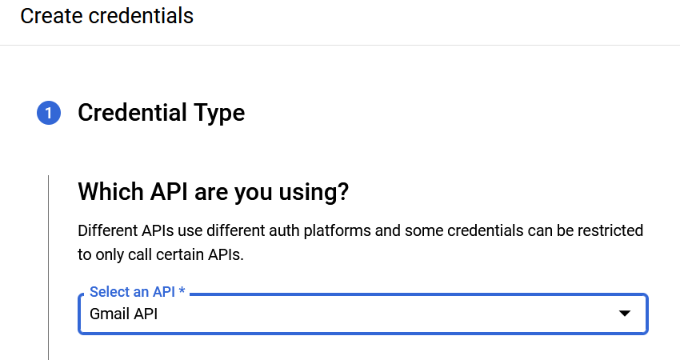
Quindi, scegliere “Dati utente” per i dati a cui si intende accedere.
A questo punto, fare clic sul pulsante “Avanti”.
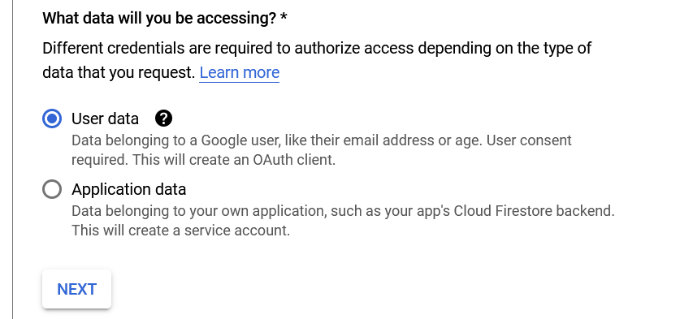
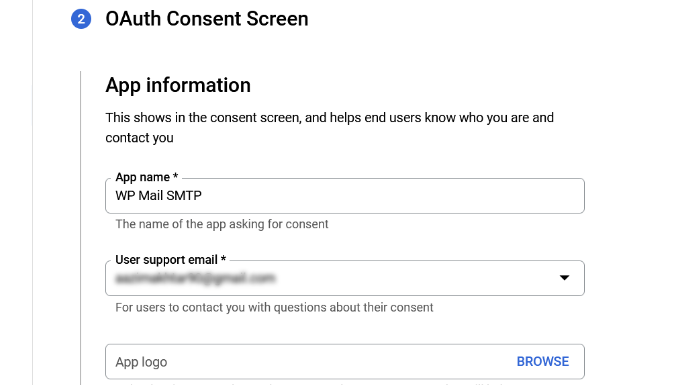
A questo punto, dovrete inserire le informazioni della vostra App.
Si può iniziare dando un nome alla propria app, selezionando l’indirizzo e-mail fornito e aggiungendo un logo dell’app, se lo si desidera.
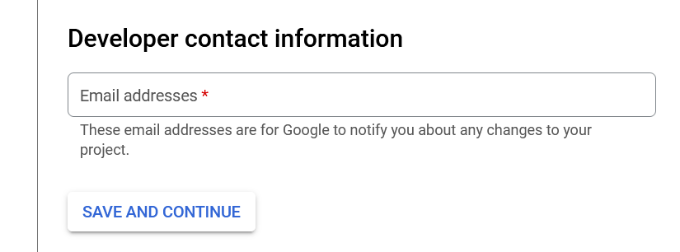
Da qui, è necessario scorrere verso il basso e inserire le informazioni di contatto dello sviluppatore.
Una volta inserito l’indirizzo e-mail, è sufficiente fare clic sul pulsante “Salva e continua”.
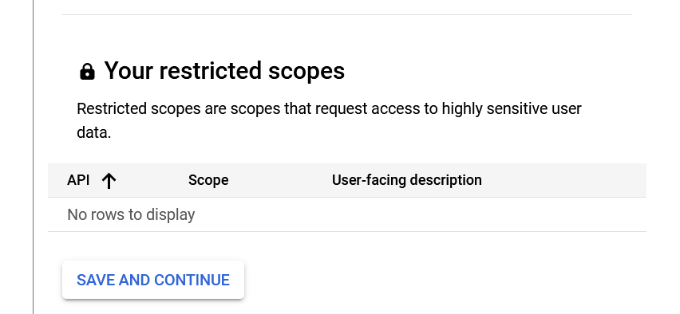
Nella schermata successiva, è possibile configurare gli ‘Scopes’ per Gmail API. Si tratta di un passaggio facoltativo, che per ora si può saltare.
È sufficiente scorrere fino alla fine della pagina e fare clic sul pulsante “Salva e continua”.
Quindi, procedere con l’inserimento dei dettagli per l’ID cliente OAuth.
Iniziate scegliendo “Applicazione web” come tipo di applicazione dal menu a discesa e poi inserite un nome.
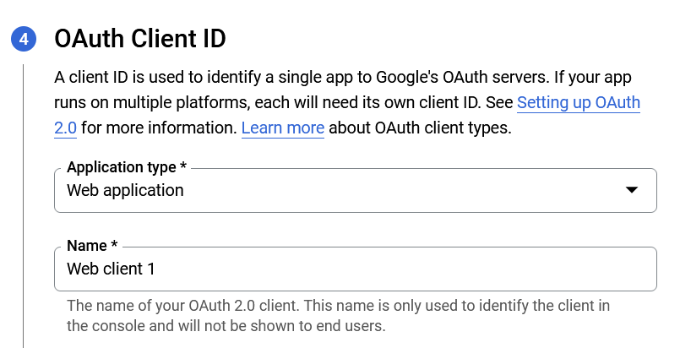
Scorrendo verso il basso, si vedranno le opzioni relative alle Origini JavaScript autorizzate. È possibile ignorare questa opzione e passare agli URL di reindirizzamento autorizzati.
Fare clic sul pulsante “+ Aggiungi URL” sotto URL di reindirizzamento autorizzati e inserire https://connect.wpmailsmtp.com/google/ nel campo URL.
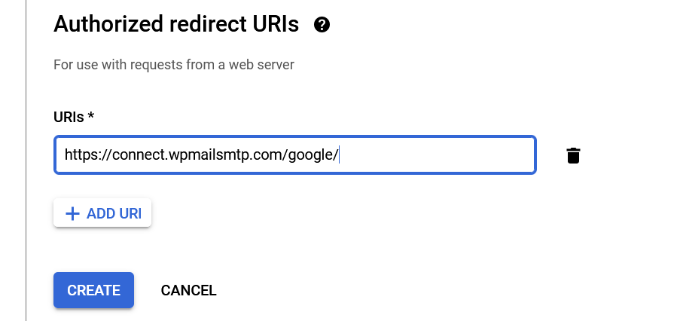
Una volta inserito l’URL, è sufficiente fare clic sul pulsante “Crea”.
Successivamente, vedrete le vostre credenziali nell’area Le vostre credenziali.
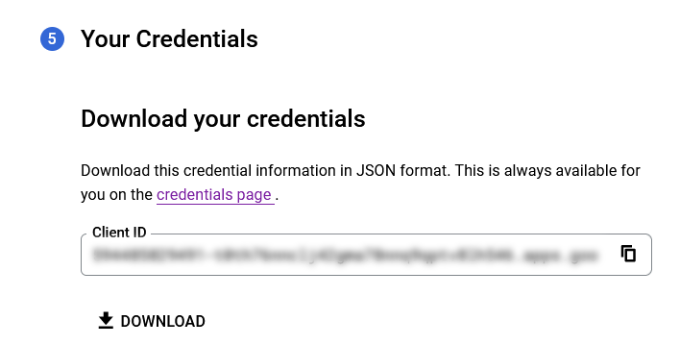
Fare clic sul pulsante Fatto in basso per andare avanti.
A questo punto si accede alla pagina delle credenziali del progetto. In questa pagina sono elencate le credenziali create di recente. Per continuare, è necessario fare clic sull’icona di modifica accanto alle credenziali.
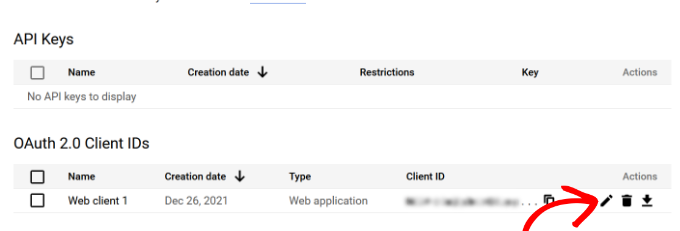
In questo modo si accede alla pagina di modifica delle credenziali, dove è possibile vedere il segreto del cliente e l’ID del cliente.
È necessario copiare e incollare la chiave nella pagina delle impostazioni del plugin.
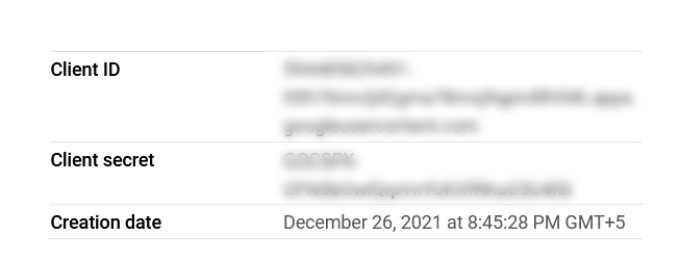
Tornate alla pagina delle impostazioni del plugin nell’area di amministrazione di WordPress.
Ora che si dispone dell’ID cliente e delle chiavi segrete del cliente, è necessario fare clic sul pulsante “Salva impostazioni” per continuare.
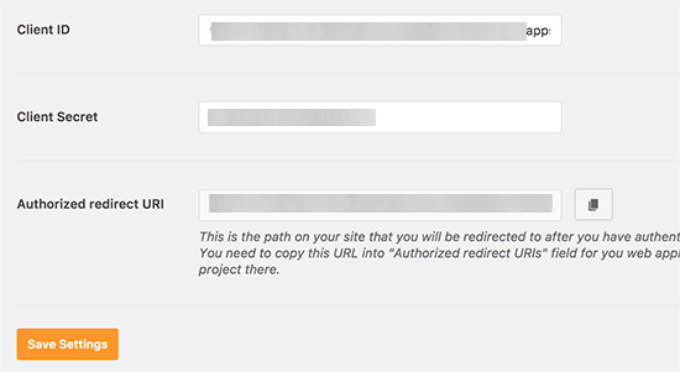
Il plugin memorizzerà le impostazioni e ricaricherà la pagina.
Successivamente, è necessario scorrere fino alla fine della pagina delle impostazioni e fare clic sul pulsante “Consenti al plugin di inviare e-mail utilizzando il tuo account Google”.
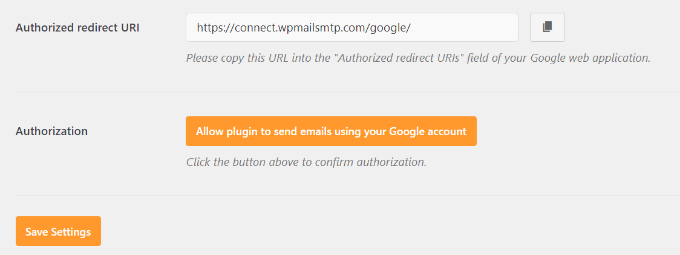
In questo modo si accede al proprio account su Google.
Poi vi verrà chiesto di autorizzare il sito web a inviare e-mail per vostro conto.
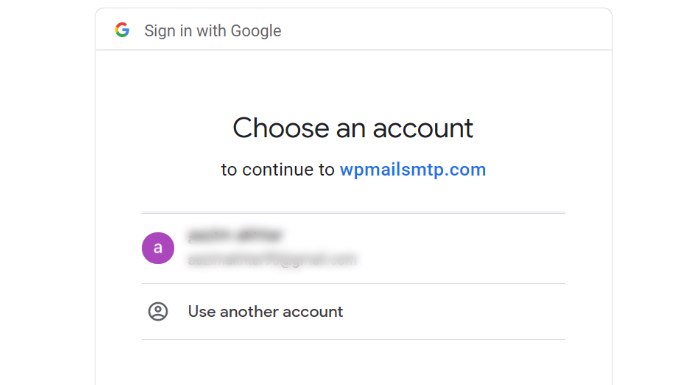
È sufficiente selezionare l’account Gmail e dare l’autorizzazione a collegare il progetto Google API.
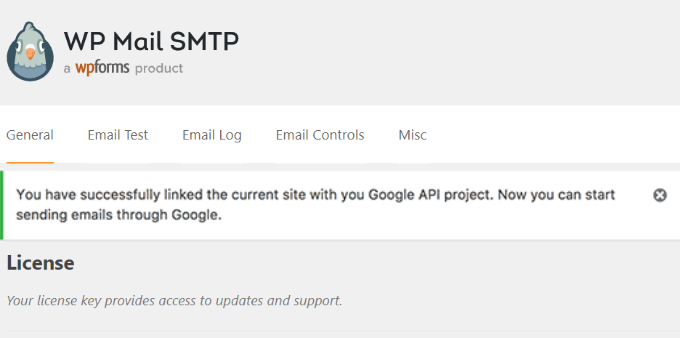
Successivamente, si verrà reindirizzati al proprio sito web, dove verrà visualizzato un messaggio di successo.
Metodo 2: Impostazione di Gmail SMTP come mittente SMTP
Questo metodo consente di collegarsi manualmente ai server SMTP di Gmail per inviare le e-mail di WordPress.
Per prima cosa, è necessario visitare la pagina Impostazioni ” WP Mail SMTP per configurare le impostazioni del plugin.
Iniziate fornendo l’indirizzo Gmail che desiderate utilizzare nel campo “Da e-mail” e il vostro nome nel campo “Da nome”.

Successivamente, è necessario selezionare “Altro SMTP” come mailer.
Selezionate anche la casella accanto al percorso di ritorno.
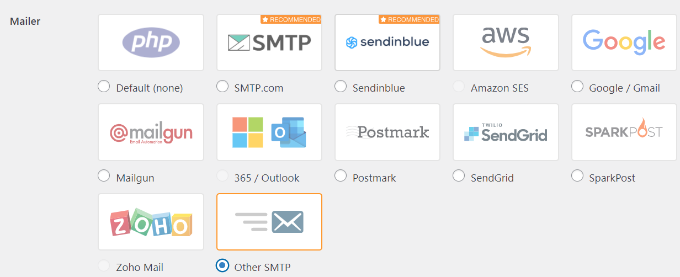
Successivamente, scorrere verso il basso fino alla sezione Altri SMTP.
Qui si configureranno altre impostazioni per connettersi ai server SMTP di Gmail.
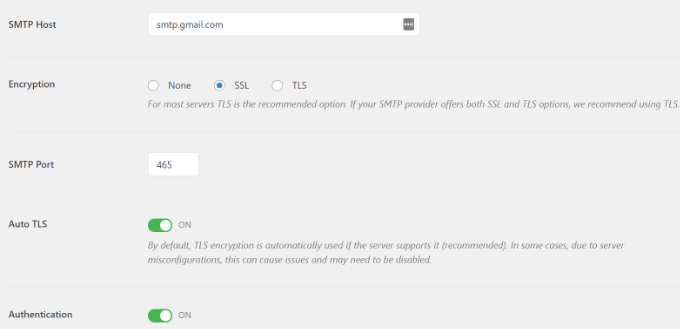
Ecco la configurazione esatta da aggiungere alle impostazioni del plugin:
- Host SMTP: smtp.gmail.com
- Crittografia: Utilizzare la crittografia SSL
- Porta SMTP: 465 (dovrebbe apparire automaticamente quando si seleziona la crittografia SSL)
- Auto TLS: Disattiva TLS
- Autenticazione: Attivare l’autenticazione
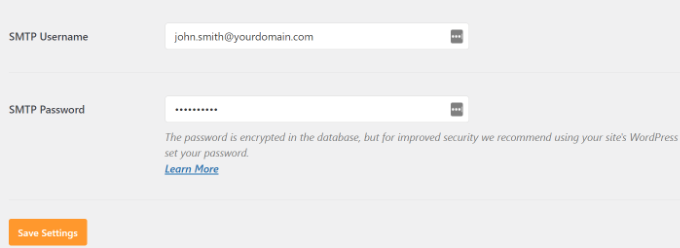
- Nome utente SMTP: l’indirizzo Gmail completo, ad esempio john.smith@yourdomain.com o john.smith@gmail.com.
- Password SMTP: password dell’account Gmail.
Al termine, fare clic sul pulsante Salva modifiche per memorizzare le impostazioni.
Questo è tutto; avete impostato con successo WP Mail SMTP per utilizzare i server SMTP di Gmail.
Nota: se utilizzate il metodo 2, sappiate che è meno sicuro perché la password viene memorizzata in testo. È possibile migliorare la sicurezza utilizzando il suggerimento costante, ma si consiglia vivamente di utilizzare il metodo 1.
Verifica delle impostazioni SMTP di WP Mail
Il plugin WP Mail SMTP consente di testare le impostazioni della posta elettronica per assicurarsi che tutto funzioni correttamente.
È necessario visitare la pagina Impostazioni ” WP Mail SMTP e fare clic sulla scheda ‘Test e-mail’. È sufficiente indicare un indirizzo e-mail accessibile nel campo ‘Invia a’ e cliccare sul pulsante Invia e-mail.
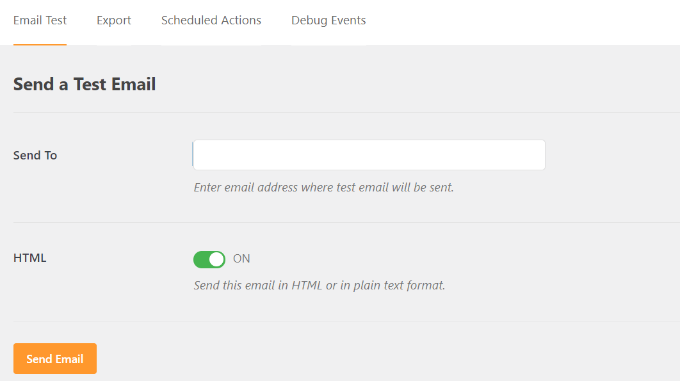
Verrà visualizzato un messaggio di successo. Ora è possibile controllare la posta in arrivo per vedere un messaggio con l’oggetto “WP Mail SMTP: Test Email to…”.
Questo è tutto; avete impostato con successo il vostro sito WordPress per inviare e-mail utilizzando i server SMTP di Gmail.
Ottenere di più con WP Mail SMTP Pro
Se volete ancora più funzionalità, dovreste provare WP Mail SMTP Pro.
Con la versione Pro del plugin, è possibile connettersi con:
- Spazio di lavoro/Gmail di Google
- Amazon SES
- Pistola postale
- Office 365 / Outlook.com
- InviaGrid
- E altro ancora
Inoltre, avrete a disposizione funzioni aggiuntive come i registri delle e-mail, la possibilità di regolare/controllare le notifiche inviate dal vostro sito WordPress e altro ancora.
Risoluzione dei problemi di Gmail SMTP non funzionante
Abbiamo riscontrato alcuni problemi nell’utilizzo di Gmail SMTP con alcune configurazioni di hosting condiviso.
Procedete come segue per risolvere il problema SMTP di Gmail:
Accedere al proprio account cPanel. Quindi, trovare il pulsante “+ Crea” nella pagina degli account e-mail.

Da qui, è possibile creare un account di posta elettronica che corrisponda all’indirizzo e-mail di Google Apps.
Creando l’account di posta elettronica, si rende noto al server di hosting un indirizzo di posta elettronica che dovrebbe inviare le e-mail. Questo passaggio è un workaround per convincere il server che si stanno inviando e-mail attraverso di esso, anche se si intende utilizzare il server SMTP di Gmail.
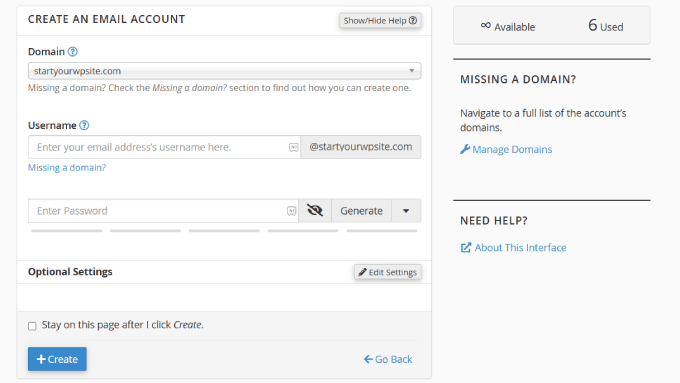
Questo potrebbe sembrare strano perché non si utilizza il server per le e-mail. In pratica, questo passaggio fa credere al server che si stia inviando l’e-mail attraverso il server.
Nel vostro account cPanel, andate nei record MX e cambiate il routing MX da automatico a remoto. Potrebbe essere un po’ difficile da trovare, dato che ogni host ha un’interfaccia cPanel personalizzata.
Dovete cercare un piccolo link accanto a MX che dice Email Routing: Mail Exchanger remoto. Potete seguire la nostra guida su come modificare i record MX per il vostro sito WordPress in base al vostro servizio di hosting.
Dopodiché, accedete nuovamente al vostro sito WordPress e inviate un’e-mail di prova.
Speriamo che questo articolo vi abbia aiutato a capire come inviare e-mail in WordPress utilizzando il server SMTP di Gmail. Potreste anche voler consultare il nostro elenco dei migliori plugin di moduli di contatto per WordPress e il nostro confronto dei migliori servizi di email marketing per le piccole imprese.
Se questo articolo vi è piaciuto, iscrivetevi al nostro canale YouTube per le esercitazioni video su WordPress. Potete trovarci anche su Twitter e Facebook.


Syed Balkhi says
Hey WPBeginner readers,
Did you know you can win exciting prizes by commenting on WPBeginner?
Every month, our top blog commenters will win HUGE rewards, including premium WordPress plugin licenses and cash prizes.
You can get more details about the contest from here.
Start sharing your thoughts below to stand a chance to win!
Jiří Vaněk says
Amazing guide. Thanks. Setting up Gmail SMTP always gives me a headache because it takes so long. It’s incomparable to the traditional SMTP setup for a private domain email, where you enter the SMTP server, login, password, and port, and it’s done. Thanks a lot.
WPBeginner Support says
You’re welcome, glad our guide was helpful
Admin
Mallory Moore says
After completing all the steps it re-directed me to my WordPress site but it went to a page that said not found to there was no success msg so I can’t test as it still says unauthorized.
WPBeginner Support says
For that specific error message, you would want to take a look at our article below:
https://www.wpbeginner.com/wp-tutorials/how-to-fix-the-401-error-in-wordpress-solutions/
Admin
Vaskar says
I want to send newsletters/mail to my website subscribers. I want to send mail to my website subscribers from my gsuite business mail address. Can you suggest to me that what I have to do now?
WPBeginner Support says
For creating a newsletter, we would recommend taking a look at our article below:
https://www.wpbeginner.com/beginners-guide/how-to-create-an-email-newsletter/
Admin
AJ says
This was a tremendous help! Thank you so much!
WPBeginner Support says
Glad you found our content helpful
Admin
Lennon says
Can we use a forwarding email address to set this up or do we have to have a Gmail account?
WPBeginner Support says
For other methods, you would want to take a look at our other article below:
https://www.wpbeginner.com/plugins/how-to-set-up-wp-mail-smtp-with-any-host-ultimate-guide/
Admin
Peter says
Hi
When setting up Oauth consent screen, Internal and External options are present. Only external option is available to Gmail users. Is this the correct one to choose?
Thanks!
WPBeginner Support says
It sounds like that would be correct, for questions about the plugin we would recommend reaching out to the plugin’s support for assistance
Admin
Gordon Barker says
No where can I find where to set the email “to field” please could you explain how to set this field?
WPBeginner Support says
You would want to check with the settings for your form plugin for setting the to location
Admin
Jairo Paredes says
Excellent!!!!
Thanks a lot….
WPBeginner Support says
You’re welcome
Admin
Ruxandra says
Awesome! Thanks!
WPBeginner Support says
You’re welcome
Admin
Vivek says
Hi,
My emails are automatically deleting, i’ve not set any filters or any other things. What might be the issue?
WPBeginner Support says
You would want to reach out to who you are using for your emails to ensure there isn’t an issue on thier end.
Admin
Vijay says
OAuth Consent Screen is mandatory during this process.
Anyway, your explanation is best.
Thanks.
WPBeginner Support says
Glad our guide could be helpful
Admin
Dalton says
I followed the steps to set up the email and it works, but how do I send emails to my email list now?
WPBeginner Support says
If you’re attempting to create a newsletter then we would recommend going through our guide here:
https://www.wpbeginner.com/beginners-guide/how-to-create-an-email-newsletter/
Admin
Dusan says
With this I get the 2000 limit in a 24 hour period as it uses only 1 email address. Is there a way to use this as the smtp relay that allows 10,000 emails to send per 24 hour period. Or any way to add in multiple emails to send from?
WPBeginner Support says
We do not have a recommended method to remove that limitation. For sending that many emails we would recommend looking at email marketing services such as the ones from our article here: https://www.wpbeginner.com/showcase/best-email-marketing-services/
Admin
Nauval says
Is it still usefull in 2020?
WPBeginner Support says
Yes
Admin
Dan Martin says
I just used this for my site and it worked. Seriously this was a life saver. I had spent several hours troubleshooting and the video solved the whole problem in like 5 minutes. Thanks.
WPBeginner Support says
Glad our guide could help
Admin
Luigi says
How can I send emails configured with WP MAIL SMTP (I use gmail) customized with the site’s domain? I need to differentiate emails depending on the type of email my site sends.
WPBeginner Support says
It would depend on what plugin/tools you are using to send the emails as WP Mail SMTP is for changing how WordPress sends the emails not for users sending emails.
Admin
Austin Blair says
Just wanted to say THANK YOU! I was totally struggling to get my contact form to send emails correctly until I came across your post. I used the first method and it worked like a charm. However there was a step (probably recently introduced) where I had to set up a consent form? Took me to a different screen not featured in the video, but was relatively straight forward. Thanks again!
WPBeginner Support says
Thank you for letting us know and glad our article could help
Admin
Bobby Zopfan says
First method (configuring inside GCloud) seemed too long to me.
So adapted the 2nd method (don’t agree with you that 2nd method is more difficult). 2nd method has just 3-4 steps.
But it didn’t work. SMTP couldn’t authenticate me. Although my ID/pW is fully correct.
WPBeginner Support says
If you reach out to the plugin’s support with your specifics they should be able to help you find the problem
Admin
Daniel says
Thanks again for the awesome tutorial, the forms work fine now! I have a question: I’d like to change the From Name in the plugin settings, but it’s impossible. I’ve tried to reintstall the plugin, all my settings were still saved tho. Is there any way I could change the From Name of the email now?
WPBeginner Support says
You would want to reach out to the plugin’s support for how to set that up but for the moment, if you set it to the default method it should allow you to change those settings.
Admin
Afam says
Hello there,
I’m really tired with this issue of CF7 not able to send mails to gmail from my site. It seems everyone has this issue.
I followed your instructions to the letter and got to the point I’m supposed to allow plugin to send emails using my google account, an error appears telling me of a URI mismatch. What’s that? I copied and pasted the uri as you said. What did I do wrong. Please help me, have not been sleeping because of this.
Thanks.
WPBeginner Support says
Hi Afam,
You may not have saved the redirect URI when creating the app, follow the steps again and make sure that you copy the exact URL from plugin’s settings page to enter in your app.
Admin
Sarah says
Hello,
I have followed the instructions you provided, than you! I got all the way to the “allow plugin to send emails….” for gmail and when i click on that button it gives me the message that the app hasn’t been verified.
I have tried multiple fixes but it is still isn’t working.
I am using bluehost and WP mail stmp.
Any suggestions?
Thank you
Jorge Zamudio says
your really save my day man !! hope you are doing well. Thank you
Raphael says
Don’t work for me. I’m using Google Cloud and Cloudflare and when i try to send a test email give me a error:
“Could not authenticate your SMTP account.”
WPBeginner Support says
Hi Raphael,
Check your mailer settings, SMTP information, username and password.
Admin
Mohd Tariq Khan says
My client use g suite for email, I have created WordPress page website with contact form 7 plugin. I have analyzed contact form was not sending email from website to Gmail.
Therefore, I have used ‘WP Mail SMTP’ plugin and create gmail API, Now email is working.
But I am facing one issue, when submit contact us form email receive in gmail but all email recived from title is ‘me’.
Therefore, every time show like I have to send email to myself.
I want in email ‘Sender name’ appear at from.
Please help me.
WPBeginner Support says
Hi Mohd Tariq Khan,
This could happen if you are sending and receiving email on the same address.
For example, if you are using john.smith@example.com in WP Mail SMTP and sending contact form messages to john.smith@example.com then Gmail would show sender name as ‘me’.
Hope this helped.
Admin
jood says
i think the key is create a same name account in bluehost within email , so as to trick host , the problem is the email will be taken as spam .
raja says
hi.. i have tried to send mail using wp-mail-smtp on wordpress BY gmail as per tutorial..
when i try to OAUTH 2 in gmail on wordpress,, it shows error.
—————————
Not Acceptable!
An appropriate representation of the requested resource could not be found on this server. This error was generated by Mod_Security.
—————————–
i have contacted hosting hostgator support.. Mod_security settings cant be whitelisted, as it may will leave the website vulnerable.
please advise how to send mails
Angela Andrieux says
Thank you for the thorough instructions! This site has saved me so many times. I really appreciate the great content!
Sushant says
Great Article, this worked for me, thanks a ton guys!
mostafa says
thanks a lot for this tutorial . i have this problem for an week and the issue has solved with this tutorial.
Leonardo Assennato says
Hello,
I setup an email address to send the emails and it worked.
But I need to change the email account.
I already tried the Method 2, but it doesn’t work on my server.
I already unnistalled and re-install the plugin but all the data are stored.
Can anybody help me?
Linda says
Thanks so much. This was a huge help!
Pankaj Chauhan says
Thank you so much! This was so helpful for me.
Imrana says
thankyou for this amazing tutorial
Ahmad fatah says
is this tutor works with free gmail account?
thanks for great tutorial you make..
i search anything about wp and your site in top of google..just wow
Kevin says
I just went through this and got the following message after trying to send a test email:
Connection: opening to smtp.gmail.com:587, timeout=300, options=array ()
Connection: Failed to connect to server. Error number 2. “Error notice: stream_socket_client(): unable to connect to smtp.gmail.com:587 (Network is unreachable)
SMTP ERROR: Failed to connect to server: Network is unreachable (101)
SMTP connect() failed.
Pawan Negi says
Hi please help me when i click on grant permission button it show me that error.
400. That’s an error.
Error: invalid_scope
You don’t have permission to access some scopes. Your project is trying to access scopes that need to go through the verification process. {invalid = [https://mail.google.com/]} If you need to use one of these scopes, submit a verification request.
Learn more
Request Details
client_id=940707600009-5f3lstctsc081s72c27h4hhmf5212a7p.apps.googleusercontent.com
That’s all we know.
Amanda says
I got . . .
Fatal error: Cannot redeclare class phpmailerException in /home/content/04/11965204/html/sofp/wp-includes/class-phpmailer.php on line 4040
I can’t seem to get this fixed no matter what solve I try. There doesn’t appear to be a contact form in our future
Google Search didn’t help with this error code. I can’t imagine that I’m the first one to get it . . .
Laura Hart says
I loved how helpful this was, unfortunately I still can’t make the “grant access” button appear! Any idea why that would happen? Googling isn’t working.
Thank you!
David says
Hi, I used this tutorial last year to install and configure the Gmail SMTP plugin. Until very recently, the Gmail SMTP plugin in conjunction with my website’s contact form worked perfectly. But I tested my website’s contact form today, and I got the following fatal-error message:
Fatal error: Uncaught exception ‘Google_Auth_Exception’ with message ‘Error refreshing the OAuth2 token, message: ‘{ “error” : “invalid_grant” }”
I don’t have a clue what that means. I get the same fatal-error message when I use the plugin to send a test message at Gmail SMTP plugin>Settings>Test email.
I haven’t changed any of the plugin settings since I first installed it a year ago, and I haven’t done anything new with my Google Console account either. I’m using the most recent version of the Gmail SMTP plugin, and also the newest version of WordPress.
Any ideas or suggestions?
Thanks!
WPBeginner Support says
Hey David,
It seems like your Oauth2 token has expired. Try following the tutorial again from the beginning to set it up again.
Admin
Ehsan says
Thank U very much – one of my problem was this “my emails goes to spam folder”
with this service(Method 1) Now It’s great – of course after 14 days you must pay for that but still it’s prefect
I have question;
Can I send 100 Emails like newsletter for my customer is it OK for Google!?
I afraid my Emails after it goes to spam folder again
Sharon says
I did everything as described, but the contact form on my website still does not work.
Adondriel says
Hey, add a thing at the end for the troubleshooting thing: “Check with your website host and verify that they do not block outgoing requests by default.” I know 1. GoDaddy does this, and won’t let you unblock. and 2. Namecheap also blocks by default but you just gotta contact support, give em your info and ask em to unblock port 587 and boom, it’ll all work again.
Lucas says
You save my life!
Tks!
adam says
i keep getting a Error: redirect_uri_mismatch when i press ‘grant permission’. It’s driving me nuts as I can’t work out what is wrong? Everything seems to match.
Adam
Grzegorz says
Same here. i get redirect_uri_mismatch
Macky says
This video has been a fantastic help.
I’m a complete WordPress beginner.The step-by step instructions are very easy to follow. Now my emails are working perfectly!! Plus I also learnt how to insert headers & footers with ease.
Thanks once again!!
WPBeginner Support says
Hi Macky,
We are glad you found the video helpful. You may also want to subscribe to our YouTube Channel for WordPress video tutorials.
Admin
Fabio says
Your tutorial saved my site! Thank you very much mate!
Maggie Z says
A follow-up question – because of the login conflict issue, I was also considering using WP Mail SMTP. However, many users on the support forum for that plugin express concern that the password for the email account is visible on the admin page in plain text.
I have a firewall set up that prevents non-admins from getting in to the back end, so is there any real security concern regarding the password showing in plain text? Any advice much appreciated!!!
Maggie Z says
After troubleshooting quite a bit, I finally relented and went with WP Mail SMTP, which requires the “allow less secure apps” solution – a tech support person at G Suite told me that it was safe, and it seems like the only way to go for my particular setup. Appears to be working now. Thanks for the incredibly clear instructions!!! I am now a firm fan of this site.
Maggie Zellner says
The video is fantastic, and the plugin installed perfectly. Unfortunately I didn’t realize until after I went through the whole process (because I didn’t read the documentation on the plugin carefully), the Gmail SMTP plugin eliminates the need for users to log in, and therefore it interfered with the login process that we have instituted for paid members on our website (which we manage through a plugin called PaidMembershipsPro).
Is there any way to disable that aspect of this plugin, so I can send all email via our Gmail account, but can still have users log in and out?
Eric says
Great article! However, I am unclear on something when using WordPress for sending newsletters. What is the difference between those mass emailing service providers (mailgun & Sendgrid) and using Google Apps for work SMTP?
Can’t we use Google Apps for work to send newsletters just as well?
WPBeginner Support says
with Google Apps for Work, you can only send an email to 500 recipients max (for paid business accounts). You cannot use it for newsletters.
Admin
Eric says
Thanks so much for your response! With Google Apps for Work only limiting to 500 recipients, then I suppose it would work if we sent it to 500 or less people.
My next question, is it max to send all at one time or per day? If we throttle it to only send out a few per minute, do you know if it would allow it to send thousands within a few hours?
Heather says
Thank you so much! This was so helpful!