Möchten Sie eine Staging-Site für WordPress erstellen, sind aber nicht sicher, wo Sie anfangen sollen?
Eine WordPress-Staging-Site ist eine Test-Site, auf der Sie „sicher“ Plugin-Updates und andere Änderungen vornehmen können, bevor Sie live gehen.
In dieser Schritt-für-Schritt-Anleitung zeigen wir Ihnen, wie Sie ganz einfach eine Staging-Umgebung für Ihre WordPress-Website erstellen können. Wir werden verschiedene Methoden vorstellen, von denen die meisten nur ein paar Klicks erfordern.
Was ist ein Schauplatz?
Eine Staging-Site ist ein Klon Ihrer Live-Website, der dazu dient, Änderungen zu testen, bevor sie live geschaltet werden. Staging-Sites helfen Ihnen, Fehler zu finden, damit Sie Ihre Live-Website nicht zerstören.
In der Vergangenheit war es sehr schwierig, eine WordPress-Staging-Site einzurichten, aber jetzt hat sich das geändert, so dass sogar eine nicht-technische Person es tun kann.
Viele Benutzer installieren WordPress lokal auf ihrem Windows- oder Mac-Computer, um Änderungen zu testen. Sobald sie mit den Aktualisierungen fertig sind, laden sie diese Änderungen einfach von localhost auf den Live-Server hoch.
Das größte Problem bei diesem Ansatz ist, was passiert, wenn etwas, das auf Ihrem Localhost funktioniert hat, auf dem Live-Server nicht funktioniert.
Oft laufen die lokalen Websites und die Live-WordPress-Hosting-Server nicht in derselben Umgebung.
Da die Staging-Site auf Ihrem Webhosting-Server läuft, können Sie all diese Fehler leicht vermeiden, da sie mit der gleichen Serverkonfiguration wie Ihre Live-Site läuft.
Werfen wir also einen Blick darauf, wie man eine Staging-Site für WordPress einrichtet.
Einfache Erstellung einer WordPress-Staging-Site
Es gibt mehrere Möglichkeiten, eine Staging-Site für WordPress zu erstellen. Am einfachsten ist es, die integrierte Staging-Site-Funktion Ihres Hosting-Anbieters zu nutzen.
Einige der besten WordPress-Hosting-Unternehmen bieten bereits 1-Klick-Staging-Websites an. Wenn Ihre Website bei einem von ihnen gehostet wird, können Sie problemlos eine Staging-Website erstellen.
Wenn Sie keine dieser beliebten Hosting-Lösungen nutzen, haben wir auch eine Lösung, mit der Sie eine WordPress-Staging-Site mithilfe eines Plugins (und sogar manuell) erstellen können.
Für ein schnelleres Blättern können Sie die Navigation unten verwenden, um zu dem Abschnitt zu springen, der für Sie am wichtigsten ist:
Erstellen einer Staging-Site bei Bluehost
Bluehost ist einer der besten WordPress-Hosting-Anbieter. Sie bieten eine schnelle 1-Klick-Staging-Site-Lösung mit all ihren Plänen.
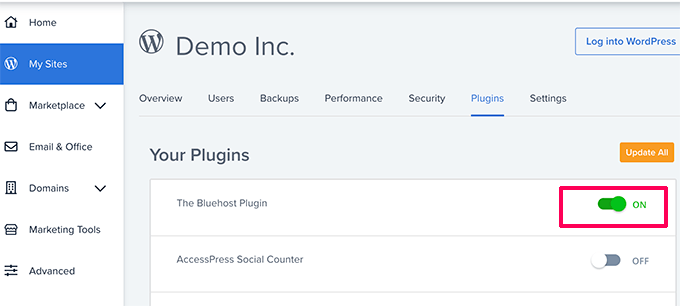
Zunächst müssen Sie Ihr Bluehost-Dashboard aufrufen und den Abschnitt „Meine Websites“ besuchen.
Wechseln Sie dann zur Registerkarte „Plugins“ und schalten Sie den Schalter neben der Option „Bluehost Plugin“ um.
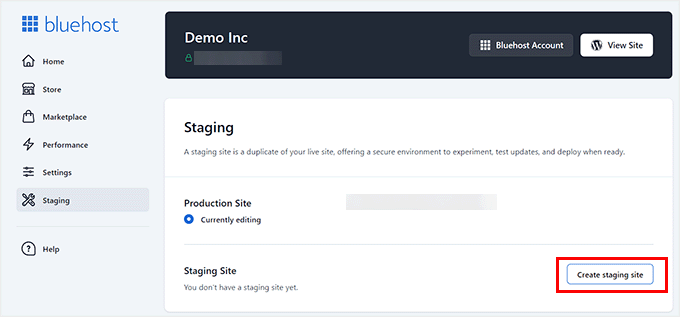
Gehen Sie danach auf das Dashboard Ihrer WordPress-Website und besuchen Sie die Seite Bluehost “ Staging.
Klicken Sie nun auf die Schaltfläche „Staging-Site erstellen“.
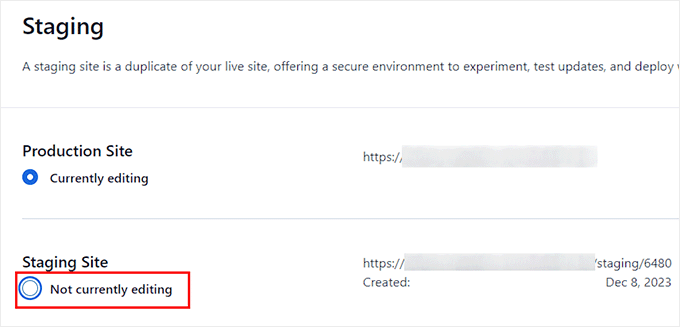
Bluehost wird nun die Staging-Umgebung für Ihre Website vorbereiten.
Sobald dies geschehen ist, wird ein Abschnitt ‚Staging Site‘ angezeigt, in dem Sie das Kästchen ‚Not currently editing‘ markieren müssen.
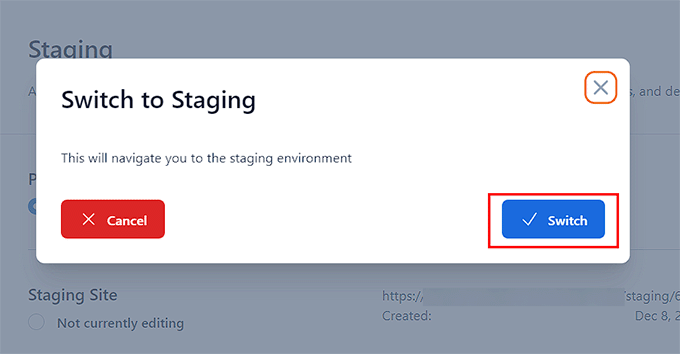
Auf Ihrem Bildschirm wird nun eine Aufforderung angezeigt, zur Staging-Site zu wechseln.
Klicken Sie hier auf die Schaltfläche „Wechseln“.
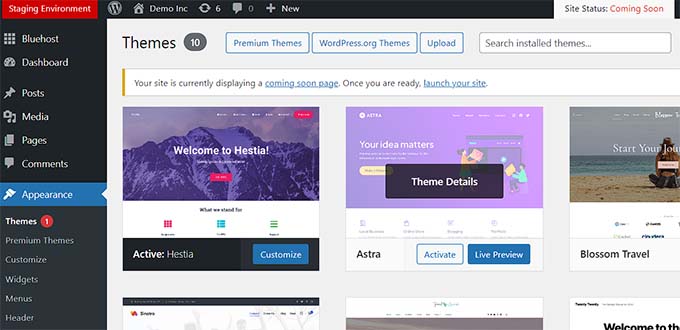
Sobald Sie umgeschaltet haben, sehen Sie eine Schaltfläche auf dem Bildschirm, die anzeigt, dass Sie auf der Staging-Website arbeiten.
Sie können weiter an Ihrer Website arbeiten, ohne sich Sorgen machen zu müssen, dass sich dies auf Ihre Live-Site auswirkt.
Bereitstellen von Änderungen von der Staging- zur Live-Site bei Bluehost
Sobald Sie bereit sind, Änderungen aus dem Staging auf die Live-Site zu übertragen, gehen Sie einfach von der WordPress-Verwaltungsseitenleiste zur Bluehost “ Staging-Seite.
Von hier aus sehen Sie das Dropdown-Menü für die Bereitstellungsoptionen neben Ihrer Staging-Website. Sie können nur die Dateien, nur die Datenbank oder alle Änderungen bereitstellen.
Wenn Sie sich nicht sicher sind, klicken Sie auf die Schaltfläche „Alle Änderungen bereitstellen“, um fortzufahren.
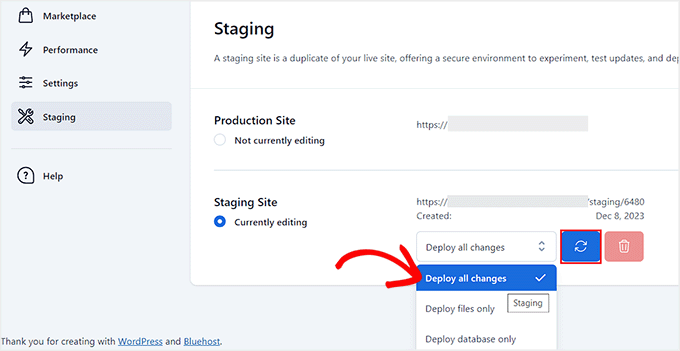
Klicken Sie anschließend auf die Schaltfläche „Deploy Site“ neben dem Dropdown-Menü.
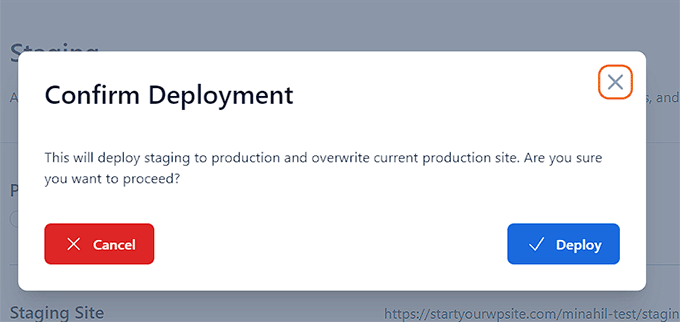
Daraufhin wird ein Popup-Fenster angezeigt, in dem Sie aufgefordert werden, zu bestätigen, dass Sie die Staging-Site auf der Produktionssite bereitstellen möchten. Klicken Sie auf die Schaltfläche „Bereitstellen“, um fortzufahren.
Bluehost wird nun damit beginnen, Ihre Staging-Site auf die Live-Site zu übertragen. Je nach Größe Ihrer Website kann dies eine Weile dauern.
Sie können nun zu Ihrer Live-Website zurückkehren, um Ihre Änderungen in Aktion zu sehen, indem Sie auf die Schaltfläche Radio unter der Option Produktionsseite klicken.
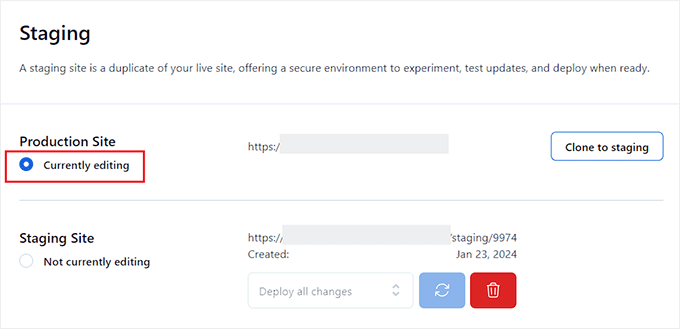
Klonen von Produktionsstandorten in Staging
Wenn Sie nun zur Produktionswebsite zurückwechseln, werden die dort vorgenommenen Änderungen nicht automatisch mit Ihrer Staging-Website synchronisiert.
Wenn Sie in Zukunft mehr Dinge auf Ihrer Staging-Website testen möchten, müssen Sie Ihre Website duplizieren.
Dazu müssen Sie die Seite Bluehost “ Staging besuchen und auf die Schaltfläche „Clone to staging“ klicken.
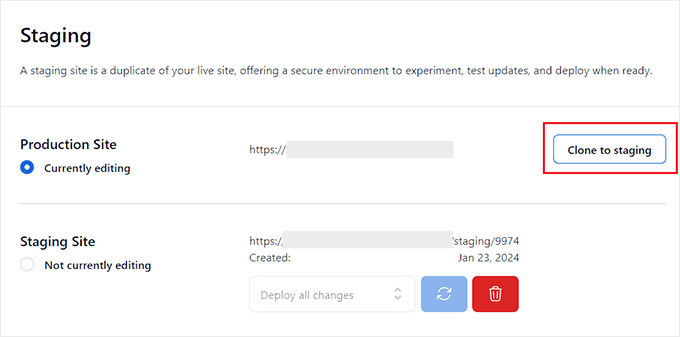
Bluehost klont dann die letzten Änderungen an Ihrer Live-Website auf Ihre Staging-Website. Danach können Sie zu Test- und Entwicklungszwecken zur Staging-Website wechseln.
Erstellen einer Staging-Site auf SiteGround
SiteGround ist ein weiteres Top-WordPress-Hosting-Unternehmen, das mit seinen GrowBig- und GoGeek-Tarifen eine 1-Klick-Staging-Funktion anbietet.
Wenn Ihre Website bei SiteGround gehostet wird, können Sie auf diese Weise eine Staging-Website einrichten.
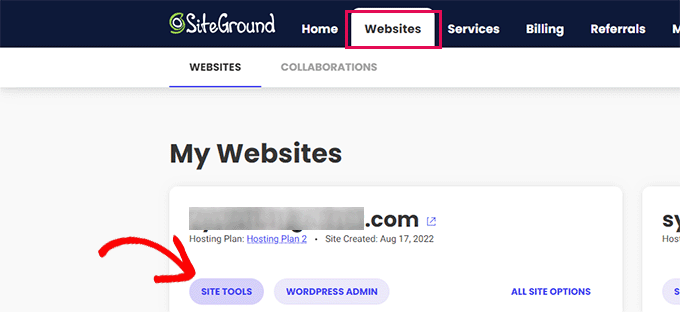
Zunächst müssen Sie sich in Ihrem SiteGround-Dashboard anmelden und zur Registerkarte Websites wechseln. Von hier aus müssen Sie die Site Tools unterhalb Ihrer Website auswählen.
Auf dem nächsten Bildschirm müssen Sie in der linken Spalte auf das Menü WordPress “ Staging klicken.
Wählen Sie hier Ihre Website aus und geben Sie dann einen Namen für Ihr Belegexemplar ein.
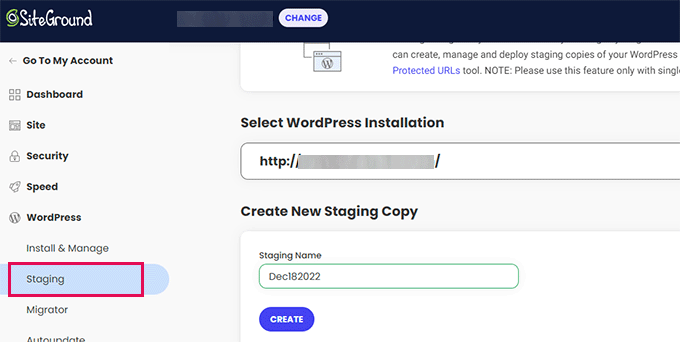
Klicken Sie auf die Schaltfläche „Erstellen“, um fortzufahren, und Siteground wird eine Staging-Kopie Ihrer Website erstellen.
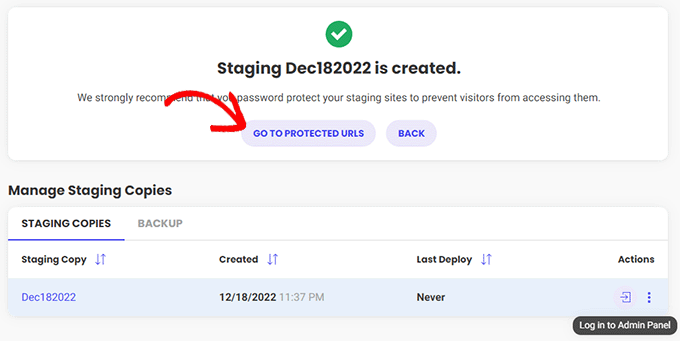
Danach müssen Sie auf die Schaltfläche „Zu geschützten URLs gehen“ klicken, um Ihre Staging-Website mit einem Passwort zu schützen und sie privat zu halten.
Auf dem nächsten Bildschirm gibt Siteground automatisch die URL und den Pfad für Ihre Staging-Website ein.
Sie müssen den Benutzernamen und das Passwort eingeben, die Sie zum Schutz Ihrer Staging-Site verwenden möchten.
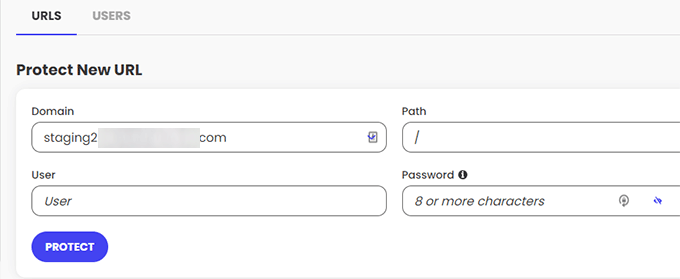
Klicken Sie auf die Schaltfläche „Schützen“, um Ihre Einstellungen zu speichern.
Sie können nun zur WordPress “ Staging-Seite zurückkehren und auf die Schaltfläche „Log in to Admin Panel“ neben Ihrer Staging-Website klicken.

SiteGround öffnet nun den WordPress-Administrationsbereich Ihrer Staging-Website. Sie können Ihre Änderungen auf dieser Staging-Website testen.
Bereitstellen von Änderungen auf Ihrer Live-Website
Sobald Sie Ihre Änderungen auf der Staging-Website ausprobiert haben, können Sie sie in Ihre Live-Website einfügen.
SiteGround macht auch dies einfach.
Klicken Sie einfach in der linken Spalte auf das Menü WordPress “ Staging. Klicken Sie dann auf das Drei-Punkte-Menü neben Ihrer Staging-Site unter dem Abschnitt „Staging-Kopien verwalten“.

Das Menü zeigt Ihnen zwei Verteilungsoptionen an. Sie können entweder die Option „Vollständige Bereitstellung“ oder „Benutzerdefinierte Bereitstellung“ wählen.
Bei der Option „Vollständige Bereitstellung“ wird alles von der Staging-Website auf Ihre Live-Website übertragen. Bei der Option „Benutzerdefinierte Bereitstellung“ können Sie auswählen, welche Dateien oder Daten Sie zusammenführen möchten.
Wenn Sie unsicher sind, wählen Sie die Option „Vollständige Bereitstellung“.
SiteGround kopiert dann die Staging-Site auf Ihre Live-Website.
Live-Übertragung auf Ihre Staging-Website
Änderungen, die Sie an Ihrer Live-Website vornehmen, werden nicht automatisch auf Ihre Staging-Website übertragen.
Jedes Mal, wenn Sie an Ihrer Staging-Website arbeiten müssen, wiederholen Sie den oben beschriebenen Vorgang, um eine neue Staging-Website zu erstellen.
Erstellen einer Staging-Site auf WP Engine
WP Engine ist das beste WordPress-verwaltete Hosting-Unternehmen der Welt. Managed WordPress-Hosting ist ein Concierge-Service für Ihre WordPress-Website, bei dem sich der Hosting-Anbieter um Updates, Backups, Sicherheit und Leistung kümmert.
WP Engine bietet eine Ein-Klick-Staging-Lösung mit all ihren Plänen. Wenn Sie WP Engine zum Hosten Ihrer Website verwenden, können Sie auf diese Weise eine Staging-Umgebung für Ihre Website einrichten.
Zunächst müssen Sie sich in Ihrem WP Engine Dashboard anmelden. Gehen Sie dann auf die Seite „Sites“ und wählen Sie Ihre Website aus, indem Sie sie anklicken.
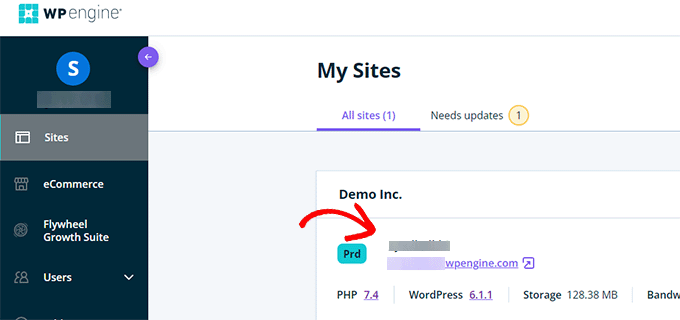
Dadurch gelangen Sie zum Dashboard Ihrer Website.
Klicken Sie nun in der linken Spalte auf den Link „Staging hinzufügen“ oder wählen Sie ihn oben unter dem Namen Ihrer Website aus.
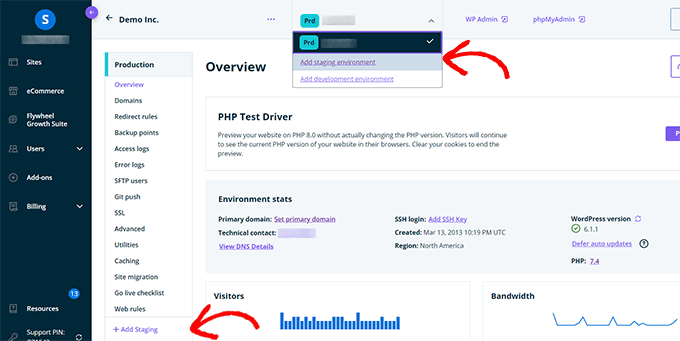
Daraufhin wird der Bildschirm „Umgebung hinzufügen“ angezeigt.
Sie werden aufgefordert, auszuwählen, wie Sie mit Ihrer Staging-Umgebung verfahren möchten.
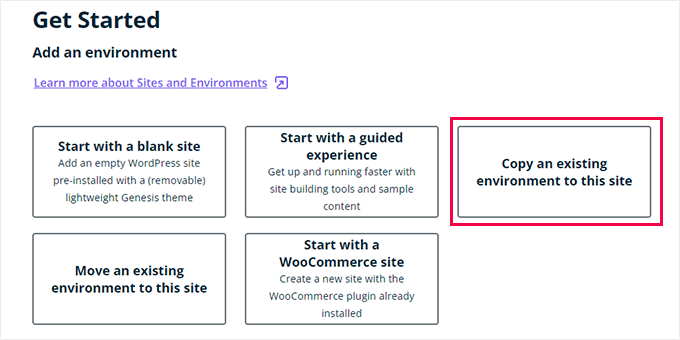
Nachfolgend wird erläutert, was jede dieser Optionen bewirkt:
- Mit einer neuen leeren Website beginnen“ erstellt eine neue leere Website.
- Beginnen Sie mit einer geführten Erfahrung“ erstellt eine neue Website mit einer geführten Erfahrung und Demo-Inhalten.
- Mit „Copy an existing environment to this site“ wird Ihre Produktions- oder Entwicklungsumgebung auf diese Site kopiert (z. B. Ihre Live-Site auf diese Umgebung).
- Vorhandene Umgebung verschieben“ verschiebt eine Umgebung an diesen Standort (z. B. Verschieben der Entwicklungsumgebung in die Staging-Umgebung)
- Mit „Mit einer WooCommerce-Site beginnen“ wird eine neue WordPress-Site mit vorinstalliertem WooCommerce erstellt.
Da Sie eine Staging-Kopie unserer Live-Website erstellen möchten, müssen Sie auf die Option „Kopieren einer bestehenden Umgebung auf diese Site“ klicken.
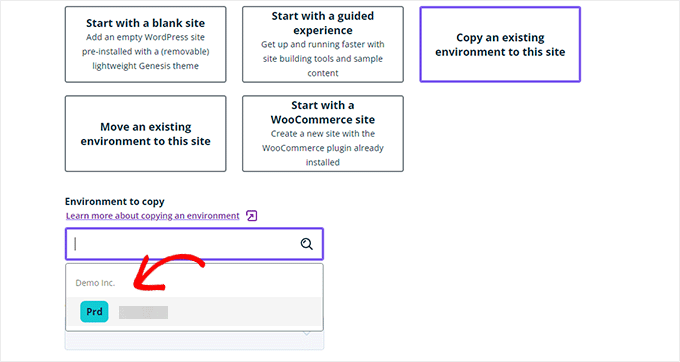
Nachdem Sie eine Umgebung ausgewählt haben, wählen Sie die letzte Sicherungskopie aus, die Sie kopieren möchten, und klicken dann auf die Schaltfläche „Weiter“, um fortzufahren.
Nun müssen Sie einen Namen für Ihre Staging-Site angeben. Dieser Name wird in der URL Ihrer Staging-Site verwendet. Wählen Sie anschließend STG (Staging) als Umgebungstyp.
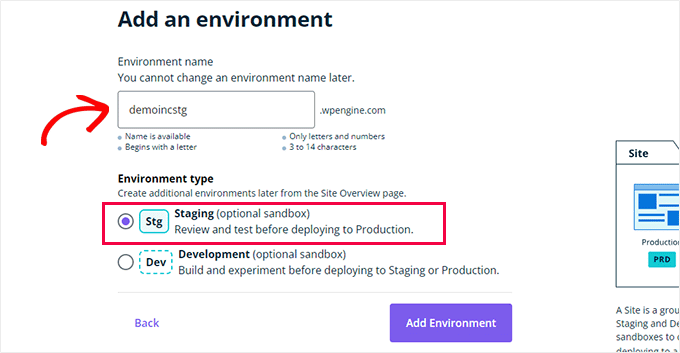
Klicken Sie auf die Schaltfläche „Umgebung erstellen“, um fortzufahren.
WP Engine wird nun eine Staging-Site für Sie erstellen. Danach werden Sie zum Dashboard Ihrer Staging-Umgebung weitergeleitet.
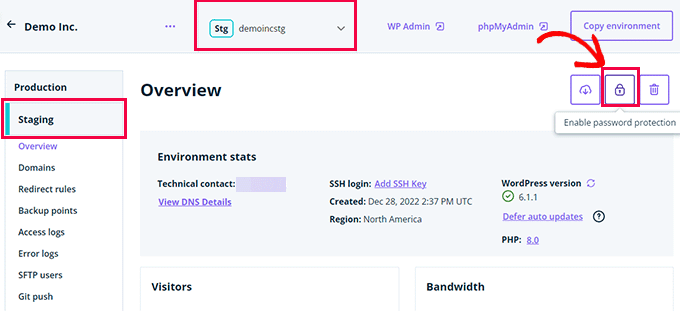
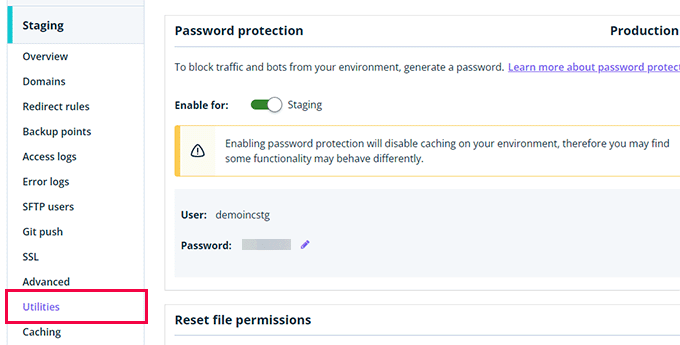
Als Nächstes müssen Sie auf die Schaltfläche Vorhängeschloss klicken, um den Passwortschutz für Ihre Staging-Site zu aktivieren.
Danach müssen Sie auf die Registerkarte „Dienstprogramme“ wechseln, um den Benutzernamen und das Passwort für die Staging-Site zu kopieren.
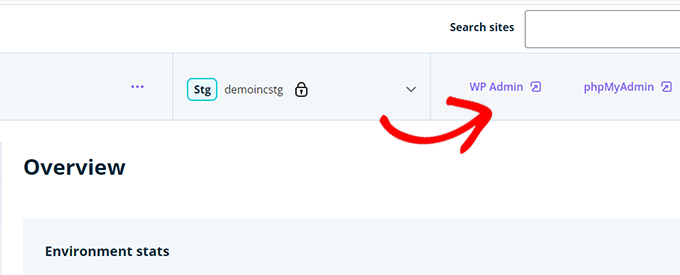
Sie können nun oben auf die Schaltfläche „WP Admin“ klicken, um sich bei Ihrer Staging-Website anzumelden.
Sie können auf der Staging-Website Änderungen vornehmen und Funktionen ausprobieren, wie Sie es auch bei einer normalen WordPress-Website tun würden, die Sie irgendwo anders installieren.
Bereitstellung von Änderungen von der Staging- zur Live-Website auf WP Engine
Möchten Sie die Änderungen, die Sie auf der Staging-Website vorgenommen haben, in Ihre Live-Website übernehmen?
Klicken Sie einfach auf die Schaltfläche „Umgebung kopieren“, um mit der Bereitstellung zu beginnen.
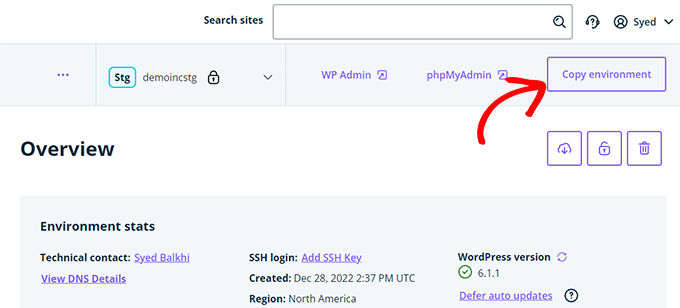
Dadurch gelangen Sie auf die Seite mit den Optionen. Hier müssen Sie Ihre Quell- und Zielumgebung für die Kopie auswählen.
Hier wählen Sie Ihre Staging-Website als Quellumgebung und Ihre Produktions- oder Live-Website als Zielumgebung aus.
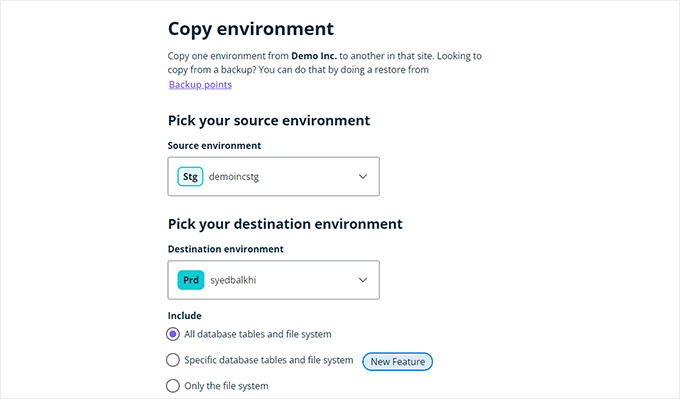
Sie können auswählen, was Sie kopieren möchten. Sie können zum Beispiel alle Datenbanktabellen und Dateien, bestimmte Dateien und Datenbanktabellen oder nur das Dateisystem kopieren.
Hinweis: Wenn Sie alles kopieren, verlieren Sie alle Daten, die auf Ihrer Live-Website gespeichert sind, nachdem Sie sie für die Staging-Umgebung verwendet haben. Dazu können wichtige Daten wie neue Beiträge, Seiten, Kunden und Bestellungen gehören. Es ist daher ratsam, ein Backup Ihrer Live-Website zu erstellen, bevor Sie die Staging-Umgebung nutzen.
Klicken Sie anschließend auf die Schaltfläche „Überprüfen und bestätigen“, um mit der Bereitstellung zu beginnen. Es wird eine Weile dauern, bis alles auf Ihre Live-Website kopiert ist.
Sie erhalten eine E-Mail-Benachrichtigung, wenn der Vorgang abgeschlossen ist.
Erstellen einer Staging-Site mit WordPress-Plugin
Wenn Ihr WordPress-Hosting-Unternehmen keine Staging-Site-Funktion anbietet, können Sie dennoch eine Staging-Website mithilfe eines WordPress-Plugins erstellen.
Diese Methode hat jedoch auch einige Nachteile.
Erstens hat ein Plugin nur begrenzte Kontrolle über Ihren Hosting-Server. Aus diesem Grund liefert es möglicherweise nicht immer die besten Ergebnisse.
Zweitens wird das von uns verwendete Plugin Ihre Staging-Site auf seinen eigenen Servern speichern. Wenn Sie sich Sorgen um Ihre Privatsphäre und den Datenschutz machen, ist dies möglicherweise nicht ideal für Sie.
Schließlich hat das Plugin mehrere bekannte Inkompatibilitäten. Bitte überprüfen Sie die Inkompatibilitätsseite, um sicherzustellen, dass Ihre Website kompatibel ist.
Sehen wir uns also an, wie man eine WordPress-Site mit einem WordPress-Plugin erstellt.
Als Erstes müssen Sie das WP Stagecoach-Plugin installieren und aktivieren. Weitere Einzelheiten finden Sie in unserer Schritt-für-Schritt-Anleitung für die Installation eines WordPress-Plugins.
Nach der Aktivierung fügt das Plugin einen neuen Menüpunkt mit der Bezeichnung WP Stagecoach zu Ihrer Verwaltungsleiste hinzu. Wenn Sie darauf klicken, gelangen Sie zur Seite mit den Einstellungen des Plugins.
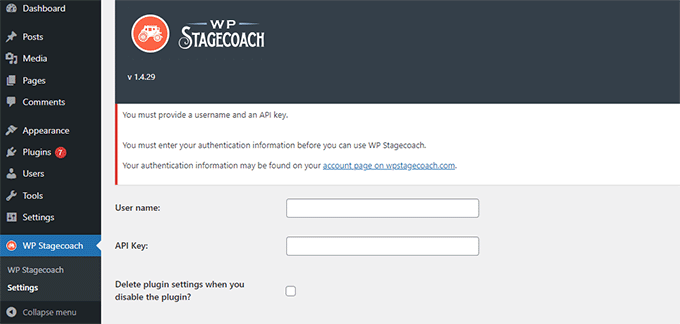
Sie müssen Ihren WP Stagecoach-Benutzernamen und den API-Schlüssel eingeben, den Sie in Ihrem Konto auf der Plugin-Website finden.
Danach müssen Sie die Seite WP Stagecoach “ WP Stagecoach besuchen und einen Namen für Ihre Staging-Website wählen. Dieser Name wird auch als Subdomain für Ihre WordPress-Staging-Website verwendet.
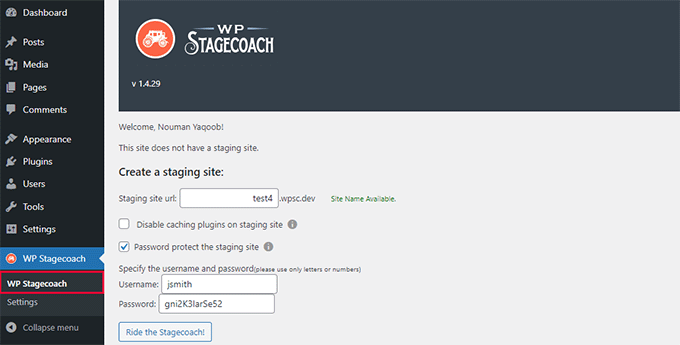
Vergessen Sie nicht, das Kästchen neben der Option „Passwortschutz für die Staging-Website“ zu aktivieren. Damit wird Ihre Staging-Website vor der Öffentlichkeit und Suchmaschinen geschützt.
Klicken Sie auf die Schaltfläche „Mit der Postkutsche fahren“, um fortzufahren.
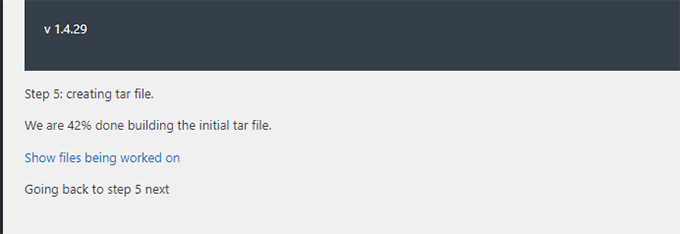
Das Plugin erstellt nun eine Sicherungskopie Ihrer WordPress-Dateien und der Datenbank, um sie für Ihre Staging-Site zu exportieren.
Je nach Größe Ihrer WordPress-Website kann dies eine Weile dauern.
Sobald Sie fertig sind, sehen Sie den Link zu Ihrer Staging-Site und deren Verwaltungsbereich.
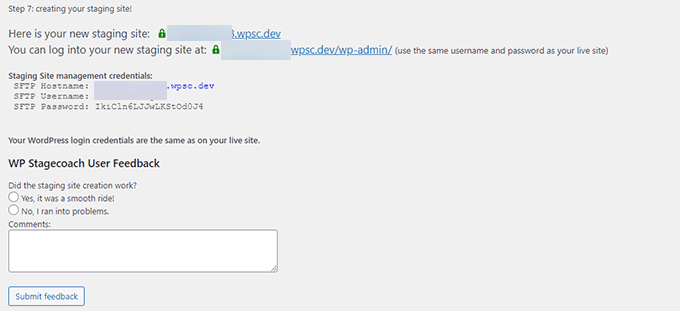
Sie können auf den Link klicken, um Ihre Staging-Site zu besuchen und mit der Arbeit daran zu beginnen.
Oben in der Verwaltungsleiste erscheint eine leuchtend orangefarbene Meldung, die anzeigt, dass Sie an Ihrer Staging-Site arbeiten.
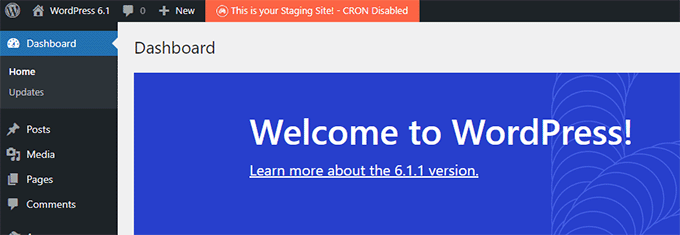
Bereitstellung der Staging-Site für den Live-Betrieb mit WP Stagecoach
Sobald Sie bereit sind, die Änderungen in Ihre Live-Site zu importieren, gehen Sie auf die Seite WP Stagecoach “ Import Changes und klicken Sie auf die Schaltfläche Check for Changes.
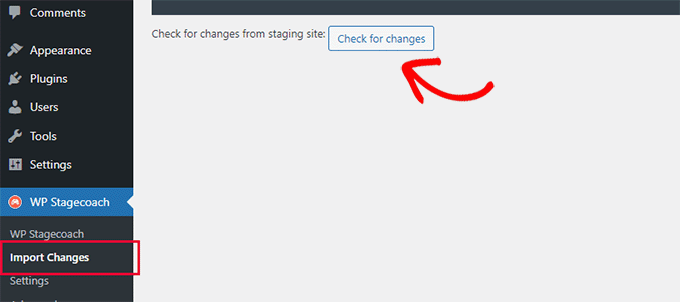
Das Plugin sucht nun nach Änderungen auf Ihrer Staging-Site und zeigt Ihnen dann Optionen zum Importieren an.
Sie können zwischen allen Änderungen, Dateiänderungen und Datenbankänderungen wählen.
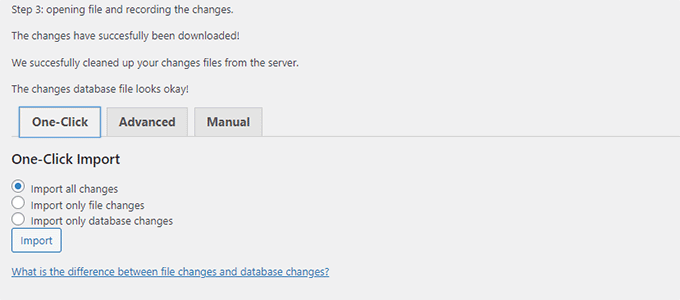
Das Plugin zeigt Ihnen den Fortschritt des Imports an und benachrichtigt Sie, wenn er abgeschlossen ist.
Sie können nun Ihre Live-Site testen, um zu sehen, ob alle Änderungen erfolgreich importiert wurden.
Manuelles Erstellen einer Staging-Site für WordPress
Mit dieser Methode lernen Sie, wie Sie manuell eine Staging-Site für Ihre WordPress-Installation erstellen. Sie ist für fortgeschrittene Benutzer und erfordert mehr Arbeit als die anderen oben beschriebenen Methoden.
Ein weiterer Nachteil dieser Methode ist, dass Ihre Website vorübergehend nicht verfügbar ist, wenn Änderungen vom Staging- auf den Live-Server übertragen werden.
Sehen wir uns also an, wie Sie manuell eine Staging-Umgebung für Ihre WordPress-Website erstellen.
Als Erstes müssen Sie eine Subdomain für Ihre Staging-Website erstellen. Wenn Sie Bluehost nutzen, gehen Sie zum Dashboard Ihres Hosting-Kontos und wechseln Sie zur Registerkarte „Erweitert“.
Klicken Sie dann auf die Schaltfläche „Verwalten“ neben der Option „cPanel“.
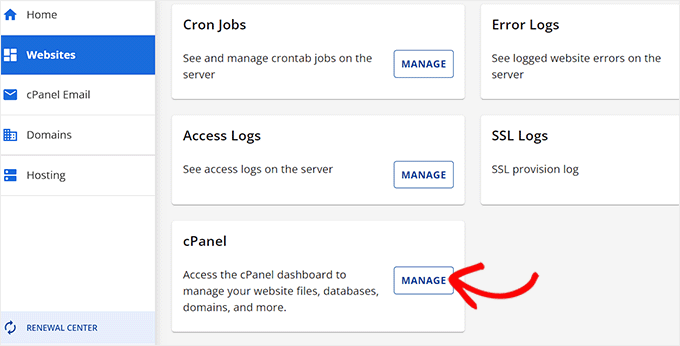
Dadurch wird das cPanel in einer neuen Registerkarte geöffnet, in der Sie zum Abschnitt „Domain“ hinunterblättern müssen.
Klicken Sie hier auf die Option „Domains“.
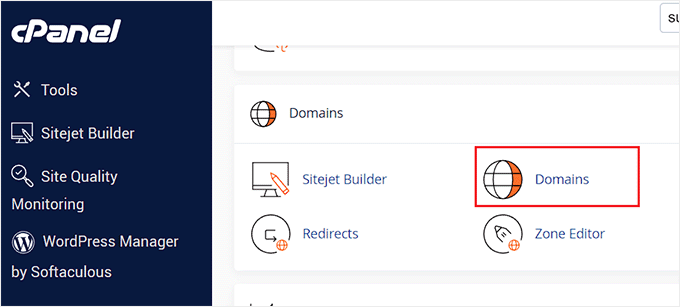
Daraufhin wird eine Liste aller Domains in Ihrem Hosting-Account angezeigt. Hier müssen Sie auf die Schaltfläche „Neue Domäne erstellen“ klicken.
Danach öffnet sich eine neue Seite auf dem Bildschirm, auf der Sie Ihre Subdomain, gefolgt vom Domainnamen, in das Feld „Domain“ eintragen müssen, etwa so:
subdomain.beispiel.de
Klicken Sie anschließend einfach auf die Schaltfläche „Absenden“, um Ihre Einstellungen zu speichern.
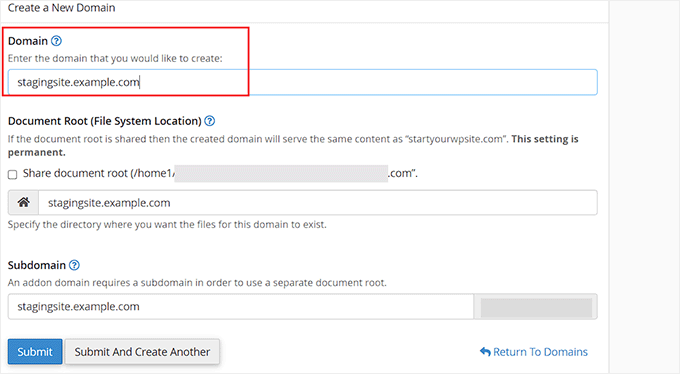
Hinweis: Wir verwenden Bluehost in unseren Beispiel-Screenshots, daher kann Ihr Bildschirm anders aussehen.
Ihr Hosting-Kontrollpanel fügt nun Ihre Subdomain hinzu, die Sie für den Import Ihrer Live-WordPress-Site verwenden können.
Als Nächstes müssen Sie das Duplicator-Plugin auf Ihrer Live-Site installieren und aktivieren. Wenn Sie alle Funktionen benötigen, können Sie die Premium-Version von Duplicator hier erwerben.
Nach der Aktivierung müssen Sie auf das Duplicator-Menü in Ihrer WordPress-Admin-Seitenleiste klicken und unter Pakete auf die Schaltfläche „Neu erstellen“ klicken.
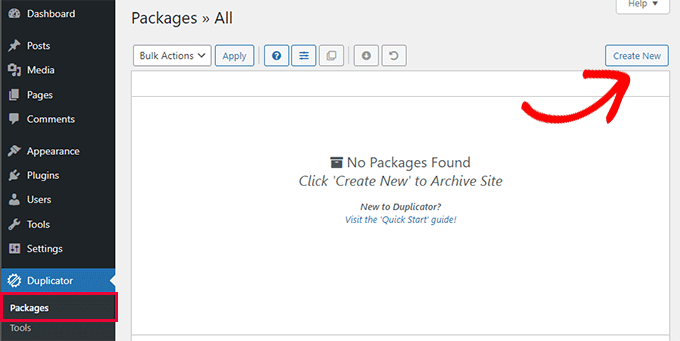
Danach werden Sie aufgefordert, auf die Schaltfläche „Weiter“ zu klicken, um fortzufahren. Duplicator führt nun den Assistenten zum Duplizieren von Websites aus.
Zunächst werden einige Tests durchgeführt, um festzustellen, ob alles in Ordnung ist. Wenn alle Punkte mit „Gut“ markiert sind, klicken Sie auf die Schaltfläche „Erstellen“.
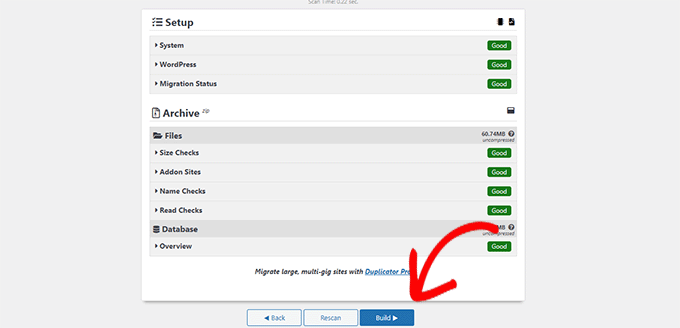
Das Plugin beginnt nun, ein Duplicator-Paket für Ihre WordPress-Website zu erstellen. Dieser Vorgang kann je nach Größe Ihrer Website einige Minuten dauern.
Wenn Sie fertig sind, sehen Sie Download-Optionen für das Installationsprogramm und das Archivpaket. Sie müssen auf die Schaltfläche „Beide Dateien herunterladen“ klicken, um beide Dateien auf Ihren Computer herunterzuladen.
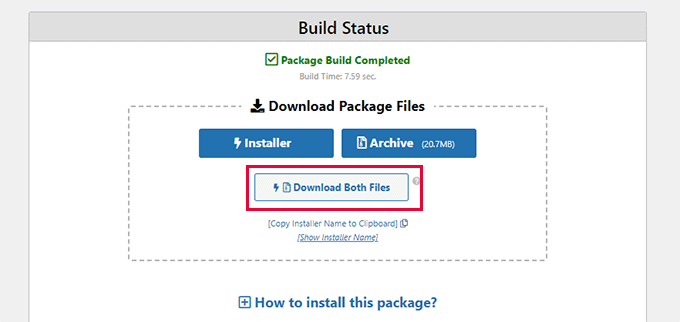
Sie müssen diese beiden Dateien in das Dateiverzeichnis der gerade erstellten Subdomain hochladen. Weitere Informationen finden Sie in unserer Anleitung zum Hochladen von Dateien auf Ihre WordPress-Website mit FTP.
Als Nächstes benötigt Ihre neue Staging-WordPress-Site eine neue Datenbank. Lassen Sie uns eine erstellen.
Gehen Sie zum Kontrollpanel Ihres WordPress-Hosting-Kontos und wechseln Sie zur Registerkarte „Erweitert“.
Blättern Sie dann zum Abschnitt „Datenbanken“ und klicken Sie auf die Schaltfläche „Verwalten“ daneben.
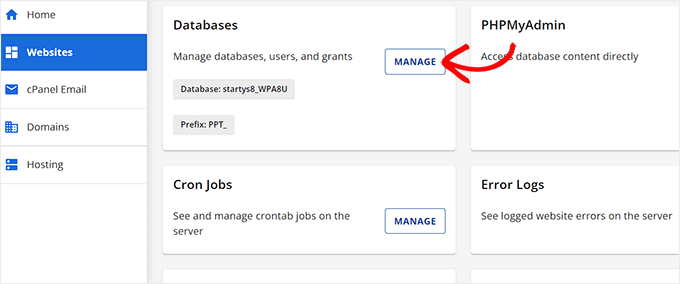
Wenn Sie nicht Bluehost nutzen, sieht Ihre WordPress-Hosting-Umgebung vielleicht etwas anders aus. Machen Sie sich keine Sorgen und suchen Sie einfach den Abschnitt Datenbanken.
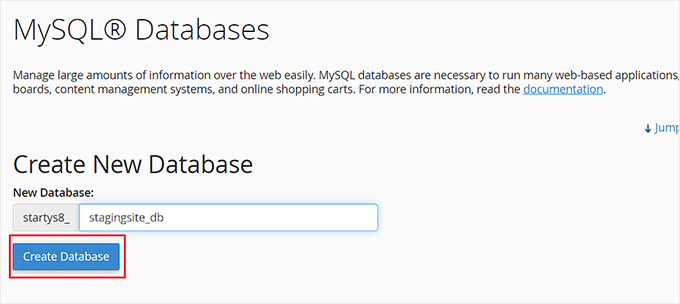
Dies führt Sie zur Seite „MySQL-Datenbanken“, wo Sie zunächst einen Namen für Ihre Datenbank eingeben können.
Klicken Sie dann auf die Schaltfläche „Datenbank erstellen“.
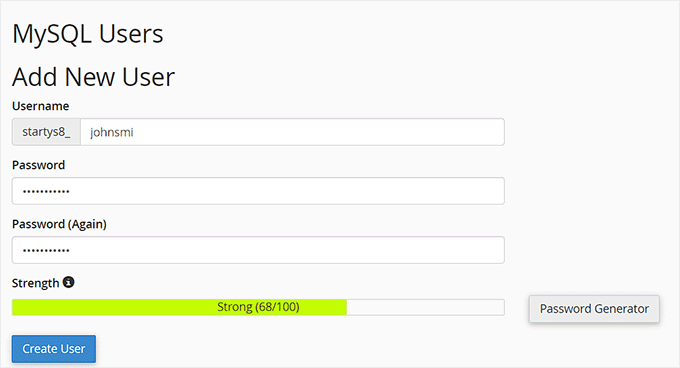
Als nächstes müssen Sie einen MySQL-Benutzer für Ihre Datenbank anlegen.
Blättern Sie nach unten zum Abschnitt MySQL-Benutzer und geben Sie einen Benutzernamen und ein Passwort für Ihren neuen Datenbankbenutzer ein.
Nun müssen Sie diesem Benutzer das Recht geben, auf die zuvor erstellte Datenbank zuzugreifen und sie zu ändern.
Blättern Sie einfach nach unten zum Abschnitt „Benutzer zur Datenbank hinzufügen“ und wählen Sie Ihre Datenbank und den soeben erstellten Benutzer aus.
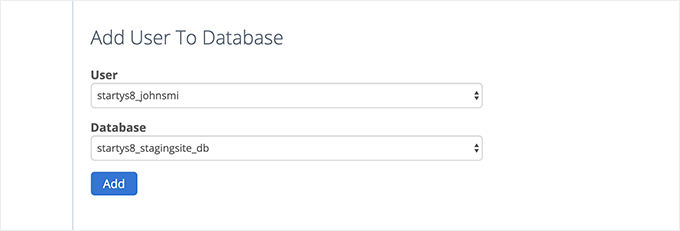
Klicken Sie anschließend auf die Schaltfläche „Hinzufügen“, um fortzufahren.
Sie werden aufgefordert, Berechtigungen für den Benutzer auszuwählen. Aktivieren Sie das Kontrollkästchen „Alle Berechtigungen“ und klicken Sie dann auf die Schaltfläche „Änderungen vornehmen“.
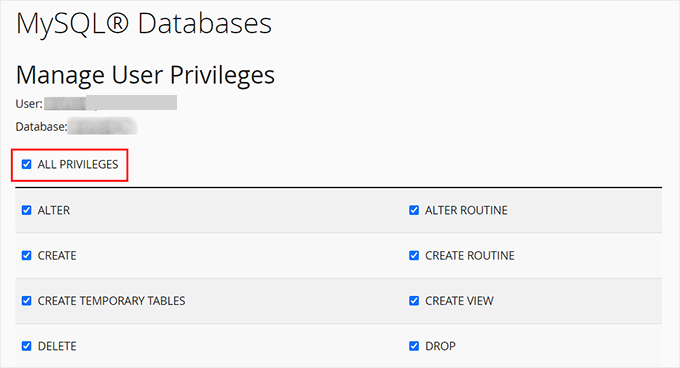
Jetzt ist Ihre Datenbank bereit, für Ihre Staging-Website verwendet zu werden.
Als Nächstes müssen Sie einen neuen Browser-Tab öffnen und die Subdomain Ihrer Staging-Site wie folgt eingeben:
https://yoursubdomain.example.com/installer.php
Vergessen Sie nicht, yoursubdomain durch die tatsächliche Subdomain und example.com durch Ihren eigenen Domainnamen zu ersetzen.
Dadurch wird der Installationsassistent von Duplicator gestartet.
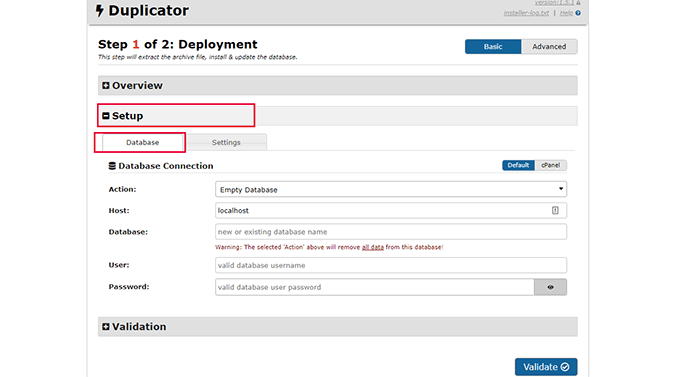
Unter dem Abschnitt „Setup“ werden Sie aufgefordert, die Daten Ihrer WordPress-Datenbank einzugeben.
Ihr Host wird wahrscheinlich localhost sein. Danach geben Sie die Details der Datenbank ein, die Sie im vorherigen Schritt für Ihren neuen Domainnamen erstellt haben.
Klicken Sie auf die Schaltfläche „Validieren“, um sicherzustellen, dass Duplicator eine Verbindung zu Ihrer Datenbank herstellen kann.
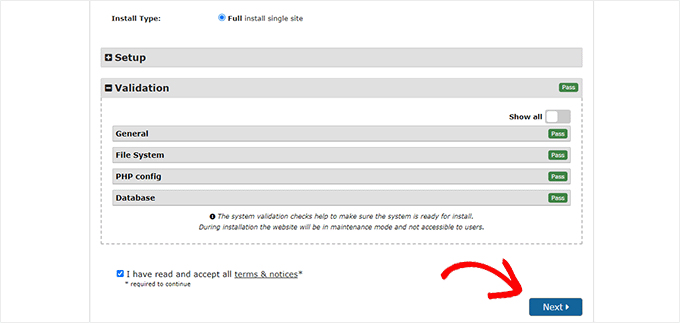
Klicken Sie anschließend auf die Schaltfläche „Weiter“, um fortzufahren.
Duplicator entpackt nun Ihre WordPress-Datenbank und -Dateien und importiert sie auf Ihre Staging-Site.
Sobald Sie fertig sind, erhalten Sie eine Erfolgsmeldung.
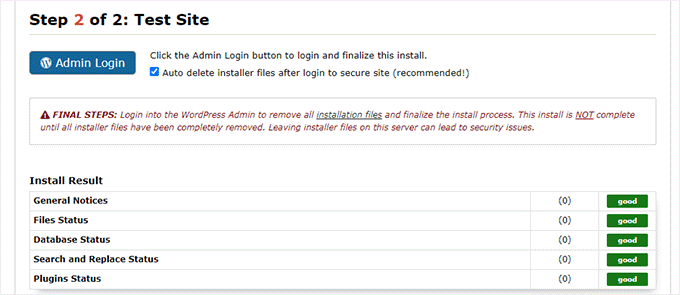
Sie können auf die Schaltfläche „Admin Login“ klicken, um den WordPress-Administrationsbereich Ihrer Website auf der neuen Staging-Site zu öffnen.
Jetzt haben Sie Ihre Staging-Site eingerichtet. Sie können sie schützen, indem Sie die Subdomain mit einem Passwortschutz versehen.
Rufen Sie das Dashboard Ihres Hosting-Accounts auf und wechseln Sie zur Registerkarte „Erweitert“.
Scrollen Sie dann zum Abschnitt „cPanel“ und klicken Sie auf die Schaltfläche „Verwalten“ daneben.
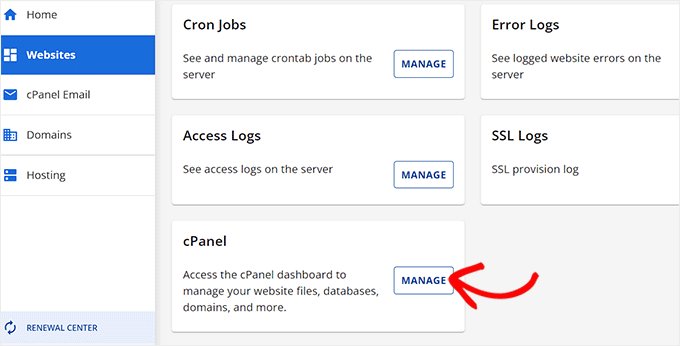
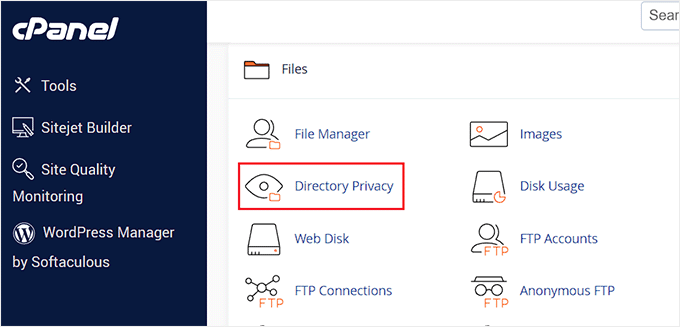
Dadurch öffnet sich das cPanel in einem neuen Fenster, in dem Sie zum Abschnitt „Dateien“ hinunterblättern müssen.
Klicken Sie hier auf das Symbol „Verzeichnisdatenschutz“.
Als Nächstes müssen Sie Ihren Subdomain-Ordner auswählen und dann das Kontrollkästchen „Passwortschutz für dieses Verzeichnis“ aktivieren.
Sie werden aufgefordert, einen Namen für diese Einstellung anzugeben, und klicken dann auf die Schaltfläche „Speichern“.
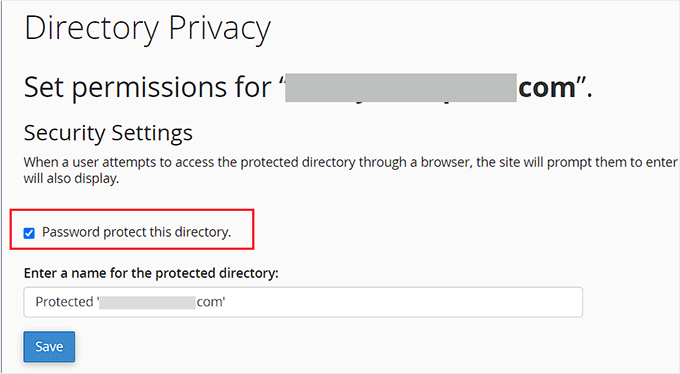
Ihre Staging-Site wird nun hinter einem Passwortschutz versteckt, so dass sie weder von Suchmaschinen noch von der Öffentlichkeit eingesehen werden kann.
Sie können nun an Ihrer Staging-Site arbeiten und alle Änderungen vornehmen.
Manuelle Bereitstellung der Staging-Site für die Live-Site
Wenn Sie bereit sind, Änderungen von Ihrer Staging-Site auf den Live-Server zu übertragen, folgen Sie den oben beschriebenen Schritten.
Erstellen Sie einfach ein neues Duplicator-Paket auf Ihrer Testseite und laden Sie das Installationsprogramm und die Archivdateien auf Ihren Computer herunter (siehe Anweisungen oben).
Als Nächstes müssen Sie zu Ihrer Live-Site wechseln und ein vollständiges WordPress-Backup erstellen (Sie können auch Duplicator verwenden, um ein vollständiges Backup zu erstellen).
Sobald Sie fertig sind, müssen Sie alle WordPress-Dateien und -Ordner von Ihrer Live-Website löschen. Das bedeutet, dass Ihre WordPress-Website für eine Weile nicht erreichbar sein wird.
Befolgen Sie schließlich die obigen Anweisungen, um den Duplicator-Installationsassistenten auszuführen und die Staging-Site auf den Live-Server zu importieren.
Wie Sie sehen können, ist die letzte Methode nicht die beste. Es gibt viele Dinge während des Prozesses, die Ihrer Website schaden können.
Wir empfehlen, diese Methode auf jeden Fall zu vermeiden, es sei denn, Sie haben keine andere Wahl. Wir empfehlen die Verwendung eines zuverlässigen Hosting-Anbieters wie Bluehost, SiteGround oder WP Engine mit integrierten Staging-Site-Funktionen.
Wir hoffen, dass Sie in diesem Artikel erfahren haben, wie Sie ganz einfach eine Staging-Umgebung für Ihre WordPress-Website erstellen können. Wenn Sie auf Probleme stoßen, lesen Sie unseren ultimativen Leitfaden zur Behebung der häufigsten WordPress-Fehler. Vielleicht möchten Sie auch erfahren , wie Sie WordPress Playground in Ihrem Browser zum Testen verwenden können.
Wenn Ihnen dieser Artikel gefallen hat, dann abonnieren Sie bitte unseren YouTube-Kanal für WordPress-Videotutorials. Sie können uns auch auf Twitter und Facebook finden.


Syed Balkhi says
Hey WPBeginner readers,
Did you know you can win exciting prizes by commenting on WPBeginner?
Every month, our top blog commenters will win HUGE rewards, including premium WordPress plugin licenses and cash prizes.
You can get more details about the contest from here.
Start sharing your thoughts below to stand a chance to win!
Lynda Joy says
Hi,
I just did the first five or so steps of this, and then got lost at „upload your WordPress content to. So now I have completely messed up my site and I would like to know how to undo what I have done.
Thanks.
– Lynda
Rachel says
Thanks so much for this – I am very much a beginner but trying to figure out how to do these things myself so I can launch a new design by first using a test site in order to get it right. I have managed to follow your instructions perfectly until this part:
„After copying your database, you need to copy your WordPress files, plugins, themes, and uploads. First download a fresh copy of WordPress from WordPress.org. Upload the contents of WordPress to your staging site. Note, do not run the WordPress install yet“
Can you please advise as to how this is done or direct me to another instruction article? I can’t seem to find out how to do it otherwise. Many many thanks in advance
Sanket D. says
So I’ve managed to create my staging environment successfully — I’ve all my media, themes, plugins, everything else properly transferred. However, I’d made some changes to my theme (not through any codes, but through the theme’s inbuilt settings — basic stuff like a custom logo (which I can see in my media library), theme color, homepage layout, etc. These changes are the only thing that for some reason are missing from my staging site. Anybody knows why this might be?
byberkan says
I’m hoping you can find the solution. Same problem exists for me.
Joe says
It seems we have to do the steps in here after we have our theme, plugin etc.
Mark Park says
Great article! Just one thing that isn’t clear to me.
If I have the current non-wordpress website on a domain name example.com and I want to build a new website using WordPress and develop it on a staging environment on a sub-domain dev.example.com – is this possible?
Can I make a sub-domain dev.example.com and install WP on the same server used by the current non-WP website?
Later when the website is finished I want to connect my WP developed site with the domain name example.com.
Thank you for your help.
WPBeginner Support says
Yes this is possible. Make sure you block search engines on your development subdomain.
Admin
Maria says
Thanks for a Very helpful article! I am in a similar situation as Mark, however my current website is a WordPress site. Can I still develop the redesigned website on a staging site within a sub domain? And if so do I have to create a new database?
byberkan says
You really didn’t read the article, do you?
Benito says
Hello, great article, but what if I don’t want to use XAMPP, and I just want to use a subdomain as a staging site and then push changes to live? What would be the best way to deploy the changes?
Raj says
Will this process create a Database User and add it to the database we created while copying giving it all privileges by itself? or do we need to create a database user at some point?
Raj says
Okay I tried it.. both ways.
Once I created the database user before installing wordpress on the staging site and it worked. The other time around, I didn’t and got the issue „We were able to connect to the database server (which means your username and password is okay) but not able to select the a*******_ata_d2db database.“
That to me means that one has to create a user manually, only copying database won’t do. Right?
Sanny says
Raj, I see the same error („Can’t select database“). How did you fix it ?
Scott says
Hopefully you guys figured this out, but just to leave this here for others to find, you do indeed need to create a database user (which is not clear in this article). While using Bluehost, I had to do about three steps. First step is to use the MySQL Database cPanel to get access to the list of MySQL databases. Once there, I could see that the new staging database that I had copied using phpMyAdmin per the article, did not have a privileged user assigned to it. So, I created a user, but then discovered that the user I created had too many characters (16 is the max). Once I got that straightened out, I then had to Add this user to a database using the same MySQL page. As part of this assignment step, I was able to select „ALL PRIVILEGES“ to make this user a privileged user for this new staging database. Once that was all setup, I was able to configure WordPress to connect up to the staging database.
Gayle says
Terrific resource! Reached a WP staging breaking point and then found this. Lifesaver! Thank you! Only things I’d add would be some meta information for newbies like me. : )
LizP says
Yikes, too hard for me!
Deborah says
Thanks for the tutorial. I seem to be stuck on one of the very first steps. When clicking go after changing the URL’s in SQL, I get a message of ‚# MySQL returned an empty result set (i.e. zero rows)‘
This is how I’ve entered the data:
UPDATE wp_options SET option_value = REPLACE(option_value, ‚http://www.example.co.za/wp‘, ‚http://staging.example.co.za‘);
UPDATE wp_postmeta SET meta_value = REPLACE(meta_value, ‚http://www.example.co.za/wp‘, ‚http://staging.example.co.za‘);
UPDATE wp_posts SET guid = REPLACE(guid, ‚http://www.example.co.za/wp‘, ‚http://staging.example.co.za‘);
UPDATE wp_posts SET post_content = REPLACE(post_content, ‚http://www.example.co.za/wp‘, ‚http://staging.example.co.za‘);
Can anyone please help me with this?
Thanks
Andreas Kofoed says
Hi,
First of all thanks for an amazing tut on this.
I’ve encountered one problem so far and that is when I try to enter my subdomain through
www.staging.example.com. I get this message: err_connection_timed_out ???Andreas Kofoed says
Hi,
I figured this out as I was due to some table prefix.
Now my staging.mysite.com is up and running, but the styling and layout is totally different.
How do I do, so my files in my child theme applies to the current theme???
It seems like it is missing a lot of pictures, css and some basic settings?…
Patrick says
Thanks for this great tutorial!
I’m finding that after setting everything up, comments on the live blog are now going to the sub-domain staging blog. I can’t find anything in the settings that explains this behavior. Do subdomains perhaps take precedence for some reason?
Any ideas?
Jennifer Filgate says
Perhaps when you ran the operation to update the URLs in your database you performed it on your live site’s database instead of the new staging site’s database? You have to select the staging site’s database after you create it before you run the operation. Maybe you missed that selecting step.
Arjun Singhal says
I got errors regarding SSL certificates. I am a newbie when it comes to using Git and the command prompt on my Mac. So I couldn’t get to syncing everything like I wanted.
Also, how it appears is that the steps are good to sync the local disks files to the server – changes in the theme folder etc.
However, there is no syncing mechanism highlighted for the MySQL server changes in the case of WordPress.
Evan says
I don’t know. This just seems really confusing.
So, a Git Bucket is like an intermediary between your local computer and the hosted dev server? For example, if I have website.com then I create dev.website.com then I create an account and empty repository in Git Bucket then I create an empty folder on my local computer, and I edit files locally and sync them to the Git Bucket repository and then how do I commit to the live site? Is there any connection and control to the live site? It seems like from here, you sync your Git Bucket repository to the dev.website.com
Then what? I wish this article had a diagram to understand how this all works. It might make sense to you guys because you do it all day, but for the first time, this is a dizzying experience. Especially since multiple points in this setup failed and I had to go about custom fixing each one. At this point, I have created dev.website.com, copied all files from the live site to it, copied the database, connected it in, logged into the dev.website.com wordpress site, made sure all is cool, but now … I am lost as to what I do next.
In your article, you ask us to INIT a local directory on our computer. Well, I’m trying out Git Bucket’s SOURCE TREE, which by the way looks great. But now what? Any help on what is the procedure from here? What’s the logic to all this?
I create a folder on my local drive, it syncs to a Git Bucket Repository so that people can develop collaboratively. But who uploads the changes to the dev.website.com server? Don’t users need to be able to do that to see live changes on the server? So how does that all connect?
And how do you update the final changes to the live website once you’re ready? Man I’m confused. I spent 3 days getting this setup and I can’t figure out this next step, because I don’t understand how that all works.
Any help?
Oscar says
Hi Evan, although I am sure you figured it out by now as its months later, I figured it may help others with the same question. After you have committed your code to version control, you would move your changes over to the server of your choice (dev/staging/production) using the deploy feature. This is described in the section above titled, „Deploying Changes From BitBucket to Staging Site“. Hope this helps clarify!
vjohnson says
I am truly a beginner at this, and I have read the article a couple of times. I think my environment is almost set up, the piece that appears to be missing is in the install step. The directions say copy the files but do not install „yet“, when in this process do I run an install of wp? I am unsure if some of the issues that i ran into are due to my host which is hostgator or something that I’ve done wrong. Any input would be great.
What is happening at this point is no errors but nothing is rendered on at the url for my staging area.
Martin says
Nice article. Although, the whole way, you’re talking about setting up a development site on the server as a subdomain. But at the end your using a local Xammp server.
How would you setup a test environment on the server where the doomain is hosted? Do you use bitbucket for it as well?
Thanks, cheers.
Alberto Serrano says
Hello , I made a staging site successfully but my live site already had a little problem with a plug in , I contacted the developer and he asked for my admin credentials , following your advice on other article I gave him log in credentials to my staging site and he fixed the issue , to make the changes on the live site he told me to import the database from the staging site to the live site , my concern is the sql changes I made to the staging database , if I copy the database isn’t my live site going to redirect to the staging site now ? I can’t find the SQL queries to delete them
Thanks
WPBeginner Support says
See our tutorial on how to update URLS when moving WordPress site.
Admin
isagani says
hey,
nice article, i followed all instructions and gave me a clean view process on using git and staging environment. hope all experienced people do what you did so many can step forward from beginner to advance.
Thanks a lot.
Isagani
Kristof Bernaert says
Just a perfect article that helped me to setup the whole thing.
My staging environment is on the same shared linux hosting, just in another directory.
I used this also as the repo for git.
With Coda, I’m working online in that staging. As I save changed files (mainly css), I see instantly the updates.
So I don’t need the local files on my laptop.
But how to checkout those remote files under the staging folder, without fetching a local copy?
Thx!
Kristof
bcall says
Thanks for the article!
I have one problem, though: I have two databases and am not sure which one (or maybe both) is connected to my live site. I checked the wp-config.php file and it’s linking to a database with a different name, one that does not appear in my database list (in phpMyAdmin). Is it possible that the database was renamed?
Nick Jubrey says
Look in your wp-config.php file that’s where wp is directed to that particular database, the db your using will be listed there.
Tiffany Johnson says
I’m having some issues with the dev site recognizing my theme and content. I copied over the following files prior to running my installation of wordpress, however the pages and content are still not being recognized. I checked the files and my media is in the uploads file, my themes are present, as are my plugins, but none of them are recognized in the actual wordpress site.
/wp-content/uploads
/wp-content/themes
/wp-content/plugins
Any suggestions on what else I can try? Thanks!
Nicole says
I’m having this same problem. Any suggestions of what to try? I followed the instructions to copy those files from one folder to the other, and it is in the right place.
Brad Scott says
@WPBeginner,
For my case.
Create subdomain: staging.example.com
Create Document Root: public_html/staging
Need to run the following SQL queries:
The NEW_URL should be http://example.com/staging not http://staging.example.com
Login: http://example.com/staging/wp-login.php
Cheers & Thanks
byberkan says
Brad, so that means you are not using the subdomain. You are just using it as a subdirectory which you didn’t have to create a subdomain to use that..
Paula Lay says
Thank you so much for this tutorial! The step-by-step instructions are perfect for someone who hasn’t done this before. I encountered a snag where I was getting an error message after creating a subdomain (something like a problem configuring the DNS). For anyone that encounters this problem – clear your browser cache and cookies, and then you will see the correct screen. Took me days to figure this out (I gave it a few days because I thought it would take 24hrs or so for the domain to propogate).
Random Dev says
Whoa. Wouldn’t it be simpler, cutting down on quite a few steps and reducing the technical nature of this process, to just use a backup plugin with a migrator (search/replace the database) function… instead of copying the databases manually, *and* instead of using Git/Bitbucket? Or am I not understanding something?
Cannonpult says
For smaller sites, maybe. But plugins like Duplicator start to fail or have significant diminishing returns on larger sites. For example, if you were working on a site with a lot of media, Duplicator will never be able to transfer everything. You will get warning messages and have to leave media behind in the transfer.
Yes, this tutorial would be overkill for a small blog. But it’s absolutely the way you should go for say, a woocommerce site with 3,000 products (including images and custom data).
The other big consideration is frequency of changes. Some sites are fairly hands-off after they go live. Maybe you just update core + plugins and perform a few minor changes per year. Other sites might require weekly or even more frequent changes. If this were the case, it would become a pain to wait for backups and then drop a backup on the new site (crossing your fingers that it works each time). By using the method described in the tutorial, you can commit smaller changes at a time right after testing them.
mgiulio says
Excellent article.I was looking for info about best practices for wordpress staging sites. The additional section on the git-bitbucket workflow is very much appreciated.
nwesource says
Fantastic tutorial, thank you! I know WPEngine.com has a staging site built into their hosting options which seems fantastic although I haven’t tried it just yet. Are there any other easier options you know of to setup and operate a staging site, with more of a plugin functionality like WPEngine? They literally have a clone to staging button and a clone to live button that makes this seem like a process from the 80’s LOL…
Amazing tutorial, thank you for enterprise level content!
WPBeginner Staff says
No you first need to extract the zip folder and then upload the contents of wordpress directory to your staging site.
Tony Leary says
Can someone elaborate on this one step:
„First download a fresh copy of WordPress from WordPress.org. Upload the contents of WordPress to your staging site. Note, do not run the WordPress install yet.“
I read that as „1) download WordPress zip file from WordPress.org and 2) upload .zip file to /staging folder via File Manager.“ However, I don’t think that’s correct.
bcall says
You can upload the .zip file and then extract the contents within file manager.
WPBeginner Staff says
Most probably your subdomain is not configured correctly.
Julius says
I actually found out the problem..and it’s been resolved…however, I am unable to add images to my library….anyone else experienced this challenge.
Hans Lindgren says
Is the wordpress install running on Windows?
(If so, you need to grant Modify NTFS permissions to IUSR on C:WindowsTemp)
Julius says
Awesome tutorial…however, after I attempt to log into the staging site I am taking to the „Opps! Google Chrome could not find http“. What am I doing wrong?
Julius says
This is really a great tutorial and something I been wanting to do for quite sometime. My problem is that when I visit the WP login screen it appears that the styling from my theme isn’t applied. Is this normal? Also, when I enter my credentials from the live site into the fields for the staging site, it doesn’t log me in. It’s taking me to the „Oops! Google Chrome could not find http“. Am I doing something wrong?
Sloan Stewart says
Very helpful article. Only issue I have is that when it begins discussing version control, it switches from focusing on the alternate wordpress installation on the server to a local installation on one’s machine.
I am assuming one would build your site locally (I am using WAMP) and then use Git/Bitbucket & Ftploy to update your dev/staging wordpress install? That would mean one would have three versions of the wordpress site at all times [Production, Dev/Staging, Local].
How does one ensure your local wordpress install remains compatible with the database and other configuration on the server? Or is there a way to utilize Git/Bitbucket/Ftploy on the server without having to involve a local copy of your wordpress site.
Karlis says
Do you need to create user for your freshly created phpmyadmin database?
WPBeginner Staff says
No this tutorial is not written for WordPress multisite.
Aathi says
Hi,
Will the above process works for wordpress multisite ?
Cheryl S. says
Because I typically develop in a staging area on my server and then move it to the clients server to go live, rolling back to previous versions is nearly impossible. This article has made me seriously consider implementing version control with Git and Bitbucket. Thank you so much for this tutorial.
WPBeginner Staff says
Yes this would be a better approach.
Mimi Bondi says
Thank you. Is it safe to simply copy all the files from the “test“ site and paste them over the current “live“ files via FTP? Or is there more to it?
Mimi Bondi says
Would this be the best way to duplicate a website, set it up with a new theme/content then copy it over to the current live website?
I want to change theme but it’s quite a big job so instead of activating it then frantically trying to fix things for days, I’m looking for a way to copy my current site, change it all “in the background“ then make the new one live. Please let me know if it’s even possible?
Mimi Bondi says
Once i have my site exacty how i want it in the staging environment,
is there a safeway to copy those files to the real live site?
My goal is to change themes but because this would involve quite a bit of
setting up, i am looking for a way to do this safely and only replace my
current content with the new content when it’s ready (without changing
permalinks and SEO hopefully). Is that possible?
Larry says
Excellent article….I was able to follow the instructions step-by-step and complete the creation of development site on my hosting server. Kudos to the writter.
Mike says
I’m having some issues when I try to run the SQL queries to change the references to the staging site. I am receiving the following error:
“
#1064 – You have an error in your SQL syntax; check the manual that corresponds to your MySQL server version for the right syntax to use near ‚1
UPDATE wp_options SET option_value = REPLACE(option_value, ‚http://example‘ at line 1
“
My SQL query is as follows:
“
1
UPDATE wp_options SET option_value = REPLACE(option_value, ‚http://example.com‘, ‚http://dev.example.com‘);
2
UPDATE wp_postmeta SET meta_value = REPLACE(meta_value, ‚http://example.com‘, ‚http://dev.example.com‘);
3
UPDATE wp_posts SET guid = REPLACE(guid, ‚http://example.com‘, ‚http://dev.example.com‘);
4
UPDATE wp_posts SET post_content = REPLACE(post_content, ‚http://example.com‘, ‚http://dev.example.com‘);
“
As I missing a step or do I have something incorrect in query? Thanks for your help.
Mike says
Never mind, I figured out my issue. Feel free to delete this comment.
djramc says
i have the same problem. could i ask how did you solve this issue?
thanks by advance
#1064 – You have an error in your SQL syntax; check the manual that corresponds to your MySQL server version for the right syntax to use near ‚)‘ at line 1
WPBeginner Support says
You need to remove numbers from lines, replace example.com with your live site url and dev.example.com with your development or staging site URL.
Admin
Bevis Larsen says
This article is most useful for the user who want to make advance wordpress application
Brad E says
I followed the directions and am able to get the staging site to work. However, every link, page and even login revert to the live site not the staging site. How do I fix this?
WPBeginner Support says
you need to change site address and wordpress address. To do that you need to run this SQL query in phpmyadmin for the database of your staging site:
UPDATE wp_options SET option_value = REPLACE(option_value, ‚ORIGINAL_URL‘, ‚NEW_URL‘);
UPDATE wp_postmeta SET meta_value = REPLACE(meta_value, ‚ORIGINAL_URL‘, ‚NEW_URL‘);
UPDATE wp_posts SET guid = REPLACE(guid, ‚ORIGINAL_URL‘, ‚NEW_URL‘);
UPDATE wp_posts SET post_content = REPLACE(post_content, ‚ORIGINAL_URL‘, ‚NEW_URL‘);
Don’t forget to replace the original url with the url of your live site and new url with the URL of your staging site.
Admin
Brad E says
OK – it works now. I had to run the query several times, but got it to work. The problem I am having now, is that all of the theme settings are missing. The header, widgets, background, etc. are set to the theme’s defaults. I am not sure how to update the settings to what the live site has. I copied the 3 files from the wp-content directory. Thanks for the outstanding article and support.
ROHIT says
Hi,
As usual, just read you well written article on staging. I’ve got only question in mind right now and is that if there is any changes made in database while working on any project then do I need to upload it seperately on server from local environment whereas files would automatically get deployed via ftploy.
Cheers and Thanks.
Keep your good work up.
Clive says
If I make changes on my local WP project, I understand files in my theme are changed, and those are uploaded to staging via BitBucket/Ftploy. What about the database/tables from my local project? I don’t understand why those aren’t also included? Or would the database/tables in staging be updated based on theme changes that are uploaded? Thanks!!
WPBeginner Support says
Clive, in your BitBucket repository you can only store your WordPress files. FTPloy simply syncs those files to your staging site.
Admin
Paul Sweany says
What do you recommend for when database changes are made? Let’s say I create a new page; should I just re-import the database on the dev server after I make changes to it on my local copy? Also, moving it from dev to live, any recommendations other than manually importing it and running a search and replace to fix the URL?
Glen Clay says
As usual, great article and right when I need it. Keep up the great work! On another note, I am on my iPhone and that annoying floating black ‚Trending‘ bar keeps getting in the way of me commenting. This article benefited me so much that I went through the several tries it took for me to comment.
WPBeginner Support says
Glen, thanks for your feedback. We will look into it.
Admin
Eben says
I wasn’t really mentioned on what to do with the staging database and how to transfer the changes to the live database, especially if your client has been making changes to the live site while you’ve been making changes to the staging site and there are changes in both databases.
This is one area of staging environments with wordpress that I haven’t been able to get my head around.
WPBeginner Support says
Staging is basically for development, when working on themes or plugins. We imported the database only so that we have actual data to test with. It is not supposed to be a synchronized mirror of your live site.
Admin
Juliana Maggioli says
I don’t know if is the same as Eben’s question, but everything is going fine till…: upload/transfer the staging content to the live site. supposing everything is perfect in the staging, how do i make all this perfect structure/content be the live site, without risks?
Damien Carbery says
I have started using WP Migrate DB (http://wordpress.org/plugins/wp-migrate-db/) to convert urls and paths in the DB. It will also convert urls and paths that are in serialised data.
So I copy the files to the staging server and create a database and then export the live db via WP Migrate DB and import it to the new database via phpMyAdmin.
The biggest issue is when the live site is updated before I bring the staging server db back.
Zimbrul says
If you have Softaculous is even easier to deploy a staging site to the live site: you can clone the site to a location within the same server.
It’s what I’m doing: I create the staging environment and when done I just go the the list of my WordPress installs in Softaculous control panel and „clone“ the site to the live location. The live location must be empty by other files for this to work.
WPBeginner Support says
Thats another way to do it.
Admin
Giacomo Ardesi says
Hey Zimbrul, can you give some more details about Softaculous and how you used it please?
Giacomo Ardesi says
Hey Zimbrul, could you please give some more details on how you use Softaculous to clone your WP staging site? Thank you!
M Asif Rahman says
Thanks Syed & The Team, that’s one of the most complete and understandable for normal readers Staging Guide for WP. Nicely done.