Als wir zum ersten Mal darüber berichteten , wie man SSL in WordPress hinzufügt, fragten viele unserer Leser nach einer kostenlosen SSL-Lösung.
Leider gab es zu dieser Zeit noch nichts. Dank Let’s Encrypt hat sich das jetzt aber geändert.
In diesem Artikel zeigen wir Ihnen, wie Sie mit Let’s Encrypt kostenloses SSL in WordPress hinzufügen können.

Was ist SSL und Let’s Encrypt?
Jeder Internetnutzer gibt täglich viele persönliche Informationen preis. Wir tun dies beim Online-Einkauf, beim Anlegen von Konten, bei der Anmeldung auf verschiedenen Websites und vielem mehr.
Wenn sie nicht ordnungsgemäß verschlüsselt sind, können diese Informationen ausspioniert und gestohlen werden. An dieser Stelle kommt SSL ins Spiel. Es bietet die Verschlüsselungstechnologie, um die Verbindung zwischen dem Browser des Benutzers und dem Webserver zu sichern.
Jede Website erhält zur Identifizierung ein eindeutiges SSL-Zertifikat. Wenn ein Server vorgibt, mit HTTPS zu arbeiten, und sein Zertifikat nicht übereinstimmt, warnen die meisten modernen Browser den Benutzer davor, eine Verbindung zu dieser Website herzustellen.
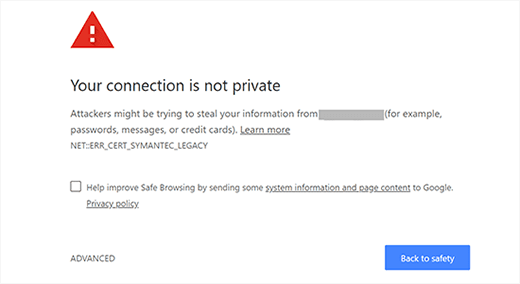
Bisher war die einzige Möglichkeit, Websites mit SSL zu sichern, die Verwendung eines kostenpflichtigen SSL-Zertifikats.
Let’s Encrypt ist eine kostenlose offene Zertifizierungsstelle, die SSL-Zertifikate für die Allgemeinheit bereitstellen will. Es handelt sich um ein Projekt der Internet Research Group, einer gemeinnützigen Gesellschaft.
Let’s Encrypt wird von vielen Unternehmen gesponsert, darunter Google, Facebook, Sucuri, Mozilla, Cisco und anderen.
Schauen wir uns nun an, wie Sie Ihrer WordPress-Site mit Let’s Encrypt ein kostenloses SSL-Zertifikat hinzufügen können.
Einfacher Weg – Verwendung eines Hosts mit integriertem kostenlosen SSL
Als Let’s Encrypt immer beliebter wurde, begannen viele WordPress-Hosting-Unternehmen, eine integrierte, einfache SSL-Einrichtung anzubieten.
Der einfachste Weg, Let’s Encrypt kostenloses SSL zu WordPress hinzuzufügen, ist die Anmeldung bei einem Hosting-Unternehmen, das eine integrierte Integration anbietet.
In diesem Artikel werden wir einige Methoden mit verschiedenen Hosting-Anbietern behandeln. Sie können die Links unten verwenden, um zu dem Abschnitt zu springen, der Sie am meisten interessiert:
- Method 1: Setting Up Free SSL With Let’s Encrypt on Bluehost
- Method 2: Setting Up Free SSL With Let’s Encrypt on SiteGround
- Method 3: Setting Up Free SSL With Let’s Encrypt on DreamHost
- Method 4: Installing Let’s Encrypt Free SSL on Other Web Hosts
- Updating WordPress URLs After Setting Up SSL
- Update Google Analytics Settings
Einrichten von kostenlosem SSL mit Let’s Encrypt bei Bluehost
Bluehost ist die Nummer 1 im Webhosting für kleine Unternehmen und wird offiziell von WordPress.org selbst empfohlen.
Darüber hinaus können WPBeginner-Leser mit unserem Bluehost-Gutschein bis zu 73% auf Hosting-Angebote sparen, die ein kostenloses SSL-Zertifikat enthalten.
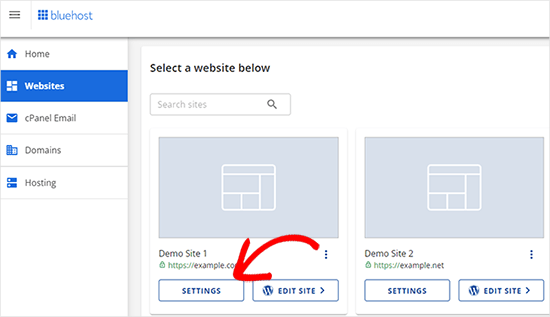
Das Einrichten Ihres kostenlosen SSL-Zertifikats bei Bluehost ist ganz einfach. Melden Sie sich dazu in Ihrem Bluehost-Kontrollzentrum an und klicken Sie im Menü auf der linken Seite auf die Registerkarte „Websites“.
Suchen Sie dann die Website, für die Sie das kostenlose SSL aktivieren möchten, und klicken Sie auf die Schaltfläche „Einstellungen“.
Klicken Sie anschließend auf die Registerkarte „Sicherheit“.
Dort sehen Sie unter dem Abschnitt „SSL-Zertifikate“, dass der Basic SSL-Status automatisch auf aktiv gesetzt ist.
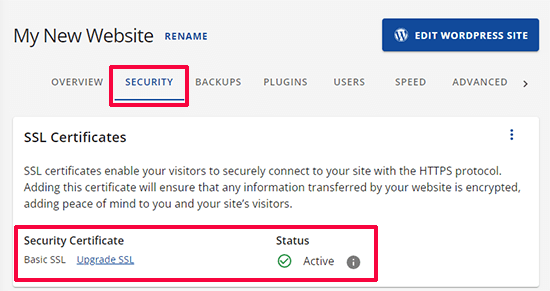
Wenn sie nicht aktiv ist, sehen Sie einen Schalter, mit dem Sie sie einschalten können.
Das war’s. Sie haben das kostenlose Let’s Encrypt SSL erfolgreich zu Ihrer Website hinzugefügt.
Allerdings ist Ihre WordPress-Website noch nicht bereit, es zu verwenden. Zunächst müssen Sie Ihre WordPress-URLs aktualisieren und dann die Probleme mit den unsicheren Inhalten beheben.
Keine Sorge, wir werden Ihnen zeigen, wie das geht. Fahren Sie mit dem Abschnitt über die Aktualisierung von URLs und die Behebung von Problemen mit unsicheren Inhalten fort.
Einrichten von kostenlosem SSL mit Let’s Encrypt auf SiteGround
SiteGround ist einer der vertrauenswürdigsten und bekanntesten Hosting-Anbieter, der die Integration von kostenlosem SSL anbietet.
Sie stellen automatisch ein kostenloses Let’s Encrypt SSL-Zertifikat für jede Website aus, die auf der Plattform erstellt wird. Es kann bis zu 72 Stunden nach der Registrierung Ihrer Domain dauern, bis Ihr SSL-Zertifikat ausgestellt ist.
Um zu überprüfen, ob Ihr SSL-Zertifikat erfolgreich ausgestellt wurde, können Sie in Ihrem SiteGround-Dashboard zu Site Tools „ Sicherheit „ SSL Manager gehen.
In der Tabelle „SSL verwalten“ sehen Sie in der Spalte „Status“ „Aktiv“, wenn das SSL-Zertifikat für Ihre Domain ausgestellt worden ist.
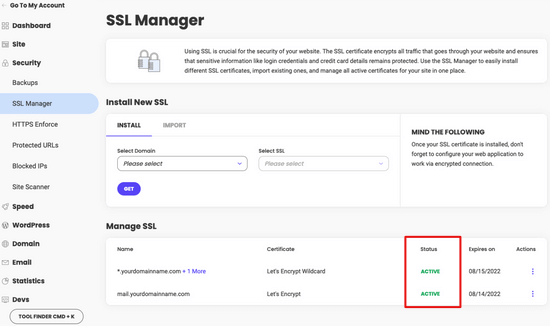
Wenn Ihr SSL-Zertifikat nach 72 Stunden noch nicht ausgestellt wurde, können Sie es auch manuell aktivieren. Hier erfahren Sie, wie Sie Let’s Encrypt kostenloses SSL in SiteGround aktivieren.
Gehen Sie einfach in Ihrem SiteGround-Dashboard zu Site Tools „ Sicherheit „ SSL Manager .
Unter dem Abschnitt „Neues SSL installieren“ müssen Sie den Domainnamen auswählen, für den Sie das kostenlose SSL verwenden möchten, und dann „Let’s Encrypt“ aus dem Dropdown-Menü wählen.
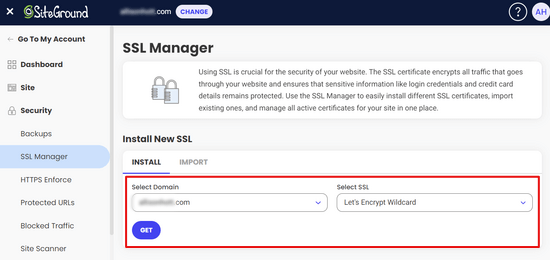
Sie können nun auf die Schaltfläche „Abrufen“ klicken. Let’s Encrypt wird ein einzigartiges SSL-Zertifikat für Ihre Website ausstellen.
Das war’s schon. Sie haben erfolgreich Let’s Encrypt kostenloses SSL in Ihre WordPress-Site integriert.
Als Nächstes müssen Sie den Prozess abschließen, indem Sie die WordPress-URLs aktualisieren und das Problem der unsicheren Inhalte beheben. Springen Sie zum Abschnitt Aktualisieren von WordPress-URLs nach dem Einrichten von SSL.
Einrichten von kostenlosem SSL mit Let’s Encrypt bei DreamHost
DreamHost ist ein weiterer beliebter WordPress-Hosting-Anbieter, der eine integrierte Möglichkeit bietet, kostenloses SSL für jede Ihrer bei ihm gehosteten Domains einzurichten.
Zuerst müssen Sie sich in Ihr DreamHost-Dashboard einloggen. Unter dem Abschnitt Websites müssen Sie auf die Option „Secure Certificates“ klicken.
Klicken Sie dann unter dem Abschnitt „Let’s Encrypt SSL-Zertifikat“ auf die Schaltfläche „Dieses Zertifikat auswählen“.
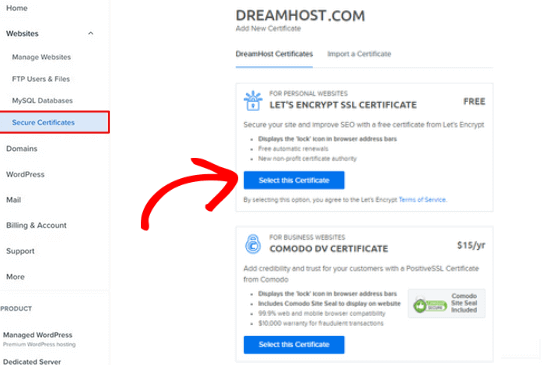
DreamHost wird nun Ihr kostenloses SSL-Zertifikat mit Let’s Encrypt einrichten. Es kann bis zu 15 Minuten dauern, bis die SSL-Änderungen auf den Server übertragen werden.
Das war’s. Sie haben erfolgreich ein kostenloses SSL-Zertifikat mit Let’s Encrypt zu Ihrer WordPress-Website bei DreamHost hinzugefügt.
Sie müssen noch die WordPress-URLs aktualisieren und das Problem der unsicheren Inhalte beheben. Springen Sie zum Abschnitt Aktualisieren von WordPress-URLs nach der Einrichtung von SSL.
Installation von Let’s Encrypt Free SSL auf anderen Webhosts
Das kostenlose SSL von Let’s Encrypt ist ein domänenbasiertes SSL-Zertifikat. Das heißt, wenn Sie einen Domänennamen haben, können Sie es zu jedem Webhost hinzufügen.
Wenn Ihr Webhoster jedoch keine einfache Integration wie Bluehost, SiteGround oder DreamHost anbietet, müssen Sie ein etwas langwieriges Verfahren durchlaufen.
Dieses Verfahren ist von einem Webhoster zum anderen unterschiedlich. Die meisten Hosting-Unternehmen haben ein Support-Dokument, in dem erklärt wird, wie man das macht. Sie können sich auch an die Support-Mitarbeiter wenden, um detaillierte Anweisungen zu erhalten.
Bluehost, einer der offiziellen WordPress-Hosting-Anbieter, ermöglicht es Ihnen, andere SSL-Zertifikate von Drittanbietern zu den bei ihm gehosteten Domains hinzuzufügen. Detaillierte Anweisungen finden Sie auf der Seite SSL-Installation von Drittanbieter-Zertifikaten.
Aktualisieren von WordPress-URLs nach dem Einrichten von SSL
Nachdem Sie das kostenlose SSL-Zertifikat mit Let’s Encrypt eingerichtet haben, besteht der nächste Schritt darin, Ihre WordPress-URL von HTTP auf HTTPS umzustellen.
Eine normale Website ohne SSL-Zertifikat verwendet das HTTP-Protokoll. Dies wird normalerweise durch das Präfix http in Webadressen wie dieser hervorgehoben:
http://www.example.com
Sichere Websites mit SSL-Zertifikaten verwenden das HTTPS-Protokoll. Das bedeutet, dass ihre Adressen wie folgt aussehen:
https:// www.example.com
Wenn Sie die URLs in Ihrer WordPress-Site nicht ändern, verwenden Sie kein SSL, und Ihre Site ist nicht sicher für die Erfassung sensibler Daten.
Sehen wir uns also an, wie man WordPress-URLs von http auf https umstellt.
Für brandneue WordPress-Website
Wenn Sie mit einer brandneuen WordPress-Website arbeiten, können Sie einfach in den WordPress-Administrationsbereich gehen und auf Einstellungen klicken.
Dort müssen Sie die WordPress-URL- und Site-URL-Felder aktualisieren, um https zu verwenden.
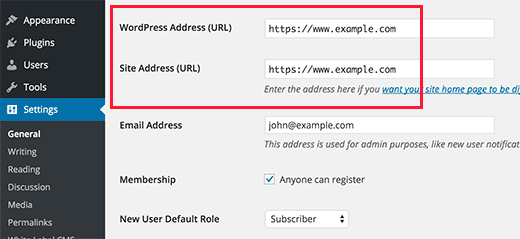
Vergessen Sie nicht, Ihre Änderungen zu speichern.
Für bestehende WordPress-Websites
Wenn Ihre Website bereits seit einiger Zeit online ist, besteht die Möglichkeit, dass sie von Suchmaschinen indiziert wird. Möglicherweise haben andere Personen mit http in der URL auf sie verlinkt. Sie müssen dafür sorgen, dass der gesamte Verkehr auf die https-URL umgeleitet wird.
Als Erstes müssen Sie das Really Simple SSL-Plugin installieren und aktivieren. Weitere Einzelheiten finden Sie in unserer Schritt-für-Schritt-Anleitung zur Installation eines WordPress-Plugins.
Das Plugin erkennt automatisch Ihr SSL-Zertifikat und richtet Ihre Website so ein, dass es verwendet wird. In den meisten Fällen müssen Sie keine weiteren Änderungen vornehmen. Das Plugin behebt auch Probleme mit unsicheren Inhalten.
Google Analytics-Einstellungen aktualisieren
Wenn Sie Google Analytics auf Ihrer WordPress-Website installiert haben, müssen Sie die Einstellungen aktualisieren und Ihre neue URL mit https hinzufügen.
Melden Sie sich bei Ihrem Google Analytics-Dashboard an und klicken Sie im Navigationsmenü auf der linken Seite auf „Verwaltung“. Als Nächstes müssen Sie im Menü auf Eigenschaftseinstellungen “ Datenerfassung und Änderungen “ Datenströme klicken.
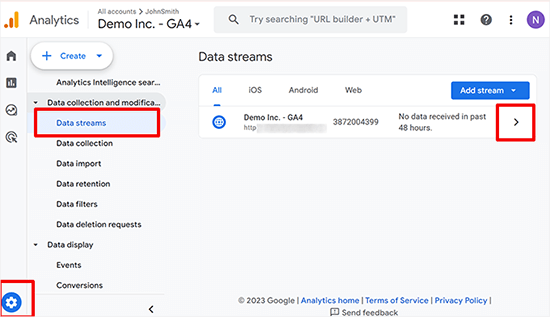
Klicken Sie auf den Pfeil neben dem Datenstrom Ihrer Website, um ihn zu erweitern.
Klicken Sie anschließend auf die Schaltfläche Bearbeiten (Stiftsymbol), um den Stream zu bearbeiten.

Daraufhin werden die Streamdetails geöffnet, die Sie ändern können.
Klicken Sie auf das Dropdown-Menü http und dann auf https.
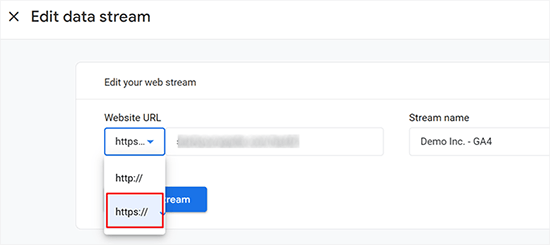
Vergessen Sie nicht, auf die Schaltfläche „Speichern“ zu klicken, um Ihre Einstellungen zu speichern.
Wir hoffen, dass dieser Artikel Ihnen geholfen hat, kostenloses SSL in WordPress mit Let’s Encrypt hinzuzufügen. Vielleicht interessieren Sie sich auch für unsere Liste nützlicher Tools zur Verwaltung und Erweiterung Ihres WordPress-Blogs oder unsere Anleitung, wie Sie eine kostenlose E-Mail-Domain erhalten.
Wenn Ihnen dieser Artikel gefallen hat, dann abonnieren Sie bitte unseren YouTube-Kanal für WordPress-Videotutorials. Sie können uns auch auf Twitter und Facebook finden.


Syed Balkhi says
Hey WPBeginner readers,
Did you know you can win exciting prizes by commenting on WPBeginner?
Every month, our top blog commenters will win HUGE rewards, including premium WordPress plugin licenses and cash prizes.
You can get more details about the contest from here.
Start sharing your thoughts below to stand a chance to win!
Moinuddin Waheed says
I was struggling to get an SSL certificate installed on one of my clients website who has already bought hosting from GoDaddy.
but there is no such option inside its dashboard like that of provided by bluehost, dreamhost and others.
Thanks for the detailed instructions for installing SSL certificate on websites.
I don’t know if GoDaddy has also any such option which I am unable to find?
WPBeginner Support says
You would need to check with GoDaddy’s support for their currently available options.
Admin
mukesh jethva says
My website is hosted on the shared hosting. How can i install Let’s Encrypt SSL on my website?
WPBeginner Support says
You would need to check with your specific hosting provider for the specifics allowed.
Admin
balu says
Is Let’s Encrypt option Available in HostGator?
WPBeginner Support says
Hi Balu,
Yes, you can install Let’s Encrypt free SSL in HostGator.
Admin
Shana says
Thanks for this great article. I have Go Daddy and my site is now secure. The Let’s Encrypt SSL certificate expires in 90 days. Do I need to „renew“ the certificate every 90 days? If so, can I just press the „renew“ link or must I go through all the steps required to install the certificate? Thanks so much!
WPBeginner Support says
Hi Shana,
Most hosting companies automatically renew the certificate.
Admin
Jorgelina says
Hi there, I could migrate my brand new page to https with no problems with your method, but when I tried to do it for my older page it didn’t work. I couldn’t log in into my dashboard, do you know what could be happening? I did everything as you said.
Many thanks!
WPBeginner Support says
Hi Jorgelina,
You probably meant website when you said page. It is harder for us to guess what may have gone wrong. Try undoing the steps you took and then try again.
Admin
Anson says
Hi,
Using Let’s Encrypt or Cloudflare SSL, which is better? and what is the difference.
Please advise.
Thanks,
Anson
Biplab Das says
Hi Syed ..thanks for this great article. I learned a clear idea about SSL and the importance of https. I already installed SSL to my website. It really help me to get higher ranking on google SERP. Previously I knew SSL certificate is paid. But now it’s getting free on Let’s Encrypt. Lot of thanks to you for written this valuable post
WPBeginner Support says
Hi Biplab Das,
Glad you found the article helpful
Admin
Phet says
Would this be a good alternative to other paid SSL certificat when building an Online Store?
Mario says
How should you change your CloudFlare settings after installing Let’s Encrypt certificate and switching your site over HTTPS? I refer expecially to the „Crypto“ tab.
serouj baghdassarian says
Hello, i just activated the SSL by SIteGround (enforcing https), and i can see it working but with the warning „Your connection to this site is not secure“.. is this normal?
WPBeginner Support says
Hi Serouj,
No, your site is not secure yet. Please follow the instructions in the article, or ask your hosting provider for support. They will be able to fix it for you or point you in the right direction.
Admin
Sunny says
After switching to https through SiteGround everything was fine excepted that I lost my social shares. Can you make a tutorial to get them back. (I used SumoMe social sharing plugin. )
Okoto Enigma says
I’ve migrated, performed 301 redirect, and changed the url to https:// in Google analytics. But now, how will I choose my preferred domain in search console? It keeps telling me to verify ownership of the www but it doesn’t show me how to verify it. Can you help me?
vamshi says
i migrated from http to https still it is shwoing insafe and its redirecting to another country website whats the issue? Please now im unable to login to my wordpress can u please help me?
Dillip says
Can you let me know how to do it in HostGator? I have checked before but seems like there are some pending issues with the hosting provider and under consideration.
Matus says
If I can ask, why you’re not using on your website SSL from Let’s Encrypt?
Stav says
thx for the infos guys!
I love this blog and it helped me alot.
I´m using Really simple SSL with the shared SSL I got from my hoster. The problem is that the redirection from http to https works fine just on the homepag. Other pages dont redirect. and The RSSSL plugin is updating every second day but not solving the problem. Any sollution for this problem?
allan says
thanks! I’ve been looking for this integration for hours and even thou my host offers let’s encrypt support, it doesn’t offer documentation on how to implement it.
Matthew Granat says
Awesome article! Just switched about 60 sites to siteground and couldn’t be happier. Finding out about and using Let’s Encrypt with the SSL plugin is like the icing on the cake!
thanks again!
Tony Bright says
OK, I’m trying to get my head around this. I will still need a dedicated IP Bluehost and then I can install the free SSL by Let’s Encrypt? And, this would be a better option than the free SSL from BH, right?
I am going to be developing an ecomm site for fitness apparel and gear.
Douglas Barnes says
I installed letsencryprt on an Ubuntu 16.04 LAMP server via the shell. All the WordPress files are white screen. I tested the site in QUALSYS, which checked out. I set up an hml test page in the root difectory that works with https. It’s just the WP pages.
I am thinking that I need to do some configuration in the default-ssl.conf file, though my attemot at that managed to break the white screen and make the site disappear. Any thought?
Suhinder lal says
I have reached to a wp plugin WP Encrypt to setup lets encrypt on WordPress site. Please guide me if it is worth installing for free SSL by lets encrypt
Ian Rayner says
This has created a nightmare for me.
On my local dev site (I use MAMP) I used the dashboard – settings – general to change the URL’s from „http“ to „https“. As soon as I saved the change I got a message saying localhost refused connection. I can’t log in to the dash board to change the url back – I get the same message and the address in the bar is
https://localhost/mysite/.I have tried fiddling with the wp-login.php to not force SSL, to no avail.
It’s a horrible catch 22. Any ideas how I can get out of this problem?
WPBeginner Support says
Hi Ian,
You can revert back your site urls to http by following these steps.
Go to /Applications/Mamp/htdocs folder on your computer. Locate your WordPress installation (propbably in mysite folder) and then go to /wp-content/themes/your-current-theme/ folder. Replace your-current-theme with the directory of the theme you were using on your website. In your theme folder you need to edit functions.php file.
Add this code in your functions.php file at the end.
1-click Use in WordPress
Save changes and try accessing your website on
http://localhost/mysiteAdmin
Markus Martin says
Hi Syed. I tried to install this certificate multiple times after activating the Really Simple SSL Plugin but it kept breaking my site and returning an Error 500. I do not understand how to create the certificate using the letsencrypt website so I used this site instead and then installed manually on my site. My hosts told me I can install SSL even though am on shared hosting. What could be the problem?
WPBeginner Support says
Try adding SSL after deactivating all other plugins on your website. Then reactivate them one by one until you are able to reproduce the error.
Admin
Markus Martin says
Thank you. I did the same and I found about two to three plugins that caused my site to fail. Despite that, the SSL breaks the CSS for my site. I had to remove it entirely and just stay without SSL.
jelvir says
Any tips for someone who is self hosting? I’m hosting my small website running in wordpress in a raspberry pi on a LAMP environment.
Luong says
Great article, I just activated the ssl in the hosting panel then install the plugin, no more configuration. Thank you.
Sorin Ciprian says
Thanks for the tutorial! May I ask, once I have activated ssl on my domain do i need to update the sitemap of the site on google webmaster tools?
Thanks!
Facun says
Hello,
Very nice article, thank you!
I was wondering how to implement Let’s Encrypt only in certain pages (Woocommerce and contact pages for example).
Thanks,
Facun
Matthew says
I’m really glad about what Let’s Encrypt is doing; making encryption easily accessible to everyone is really awesome. Good to see web hosts implementing it for their customers also. My host, StackPress, is among those hosts who now offer Let’s Encrypt and I’m pretty stoked about it.
John Pescod says
I am relatively new to WordPress so I have read a lot on WPBeginner. I’m starting a new website and want to use SSL from the start – that’s how I came across this article. My Belgian hosting company does not provide an automated way to install Let’s Encrypt, but it does allow me to install my own SSL without having to buy/install the certificate through them.
In your article you write „Updating WordPress URLs After Setting up SSL – After setting up the Free SSL certificate with Let’s Encrypt“ but you don’t write how this process is actually done manually (unless I have missed it completely!). On the Let’s Encrypt website on their „Getting Started“ webpage they refer to the installation of „Certbot“ for this purpose, and then it all becomes as good as Chinese for me…
The link imbedded in your text, „After setting up the Free SSL certificate with Let’s Encrypt,“ just sent me off to a GoDaddy promo for webhosting, whereas I expected it was going to refer to a useful text explaining how to get a free SSL certificate from Let’s Encrypt.
I was hoping that your article would tell people who’s host do not automate the Let’s Encrypt installation how to complete this themselves, but after getting to the end of your article, I am (and surely many others) are left without the info we were hoping for.
WPBeginner Support says
Please look at the section ‚Installing Let’s Encrypt Free SSL on Other Web Hosts‘. We have given example of BlueHost, a web hosting company that does not offer easy tools to automatically setup Let’s Encrypt. But they do have a page on how to setup 3rd party SSL certificates. You can also ask your web hosting company to help you setup SSL.
Admin
John Pescod says
I’m sorry I didn’t mention that I had also read the BlueHost link. In the info BlueHost provide they say, „Provide the CSR to the SSL vendor of your choice. They will exchange it for a CRT file.“ I’ve already created a CSR that is ready to be forwarded to a 3rd party for a SSL certificate and I’d like to use Let’s Encrypt for this. But nowhere on the Let’s Encrypt website can I find a way to submit my CSR. They have a support page, but this is full of technical questions and answers, I found nothing that says how to obtain a SSL certificate from Let’s Encrypt using a CSR. Other (paid) SSL certificate providers have a simple and obvious way of letting you submit your CSR to get a SSL cert. in return.
Saif says
I have personally tried installing Let’s Encrypt on Bluehost, but failed. I talked with the customer support and they told me that they do not support Let’s Encrypt certificates. And he referred me to get a paid one. Their shared hosting sucks these days.
Bartek says
Dreamhost told me I can’t use Let’s Encrypt and CloudFlare at the same time. I therefore signed up for Cloudflare outside of Dreamhost because they offer free encryption of their own…somehow. I can’t figure out how to get a certificate created and put on my site and Dreamhost isn’t helping since it’s a Cloudflare product. Cloudflare isn’t helping cause it’s a free plan. I’m wondering if anyone has any simple insights into this?
Have a great day in The Matrix!
VB
vijay says
Cloudflare doesn’t support HTTPS for free plans. So you need a premium Cloudflare account if you want to use SSL.
Bartek says
Hi,
Maybe you’re right but they say they do and the options to turn it on are right there for me to choose ranging from strict to self signed…
Ruud says
Please note, on SiteGround Let’s Encrypt won’t work with the free plan from CloudFlare!
Rakesh says
A very good information. Please help me to add ssl to my website, i am using Godaddy shared hosting, could anyone help to add Let’s Encrypt SSL To my site.
kenny says
Go daddy told me that they do not allow lets encrypt on their shared hosting.
Dean Bartley says
Very interesting stuff. This site has been teaching me a lot of stuff.
AHMED says
Hello Syed! Great tutorial. I just want to ask when this error occurs whether its the time when user buys, login to website or every time if web does not have a ssl certificate. For example, my web don’t offer login, shopping system so do i need a ssl certificate. Whether this error will appear or not??
thanks
Jay A says
I have a WordPress site running on InMotion hosting. I contacted them today and they basically told me that I’m free to install it but that they won’t offer any support or help doing it. Has anyone set up Let’s Encrypt for a InMotion WP site? I made it to the SSL/TLS manager in my cPanel but had no idea what to do from there. Any help would be appreciated. Thank you.
John says
Hello Syed,
Thanks for the article. Very interesting since I recently joined Siteground and of course had Let’s Encrypt installed. Works great on pc, but …. is untrusted on mobile devices. Have you heard about this phenomenon or could it be a Siteground problem (configuration of their webservers)?
WPBeginner Support says
Please contact SiteGround support. They will be able to help you better.
Admin
Ashutosh Kumar says
It is not problem of Siteground.
Letsencrypt SSL is not trusted on most of the mobile device browsers
Rick Zich says
This issue may have been fixed. Have have a let’s encrypt cert and it is working on both desktop and mobile using woocommerce. At least on the iphone safari browser. It is interesting though because you have tap into the address to see the https as it does not show in the normal address.
Luna Lunapiena says
I just tried it on multiple sites/domains. Appears to be working fine!
Luna Lunapiena says
tested on iOS 9.2 and 9.3, Safari & Chrome – seems to work fine on both
Melanie Lewis says
Thanks for this great post and the step by step instructions! I had previously purchased a certificate but didn’t take the right steps to get is installed properly. Your post helped me get everything in order!
I also have the same question as Tasos: Do we uninstall the Really Simple SSL plugin after everything is all set, or does it need to remain running?
Thanks for all your educational efforts!
WPBeginner Support says
You will need to keep the plugin installed and activated.
Admin
Justin says
I suppose one would have to update webmaster tools once this is done right?
Arjun Chandran says
If you set the site url and and homepage url with https then WordPress will automatically redirect visitors, updating you webmaster tool is also a good idea.
Senthilkumar says
Thanks a lot for this article. I have a question though. I read somewhere enabling SSL will affect the adsense income? Is it true?
Editorial Staff says
Honestly don’t see why it would impact your Adsense revenue. We have heard that some folks reported their traffic dropping after they switched to SSL but that’s mainly because Google needs some time to re-index everything.
Admin
Andrew says
It’s great to see SiteGround is constantly innovating their web hosting services. I have multiple customers who I’ve placed on SiteGround and never looked back. Adding the free SSL certificate is an interesting service. Does the certificate come with standard web hosting? Is the certificate a premium option? Either way, the tutorial was extremely helpful! Especially with Google factoring in websites with http vs. https.
Editorial Staff says
It’s available on all of their accounts from what I can tell.
-Syed
Admin
Tasos Perte Tzortzis says
Hi , thanks for this information.One question
After we successfully install the Let’s Encrypt and the Really Simple SSL plugins and we finish with the process of renaming the URL to https can we then remove those plugins from the WordPress dashboard?..
Or do we have to keep them installed and running?
Kind regards
Keith Davis says
Hi Guys
This looks pretty good and with Google favouring SSL sites it is certainly something that I will be looking into.
I’ll send my host a link to this article and see if they are using it via CPanel.
Kate_H says
Great timelyarticle Wpbeginner!
I am just getting into the world off SSL certificates and this tutorial has given me a great starting place.
Regards,
Kate_H
Bern Ruelas says
Great job Syed! I’ve paid for certificates but was unable to give all my sites the https secure domain ability until now. Good timing as well because of the increased security threats everywhere on the net.
Keep up the good work!
Thanks,
Bern
Editorial Staff says
Thanks Bern – yes this will help a lot of sites get SSL. The folks at Let’s Encrypt are really doing awesome stuff.
Admin