State cercando di rimuovere /wordpress/ dall’URL del vostro sito?
A volte i principianti installano WordPress in una sottodirectory e questo fa sì che /wordpress/ appaia nell’URL del loro sito web, come ad esempio http://example.com/wordpress/.
In questo articolo vi mostreremo come eliminare /wordpress/ dall’URL del vostro sito WordPress.
Nota: il metodo illustrato in questa esercitazione funziona anche per altre sottodirectory.
Perché il mio sito web ha /wordpress/ nell’URL?
WordPress è abbastanza facile da installare e la maggior parte delle società di hosting WordPress offre installatori rapidi di WordPress nei loro pannelli di controllo.
Tuttavia, alcuni principianti che installano manualmente il proprio sito web WordPress possono finire per installarlo accidentalmente in una sottodirectory. Molto spesso, questa sottodirectory è denominata “wordpress”.
Di solito questo accade perché gli utenti finiscono per caricare la cartella wordpress che trovano all’interno del download ufficiale di WordPress.org.
Vediamo come risolvere facilmente questo problema e come eliminare /wordpress/ dall’URL del vostro sito. Verranno illustrati tre metodi e potete utilizzare questi link per passare a quello che desiderate utilizzare:
Metodo 1: Ricominciare semplicemente con una nuova installazione di WordPress
Se avete appena installato WordPress e non ci sono contenuti sul vostro sito web, potete ricominciare da capo.
È sufficiente cancellare l’installazione corrente e seguire le istruzioni del nostro tutorial sull’installazione di WordPress per reinstallare correttamente WordPress.
Se avete già aggiunto dei contenuti al vostro sito web, ci sono due modi semplici per rimuovere /wordpress/ dall’URL del vostro sito. Li illustreremo nei metodi 2 e 3.
Metodo 2: Cambiare l’indirizzo del sito WordPress
Se avete un sito WordPress consolidato, questo metodo è più semplice e veloce. Lo svantaggio di questo metodo è che i file multimediali, come le immagini, continueranno a utilizzare /wordpress/ nel loro URL.
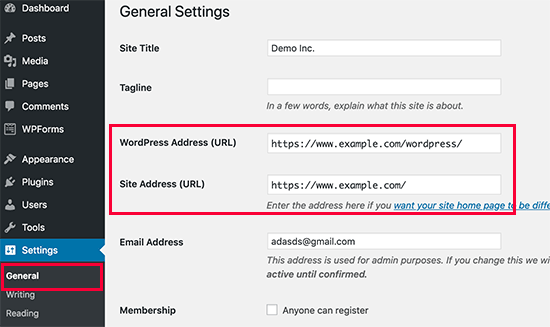
Per prima cosa, è necessario accedere all’area di amministrazione di WordPress e andare su Impostazioni ” Generale. Noterete che i campi “Indirizzo WordPress” e “Indirizzo del sito” avranno entrambi lo stesso URL.
È necessario modificare l’opzione “Indirizzo del sito” e farla puntare al vostro dominio principale, ad esempio http://www.example.com e lasciare l’opzione “Indirizzo di WordPress” così com’è.
Una volta fatto ciò, fare clic sul pulsante “Salva modifiche” per memorizzare le impostazioni.
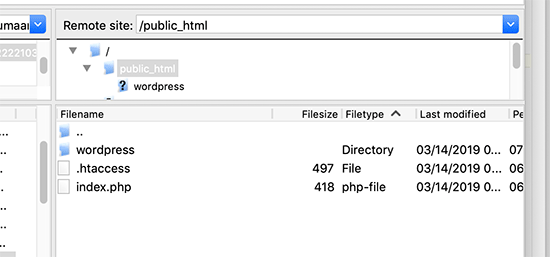
Successivamente, è necessario collegarsi al proprio sito web utilizzando un client FTP. Una volta lì, andate nella directory /wordpress/ e scaricate i file .htaccess e index.php sul vostro computer.
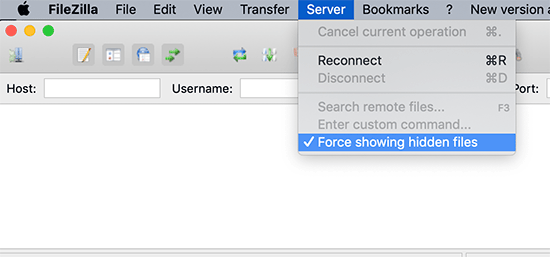
Se non si riesce a individuare il file .htaccess, potrebbe essere necessario forzare il client FTP a mostrare i file nascosti. Se si utilizza Filezilla, è necessario fare clic su Server dalla barra dei menu e selezionare l’opzione “Forza la visualizzazione dei file nascosti”.
Una volta scaricati entrambi i file sul computer, è necessario aprire il file index.php in un editor di testo come Notepad. In questo file, troverete una riga come questa:
require( dirname( __FILE__ ) . '/wp-blog-header.php' );
Questa riga carica il file wp-blog-header.php, necessario per caricare il sito WordPress.
Ora è necessario inserire la posizione corretta del file, sostituendo la riga esistente con questa:
require( dirname( __FILE__ ) . '/wordpress/wp-blog-header.php' );
Salvate le modifiche e caricate entrambi i file index.php e .htaccess dal vostro computer desktop alla root del vostro dominio usando l’FTP.
La cartella principale è la cartella madre con la cartella “wordpress” al suo interno e di solito si chiama /www/ o /public_html/.
Questo è tutto. Ora potete visitare il vostro sito web utilizzando il dominio principale e tutto funzionerà bene.
http://example.com
Tuttavia, se avete bisogno di accedere all’amministrazione di WordPress, dovrete comunque accedere a wp-admin all’interno della cartella ‘wordpress’, in questo modo:
http://www.example.com/wordpress/wp-admin
Metodo 3: Spostare WordPress nella directory principale
Questo metodo è più completo e sposta definitivamente il vostro sito WordPress dalla sottodirectory alla cartella principale del vostro sito web.
Passo 1: Creare un pacchetto Duplicatore
Per prima cosa, è necessario installare e attivare il plugin Duplicator sul proprio sito web. Per maggiori dettagli, consultate la nostra guida passo-passo su come installare un plugin di WordPress.
Dopo l’attivazione, è necessario visitare la pagina Duplicator ” Impostazioni e fare clic sul pulsante ‘Crea nuovo’.
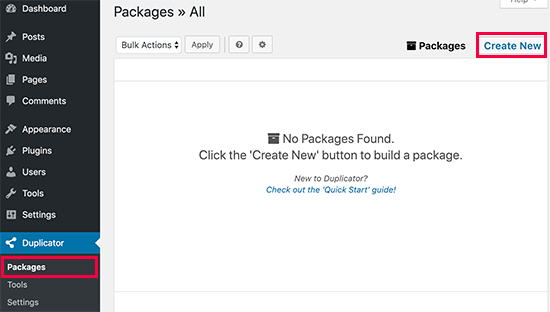
In questo modo si avvierà la procedura guidata di Duplicator, che creerà un pacchetto di installazione del vostro sito web completo. Fare clic sul pulsante successivo per continuare.
Successivamente, il plugin eseguirà alcune scansioni. Se tutto sembra a posto, è possibile fare clic sul pulsante “Build” in basso.
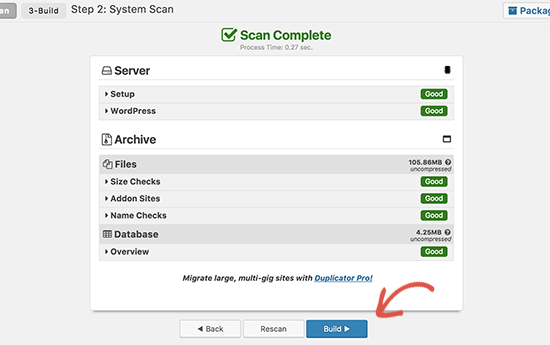
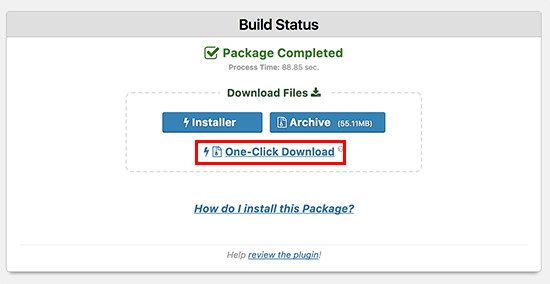
Duplicator creerà un pacchetto e chiederà di scaricarlo insieme allo script di installazione.
Scaricate entrambi i file sul vostro computer.
Passo 2: Creare un nuovo database per una nuova installazione di WordPress
È possibile utilizzare il database di WordPress esistente, ma è meglio crearne uno nuovo in modo che il vecchio database sia al sicuro e immutato. In questo modo, potrete tornare al vostro sito senza troppi problemi se qualcosa dovesse andare storto.
È necessario visitare la dashboard del cPanel del proprio account di hosting, scorrere verso il basso fino alla sezione “Database” e quindi fare clic sull’icona “Database MySQL”.

Dopodiché, è sufficiente indicare un nome per il database.
Successivamente, si deve fare clic sul pulsante “Crea database”.

cPanel creerà un nuovo database per voi. Dopodiché, è necessario scorrere verso il basso fino alla sezione “Utenti MySQL”.
Da qui, è necessario fornire un nome utente e una password per il nuovo utente del database e fare clic sul pulsante “Crea un utente”.
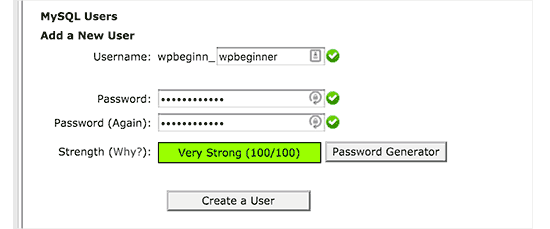
Ora è necessario assegnare i permessi del database al nuovo utente.
Scorrere fino alla sezione “Aggiungi utente al database”. Selezionare l’utente del database creato dal menu a discesa accanto al campo “Utente”, quindi selezionare il database. Infine, fare clic sul pulsante “Aggiungi”.

Il nuovo database è ora pronto per essere utilizzato per la nuova installazione di WordPress.
Passo 3: Eseguire la procedura guidata del Duplicatore
Ora è necessario caricare il pacchetto di archivi di Duplicator e il file di installazione scaricato in precedenza nella directory principale del sito web.
Questa sarà la directory contenente la cartella/wordpress/.
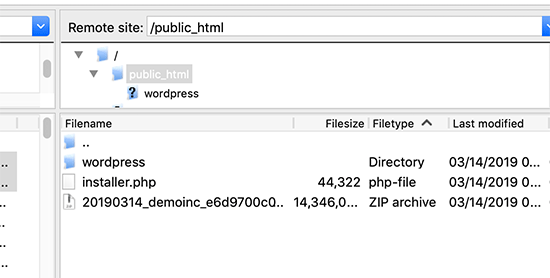
Dopo aver caricato entrambi i file, aprire lo script di installazione in una finestra del browser. È necessario inserire l’URL principale del sito, preceduto da /installer.php.
https://example.com/installer.php
Si aprirà la procedura guidata di installazione di Duplicator.
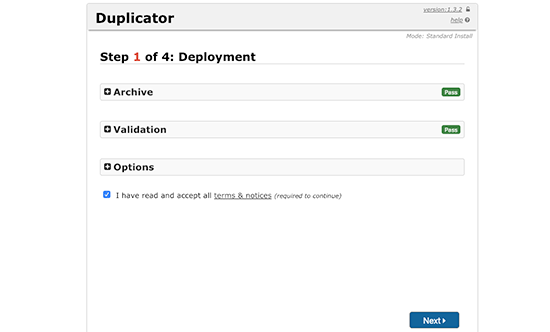
Selezionate la casella dei termini e delle condizioni e fate clic sul pulsante “Avanti” per continuare.
Successivamente, verrà richiesto di fornire le informazioni sul database. Inserite le informazioni relative al database creato in precedenza al punto 2.
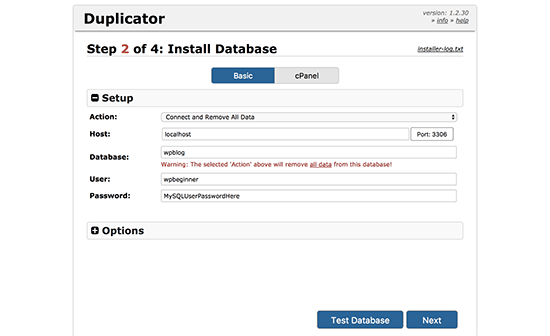
Dopo aver inserito le informazioni sul database, fate clic sul pulsante “Avanti” per continuare. Duplicator scompatterà ora il backup del database di WordPress dall’archivio al nuovo database.
Successivamente, verrà chiesto di aggiornare l’URL e il percorso del sito. Non è necessario fare nulla in questo caso, poiché il sito rileverà automaticamente il nuovo URL e il nuovo percorso. Tuttavia, se non lo fa, è possibile inserire manualmente i dettagli.
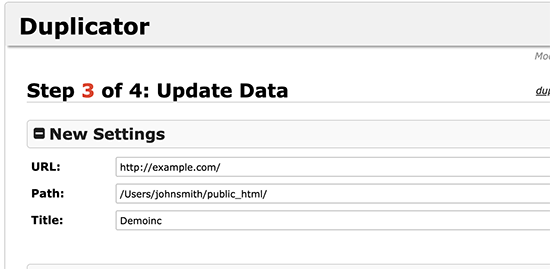
Duplicator terminerà la migrazione.
Sarà possibile fare clic sul pulsante “Admin Login” per accedere al sito web nella nuova posizione.
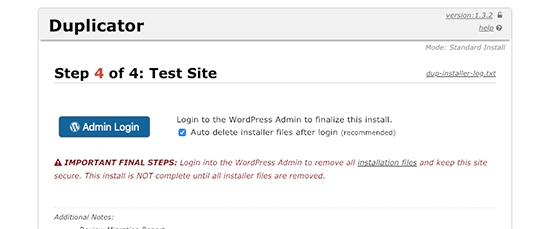
Passo 4: Impostare i reindirizzamenti da sottodirectory a cartella principale
Congratulazioni, avete spostato con successo il vostro sito WordPress dalla sottodirectory alla cartella principale.
Ora è il momento di impostare i reindirizzamenti in modo che gli utenti e i motori di ricerca possano trovare la nuova posizione del sito.
Per prima cosa, è necessario collegarsi al sito WordPress utilizzando un client FTP e cancellare la vecchia cartella /wordpress/.
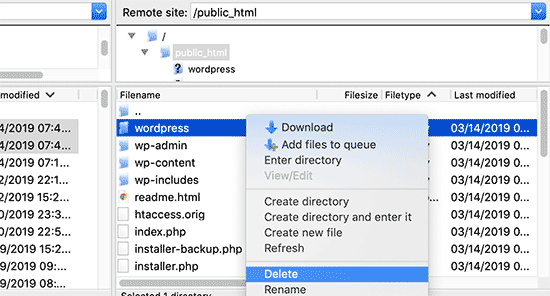
Dopodiché, passate all’area di amministrazione del vostro sito WordPress. Poiché è stato spostato nella radice del sito, l’URL di amministrazione di WordPress sarà questo:
https://example.com/wp-admin
Ora è necessario installare e attivare il plugin Redirection. Per maggiori dettagli, consultate la nostra guida passo-passo su come installare un plugin di WordPress.
Dopo l’attivazione, è necessario visitare la pagina Strumenti ” Reindirizzamento. A questo punto il plugin mostrerà una configurazione guidata. È sufficiente fare clic sui pulsanti “Continua l’installazione” e “Termina l’installazione”.
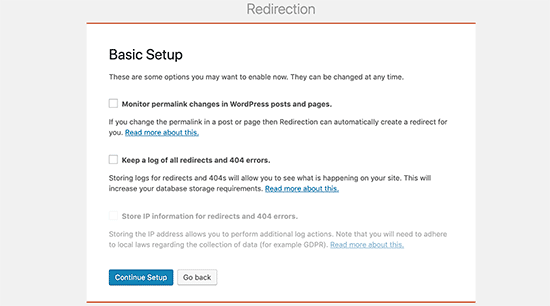
Successivamente, è necessario passare alla scheda “Reindirizzamenti” e aggiungere il nuovo reindirizzamento.
Innanzitutto, è necessario selezionare la casella “Regex” nell’angolo del primo campo.
Successivamente, passare al campo “URL di origine” e aggiungere https://example.com/wordpress/.*Poipassare al campo “URL di destinazione” e aggiungere https://example.com/$1.
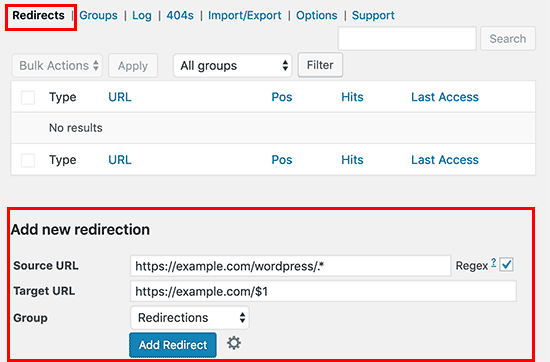
Non dimenticate di sostituire “example.com” con il vostro nome di dominio. Quindi, assicurarsi di fare clic sul pulsante “Aggiungi reindirizzamento” per salvare le modifiche e il gioco è fatto.
Un altro strumento che potete utilizzare per reindirizzare post e pagine è All in One SEO (AIOSEO). Vi mostriamo come reindirizzare i visitatori che utilizzano vecchi URL contenenti /wordpress/ verso la nuova posizione del sito nella nostra guida per principianti su come effettuare reindirizzamenti completi del sito in WordPress.
Inoltre, è possibile attivare il monitoraggio degli errori 404 per individuare eventuali link non funzionanti, in modo da non perdere il posizionamento delle parole chiave.
D’ora in poi, tutti gli utenti che cercheranno di accedere al vostro sito web con /wordpress/ nell’URL saranno automaticamente reindirizzati ai post corretti con il vostro nuovo URL principale.
Guide di esperti sulla modifica degli URL in WordPress
Ora che sapete come rimuovere /wordpress/ dall’URL del vostro sito web, potreste voler consultare altre guide relative alla modifica degli URL in WordPress.
- Come modificare gli URL del sito WordPress (passo dopo passo)
- Come aggiornare facilmente gli URL quando si sposta il sito WordPress
- Come rimuovere i numeri dagli URL di WordPress
- Come rimuovere la data dagli URL di WordPress
- Come rimuovere la stringa v=XXXX dagli URL di WordPress
- Come rimuovere lo slug genitore dall’URL della pagina figlio in WordPress
- Come cambiare lo slug dell’URL di ricerca predefinito in WordPress
- Come aggiungere un URL di accesso personalizzato in WordPress (passo dopo passo)
- Guida per principianti: Come trovare l’URL di accesso a WordPress
- Come spostare correttamente WordPress da HTTP a HTTPS (Guida per principianti)
Speriamo che questo articolo vi abbia aiutato a capire come eliminare /wordpress/ dall’URL del vostro sito WordPress. Potreste anche voler consultare la nostra guida su come accelerare le prestazioni di WordPress o la nostra selezione dei migliori plugin e strumenti SEO per WordPress.
Se questo articolo vi è piaciuto, iscrivetevi al nostro canale YouTube per le esercitazioni video su WordPress. Potete trovarci anche su Twitter e Facebook.


Syed Balkhi says
Hey WPBeginner readers,
Did you know you can win exciting prizes by commenting on WPBeginner?
Every month, our top blog commenters will win HUGE rewards, including premium WordPress plugin licenses and cash prizes.
You can get more details about the contest from here.
Start sharing your thoughts below to stand a chance to win!
Brenda says
Thank you so much for this tutorial! So helpful.
I followed step #2 and all the pages on my site work now without the /wordpress in the URL, EXCEPT for the homepage. I updated the Site URL in Settings > General, but for some reason the homepage still redirects from mysite.com to mysite.com/wordpress.
Any idea why this might be happening? Thanks in advance!
WPBeginner Support says
From the sound of the issue, we would recommend checking your index.php and htaccess are both in the correct folder for a likely reason.
Admin
Brenda says
Thanks so much for your response. Figured out the issue!
WPBeginner Support says
Glad to hear!
Adrian says
Not sure if this related, on initial set up should you you use the www dot …. com or just your sitename dot… com
WPBeginner Support says
That is a different situation that we cover in our guide below. WWW vs non-WWW is personal preference:
https://www.wpbeginner.com/beginners-guide/www-vs-non-www-which-is-better-for-wordpress-seo/
Admin
Lilly Walker says
I followed Method 1: Change WordPress Site Address
changed the site address with out /mywpfolder
and downloaded the ht.access and the index file – (they dont match your eg but just added the /mywpfolder etc
and uploaded the htaccess and the index files back to the root directory
BUT
the correct front page came up and then clicked on a link it came up but clicked on a link then and it 404’d.
my guess is that some pages have urls manually put in but how do I search and replace these?
Alice K says
Hi!
First, thank you very much!
I followed the second method, and now accessing the admin page works without adding “/wordpress” in the URL.
But when I try to access my website I still have to add “/wordpress” to the URL?!
Can anyone help? Where have I gone wrong?
WPBeginner Support says
The site is likely active in the old location, you should should still be able to see your login if you go to yourdomain/wp-login.php
Admin
sginader says
Thank you! I’m a WP novice so your step by step instructions was perfect. I do have a question – I followed Method 1 – does the redirect add to the site loading time? I ask because my site takes very long to load. Thank you!
WPBeginner Support says
While it adds a small amount to the loading time, it shouldn’t add enough to be noticeable. If this increase in load time was recent then you may want to check with your host to ensure there isn’t something conflicting with the redirect you set up.
Admin
Nkosiyapha says
This was very helpful. Thank you very much
WPBeginner Support says
You’re welcome
Admin
Rachel says
I have a question: if I use method 1, do I have to change all url links of my posts and images? My blog are actually inside a folder and I want to make a redirection to the root domain. It’s not clear…
WPBeginner Support says
For the first method, you shouldn’t need to redirect your posts.
Admin
birgit van Munster says
Hi, I made the change in the index.pho file as directed and moved the two files to the root directory, but I get this error message:
Parse error: syntax error, unexpected ” );’ (T_ENCAPSED_AND_WHITESPACE) in /data/40/5/47/114/5373603/user/6433782/htdocs/index.php on line 17
I think line 17 is exactly as described in the instructions, please help!
WPBeginner Support says
You may want to ensure you copied the code correctly and pasted it on a new line. You may want to take a look at our article here: https://www.wpbeginner.com/beginners-guide/beginners-guide-to-pasting-snippets-from-the-web-into-wordpress/
Admin
Bella says
Thank you so much! The guide I was reading didn’t mention the .htaccess part. This guide fixed the error on my site. Great work!
Bart says
Hi!
Great tutorial, and my URL now redirects (woohoo!)
However when I go the settings tab and change the site title to the one without /wordpress, the site works fine except for the home page, which gives an error.
What am I missing here…?
TROP ICSU says
Hi there!
I have my site hosted on my server. WordPress dir is located in /home/myuser/.
I tried to follow your steps by copying the updated index.php and .htaccess into same dir level where wordpress dir is. But no success.
Can you pl guide? Thank you.
Rachel says
If I have a wordpress instance in a subdirectory and I just want to delete it and not move it, can I just delete the folder, or do I need to go through some kind of un-install procedure so it is removed from the database as well?
WPBeginner Support says
Hi Rachel,
Yes you can delete it. However, we will still recommend to download it as a backup before deleting it.
Admin
Michael Hayman says
Hey, so i had a go at this, and for some reason i am now faced with an HTTP 500 error.
Not sure where i went wrong, but i don’t seem to be able to get it back to normal.
Any ideas would be much appreciated.
I have tried resetting the index.php back to default as well as the .htacess file with no avail.
To make matters more difficult i get the same HTTP 500 message when trying to login to the wordpress admin as well.
Clarisse says
Hi Michael,
My folder is called “/wp” instead of “/wordpress”, so probably yours too!
That might be the problem…
Louise says
I had the same problem, and my folder was called wp. I just went back to the index.html file and changed it from wordpress to wp and problem solved! Such a helpful article, this was hanging over my head for months and so glad to have it fixed!
Gareth Botha says
Hi Syed, many thanks for all these, I have been postponing my site for over a year now as it was simply too intimidating. I had however made the fault of installing wordpress to the subdomain /wp and set the entire site up. Just sorted it out with you tut above. I have however come across a new problem, my home/landing page no longer loads my blog posts. How do I resolved this? I also get a redirect error as well.
WPBeginner Support says
Hi Gareth,
Good luck with your new website. Wish we could be more helpful, but it is up to the theme and your website settings. Please see our WordPress troubleshooting guide to figure out whats causing it.
Admin
Yan Xun says
Hi, I followed these steps and my website is working fine. Only issue is now I can’t seem to load my theme’s UX Builder for my site.
does this method cause any issue if I am using a theme UX builder?
WPBeginner Support says
Hi Yan Xun,
Here is what you can try. First create a backup of your website. After that Uninstall the UX builder by visiting the plugins page, now install and activate it again.
If it comes packaged with your theme, then again create a backup of your website. After that you need to download a fresh copy of your theme. Next, temporarily switch your WordPress site to a default WordPress theme like TwentySeventeen. Delete your old theme and then install it from the zip file you downloaded earlier.
Admin
Gina says
Help! I followed your tutorial for removing wordpress. Now I can’t get into the site or admin.
Getting the following:
Warning: require(/home/content/09/8001609/html/wordpress/wp-blog-header.php) [function.require]: failed to open stream: No such file or directory in /home/content/09/8001609/html/index.php on line 17
Fatal error: require() [function.require]: Failed opening required ‘/home/content/09/8001609/html/wordpress/wp-blog-header.php’ (include_path=’.:/usr/local/php5/lib/php’) in /home/content/09/8001609/html/index.php on line 17
Marko says
Done that, and ‘/wordpress’ from addressbar is gone, but Google still lists it with it in the search. For example:
WPBeginner Support says
Hi Marko,
You will need to redirect those users. See our guide on how to setup redirects in WordPress.
Admin
Andrew says
Thanks guys i love u <3
Priyanka says
This tutorial is a life saviour. Thank you so much.
Beth says
Thanks for your helpful website. I downloaded .htaccess and index.php. My index php says index.php4 The line on it says this: .htaccess disapears when I download it to the desktop. In ftp, they are located in the same folder as the wordpress1 folder is located. It appears to be the root directory. The site has the url with wordpress1 at the end of it. I’m not sure what to do, and don’t want to crash the site!
Thanks,
Beth
Lee Graham says
Can I ask why you download .htaccess only to upload it again?, there is no mention of edting htaccess so why download in the first place ?
Brandi says
I believe he’s asking us to download the one from the /wordpress/ subdirectory and then upload it to the / root (which is up one level). I hope that helps
Manpreet Kaur says
HI,
Thankyou so much for these helpful tutorials my one problem is solved but there is one another. When I search on google and type my website address it shows index of link instead of my website name. When I click on that link it opens my website. Can anyone help me to display my website URL on google instead of index of URL.
Ariadne1985 says
THANK YOU SO MUCH!!!
I spent hours working on it (failure) and then found your site + explanation.
SUPERB!
Filip Kevely says
1. I have moved my example.com WP installation into subfolder (let’s call it “secret-sub”).
2. Typing example.com/wp-login.php automatically re-directs me to example.com/secret-sub/wp-login.php :((
((Note: Visiting no other part of my web page shows this subfolder name as part of URL address; visitors see only example.com everywhere.))
Is this normal behaviour?
And if so – what’s actually the point of having your WP installation in “secret” subfolder – when basic /wp-login.php and /wp-admin brute attack re-directs to URL showing the “secret subfolder” name??
Any clear explanation will be very much appreciated. Thx.
WPBeginner Support says
Hi Filip Kevely,
When you install another WordPress instance in a sub-folder it creates a conflict for WordPress permalinks. To fix that you need to add this code to your sub-folder site’s .htaccess file:
# BEGIN WordPress <IfModule mod_rewrite.c> RewriteEngine On RewriteBase /secret-sub/ RewriteRule ^index\.php$ – [L] RewriteCond %{REQUEST_FILENAME} !-f RewriteCond %{REQUEST_FILENAME} !-d RewriteRule . /secret-sub/index.php [L] </IfModule> # END WordPress1-click Use in WordPress
Don’t forget to replace secret-sub with the actual subfolder name.
Admin
Charlotte Tomic says
How do you get rid of FEATURED CONTENT on your blog? I eliminated footers without a problem, but can’t get rid of featured content showing up on the blog front page.
Jade says
Hi there, I am pulling my hair out…….I dont have the wordpress address url or the Site Address url under settings general! I have one site with nothing on it with my web address and then another site which I have fixed up with the same name but then wordpress.com at the end, any help would be greatly appreciated.
Arif says
I have followed given the instruction but I am facing problem my website is not open correct and wp login penal is not coming please help me quickly.
Bright Bernard says
Hello,
I successfully got rid of /wordpress from site URL following the instructions in the tutorial but once i installed yoast for seo , google shows the pages with /worpress in its search results.how can we remove that from google search results also?
Blane says
Thank you! This works great!
Kala says
Please help, I thought I had followed the steps correctly but am receiving this error when I type in my web domain:
Fatal error: require() [function.require]: Failed opening required ‘/home/melanieh/public_html/wordpress/wp-blog-header.php’ (include_path=’.:/usr/lib/php:/usr/local/lib/php’) in /home/melanieh/public_html/index.php on line 17
What did I do wrong?
Robel says
Thank you man this work after so many hard work. Thanks again keep it up…..will come here for wordpress problem
Julius Decada says
problem with 404, I resolve it in a longest manner, First I just open the post and click update, it works,.. although if you got a thousand post then you grow beard before you finish everything,..
second solution
another solution, although i never test this type of solutions in my active sites,
1. first thing first back-up your wordpress website,
2. when back-up is done, got to tools and click export, it will create xml file
3. delete all post,..
4. Import the xml file that you exported,. and and everythng go smoothly,..
Rodrigo Henriques says
Thank you for the great tutorial. Worked perfectly!
rio says
everything worked except my root domain name.
when I go to mydomain.com I get a 500 error, but all my links mydomain.com/contact mydomain.com/links look fie
Rodrigo Henriques says
Hi,
have you checked if you REALLY have a “yourdomain/wordpress” directory?
Or a “yourdomain/wp” directory!
Because if you do you have to change the index.php editing accordingly ; )
Hope that helps,, it worked for me ; )
Marko Vojnovic says
THANK YOU SO MUCH!!!!!!!
omkar says
how to check whether i have a /wordpress or a /wp directory? and what following changes should i make then in the index.php file?
Tammie Radikopf says
Thank you for this reply!! Your answer is what helped me solve my problem. I didn’t realize you couldn’t just use ‘wordpress’ as the tutorial said but needed to use the exact subdirectory name. it worked. Thanks!!
Vernon Harris says
I was moving our word press site from the root folder to a sub folder and everything almost worked. The only exception was that I couldn’t find a way to remove the sub-folder from the domain URL. This site had the easiest instructions and was easy to follow. It worked perfectly the 1st time. Thank You!
WPBeginner Support says
Hi Vernon,
Glad you found it helpful Don’t forget to join us on Twitter for more WordPress tips and tutorials.
Admin
rio says
I followed the steps but now my website page isn’t working. And I cannot open my wordpress admin page either. Help?
Fadiah Karim says
I followed the steps but now my website page isn’t working. And I cannot open my wordpress admin page either. Help?
Dan Kemble says
You say upload the ht access file but you never say how to edit it?
Alexandra says
I never leave comments but this post was just so clear and helpful that I have to say THANK YOU!!! :-)))
WPBeginner Support says
Hi Alexandra,
Thanks, we are glad you found it helpful. Don’t forget to join us on Twitter for more WordPress tips and tutorials.
Admin