WordPress visualizza lo stesso menu di navigazione per tutti. Tuttavia, è possibile personalizzare il menu in base al fatto che l’utente sia connesso o meno.
Mostrare menu diversi agli utenti connessi in WordPress è un ottimo modo per creare un’esperienza più personalizzata. Permette di visualizzare contenuti rilevanti solo a chi è connesso, come i dettagli dell’account o risorse esclusive.
In questa guida spiegheremo come impostare diversi menu per gli utenti connessi, utilizzando due metodi.
Perché mostrare menu diversi agli utenti connessi in WordPress?
Modificando le diverse aree del sito WordPress in base ai visitatori e alle loro attività, il sito viene personalizzato per ogni utente.
Questi contenuti personalizzati aiutano a migliorare l’esperienza dell’utente sul vostro sito web WordPress.
Se gestite un sito web in cui gli utenti non devono registrarsi o effettuare l’accesso, potete probabilmente utilizzare gli stessi menu di navigazione in tutto il sito. Tuttavia, altri siti web possono trarre grande beneficio dalla visualizzazione di menu personalizzati per gli utenti connessi.
Ad esempio, siti web come un negozio online, una piattaforma di apprendimento online o un sito di membership Community su WordPress possono beneficiare di menu di navigazione personalizzati.
Un menu di navigazione personalizzato per gli utenti connessi li aiuta a trovare più facilmente le cose per cui si sono registrati.
Ad esempio, un utente di un negozio online può gestire il proprio account, o un membro di una Community a pagamento può facilmente rinnovare il proprio abbonamento o visualizzare i corsi online esclusivi che ha acquistato.
Di default, WordPress consente di creare tutti i menu di navigazione che si desidera. Tuttavia, è possibile scegliere di mostrare un solo menu in una particolare posizione del tema WordPress.
Prima di impostare i menu per gli utenti connessi, è necessario creare due menu di navigazione separati. Un menu sarà per gli utenti connessi e l’altro per quelli disconnessi. Cominciamo.
Solo una nota veloce! I metodi che condividiamo sono pensati per chi utilizza temi classici di WordPress. Se si utilizza un tema a blocchi con caratteristiche di Full Site Editing (FSE) da WordPress 5.8 in poi, questo metodo potrebbe non funzionare.
Creazione di menu per utenti connessi e non connessi in WordPress
Per creare menu separati per i due tipi di utenti, occorre andare alla pagina Aspetto ” Menu della dashboard di WordPress.
Se avete già un menu di navigazione che utilizzate sul vostro sito web per tutti gli utenti, questo può essere il vostro menu predefinito.

Dopodiché, si può cliccare sul link “Crea un nuovo menu” per creare un nuovo menu personalizzato per gli utenti connessi.
Qui si possono aggiungere le voci di menu che si desidera mostrare agli utenti connessi o registrati. Ad esempio, si potrebbe aggiungere un link di logout al menu.
Nella parte sinistra della schermata è presente un elenco delle pagine del sito web. È sufficiente selezionare la casella accanto alla pagina che si desidera aggiungere al menu e fare clic sul pulsante “Aggiungi al menu”.
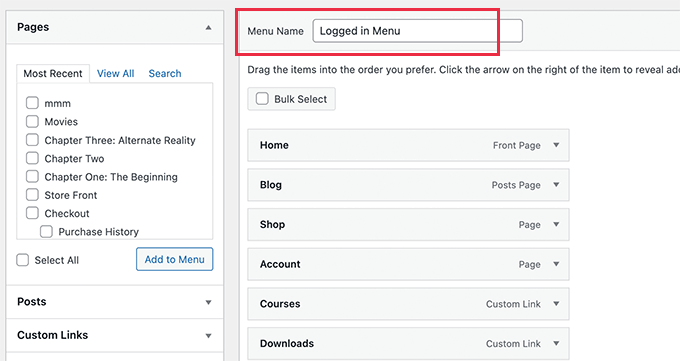
È anche possibile trascina e rilascia le voci di menu sul lato destro della schermata per riorganizzarle.
Giù nella pagina, è possibile scegliere una posizione per visualizzare il menu. Ma non è necessario assegnare una posizione a questo menu ora. Lo faremo più avanti nell’articolo.
Non dimenticate di cliccare sul pulsante “Salva menu” per memorizzare le modifiche.
Per maggiori dettagli sulla creazione di menu, date un’occhiata alla nostra guida per principianti sui menu di navigazione di WordPress.
Ora siete pronti a mostrare diversi menu agli utenti connessi. Ecco una rapida panoramica di tutti i metodi di cui ci occuperemo in questa guida:
Vediamo il primo metodo.
Metodo 1. Mostrare menu diversi agli utenti connessi in WordPress utilizzando un plugin
Il modo più semplice per mostrare menu diversi agli utenti connessi è utilizzare il plugin Conditional Menus. Quindi, per prima cosa installiamolo e attiviamolo.
Per maggiori dettagli, potete consultare la nostra guida passo-passo su come installare un plugin di WordPress.
Dopo l’attivazione, è necessario navigare in Aspetto ” Menu dal cruscotto di WordPress. Quindi, passare alla scheda “Gestisci posizioni”.
Da qui si vedrà l’elenco delle posizioni di menu disponibili definite nel tema di WordPress e i menu attualmente visualizzati.
Ad esempio, la nostra posizione “Menu primario” mostra attualmente un “Menu principale”.
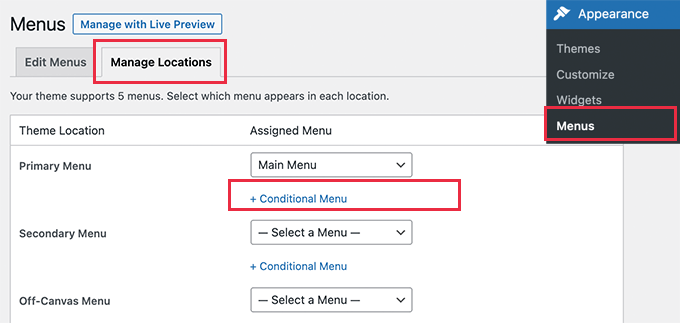
Ora, dobbiamo dire al plugin di mostrare un menu diverso quando una certa condizione è in corrispondenza.
Per farlo, fare clic sul link ‘+ Menu condizionale’. Quindi, dal menu a discesa si può selezionare il menu di navigazione che si desidera mostrare agli utenti connessi.

Successivamente, fare clic sul link “+ Condizioni”.
Si aprirà una finestra a comparsa con una serie di condizioni tra cui scegliere.
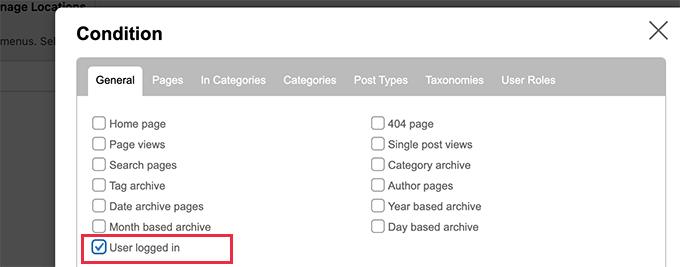
È sufficiente selezionare la casella accanto all’opzione “Utente connesso” e cliccare sul pulsante “Salva”.
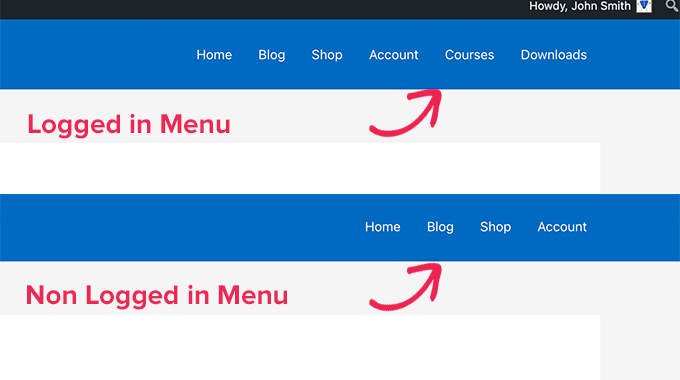
Ora è possibile visitare il sito web per vedere il menu dell’utente connesso in azione. Potete anche disconnettervi dall’amministrazione di WordPress per visualizzare il menu di navigazione connesso a tutti gli altri utenti.
Metodo 2. Selezionare manualmente il menu connesso in WordPress usando il codice
Questo metodo richiede l’aggiunta di codice al vostro sito WordPress. Se non l’avete mai fatto prima, date un’occhiata alla nostra guida su come copiare e incollare snippet di codice in WordPress.
In generale, è necessario aggiungere uno snippet di codice al file functions.php del tema o a un plugin specifico del sito. Tuttavia, non raccomandiamo questo metodo perché può causare problemi al sito web.
È invece possibile utilizzare il plugin WPCode.
WPCode consente di aggiungere snippet di codice personalizzati al sito senza modificare direttamente i file del tema. Inoltre, aiuta a gestire questi snippet e garantisce che vengano eseguiti in modo sicuro, riducendo al minimo il rischio di rottura del sito.
Per iniziare, installiamo il plugin WPCode. Si può usare la versione gratuita di WPCode, che ha tutto ciò che serve per mostrare diversi menu agli utenti connessi.
Una volta installato, si dovrà navigare in Code Snippets “ + Add Snippets.
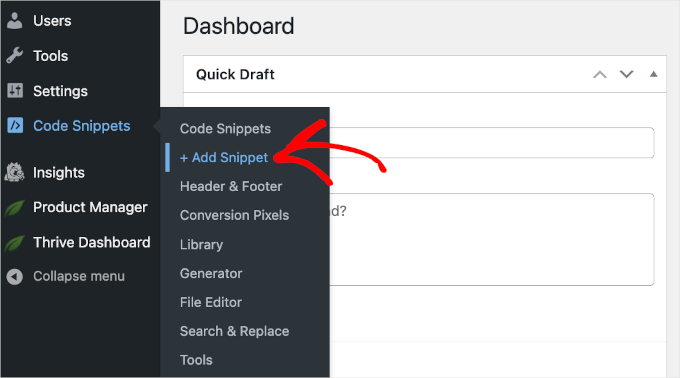
Si aprirà la galleria di frammenti di codice di WPCode.
Da qui è possibile fare clic sul pulsante ‘+ Aggiungi Personalizza’.
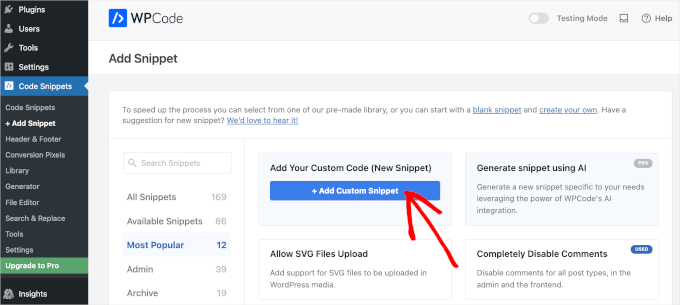
Si arriva quindi all’editor di testo di WPCode.
Il passo successivo è aggiungere un titolo al frammento di codice e scegliere “HTML snippet” dal menu a discesa “Code Type”.
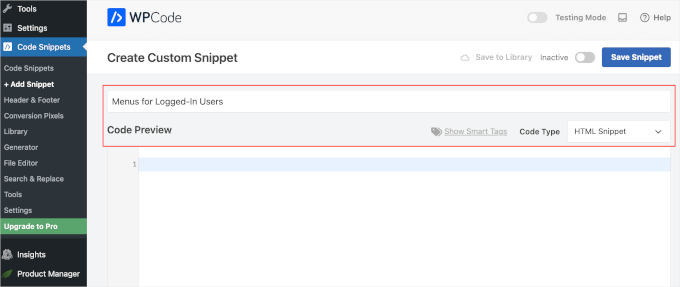
Una volta fatto, è sufficiente copiare e incollare il seguente codice nel campo “Anteprima codice”:
function my_wp_nav_menu_args( $args = '' ) {
if( is_user_logged_in() ) {
// Logged in menu to display
$args['menu'] = 43;

} else {
// Non-logged-in menu to display
$args['menu'] = 35;
}
return $args;
}
add_filter( 'wp_nav_menu_args', 'my_wp_nav_menu_args' );
Ecco come potrebbe apparire nell’editor di WPCode:
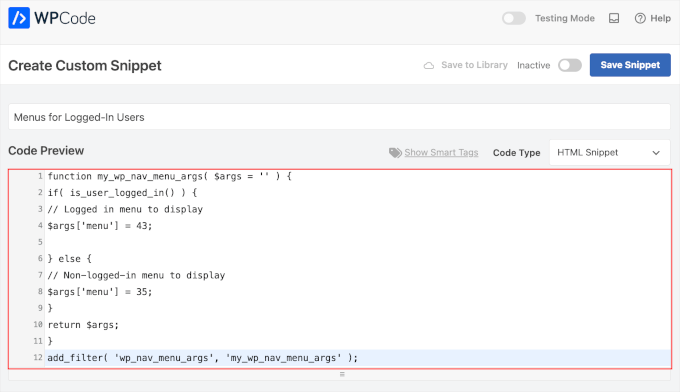
Assicurarsi di sostituire 43 e 35 con gli ID dei menu di navigazione creati in precedenza.
È possibile trovare l’ID di un menu di navigazione selezionandolo sulla pagina “Menu”. Il numero ID del menu viene visualizzato nella barra degli indirizzi del browser.
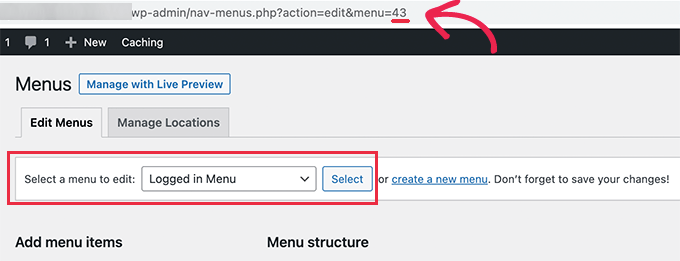
Dopo essersi assicurati che tutti i dettagli siano corretti, fare clic sul pulsante blu “Salva snippet”.
E questo è tutto! Speriamo che questo articolo vi abbia aiutato a capire come mostrare facilmente diversi menu di navigazione agli utenti connessi in WordPress. A seguire, potete consultare le nostre guide su come consentire agli utenti di invitare i propri amici a registrarsi in WordPress e su come creare un menu di navigazione in WordPress.
Se questo articolo vi è piaciuto, iscrivetevi al nostro canale YouTube per le esercitazioni video su WordPress. Potete trovarci anche su Twitter e Facebook.


Syed Balkhi says
Hey WPBeginner readers,
Did you know you can win exciting prizes by commenting on WPBeginner?
Every month, our top blog commenters will win HUGE rewards, including premium WordPress plugin licenses and cash prizes.
You can get more details about the contest from here.
Start sharing your thoughts below to stand a chance to win!
Alex says
Thanks for the code – works as it should, appreciated
WPBeginner Support says
Glad our guide could be helpful!
Admin
Paul K says
Great! But where do I find my theme’s function.php?
WPBeginner Support says
It is in your theme’s folder, you can see more about it in our page below:
https://www.wpbeginner.com/glossary/functions-php/
Admin
Paul K says
OK, found it, thanks. But I’m puzzled where to put the additional code. I’m not familiar with PHP but I see the “” at the end.
WPBeginner Support says
For pasting code snippets, you want to take a look at our guide below that covers where to paste into your functions.php as well as where to past other code should you look at other code-based tutorials:
https://www.wpbeginner.com/beginners-guide/beginners-guide-to-pasting-snippets-from-the-web-into-wordpress/
Admin
Clara says
Works great! I have the problem that I have to menus at the top: A headliner menu and the main menu. When I use the Code and the user is logged in bove menus switch to the logged-in menu. How can I adjust the code so that the headliner menu remains the same?
WPBeginner Support says
For what you’re wanting, you would want to take a look at our article below:
https://www.wpbeginner.com/plugins/how-to-add-conditional-logic-to-menus-in-wordpress/
Admin
Sergio says
Thank you very much!
WPBeginner Support says
You’re welcome
Admin
Echo says
Would be much easier if you could do it for a specific menu item rather than an entire menu. What would someone with 499 menu items have to do?
WPBeginner Support says
We would not recommend that many menu items as that would be far too many for someone to navigate through which would likely cause an SEO issue if your menu links don’t add value for your visitors
Admin
Evaldo Santos says
100%. Just configured it with Sahifa Theme and works like a charm.
Keep up with this good work.
Jason says
Thank you!!
Bk Millanzi says
this is so helpful, but is there a way to display a username and avatar which can act as a container of other profile menu items, as a drop-down menu?
Amarnadh says
The path you showed is well and good only for just showing custom menus. But what if i want to show my content to a specific logged in user based on his interests. That is in detail, like various deals sites, when we login and save our interests, the next moment we see deals only on that specific topic. Can we make that possible using WordPress plugins.
Sam says
Hey there, thanks for the great work. I have a question about multiple user roles.
So I have two main menus, Menu 1 and Menu 2.
I would like all users (logged in or out) to see the main menu unless they have the userole of “Alt”, in which case Menu 1 is replaced by Menu 2.
How would I go about doing that?
Tendai Mugoni says
It is working, thanks
Curtis says
@ERICLEE You can create a child theme to prevent that from happening. I just added this code and need to do the same thing.
shahzaib sarwer says
can it possible to add the menus in the subscriber profile accept than the home page these menu pages not show on the home page, just on the every subscriber profile. if it possible then please guide me, and tell me how use any pluging for this.
shahzaib sarwer says
can it possible to add the menus in profile of the subscriber in wp site , if it possible so please anyone guide me what i do and how use any pluging of this work.
Yuda says
How can the same be achieeved on a multi-language members site? For example show different menu for users logged in in english and a different menu for users logged in with german?
WPBeginner Support says
Hi Yuda,
If you are using a multilingual WordPress plugin then this should be handled by the plugin. You will essentially need to provide translations for your multilingual menus.
Admin
solomon says
i have added log in menu and logout menu, how do i configure the page for login and log out ???,,
Jan-Paul Kleijn says
First I thought of a plugin. Gotta quit thinking like that.
Then I saw your post and was sold.
Thank you for posting this, you helped me very nicely.
Phil says
Thanks so much for that. Works perfectly.
Ariet says
Hello,
This totally works!
But it change my footer menu too.. is there a way where my footer manu stay the same?
Tarron Acuff says
So, I have 2 menus. One for the public and another that I would like employees to see when they are logged in. The employee menu would replace the main menu only when an employee is logged in.
Here is what I am currently using in my functions.php file
// Set the Role as a body class
function add_role_to_body( $classes ) {
$user = wp_get_current_user();
$user_roles = $user->roles;
foreach( $user_roles as $role ) {
$classes[] = ‘role-‘ . $role;
}
return $classes;
}
add_filter( ‘body_class’, ‘add_role_to_body’ );
***Here is what I added for CSS***
/* First hide the menu items for non “employee” user */
#top-menu li.menu-for-employee {
display: none;
}
/* Show the menu items for the “employee” user */
.role-employee #top-menu li.menu-for-employee {
display: initial;
}
When I log in as an employee both menus are showing.
Thanks in advance.
Wasim says
its not working for me. It display default menu after I add this code, even my primary menu gone.
Joe says
Hi Guys,
I nice tutorial but i was wondering could you use the same approach to replace a responsive menu at a certain screen size?
I have two menus but would rather have just one responsive menu at 768 px by replacing the menu with another.
Thanks
Pet says
Awesome job with your guides. I am building my first wordpress site and I am finding your site incredibly helpful in guiding me along, thank you.
I really wanted to show different menus for logged in users (like ‘edit profile’) and for logged out users and that brought me here. The code you shared works alright for me. I now have two menus which are showing up nice. However, the last part of the code, add filter string, I believe, is messing me up a little bit. Now, another menu is showing under the sidebar widget. The ‘logged-in’ menu. I am using sydney theme and I have tried to no avail to remove this unnecessary menu. Any idea on how I can make it not display?
WPBeginner Support says
Hi Pet,
Please check Appearance » Widgets page to see if you have a custom menu added as a widget there. If it is there then you can just delete that widget.
Admin
Pet says
What genius! It worked! Thanks for the wonderful tip!!
Jomcy Johny says
Me too have the same problem..Please help me..but I dont have widgets..Thank you..!
Alex Hammerschmied says
Works like a charm…
Thanks for that.
Btw i love theses short tutorials
giovanna says
Hi can you help me please? I have another trouble please? I need to hide one menu to all and allow only the vendors to see what I have to do please? what is the specific code i have to use please?
ericlee says
When you modify the functions.php like so- wouldn’t it get wiped when you upgrade your WP next version ?
WPBeginner Support says
Yes, it will get wiped out when you update your theme. To prevent this you can create a site-specific plugin.
Admin
Ramona says
Will this work for a Buddypress install? Thanks.
Nikhil Chaudhari says
the function set secoundary menu also? i only want to set primary menu. how to do that
Nikhil Chaudhari says
this above function set secondary menu all i want to set only header menu?
how to do that
Asfaha says
Hi,
thanks a lot for this solution, I’ve applied and woks perfect and saved me installing one more plugin.
Shafaq says
this is the code for replacing existing menu to logged user menu by addming location top-menu and with menu loggedin no need else statement with this
add_filter( ‘wp_nav_menu_args’, function ( $args )
{
if( is_user_logged_in() && $args[‘theme_location’] === ‘top-menu’ ) {
$args[‘menu’] = ‘loggedin’;
}
return $args;
});
Ashraf Ali says
———————————————————–
function my_wp_nav_menu_args( $args = ” ) {
if( is_user_logged_in() ) {
$args[‘menu’] = ‘logged-in’;
} else {
$args[‘menu’] = ‘logged-out’;
}
return $args;
}
add_filter( ‘wp_nav_menu_args’, ‘my_wp_nav_menu_args’ );
———————————————————–
Now how do i get it to work with
—————————————————
———————————————————————————————————————-
Please Advice
Iqbal Mahmud says
If I want to hide a page from logged out user from a single menu what have to do?
Kasper says
You can lock pages to hide them from logged out users. There are several plugins that make this very easy to do. Users Ultra comes to mind.
Zev says
Everything worked perfectly.
However, I still have the issue of a repeated primary menu in the secondary navigation menu section which I can’t seem to remove (I don’t have a secondary menu set up).
Vince says
I’m having the exact issue. The change reflects in the secondary menu location out of nowhere and I too don’t have a secondary menu setup. :/ Please advice how to deal with it.
Thanks in advance.
Chiranjeevi Vinodkumar says
LISTEN!!!
Most of us, uses themes.
So first go to the functions.php of your theme.
Search with navigation as keyword.
In case of Shopkeeper theme..
==================================================================
register_nav_menus( array(
‘top-bar-navigation’ => __( ‘Top Bar Navigation’, ‘shopkeeper’ ),
‘main-navigation’ => __( ‘Main Navigation’, ‘shopkeeper’ ),
‘footer-navigation’ => __( ‘Footer Navigation’, ‘shopkeeper’ ),
===================================================================
This is how you look.. so pick the one which is primary, In my case, Its “Top Bar Navigation” hence used “top-bar-navigation”
I used the following code and worked like a charm!!!
This is my way of thanking the author.
Good day !!
Ann Novakowski says
Here’s what worked for me with WP . I used this to create a specific primary menu for logged-in Buddypress users. It will NOT affect my footer menu OR social media menu for any visitors, so everyone sees the same secondary menus regardless of whether they’re logged in or not. This is based on all of the comments above (HT to Fransiska!).
Added the following to my Child Theme’s functions.php file:
// CHANGE MAIN MENU =ONLY= IF MEMBER IS LOGGED IN
function my_wp_nav_menu_args( $args = ” ) {
if ($args[‘theme_location’] == ‘primary’) {
if( is_user_logged_in()) {
$args[‘menu’] = ‘logged-in’;
}else{
$args[‘menu’] = ‘logged-out’;
}
}
return $args;
}
add_filter( ‘wp_nav_menu_args’, ‘my_wp_nav_menu_args’ );
Oliver says
Don’t know what happened why my comment, but –> ” <– these are correct!
fidel toro says
thanks!! help me a lot
Matthias Campbell says
Hello,
I added this code (probably wrongly) in my functions.php within my theme in wordpress editor and now I have a constant 500 server error. Even after removing the code.
Before this i attempted to create a site specific plugin but that didnt work. Could you please tell me if the snippet requires an opening and closing bracket?
If so how do i do that?
My host cant help me now and they’re requesting I pay a programmer to help me for 50Eu per hour. Please help me. Its urgent.
I am still logged into wordpress but what ever I click I get the 500 error with this specific error.
PHP Parse error: syntax error, unexpected ‘}’ in line 1194.
This is because I pasted the snippet after all the text in the functions.php file.
I then removed the snippet to see if that would fix it, via editor and FTP and I still get the error.
I look forward to hearing your response.
Kind regards
WPBeginner Support says
It depends on where you are adding the code. If there is a closing PHP tag before it then you need to add a php start tag like <?php
If this code is the last thing in the functions file then you don’t need to add a closing tag.
Admin
Hubert says
If you have multiple menu locations and want to apply different menus for each location you can use the code bellow:
function my_wp_nav_menu_args( $args = ” ) {
// Primary menu location
if( ‘primary-main’ == $args[‘theme_location’] ) {
if( is_user_logged_in() ) {
$args[‘menu’] = ‘Primary-Logged-In’;
} else {
$args[‘menu’] = ‘Primary-Logged-Out’;
}
return $args;
}
// Secondary menu location
if( ‘secondary-menu’ == $args[‘theme_location’] ) {
if( is_user_logged_in() ) {
$args[‘menu’] = ‘Secondary-Logged-In’;
} else {
$args[‘menu’] = ‘Secondary-Logged-Out’;
}
return $args;
}
}
add_filter( ‘wp_nav_menu_args’, ‘my_wp_nav_menu_args’ );
Haji says
This does not work, anyone that does know the proper code if you have 2 or more menus?
Ravikant says
Perfect bro .Its work …. awesome work
Leopold says
This was almost too easy!
Thanks alot for the simple article.
In this way I don’t have to install any plugin..
Gaurang says
I think it is better to use IF MENU plugin. https://wordpress.org/plugins/if-menu/
Creating two separate menus like this, use has to create/update menu twice.
Chris says
Hi Gaurang,
I’m curious to know why you feel using the plugin is better, than coding the functions.php file? I was told a while ago to watch how many plugins are actually used for a wordpress site, and the code above seems simple enough; minus the having to monitor every time your theme updates….
Thanks,
Rub says
Great, how I can use it to show menu for logged user that have certain role?
Kit Johnson says
This worked so simply and neatly. I didn’t think it would be this easy. Thank you!
Jason Sisson says
this is awesome tried it. works. but i also would like to redirect by role
is that simple or much harder
Ryan R. Bayne says
Thanks. Working with menu functions for the first time.
Creating the WTG Portal Manager plugin which will allow a portal to be defined very quickly. Every portal having it’s own menu. The plugin make the relationship between portal and menu clearer plus provide other unique options.
veer2412 says
how can i show different posts to different users??
veer2412 says
thnkx for the help.. but what if i want to show different users different posts on my site.. is there any way to do that using coding??
WPBeginner Staff says
Under Appearance > Menus you need to choose a location for your menu. Seems like there are two areas on your site where you can add menus. So you need to create two different menus and then assign a location to them.
Heather Gile says
what would the revised code for this be, if there was a distinction of ‘Primary’ and ‘Top’?
$args[‘primary-menu’] = ‘logged-in’;
$args[‘top-menu’] = ‘logged-in’;
else
$args[‘primary-menu’] = ‘logged-out’;
$args[‘top-menu’] = ‘logged-out’;
?
Kyle says
WordPress will not let me put 2 menus in my “top header” location. The code you provided works, but it changed ALL of my menus to the logged in or out, and is not displaying my normal nav menu
b2995 says
I have a top menu as well as a site menu (under logo). How would I change the code to switch just that top menu. Right now, ALL my menus change.
Harry Slyman says
You saved my day! thank you