Viele WordPress-Nutzer ziehen es vor, ihre Websites auf einem lokalen Server auf ihrem Computer zu bearbeiten, bevor sie sie auf einen Live-Hosting-Server übertragen.
Es ermöglicht Ihnen, Ihre Website privat zu bearbeiten, bevor Sie die Änderungen online zugänglich machen.
Schließlich müssen Sie sie auf einen Live-Server verschieben, um sie für Online-Besucher verfügbar zu machen.
In diesem Artikel zeigen wir Ihnen eine Schritt-für-Schritt-Anleitung, wie Sie WordPress von einem lokalen Server auf eine Live-Site umziehen.
Warum WordPress von einem lokalen Server auf eine Live-Site verschieben?
Die Erstellung Ihres WordPress-Blogs auf einem lokalen Server ist ein sicherer Weg, um Änderungen an Ihrer Website zu testen, ohne die Besucher zu beeinträchtigen.
Wenn Sie Ihre Website perfektioniert haben, ist der nächste Schritt der Umzug von Ihrem lokalen Server auf eine Live-Site.
Wir zeigen Ihnen zwei Möglichkeiten, wie Sie Ihre Website von einem lokalen Server auf eine Live-Site übertragen können.
Die erste Methode verwendet ein WordPress-Migrations-Plugin und ist für Anfänger zu empfehlen.
In der zweiten Methode zeigen wir Ihnen, wie Sie WordPress manuell von einem lokalen Server auf eine Live-Site verschieben können.
Sie können die Methode wählen, die für Sie am besten geeignet ist:
Bevor Sie Ihre WordPress-Website migrieren
Um WordPress von einem lokalen Server auf einen Live-Server zu migrieren, müssen Sie ein paar Dinge vorbereiten.
Zunächst gehen wir davon aus, dass Sie eine WordPress-Website auf einem lokalen Server (auch localhost genannt) auf Ihrem Computer laufen haben und Sie vollen Zugriff darauf haben.
Als Nächstes benötigen Sie einen Domänennamen und Webhosting.
Um Ihnen die Entscheidung zu erleichtern, empfehlen wir Bluehost. Bluehost ist ein offiziell empfohlener WordPress-Hosting-Anbieter und bietet WPBeginner-Nutzern einen exklusiven Rabatt sowie eine kostenlose Domain und SSL.
Im Grunde können Sie schon für 1,99 $ pro Monat einsteigen.
Wenn Sie eine gute Bluehost-Alternative suchen, können Sie sich Hostinger ansehen. Sie bieten auch einen exklusiven Rabatt für WPBeginner-Nutzer mit einem kostenlosen Domainnamen.
Wenn Sie es sich leisten können, ein wenig mehr zu bezahlen, dann schauen Sie sich SiteGround an. Sie haben auch ein spezielles Angebot für WPBeginner-Leser.
Wenn Sie Hilfe bei der Einrichtung Ihrer Website benötigen, folgen Sie unserer Schritt-für-Schritt-Anleitung für die Erstellung einer Website.
Schließlich benötigen Sie ein FTP-Programm und müssen wissen , wie Sie FTP verwenden, um Ihre lokale Server-Site auf die Live-Site hochzuladen.
Sind Sie bereit? Beginnen wir mit der Migration Ihrer WordPress-Website.
Video-Anleitung
Wenn Sie eine schriftliche Anleitung bevorzugen, dann lesen Sie einfach weiter.
Methode 1: Übertragen von WordPress vom lokalen Server auf die Live-Site mithilfe eines Migrations-Plugins (empfohlen)
Diese Methode ist einfacher und wird für Anfänger empfohlen. Wir werden ein WordPress-Migrations-Plugin verwenden, um WordPress vom lokalen Host auf eine Live-Site zu verschieben.
Schritt 1: Installieren und Einrichten des Duplicator-Plugins
Zunächst müssen Sie das Duplicator-Plugin auf Ihrer lokalen Website installieren und aktivieren. Weitere Einzelheiten finden Sie in unserer Schritt-für-Schritt-Anleitung für die Installation eines WordPress-Plugins.
Profi-Tipp: Es gibt auch eine Pro-Version von Duplicator, die sichere Backups, Cloud-Speicher, einfache Wiederherstellung von Websites und mehr bietet.
Nach der Aktivierung müssen Sie auf die Seite Duplicator “ Pakete gehen und auf die Schaltfläche „Neu erstellen“ klicken.
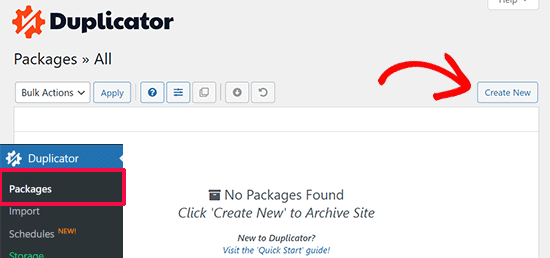
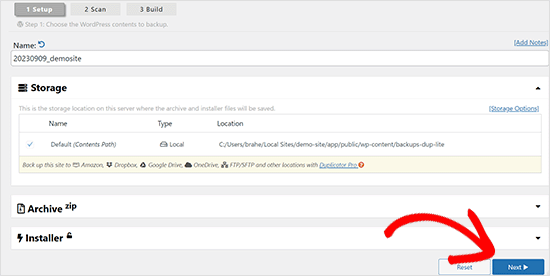
Daraufhin wird ein Bildschirm angezeigt, in dem Sie der Sicherung einen Namen geben können.
Klicken Sie dann auf die Schaltfläche „Weiter“.
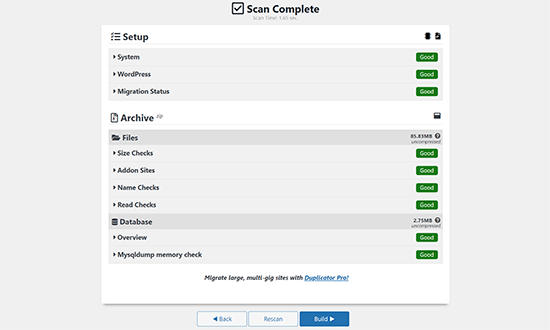
Duplicator führt nun einige Tests durch, um festzustellen, ob alles in Ordnung ist.
Wenn alle Punkte mit „Gut“ markiert sind, klicken Sie auf die Schaltfläche „Erstellen“.
Dieser Vorgang kann einige Minuten dauern, je nach Größe Ihrer Website. Sie müssen diese Registerkarte geöffnet lassen, bis der Vorgang abgeschlossen ist.
Sobald Sie fertig sind, sehen Sie Download-Optionen für „Installer“- und „Archiv“-Pakete. Klicken Sie auf den Link „One-Click Download“, um beide Dateien auf Ihren Computer herunterzuladen.
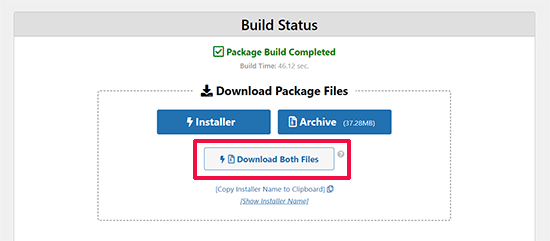
Die „Archiv“-Datei ist eine vollständige Kopie Ihrer WordPress-Website. Sie enthält alle WordPress-Kerndateien sowie Ihre Bilder, Uploads, Themes, Plugins und ein Backup Ihrer WordPress-Datenbank.
Die „Installer“-Datei ist ein Skript, das den gesamten Migrationsprozess automatisiert, indem es die Archivdatei mit Ihrer Website entpackt.
Schritt 2: Erstellen Sie eine Datenbank für Ihre Live-WordPress-Website
Bevor Sie das Installationsprogramm ausführen oder die WordPress-Website von localhost auf Ihren Hosting-Server hochladen können, müssen Sie eine MySQL-Datenbank für Ihre neue Live-Website erstellen.
Wenn Sie bereits eine MySQL-Datenbank erstellt haben, können Sie diesen Schritt überspringen.
Um eine Datenbank zu erstellen, müssen Sie das cPanel-Dashboard Ihres Hosting-Accounts aufrufen. Suchen Sie dann den Abschnitt „Datenbanken“ und klicken Sie auf das Symbol „MySQL-Datenbank-Assistent“.
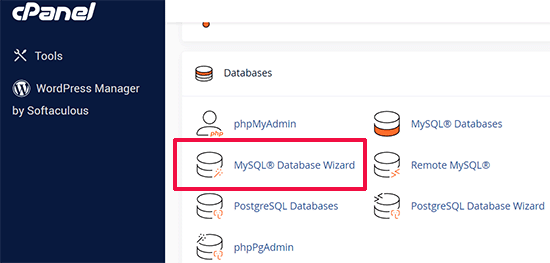
Auf dem nächsten Bildschirm gibt es ein Feld zum Erstellen einer neuen Datenbank.
Geben Sie einfach einen Namen für Ihre Datenbank ein und klicken Sie auf die Schaltfläche „Datenbank erstellen“.

cPanel wird nun eine neue Datenbank für Sie erstellen.
Danach müssen Sie einen Benutzernamen und ein Passwort für Ihren neuen Benutzer eingeben und dann auf die Schaltfläche „Benutzer erstellen“ klicken.
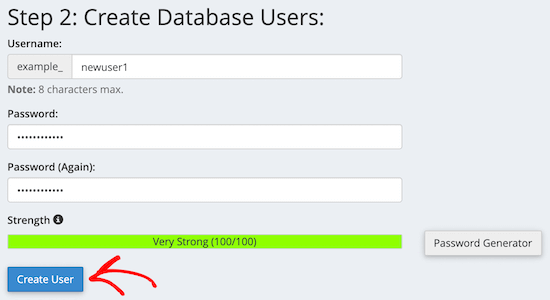
Als nächstes müssen Sie den soeben erstellten Benutzer zur Datenbank hinzufügen.
Klicken Sie zunächst auf das Kontrollkästchen „Alle Berechtigungen“.
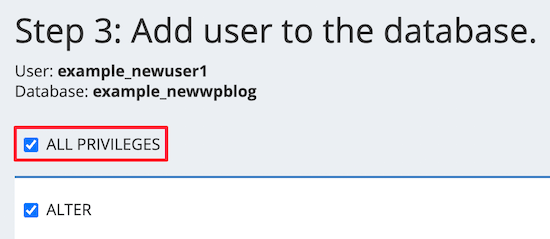
Blättern Sie dann nach unten und klicken Sie auf die Schaltfläche „Änderungen vornehmen“, um Ihre Änderungen zu speichern.
Ihre Datenbank ist nun bereit, mit Ihrer WordPress-Website verwendet zu werden. Notieren Sie sich unbedingt den Namen der Datenbank, den Benutzernamen und das Passwort. Sie werden diese Informationen im nächsten Schritt benötigen.
Schritt 3: Dateien vom lokalen Server auf die Live-WordPress-Website hochladen
Nun müssen Sie das Archiv und die Installationsdateien von Ihrer lokalen Website auf Ihr Hosting-Konto hochladen.
Stellen Sie zunächst mit einem FTP-Client eine Verbindung zu Ihrer Live-Website her. Vergewissern Sie sich nach der Verbindung, dass das Stammverzeichnis Ihrer Website völlig leer ist.
Normalerweise ist das Stammverzeichnis der Ordner /home/public_html/.
Einige WordPress-Hosting-Unternehmen installieren WordPress automatisch, wenn Sie sich anmelden. Wenn Sie dort WordPress-Dateien haben, müssen Sie diese löschen.
Danach können Sie die Dateien archive.zip und installer.php von Duplicator in Ihr leeres Stammverzeichnis hochladen.

Schritt 4: Ausführen des Migrationsskripts
Nachdem Sie die Migrationsdateien hochgeladen haben, müssen Sie die folgende URL in Ihrem Browser aufrufen:
http://example.com/installer.php
Vergessen Sie nicht, „example.com“ durch Ihren eigenen Domänennamen zu ersetzen.
Dadurch wird der Duplicator-Migrationsassistent gestartet.
Das Installationsprogramm führt ein paar Tests durch und initialisiert das Skript.
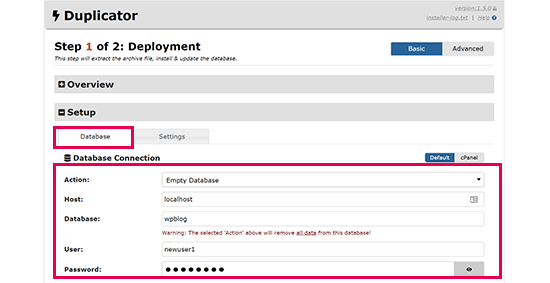
Im Abschnitt Setup werden Sie aufgefordert, den MySQL-Host, den Datenbanknamen, den Benutzernamen und das Passwort einzugeben.
Ihr Host wird wahrscheinlich localhost sein. Danach geben Sie die Details der Datenbank ein, die Sie im vorherigen Schritt erstellt haben.
Klicken Sie dann auf die Schaltfläche „Validieren“, um sicherzustellen, dass die eingegebenen Daten korrekt sind.
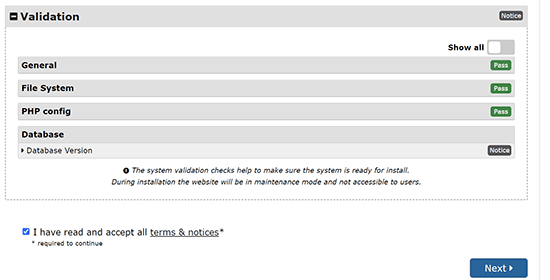
Klicken Sie anschließend auf die Schaltfläche „Weiter“, um fortzufahren.
Duplicator importiert nun die Sicherung Ihrer WordPress-Datenbank aus dem Archiv in Ihre neue Datenbank.
Außerdem werden die URLs, die auf die lokale Website verweisen, auf Ihre neue Live-Site aktualisiert.
Sie können nun auf die Schaltfläche „Admin Login“ klicken, um in den WordPress-Administrationsbereich Ihrer Live-Site zu gelangen.

Sobald Sie sich bei Ihrer Live-Site anmelden, bereinigt Duplicator automatisch die Installationsdateien.
Das war’s schon. Sie haben WordPress erfolgreich vom lokalen Server auf Ihre Live-Site verschoben.
Methode 2: Manuelle Übertragung von WordPress vom lokalen Server auf die Live-Site
In dieser Methode zeigen wir Ihnen, wie Sie WordPress manuell vom lokalen Server auf Ihre Live-Site verschieben können. Sie ist nützlich, wenn die erste Methode nicht funktioniert oder wenn Sie es lieber manuell machen möchten.
Schritt 1: Lokale WordPress-Datenbank exportieren
Als Erstes müssen Sie Ihre lokale WordPress-Datenbank exportieren. Wir werden dafür phpMyAdmin verwenden.
Wenn Sie damit nicht vertraut sind, sollten Sie einen Blick auf unsere Anleitung zur WordPress-Datenbankverwaltung mit phpMyAdmin werfen.
Gehen Sie einfach auf http://localhost/phpmyadmin/ und klicken Sie auf Ihre WordPress-Datenbank. Klicken Sie dann auf die Schaltfläche „Exportieren“ in der oberen Menüleiste.

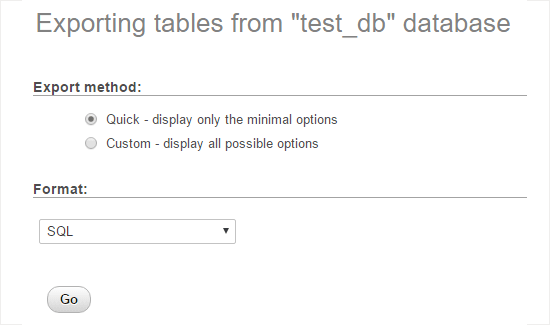
Bei der Option „Exportmethode:“ können Sie „Schnell“ oder „Benutzerdefiniert“ wählen. Die Option „Benutzerdefiniert“ bietet Ihnen mehr Optionen für den Export Ihrer Datenbank.
Wir empfehlen jedoch, „Schnell“ zu wählen und dann auf die Schaltfläche „Los“ zu klicken, um Ihre Datenbank herunterzuladen.
Schritt 2: WordPress-Dateien auf die Live-Site hochladen
Nun müssen wir alle Dateien Ihrer Website auf die Live-Site verschieben.
Um loszulegen, öffnen Sie Ihren FTP-Client und verbinden Sie sich mit Ihrem Webhosting-Konto.
Sobald Sie mit Ihrer Live-Site verbunden sind, müssen Sie sicherstellen, dass Sie die Dateien in das richtige Verzeichnis hochladen. Wenn Sie zum Beispiel möchten, dass die Website auf „yourite.com“ gehostet wird, müssen Sie alle Dateien in Ihr Verzeichnis public_html hochladen.
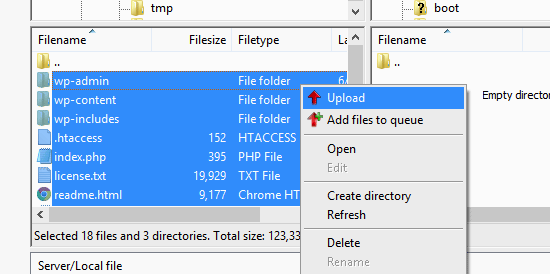
Wählen Sie nun Ihre lokalen WordPress-Dateien aus und laden Sie sie auf Ihren Live-Server hoch.
Schritt 3: Erstellen Sie eine MySQL-Datenbank auf Ihrer Live-Site
Während Ihr FTP-Client Ihre WordPress-Dateien hochlädt, können Sie damit beginnen, Ihre Datenbank auf den Live-Server zu importieren.
Die meisten WordPress-Hosting-Provider bieten cPanel zur Verwaltung Ihres Hosting-Kontos an. Wir zeigen Ihnen, wie Sie mit cPanel eine Datenbank erstellen können.
Melden Sie sich zunächst in Ihrem cPanel-Dashboard an und klicken Sie auf das Symbol „MySQL-Datenbank-Assistent“, das Sie im Abschnitt „Datenbanken“ finden.

Auf dem nächsten Bildschirm können Sie eine neue Datenbank anlegen.
Geben Sie einen Namen für Ihre Datenbank ein und klicken Sie dann auf „Datenbank erstellen“.

cPanel wird nun automatisch eine neue Datenbank für Sie erstellen.
Als Nächstes müssen Sie einen Benutzernamen und ein Passwort für Ihren neuen Benutzer eingeben und dann auf „Benutzer erstellen“ klicken.
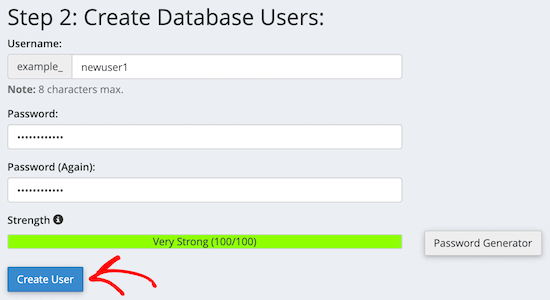
Danach müssen Sie den soeben erstellten Benutzer in die Datenbank aufnehmen.
Aktivieren Sie zunächst das Kontrollkästchen „Alle Berechtigungen“.
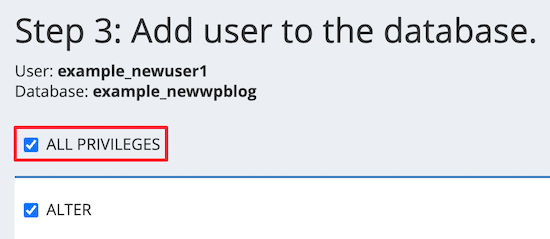
Blättern Sie dann nach unten und klicken Sie auf „Änderungen vornehmen“, um Ihre Änderungen zu speichern.
Sie haben erfolgreich eine neue Datenbank für Ihre Live-WordPress-Site erstellt.
Schritt 4: WordPress-Datenbank in die Live-Site importieren
Der nächste Schritt ist der Import Ihrer WordPress-Datenbank.
Gehen Sie zu Ihrem cPanel-Dashboard, scrollen Sie nach unten zum Abschnitt „Datenbanken“ und klicken Sie auf „phpMyAdmin“.
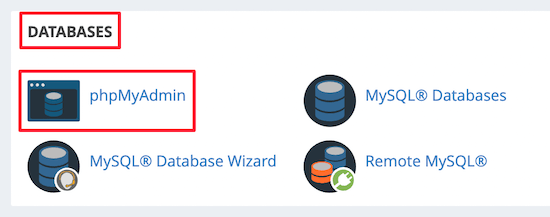
Dies führt Sie zu phpMyAdmin, wo Sie auf die Datenbank klicken, die Sie gerade erstellt haben. phpMyAdmin zeigt Ihre neue Datenbank ohne Tabellen an.
Klicken Sie dann im oberen Menü auf die Registerkarte „Importieren“. Klicken Sie auf der Importseite auf die Schaltfläche „Datei auswählen“ und wählen Sie dann die Datenbankdatei von der lokalen Website, die Sie im ersten Schritt gespeichert haben.
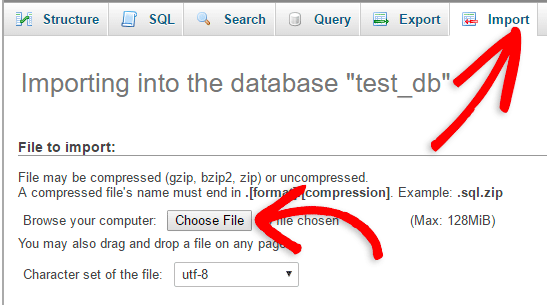
Klicken Sie anschließend auf die Schaltfläche „Go“ unten auf der Seite. Ihre Datenbank wird automatisch in phpMyadmin importiert.
Schritt 5: Ändern Sie die URL der Website
Nun müssen Sie die Website-URL in Ihrer Datenbank ändern, damit sie sich mit Ihrer Live-WordPress-Site verbindet.
Suchen Sie in phpMyAdmin nach der Tabelle wp_options in Ihrer Datenbank, die Sie oben importiert haben.
Wenn Sie Ihr Datenbankpräfix geändert haben, könnte es statt wp_options {new_prefix}_options heißen.
Klicken Sie dann auf die Schaltfläche „Durchsuchen“ neben wp_options. Oder klicken Sie auf den Link in der Seitenleiste, um die Seite mit einer Liste der Felder in der Tabelle wp_options zu öffnen.
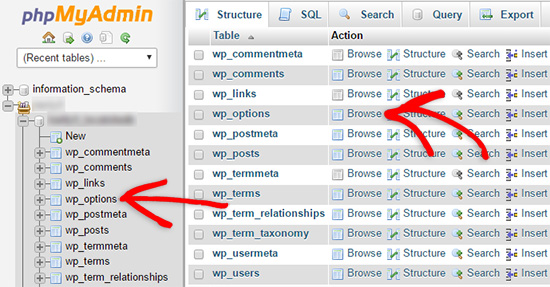
Dann müssen Sie in der Spalte options_name nach der Option siteurl suchen.
Klicken Sie dann auf das Symbol „Bearbeiten“.

Daraufhin öffnet sich ein Fenster, in dem Sie das Feld bearbeiten können.
Im Eingabefeld für option_value sehen Sie die URL Ihrer lokalen Installation, die etwa http://localhost/test lautet .
In dieses Feld müssen Sie die URL Ihrer neuen Website eingeben, z. B. https://www.wpbeginner.com.
Anschließend können Sie das Feld speichern, indem Sie auf die Schaltfläche „Go“ klicken.
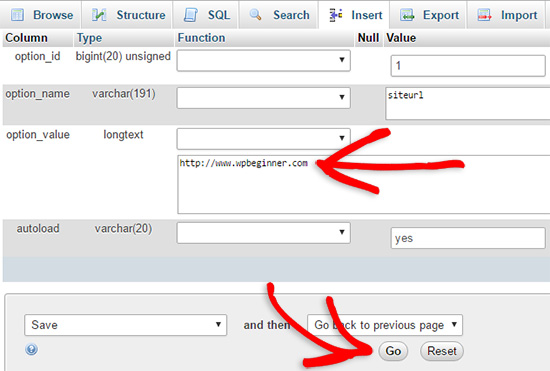
Als nächstes müssen Sie die gleichen Schritte wie oben für den Namen der Home-Option ausführen. Das Menü wp_options kann einige Seiten lang sein. Normalerweise befindet sich die Home-Option auf der zweiten Seite.
Aktualisieren Sie dann die Home-URL, damit sie mit der URL Ihrer Live-Site übereinstimmt.
Schritt 6: Einrichten Ihrer Live-Site
Nachdem Sie nun die Datenbank importiert und Ihre Inhalte hochgeladen haben, ist es an der Zeit, WordPress zu konfigurieren.
Zu diesem Zeitpunkt sollte auf Ihrer Website die Fehlermeldung„Fehler beim Herstellen einer Datenbankverbindung“ angezeigt werden.
Um dies zu beheben, verbinden Sie sich mit einem FTP-Client mit Ihrer Website und öffnen Sie die Datei wp-config.php.
Sie werden nach den folgenden Codezeilen suchen:
// ** MySQL settings - You can get this info from your web host ** //
/** The name of the database for WordPress */
define( 'DB_NAME', 'database_name_here' );
/** MySQL database username */
define( 'DB_USER', 'username_here' );
/** MySQL database password */
define( 'DB_PASSWORD', 'password_here' );
/** MySQL hostname */
define( 'DB_HOST', 'localhost' );
Sie müssen den Datenbanknamen, den Benutzernamen und das Passwort angeben, die Sie zuvor erstellt haben.
Speichern Sie anschließend die Datei wp-config.php und laden Sie sie zurück auf Ihren WordPress-Hosting-Server.
Wenn Sie jetzt Ihre Website besuchen, sollte sie live sein.
Danach müssen Sie sich in Ihr WordPress-Administrationspanel einloggen und zu den Einstellungen “ Allgemein gehen. Dann, ohne etwas zu ändern, scrollen Sie zum Ende und klicken Sie auf die Schaltfläche „Änderungen speichern“.
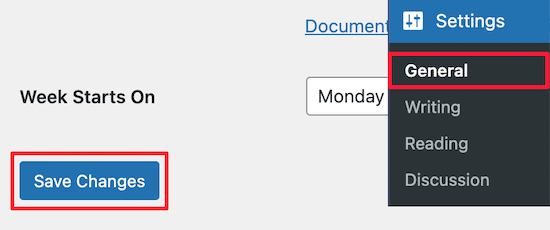
Dadurch wird sichergestellt, dass die URL Ihrer Website überall dort korrigiert wird, wo sie sein muss.
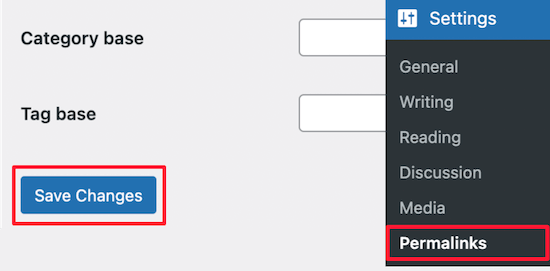
Wenn Sie das getan haben, gehen Sie zu Einstellungen “ Permalinks, scrollen Sie nach unten und klicken Sie auf „Änderungen speichern“, um sicherzustellen, dass alle Beitragslinks funktionieren.
Schritt 7: Bilder und defekte Links durch Aktualisierung der Pfade reparieren
Wenn Sie eine WordPress-Site von einer Domain auf eine andere oder von einem lokalen Server auf eine Live-Site verschieben, werden Sie mit defekten Links und fehlenden Bildern konfrontiert.
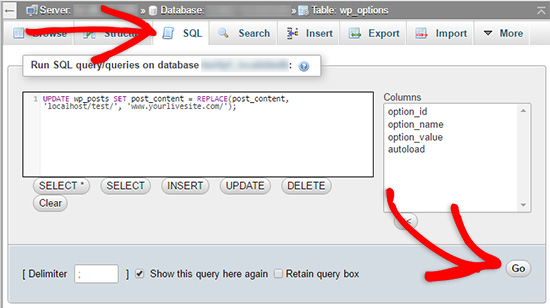
Eine einfache Möglichkeit zur Aktualisierung der URLs ist die folgende SQL-Abfrage:
UPDATE wp_posts SET post_content = REPLACE(post_content, 'localhost/test/', 'www.yourlivesite.com/');
Gehen Sie einfach zu phpMyAdmin, klicken Sie auf Ihre Datenbank und dann auf „SQL“ im oberen Menü und fügen Sie die oben genannte Abfrage hinzu.
Stellen Sie sicher, dass Sie die URLs Ihrer eigenen lokalen Website und der Live-Site ändern und klicken Sie auf die Schaltfläche „Go“.
Das war’s. Sie haben WordPress nun erfolgreich von Ihrem lokalen Server auf eine Live-Site migriert.
Hoffentlich funktioniert Ihre Live-Website jetzt reibungslos. Wenn Sie Fehler bemerken, können Sie in unserem Leitfaden zu häufigen WordPress-Fehlern nachsehen, um Hilfe bei der Fehlersuche zu erhalten.
Wir hoffen, dass dieser Artikel Ihnen geholfen hat, WordPress von einem lokalen Server auf eine Live-Site umzuziehen. Vielleicht interessieren Sie sich auch für unseren Leitfaden zur Erstellung eines E-Mail-Newsletters oder für unseren Vergleich der besten GoDaddy-Hosting-Alternativen.
Wenn Ihnen dieser Artikel gefallen hat, dann abonnieren Sie bitte unseren YouTube-Kanal für WordPress-Videotutorials. Sie können uns auch auf Twitter und Facebook finden.


Syed Balkhi says
Hey WPBeginner readers,
Did you know you can win exciting prizes by commenting on WPBeginner?
Every month, our top blog commenters will win HUGE rewards, including premium WordPress plugin licenses and cash prizes.
You can get more details about the contest from here.
Start sharing your thoughts below to stand a chance to win!
ANTONIO says
Some days ago I posted I had used method #1 successfully. I am now trying again, from scratch, with no success.
I have two webs in one host (two subdomains: www and blog). one seats in /public/ and the other seats in /public_blog/.
(so, not a subfolder but a sibling, in my host provider). Both (www and blog subdomains) have a SSL.
I got to enter the WP admin area, clean the remaining files; posts and pages are listed, but clicking preview shows a blank page. No errors on the log
I don’t know how to trace and find out the steps (although I have the dup-installer-log.txt
thanks
WPBeginner Support says
You would likely want to reach out to your hosting provider to ensure that the subdomain is set to the correct folder location for the most common reason for that issue.
Admin
Rob H says
Brilliant tutorial.
I went with option 1. Got write through to point 4, but then on trying to launch WordPress, I received a „too many redirects“. Spent ages trying to figure out what I had done wrong, trying all the suggested for the error type and turned out not to be my fault. It wasn’t working because the database version I was using on Wamp was newer than the version on my hosting company 1and1 ionos.
I called up 1and 1 CS’s to ask if they could update the database version and it appears they must have had other complaints. 2 days later, database version updated and my local website transferred to the live site within minutes.
So…… database versions is another thing to consider if you get problems.
Thanks for such an excellent tutorial, I will use this method again in the future.
WPBeginner Support says
Thanks for sharing your solution should anyone else run into this issue
Admin
Antonio says
Perfect. I used method #1. Now the site (in server) is up and running.
But, then, when I add some posts, pages, menus in localhost,… how can I update the real site, without starting from scratch again?
thanks
WPBeginner Support says
You could use the duplicator method to move the updated content over to your current site
Admin
Antonio says
Thanks. I will try.
I didn’t notice my post was published yesterday, so I just wrote a new one asking the same question.
Sorry for the inconvenience.
WPBeginner Support says
No worries
Bahadur says
My website working fine on localhost but when i upload it to my live domain some of the Social button images are not showing can you help please ?
WPBeginner Support says
We would first recommend reaching out to the support for the plugin you are using to ensure there isn’t a hiccup that is specific to transferring the content.
Admin
Luisa says
Hi! I followed every step but once I get to step 4 and click on Admin Login I get an error saying „Too many redirects occurred trying to open […]. This might occur if you open a page that is redirected to open another page which then is redirected to open the original page“.
How can I fix that?
WPBeginner Support says
For that error you would want to try the troubleshooting steps in our article here: https://www.wpbeginner.com/wp-tutorials/how-to-fix-error-too-many-redirects-issue-in-wordpress/
Admin
Anita Steen-van Meerveld says
Hi, I’ve followed the instructions so far, and everything seems to go as it has, but the problem begins on step 4.
I’ve uploaded the migration files, after check the file is 1.2 gig.
After launching the installer.php the message is : file is 4k, please upload the complete file.
I am sure that the uploaded file is completely uploaded.
The process stops here, what can I do?
WPBeginner Support says
You would want to reach out to duplicator’s support and let them know the error and they will be able to assist.
Admin
Jessica says
Thankyou for this fantastic tutorial! I am building a new website locally but I already have a live site running that I will want to completely overwrite with the new one. Do I need to delete my whole live website before migrating? Both are running WordPress but are completely different themes… thanks!
WPBeginner Support says
It would normally be best to remove the site you are replacing so you do not have unnecessary additional files on your server.
Admin
nurudeen says
In my opinion I recommend you guys to please organize a complete video tutorial, it gonna be a great practical guide and more helpful and much easier, for it may allow to view in real doing until results achieve.. Thanks you guys for good job you are offering.
WPBeginner Support says
Thank you for your recommendation
Admin
Reggie says
Hi, I did this and now my slider/carousel does not work live but it shows and works on localhost. What can I do to fix this? Thank you.
WPBeginner Support says
It would depend on what error you are running into at the moment. If you reach out to the slider plugin’s support they should be able to assist.
Admin
Gage says
Hi I really appreciate the in depth explanation. I am completely finished with step 5, changed my URL and Home to my actual URL i am using, but now when I type in my URL it still gives me the „if you are the owner login to launch site“. Not sure what I’m missing but i dont get an error message.
WPBeginner Support says
Hi Gage,
Please recheck if you uploaded WordPress files to the correct directory. If you are unsure, then ask your hosting provider and they will let you know which directory you should upload it to.
Admin
Vladimir says
Thank. Very useful tutorial.
WPBeginner Support says
Thank you
Admin
Tarun Bisht says
Thanks for sharing the post, i will surely try.
WPBeginner Support says
Glad our post can help you
Admin
Hazel beaver says
I normally love your tutorials and have built my two personal websites with your help and guidance… But this is too complicated for me!
When I run Duplicator If doesn’t list all the entries as ‚good‘. The size check and add on checks come back as having a warning. so I can’t get any further. My site isn’t that big.. but I think it’s trying to package everything ( including back-up and plugins that I assume I don’t need to migrate. Is there a way round this ( I’m trying to down load my live site to WAMP so I can work on using a new theme )
WPBeginner Support says
As long as they are only warnings you should be able to continue, if you click on the section with the warning it should let you know different options on how to change from warning to good. You can also enable filters to ignore certain files/folders
Admin
Fahim says
Good post.
WPBeginner Support says
Thank you
Admin
Ravi gupta says
Great! Thanks for sharing this information I am so very happy to read this information
WPBeginner Support says
Glad you like our article
Admin
Rosa says
Hi there! I’ve followed your instructions so far, and everything seems to go as it has, but I’ve stuck on Step 6.
I read: „To fix this, connect to your website using an FTP client and edit wp-config.php file. Provide the database name, user and password you created earlier in Step 3. Save the wp-config.php file and upload it back to your server. Visit your website, and it should be live now.“
Can you please be more specific? Where exactly do I find wp-config.php file and how do I edit it?
WPBeginner Support says
You would find the wp-config file where your WordPress folders are which is normally in the public_html or www folder of your hosting. You would use a text editor such as notepad or similar to edit the content of the file
Admin
Hirr says
Could be more helpful if you uploaded a video..
WPBeginner Support says
Thank you for your recommendation, we’ll certainly take a look for a possible video
Admin
Mike says
„Click on the Import tab in the top menu. On the import page, click on Choose File button and then select the database file you saved in Step 1.“ I cannot locate this file – no idea where to even look.
WPBeginner Support says
Hi Mike,
In the first step you would have saved a file to your computer. This is the file you need to import here.
Admin
Samad says
Thank you very much for the information,
I have been doing these wrong in the past.
Jim Thorne says
Fantastic how-to article. I followed it and easily migrated my site from localhost to the live server. Thanks for posting! I’m a newbie at moving a site, so I had to figure out some of the simplest things. One thing I had to discover was how to move the file folders from my computer to the host server using cPanel. After researching this, I discovered to ZIP the entire folder with all of its subfolders into a ZIP file and then upload that one file.
Christian says
Fix Images and Broken Links by Updating Paths: How to update background images? The method mention in step 7, only work normal image not background images. So how to update images?
WPBeginner Support says
Hi Christian,
You’ll have to manually update those.
Admin
Alex says
Hi guys, great tutorial.
But when i try to access my site through the url, it asks me to re-install WordPress (i mean is shows me the wizard of the WordPress when it starts)
Plus, when you say go to the database and create a new user, mySQL doesn’t have an option.
Olaniyan says
Hello please i followed all the steps but at the end of it all am getting an error message stating Erro In Establishing a database connection message
Steph says
Hi, how do I proceed if there is no cPanel? Thank you in advance!
Jasonas says
Hello! Great article. Just two things that I think would be cool to read on this subject.
1.Are there any tips of workflow in order to avoid the broken links, images etc. that you mention?
2.Also, I’ve read plugin reviews where users claim that some bad plugins will leave „trash code“ (unusable code and files) after the uninstall/deletion of the plugin, which eventually makes their website slower. Is that true? If yes how could we, as beginners, detect that „trash code“ (essentially the leftovers of plugins that we deleted) and remove it?
In my local website I try many plugins that I don’t intend to use and will end up deleting (like many others do), so I am interested in this.
Thank you in advance.
WPBeginner Support says
Hi Jasonas,
1. You can follow the steps above in order they appear to avoid broken links.
2. You can view leftover data in your WordPress database by using phpMyAdmin. However, we don’t recommend beginners to do that unless they are certain that this data is slowing down their website.
Admin
Sally says
Hi,
I have been building my site on the local server, I now want to move it over to a temporary Url on my WordPress which is installed on my hosting package to finish and then once ready it will be pointed to the domain name which currently hosts the old site, I have attempted the above steps but I get as far as step 1 and have no idea where the export file goes?
Sorry if this is a silly question but can’t seem to find it anywhere!
Any help would be much appreciated.
Thanks,
Sally
WPBeginner Support says
Hi Sally,
Export file is automatically downloaded to your computer. Check your computer’s Downloads folder or any other folder where your browser usually stores downloaded files.
Admin
Sally says
Hello,
Thanks, sorry can’t find it there at all. I emptied the folder and did it again but nothing appeared in there at all, hence asking the question.
All Safari downloads go into the normal download folder, so don’t know where it could be going. Going to give it a go with Duplicator and see if I get any further!
Thanks,
Sally
Sheuen says
I think maybe you can try choose download custom instead of download quick, and then in output field, choose „Save output to a file“ > Compression: > gzipped
JD Simpkins says
Depending on your setup, it may not automatically download. It may open up in a new screen and you can then copy/paste it into a file and save yourself. Not sure if this is just a MAMP thing or what but when I migrated over to working on a Mac, this part of the steps changed.
Sally says
Hi,
Your tutorials are great, thank you!
I have just been following this thread and not sure if what I am doing is wrong but I do Step 1 (Export) but no idea where the file that I am exporting goes?
I am running a local server on my Mac and have got stuck here, am I missing something?
I am trying to get my website from the local server to WordPress running on my hosting package with 123 Reg. This is going onto a temporary URL until I am ready to move onto the domain which has currently got the old website on it.
Any help will be much appreciated.
Many thanks
Sally
Ahmad Lone says
Thank you so much.
Ismail says
I have a wordpress website on live server, i want to replace it by another wordpress server that i created on localhost, i want to keep the same host and same domaine name. what should i do please ?
Sandy says
This is very helpful. I want to ask about the next step. What if I continue to develop locally and want to sync changes from time to time ? Do you have a tutorial for that ?
DEAN O says
I have an issue where my laptop died with localhost MAMP server. I have been able to extract the all the files from the hard disc but I can’t run a database export.
I have an laptop set up with XAMP.
Any thoughts?
Mauricio says
Sunday evening.
The client wants the website.
I have tried Duplicator all day long, no way.
Problems with PHP and DB, just doesn’t work… until I get to your post.
Back to basics man, manually put the live on air.
Thanks for sharing.
Its the simpler idea yet we try to automate things and get less work done sometimes.
Had to share with you my truly akcnowledgment.
Nicely done
Stefan says
Thank you! This guide is perfect. I use it every time I forget how I move wordpress from local to live!
Chell says
I have recieved a complete WP „filesystem“ through an FTP server from a supplier of mine, and I want to creat a new webpage with these files, but with my own domain.
Can I use this „walk-through“ for this?
Sorry silly questions, but I have only worked on WP through a cloud solution
WPBeginner Support says
Hi Chell,
You will also need the WordPress database not just the files. Once you have both database and WordPress files, then you will be able to upload them to your own domain name and import the database.
Admin
Scott says
Hello. I have finished building my site on a local server and ready to move it to my live server. I am assuming that before I follow your steps, that I would need to install WordPress on my hosting account first. Is that correct? And if so, should I click the box that says „Automatically create a new database for this installation“ ? If I do that, I will need to replace that database with the one from my local server, right? Or should I leave that box unchecked since I’m about to migrate a new database to it? Thanks.
WPBeginner Support says
Hi Scott,
No, instead of installing WordPress you will be moving one from your local server to the live site. Similarly, you will export your local database and then import it on your live server’s hosting account using phpmyadmin via cpanel.
Admin
Bryn Why says
Hi, after updating my wp-config.php file to reflect the database information, I am now presented with the below when accessing the live site:
Fatal error: Class ‚WP_Widget_Media‘ not found in /home/…/wp-includes/widgets/class-wp-widget-media-audio.php on line 17
Manos Liakos says
Dude, you are a life saver. That thing with the SQL query to change the links just saved me. I’ve been trying for 2 days straight to fix the site not displaying properly when accessing it from public ip through my domain name, even if „siteurl“ and „home“ were correctly configured. Thanks!
WPBeginner Support says
Hi Manos,
Glad you found the solution. Don’t forget to join us on Twitter for more WordPress tips and tutorials.
Admin
Shreshta says
Thank you in advance.
I have to upload the word press website from my local machine to the web server my company owns which sits in the same building as I work. My problem is I am not using any hosting services so I am not sure what to do when it comes to the file manager step for the database transfer. Just to be clear, how would I go if I were to upload the website from my local machine to the private company server without using a web hosting service.
Dimitris says
Hello I am going to do this migration, but I have a question. What happened if i have to upload a website to a server but in my localhost this website is a part of multisite? How can I isolate this website from the local WordPress Network and finally upload it to a real web server?
Olumide says
phpMyAdmin – Error
Error during session start; please check your PHP and/or webserver log file and configure your PHP installation properly. Also ensure that cookies are enabled in your browser.
session_start(): open(SESSION_FILE, O_RDWR) failed: No such file or directory (2)
The above is what i get and my site is not working please help.
WPBeginner Support says
Hi Olumide,
If the error occurs on your live site, then please contact your hosting provider. If this happens on your local server, then this means your local server set up is not properly configured.
Admin
Angela says
I just followed these steps to move a local site to active and none of my local site transferred over.
Olakorede O says
Please i am having issues with step 7. i imputed the life site but what will i put for the local site? thanks
Dimitri says
Thanks god for this article !
The Step 6 saved my life, it could not be found anywhere on the internet !!!
Kisses from France
Marlon says
Hi WPBEGINNER SUPPORT et al,
Thanks I have found your article helping people out there. I hope I can find your favor to my problem. After having modifies by adding codes in functions.php (live site) i can’t view or access the website anymore, it always shows the message saying:
Notice: ob_end_clean(): failed to delete buffer. No buffer to delete in /home/dh_awey63/website/wp-content/plugins/nextgen-gallery/nggallery.php on line 92
ParseError thrown
syntax error, unexpected ‚ang‘ (T_STRING)
I used to searched in google the message error and got some advices to access it thru FTP FileZilla client, but I can’t login successfully I always got an error in: „Response: 530 Login incorrect“. „Error: Critical error: Could not connect to server“. Is there a way i can edit the functions.php file to delete my comments there and put back the site in normal, I just don’t know if the web developer have configured ftp account, that freelance developer left his messy and lousy stuff in his web design and has gone out after he receives the payment. I am really new to this area and don’t know what to do. Please help. Thank you very much.
WPBeginner Support says
Hi Marlon,
You can also access your WordPress files using the File Manager in cPanel under your web hosting account dashboard. Once you are connected to your site using file manager, you need to locate your functions.php file and undo the changes you made earlier.
Admin
Marlon says
Hi WPBEGINNER SUPPORT,
Thank you for your prompt reply. I sad I really have no idea if the guy who build the site created a cpanel account, I really don’t know the login details if there’s any. That bad guy never replies my messages after he receives the money from us. Please help me what to do if there’s any available options. Please visit the website at rheumacares.ph. Thank you very much.
Victor says
Hi, I’m with a problem in step 4. After importing my database I get an error message. I don’t now what I did wrong in the process and I don’t know how to fix it. Could you give me some advice? I’m posting the error message below
Thanks
Error
SQL query:
—
— Database: `meusite`
—
— ——————————————————–
—
— Table structure for table `wp_commentmeta`
—
CREATE TABLE `wp_commentmeta` (
`meta_id` bigint(20) UNSIGNED NOT NULL,
`comment_id` bigint(20) UNSIGNED NOT NULL DEFAULT ‚0‘,
`meta_key` varchar(255) COLLATE utf8mb4_unicode_520_ci DEFAULT NULL,
`meta_value` longtext COLLATE utf8mb4_unicode_520_ci
) ENGINE=InnoDB DEFAULT CHARSET=utf8mb4 COLLATE=utf8mb4_unicode_520_ci
MySQL said: Documentation
#1050 – Table ‚wp_commentmeta‘ already exists
WPBeginner Support says
Hi Victor,
The table in your database already exists. If you do not have any content on your live site, then you can simply DROP all tables in your WordPress database and then try to import again.
Admin
Jonathan says
Thank you for a fantastic article!
I have locally built a wordpress site which I would like to replace a site currently live online.
If I want to upload the local site to a test environment online, am I able to do this without the need to setup a new database? i.e. am i able to share the same database being used by the live site? If so how can I do this?
Cheers, Jon
Jon says
Fantastically helpful article thankyou! I have been building a wordpress site locally to replace one that is hosted online.
I would like to move the locally hosted one to online in a test environment so that it does not replace the existing site.
You instructions suggest that I need to setup a new SQL database for which I will incur charges. Is there a way that I can upload the test site to the existing database without disturbing the live site? If so how?
Thanks,
Jon
WPBeginner Support says
Hi Jon,
It is not recommended, but you can change the table prefix in the wp-config.php file of your test site to something unique. Use the same MySQL database as your live site. Doing so your live website’s database will have tables for different WordPress installs.
Admin
Jojo Esposa Jr says
Can I use the Cpanel Softaculous installation of WordPress, then simply upload the sql database and the current theme I used? Uploading the entire wordPress files from my laptop to the live site using ftp takes very long since my internet connection is extremely slow, (2 mbps).
WPBeginner Support says
Hello Jojo Esposa Jr,
Yes, you can do that.
Admin
Lyada Emmanuel says
Hello i followed all the steps ,however when i open login page to wordpress i get this
Internal Server Error
WPBeginner Support says
Hi Lyada,
Please see our guide on how to fix internal server error in WordPress.
Admin
Madison Duncan says
Hello,
I am confused by step two. When I click on my FTP client account it prompts me to use Cyberduck, but then I am not sure which files to upload or where (how to I make sure it is on public html?). I completed step one, so are those the files that I am supposed to upload? I just don’t see all of those anywhere. Thanks!
WPBeginner Support says
Hi Madison,
This tutorial is about moving a WordPress website built on local server (Your computer) to a live website. If you have a local server installed on your computer (programs like Wamp, MAMP, XAMP), then you will find local files on your computer. These are the files you need to upload.
The first step only exports your database. You will need it in Step 4.
Admin