Volete imparare a creare facilmente tipi di post personalizzati in WordPress?
I tipi di post personalizzati consentono di andare oltre i post e le pagine e di creare diversi tipi di contenuti per il vostro sito web. Trasformano il vostro sito WordPress da una piattaforma di blogging in un potente sistema di gestione dei contenuti(CMS).
In questo articolo vi mostreremo come creare facilmente tipi di post personalizzati in WordPress.

Che cos’è il tipo di post personalizzato in WordPress?
Sul vostro sito web WordPress, i tipi di post servono a distinguere i diversi tipi di contenuto in WordPress. I post e le pagine sono entrambi tipi di post, ma hanno scopi diversi.
WordPress è dotato di alcuni tipi di post diversi per impostazione predefinita:
- Messaggio
- Pagina
- Allegato
- Revisione
- Menu Nav
È anche possibile creare tipi di post personalizzati, noti come custom post types. Questi sono utili per creare contenuti con un formato diverso da quello di un post o di una pagina standard.
Ad esempio, se gestite un sito web di recensioni di film, probabilmente vorrete creare un tipo di post per le recensioni di film. Si possono anche creare tipi di post personalizzati per portafogli, testimonianze e prodotti.
Su WPBeginner, utilizziamo tipi di post personalizzati per le nostre sezioni Offerte e Glossario per tenerle separate dagli articoli del blog quotidiano. Questo ci aiuta a organizzare meglio i contenuti del sito.
I tipi di post personalizzati possono avere diversi campi personalizzati e una struttura di categorie personalizzata.
Molti plugin WordPress popolari utilizzano tipi di post personalizzati per memorizzare i dati sul vostro sito web WordPress. Di seguito sono elencati alcuni dei principali plugin che utilizzano i tipi di post personalizzati:
- WooCommerce aggiunge un tipo di post “prodotto” al vostro negozio online
- WPForms crea un tipo di post “wpforms” per memorizzare tutti i vostri moduli.
- MemberPress aggiunge un tipo di post personalizzato ‘memberpressproduct’.
Video tutorial
Se preferite le istruzioni scritte, continuate a leggere.
È necessario creare tipi di post personalizzati?
Prima di iniziare a creare tipi di post personalizzati sul vostro sito WordPress, è importante valutare le vostre esigenze. Spesso è possibile ottenere gli stessi risultati con un normale post o pagina.
Se non siete sicuri che il vostro sito abbia bisogno di tipi di post personalizzati, consultate la nostra guida su quando è necessario un tipo di post o una tassonomia personalizzata in WordPress.
Detto questo, vediamo come creare facilmente tipi di post personalizzati in WordPress per il vostro uso personale.
Vi mostreremo due metodi e illustreremo anche alcuni modi per visualizzare i tipi di post personalizzati sul vostro sito WordPress.
- Creare un tipo di post personalizzato con WPCode (consigliato)
- Creare un tipo di post personalizzato con un plugin
- Visualizzazione dei tipi di post personalizzati sul sito
Creare manualmente un tipo di post personalizzato utilizzando WPCode
La creazione di un tipo di post personalizzato richiede l’aggiunta di codice al file functions.php del tema. Normalmente, non raccomandiamo questa operazione a nessuno, se non agli utenti esperti, perché anche un piccolo errore può danneggiare il sito. Inoltre, se si aggiorna il tema, il codice viene cancellato.
Tuttavia, utilizzeremo WPCode, il modo più semplice e sicuro per chiunque di aggiungere codice personalizzato al proprio sito WordPress.
Con WPCode è possibile aggiungere snippet personalizzati e attivare molte funzioni dalla libreria di codice integrata e preconfigurata, che può sostituire molti plugin dedicati o monouso installati.
Per prima cosa, è necessario installare e attivare il plugin gratuito WPCode. Per istruzioni dettagliate, consultate la nostra guida passo-passo su come installare un plugin di WordPress.
Una volta attivato, andate su Code Snippets “ Add Snippet nella vostra dashboard di WordPress. Passate il mouse su “Aggiungi il tuo codice personalizzato (nuovo snippet)”, quindi fate clic su “Usa snippet”.
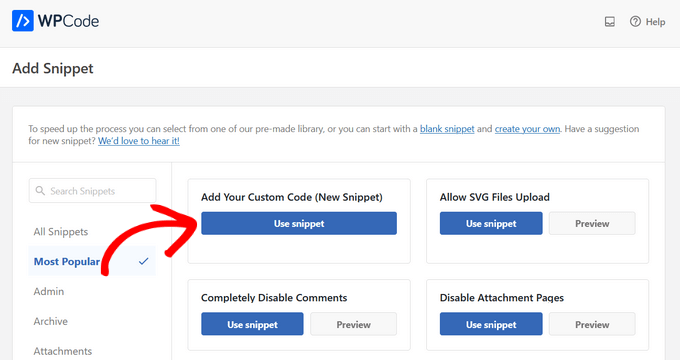
Successivamente, si accede alla schermata “Crea snippet personalizzato”.
A questo punto, si può dare un titolo allo snippet di codice e attivare l’interruttore su “Attivo”.
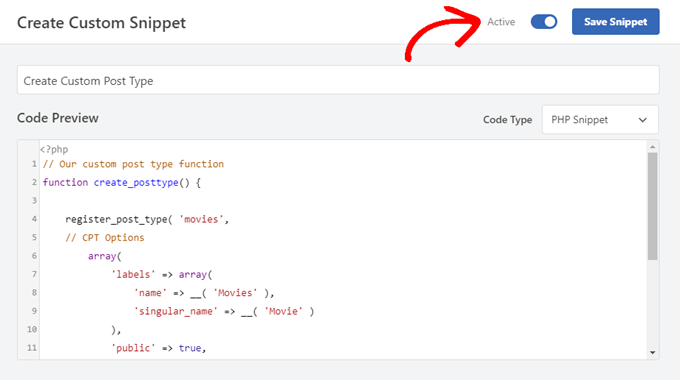
Dopodiché, è sufficiente incollare il seguente codice nell’area “Anteprima codice”. Questo codice crea un tipo di post personalizzato di base chiamato “Film” che apparirà nella barra laterale dell’amministrazione e funzionerà con qualsiasi tema.
// Our custom post type function
function create_posttype() {

    register_post_type( 'movies',
    // CPT Options
        array(
            'labels' => array(
                'name' => __( 'Movies' ),
                'singular_name' => __( 'Movie' )
            ),
            'public' => true,
            'has_archive' => true,
            'rewrite' => array('slug' => 'movies'),
            'show_in_rest' => true,

        )
    );
}
// Hooking up our function to theme setup
add_action( 'init', 'create_posttype' );
Se si desidera solo un tipo di post personalizzato di base, è sufficiente sostituire film e Film con lo slug e il nome del proprio CPT e fare clic sul pulsante ‘Aggiorna’.
Tuttavia, se volete ancora più opzioni per il vostro tipo di post personalizzato, utilizzate il seguente codice al posto di quello sopra riportato.
Il codice sottostante aggiunge molte altre opzioni al tipo di post personalizzato “Film”, come il supporto per le revisioni, le immagini in primo piano, i campi personalizzati e l’associazione del tipo di post personalizzato con una tassonomia personalizzata chiamata “generi”.
Nota: non combinare questi due snippet, altrimenti WordPress darà un errore perché entrambi gli snippet registrano lo stesso tipo di post personalizzato. Si consiglia di creare un nuovo snippet utilizzando WPCode per ogni tipo di post aggiuntivo che si desidera registrare.
/*
* Creating a function to create our CPT
*/

function custom_post_type() {

// Set UI labels for Custom Post Type
    $labels = array(
        'name'                => _x( 'Movies', 'Post Type General Name', 'twentytwentyone' ),
        'singular_name'       => _x( 'Movie', 'Post Type Singular Name', 'twentytwentyone' ),
        'menu_name'           => __( 'Movies', 'twentytwentyone' ),
        'parent_item_colon'   => __( 'Parent Movie', 'twentytwentyone' ),
        'all_items'           => __( 'All Movies', 'twentytwentyone' ),
        'view_item'           => __( 'View Movie', 'twentytwentyone' ),
        'add_new_item'        => __( 'Add New Movie', 'twentytwentyone' ),
        'add_new'             => __( 'Add New', 'twentytwentyone' ),
        'edit_item'           => __( 'Edit Movie', 'twentytwentyone' ),
        'update_item'         => __( 'Update Movie', 'twentytwentyone' ),
        'search_items'        => __( 'Search Movie', 'twentytwentyone' ),
        'not_found'           => __( 'Not Found', 'twentytwentyone' ),
        'not_found_in_trash'  => __( 'Not found in Trash', 'twentytwentyone' ),
    );

// Set other options for Custom Post Type

    $args = array(
        'label'               => __( 'movies', 'twentytwentyone' ),
        'description'         => __( 'Movie news and reviews', 'twentytwentyone' ),
        'labels'              => $labels,
        // Features this CPT supports in Post Editor
        'supports'            => array( 'title', 'editor', 'excerpt', 'author', 'thumbnail', 'comments', 'revisions', 'custom-fields', ),
        // You can associate this CPT with a taxonomy or custom taxonomy.
        'taxonomies'          => array( 'genres' ),
        /* A hierarchical CPT is like Pages and can have
        * Parent and child items. A non-hierarchical CPT
        * is like Posts.
        */
        'hierarchical'        => false,
        'public'              => true,
        'show_ui'             => true,
        'show_in_menu'        => true,
        'show_in_nav_menus'   => true,
        'show_in_admin_bar'   => true,
        'menu_position'       => 5,
        'can_export'          => true,
        'has_archive'         => true,
        'exclude_from_search' => false,
        'publicly_queryable'  => true,
        'capability_type'     => 'post',
        'show_in_rest' => true,

    );

    // Registering your Custom Post Type
    register_post_type( 'movies', $args );

}

/* Hook into the 'init' action so that the function
* Containing our post type registration is not
* unnecessarily executed.
*/

add_action( 'init', 'custom_post_type', 0 );
Si può notare anche la parte in cui abbiamo impostato il valore gerarchico su false. Se si desidera che il tipo di post personalizzato si comporti come le Pagine piuttosto che come i Post, si può impostare questo valore a true.
Un’altra cosa da notare è l’uso ripetuto della stringa twentytwentyone , chiamata dominio di testo. Se il vostro tema è pronto per la traduzione e volete che i vostri tipi di post personalizzati siano tradotti, dovrete indicare il dominio di testo utilizzato dal vostro tema.
È possibile trovare il dominio di testo del tema all’interno del file style.css nella cartella del tema o andando su Aspetto “ Editor file del tema nel pannello di amministrazione. Il dominio di testo sarà indicato nell’intestazione del file.
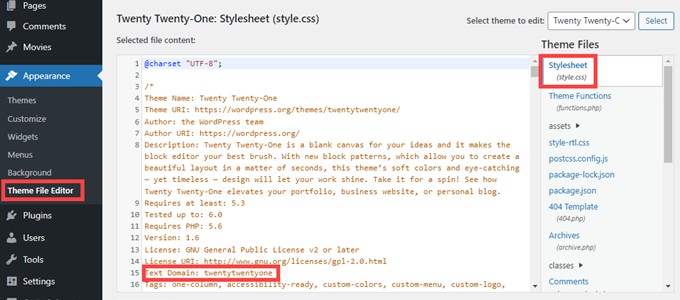
È sufficiente sostituire twentytwentyone con il dominio di testo del proprio tema.
Una volta soddisfatti delle modifiche, è sufficiente fare clic sul pulsante “Aggiorna” e WPCode si occuperà del resto.
Creare un tipo di post personalizzato con un plugin
Un altro modo semplice per creare un tipo di post personalizzato in WordPress è utilizzare un plugin. Questo metodo è consigliato ai principianti perché è sicuro e facilissimo.
La prima cosa da fare è installare e attivare il plugin Custom Post Type UI. Per maggiori dettagli, consultate la nostra guida passo passo su come installare un plugin di WordPress.
Dopo l’attivazione, è necessario andare su CPT UI ” Aggiungi / Modifica tipi di post per creare un nuovo tipo di post personalizzato. Dovreste trovarvi nella scheda “Aggiungi un nuovo tipo di post”.
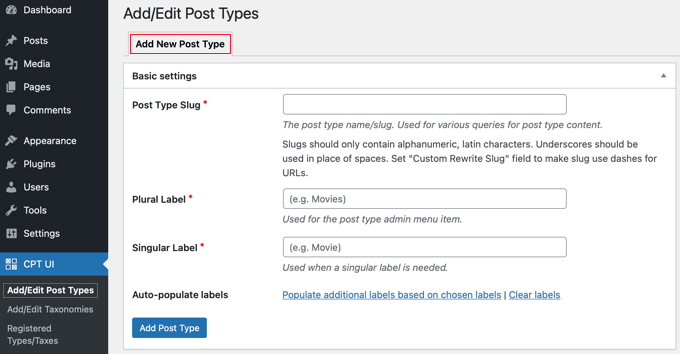
Innanzitutto, è necessario fornire uno slug per il tipo di post personalizzato, ad esempio “film”. Questo slug sarà utilizzato nell’URL e nelle query di WordPress, quindi può contenere solo lettere e numeri. Poi, occorre fornire i nomi plurali e singolari del tipo di post personalizzato.
Dopodiché, se si desidera, è possibile fare clic sul link “Popola etichette aggiuntive in base alle etichette scelte”. Questo riempirà automaticamente i campi delle etichette aggiuntive in basso e di solito vi farà risparmiare tempo.
Ora potete scorrere fino alla sezione “Etichette aggiuntive”. Se non avete fatto clic sul link che abbiamo menzionato, ora dovrete fornire una descrizione per il vostro tipo di post e cambiare le etichette.
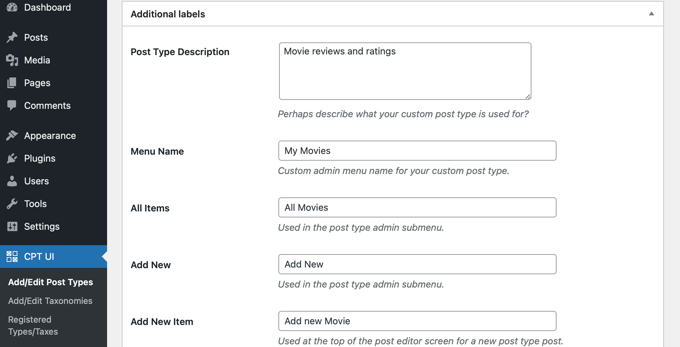
Queste etichette saranno utilizzate in tutta l’interfaccia utente di WordPress quando si gestisce il contenuto di quel particolare tipo di post.
Segue l’impostazione del tipo di post. Da qui è possibile impostare diversi attributi per il tipo di post. Ogni opzione è accompagnata da una breve descrizione che ne spiega l’utilità.
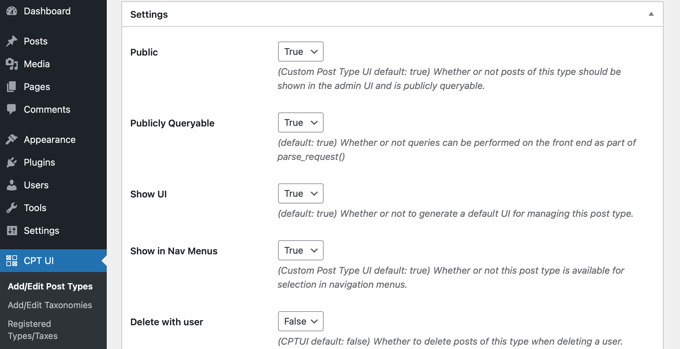
Ad esempio, si può scegliere di non rendere un tipo di post gerarchico come le pagine o di ordinare i post cronologici al contrario.
Sotto le impostazioni generali, si trova l’opzione per selezionare le funzioni di modifica supportate da questo tipo di post. È sufficiente selezionare le opzioni che si desidera includere.
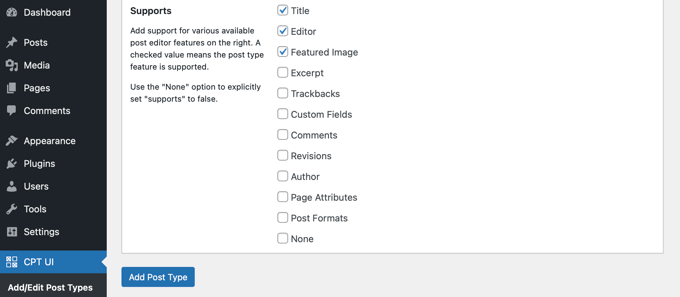
Infine, fare clic sul pulsante “Aggiungi tipo di post” per salvare e creare il tipo di post personalizzato.
Questo è tutto. Avete creato con successo il vostro tipo di post personalizzato e potete iniziare ad aggiungere contenuti.
Visualizzazione dei tipi di post personalizzati sul sito
WordPress è dotato di un supporto integrato per la visualizzazione dei tipi di post personalizzati. Una volta aggiunti alcuni elementi al vostro nuovo tipo di post personalizzato, è il momento di visualizzarli sul vostro sito web.
I metodi che si possono utilizzare sono diversi e ognuno ha i suoi vantaggi.
Visualizzare i tipi di post personalizzati usando il modello di archivio predefinito
Innanzitutto, è sufficiente andare in Aspetto ” Menu e aggiungere un link personalizzato al menu. Questo link personalizzato è il collegamento al tipo di post personalizzato.
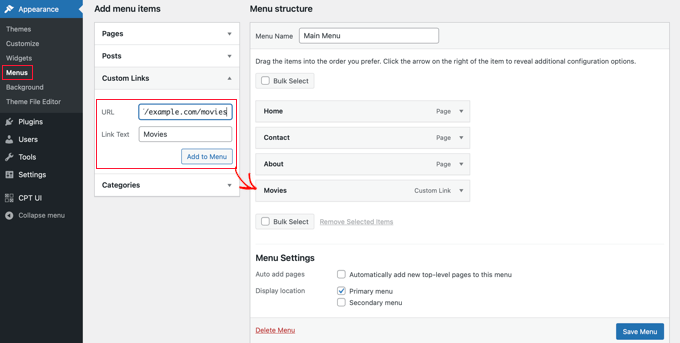
Se si utilizzano permalink SEO-friendly, l’URL del tipo di post personalizzato sarà probabilmente qualcosa di simile:
http://example.com/movies
Se non si utilizzano permalink SEO-friendly, l’URL del tipo di post personalizzato sarà qualcosa di simile:
http://example.com/?post_type=movies
Non dimenticate di sostituire “example.com” con il vostro nome di dominio e “movies” con il nome del vostro tipo di post personalizzato.
Salvare il menu e visitare il front-end del sito web. Si vedrà la nuova voce di menu aggiunta e, quando si fa clic su di essa, verrà visualizzata la pagina di archivio del tipo di post personalizzato, utilizzando il file di modello archive.php del tema.

Creare modelli di tipi di post personalizzati
Se non vi piace l’aspetto della pagina di archivio per il vostro tipo di post personalizzato, potete utilizzare un modello dedicato per gli archivi dei tipi di post personalizzati.
È sufficiente creare un nuovo file nella cartella del tema e chiamarlo archive-movies.php. Assicuratevi di sostituire ‘movies’ con il nome del vostro tipo di post personalizzato.
Per iniziare, si può copiare il contenuto del file archive.php del proprio tema nel modello archive-movies.php e modificarlo in base alle proprie esigenze.
Ora, ogni volta che si accede alla pagina dell’archivio per il tipo di post personalizzato, questo modello verrà utilizzato per visualizzarlo.
Allo stesso modo, è possibile creare un modello personalizzato per la visualizzazione delle voci singole del proprio tipo di post. Per farlo, è necessario creare single-movies.php nella cartella del tema. Non dimenticate di sostituire ‘movies’ con il nome del vostro tipo di post personalizzato.
Si può iniziare copiando il contenuto del template single.php del proprio tema nel template single-movies.php e poi iniziare a modificarlo per soddisfare le proprie esigenze.
Per saperne di più, consultate la nostra guida su come creare modelli di post singoli personalizzati in WordPress.
Visualizzazione dei tipi di post personalizzati in prima pagina
Un vantaggio dell’uso dei tipi di post personalizzati è che i tipi di contenuti personalizzati sono separati dai normali post. Tuttavia, se si desidera, è possibile visualizzare i tipi di post personalizzati nella prima pagina del sito.
È sufficiente aggiungere questo codice come nuovo snippet utilizzando il plugin gratuito WPCode. Per istruzioni dettagliate, consultare la sezione di questo articolo dedicata all’aggiunta manuale del codice.
add_action( 'pre_get_posts', 'add_my_post_types_to_query' );

function add_my_post_types_to_query( $query ) {
    if ( is_home() && $query->is_main_query() )
        $query->set( 'post_type', array( 'post', 'movies' ) );
    return $query;
}
Non dimenticate di sostituire ‘movies’ con il vostro tipo di post personalizzato.
Interrogare i tipi di post personalizzati
Se si ha familiarità con la codifica e si desidera eseguire query ad anello nei propri template, ecco come fare. Interrogando la base dati, è possibile recuperare elementi da un tipo di post personalizzato.
È necessario copiare il seguente frammento di codice nel modello in cui si desidera visualizzare il tipo di post personalizzato.
<?php
$args = array( 'post_type' => 'movies', 'posts_per_page' => 10 );
$the_query = new WP_Query( $args );
?>
<?php if ( $the_query->have_posts() ) : ?>
<?php while ( $the_query->have_posts() ) : $the_query->the_post(); ?>
<h2><?php the_title(); ?></h2>
<div class="entry-content">
<?php the_content(); ?>
</div>
<?php endwhile;
wp_reset_postdata(); ?>
<?php else:  ?>
<p><?php _e( 'Sorry, no posts matched your criteria.' ); ?></p>
<?php endif; ?>
Questo codice definisce il tipo di post e il numero di post per pagina negli argomenti della nostra nuova classe WP_Query. Quindi esegue la query, recupera i post e li visualizza all’interno del ciclo.
Visualizzazione dei tipi di post personalizzati nei widget
Si noterà che in WordPress esiste un widget predefinito per visualizzare i post recenti, ma non consente di scegliere un tipo di post personalizzato.
E se si volesse visualizzare le ultime voci del tipo di post appena creato in un widget? Esiste un modo semplice per farlo.
La prima cosa da fare è installare e attivare il plugin Custom Post Type Widgets. Per maggiori dettagli, consultate la nostra guida passo passo su come installare un plugin di WordPress.
Dopo l’attivazione, è sufficiente andare su Aspetto ” Widget e trascinare il widget ‘Post recenti (Custom Post Type)’ in una barra laterale.
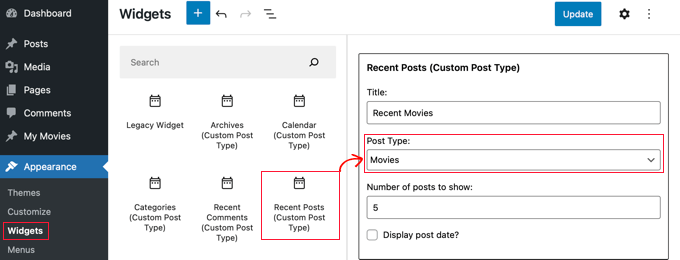
Questo widget consente di mostrare i post recenti di qualsiasi tipo di post. È necessario selezionare il tipo di post personalizzato dal menu a tendina ‘Post Type’ e selezionare le opzioni desiderate.
Dopodiché, fate clic sul pulsante “Aggiorna” nella parte superiore dello schermo e visitate il vostro sito web per vedere il widget in azione.

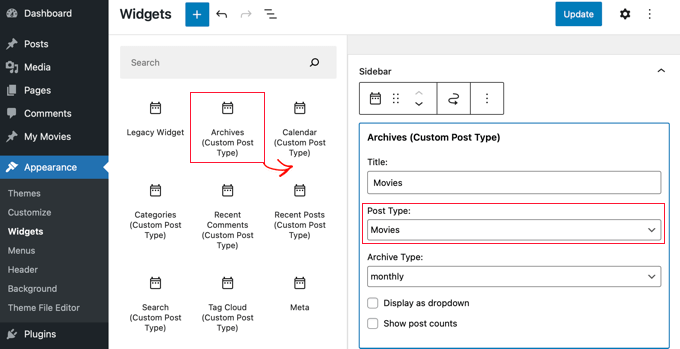
Il plugin fornisce anche widget di tipo post personalizzati che visualizzano archivi, un calendario, categorie, commenti recenti, ricerca e una nuvola di tag.
Speriamo che questo tutorial vi abbia aiutato a imparare come creare tipi di post personalizzati in WordPress. Potreste anche voler imparare come aumentare il traffico del vostro blog, oppure consultare il nostro elenco di errori comuni di WordPress e come risolverli.
Se questo articolo vi è piaciuto, iscrivetevi al nostro canale YouTube per le esercitazioni video su WordPress. Potete trovarci anche su Twitter e Facebook.


Syed Balkhi says
Hey WPBeginner readers,
Did you know you can win exciting prizes by commenting on WPBeginner?
Every month, our top blog commenters will win HUGE rewards, including premium WordPress plugin licenses and cash prizes.
You can get more details about the contest from here.
Start sharing your thoughts below to stand a chance to win!
Anna says
Good stuff! TY!
Is it possible to select a category for the CPT or create it’s own category list?
In your example of ‘Movies’ – select which category – Family, Drama, Action, etc?
WPBeginner Support says
You can place the custom post types in a category, we have our article below that goes more in-depth on how to set that up
https://www.wpbeginner.com/wp-tutorials/how-to-add-categories-to-a-custom-post-type-in-wordpress/
Admin
Michelle says
Hi! How can I set the query to only display custom post types by category on the category page? Currently, my query pulls ALL the post type, and I can’t seem to get just current category to display. thanks
WPBeginner Support says
For customizing your search results, we would recommend taking a look at our guide below!
https://www.wpbeginner.com/wp-tutorials/how-to-create-advanced-search-form-in-wordpress-for-custom-post-types/
Admin
hussain says
I have used this method which you explained above, but after creating a new menu, menu has created successfully created but when I click my menu it shows me error that “This page could not foun”
WPBeginner Support says
It sounds like you would need to check and resave your permalinks to be safe. The other thing you could do would be to ensure you have a custom post type published for be found on the page.
Admin
Jarkko says
So I used Code Snippets and the longer code but the features after ‘supports’ are not visible anywhere? Shouldn’t they be visible when clicking “Add new”… How do I insert a new movie and the information of it… I don’t get it.
WPBeginner Support says
There should be a new section in your admin area where you can add new posts of your custom post type similar to how you add posts or pages.
Admin
Hafeez Ulllah says
How cn display custom post type and where the code of display will be pasted
Johan says
Seems to work perfectly, except for one thing: My theme is showing featured images on the pages. But when I use the CPT the images are never show, whatever I do. Any idea why?
WPBeginner Support says
Your theme likely has a different template being used, if you reach out to your theme’s support they should be able to assist.
Admin
D Hebing says
I tried many things with the code above, even compare it with the twintytwintyone theme of wordpress. But the post types don’t appear in the backend in the post editor.
WPBeginner Support says
If none of the methods work for you, you would want to go through our troubleshooting steps below for finding the cause of the issue:
https://www.wpbeginner.com/beginners-guide/beginners-guide-to-troubleshooting-wordpress-errors-step-by-step/
Admin
Aurelien says
5 years on, still useful! Thank you guys
WPBeginner Support says
Glad you’ve found our content helpful
Admin
Max says
Thanks very useful.
What do you think? In such cases from view of site speed it is better to install the plugin or write the code you provide?
WPBeginner Support says
There shouldn’t be a difference in speed with either method being used.
Admin
Marshal Tudu says
Thanks a lot for the help. I am trying to create a movie database on my website
Your post really helped me.
WPBeginner Support says
Glad our guide was helpful
Admin
Harsha says
How to migrate old posts to the new post type?
WPBeginner Support says
You would want to use the plugin from our guide below:
https://www.wpbeginner.com/plugins/how-to-convert-post-types/
Admin
Leslie Campos says
Great article! I tried to add two different post types on top of blog posts but the second add_action( ‘init’, ‘create_posttype’ ); overwrote the first one. I don’t know php but am wondering if it is possible to create two different ones in the same functions.php file. I don’t know php so perhaps it’s the way I am writing it?
WPBeginner Support says
We would recommend using the plugin method to make the process easier. For a second post type with the code, you would need to copy from lines 4 to 17 and paste it on a new line below 17 then rename movies to a different name.
Admin
Girish Sahu says
Really loved the article, Simple explained and was really of great help.
I wanted to mix custom posts and blogs post in a single page and was able to do so after reading the article.
WPBeginner Support says
Glad our guide was helpful
Admin
Rafiozoo says
Great recipe! Thank you!
One question:
‘exclude_from_search’ => true
should exclude my new custom posts from search results, I believe. Why does not work?
WPBeginner Support says
It would depend on the search being used, you may want to take a look at our guide below:
https://www.wpbeginner.com/wp-tutorials/how-to-exclude-pages-from-wordpress-search-results/
Admin
snelson says
Is there a way to display the new post type without the new slug? example. Default is mysite.com/newposttype/newpage
I would like
mysite.com/newpage/
WPBeginner Support says
For customizing your permalinks, you would want to take a look at our article below:
https://www.wpbeginner.com/wp-tutorials/how-to-create-custom-permalinks-in-wordpress/
Admin
Yogesh says
Hi,
I tried to use the manual approach using the simple code youve mentioned for creating a custom post type, but unfortunatley the posts dont show up (page not found error). The post permalink structure looks fine but the posts dont get displayed.
WPBeginner Support says
You may want to clear the cache for your site and resave your permalinks to clear that issue.
Admin
rajni says
hey thank you so much it working fine but i want to show post type on a page where only categories will show and when click on category post listed under this category will open can you please suggest me how to do that.thank you in advance
WPBeginner Support says
For what it sounds like you’re wanting, you would want to ensure that categories are enabled for your custom post type and you could then add the category link in your menu for the page listing them how you want
Admin
G'will Chijioke says
Hi, i am a newbie developer trying to create a custom post type.
All is good, just 1 huge problem.
I want to display the taxonomies that i created and linked to the post (tags and categories ) on the post itself.
i want to show it on my breadcrumbs as well.
pls it would mean d world if you helped me out.
Thanks in advance.
WPBeginner Support says
Displaying the tags and categories would require you editing your theme’s template if your theme does not show that currently.
For breadcrumbs, if you’re using a plugin most should detect your taxonomy and give you options: https://www.wpbeginner.com/plugins/how-to-display-breadcrumb-navigation-links-in-wordpress/
Admin
rana ritesh singh says
nice post
WPBeginner Support says
Thank you
Admin
Haibatan says
I want a CPT for my english posts, my site is in an RTL language, is it possible?
WPBeginner Support says
You certainly could, you can also take a look at multilingual plugins such as the one in our article: https://www.wpbeginner.com/beginners-guide/how-to-easily-create-a-multilingual-wordpress-site/
Admin
RZKY says
One question, in the default WP post dashboard, there’s a filter by categories feature on top of the list.
So I already link my custom post type with a custom taxonomy, but the filter menu is not showing (A portfolio post type, and the portfolio category custom taxonomy). Is there any settings i need to enable? I’m doing this from inside my functions.php
WPBeginner Support says
Hi,
in your custom taxonomy function set ‘show_admin_column’ to true
Admin
Feras says
Hi there, So “Custome post type UI” is not compatible with my wp version! is there any useful plugin that I CAN USE
Oscar says
Hi!. I want to ask you something.
I created a Custom Post Types.
But when i create a post, there isnt the options “Page Attributes”, to choose the template and order the posts.
How can I get it?
Thanks in advanced.
Syed Furqan Ali says
Hi Oscar,
If you are using the CPT UI plugin to create custom post types, you’ll need to ensure that you enable the “Page Attributes” option under the “Supports” section. This will allow you to assign parent pages to your custom post types. Similarly, if you are using custom code to create custom post types, make sure to include the “page-attributes” in the supports parameter to enable this feature.
vinay says
post is created but custom fields are not showing why?/
Kevin says
I’ve created a CPT with unique archive page, but I would like to be able to show a featured image for the archive page (not from the first post) but as the archive page doesn’t exist in “pages” there is no way to add the featured image
how would this be achieved ?
Juno says
Is it possible to access these custom post types via WP REST API? If so how? (for GET, POST, etc.
Mottaqi says
I want a custom post type page that will be open from archive.php page with all it’s posts and under this page I want to place it’s all posts as sub menu items. But when I create a custom link page and place it’s sub menu items as I describe, sum menu url will open but my main archive page , I mean that post type page url will disappear.
Plz I want to access both pages.. But how…?
Steven Denger says
Will adding Custom Post Types allow me to have another posting page for these? My regular Home page has products running through that. I need an additonal posting page for product reviews. When I create a review, I need it to post on another feature page. Is this what tis is for?
utkarsh says
nevermind that last question i asked read your whole article and got it
utkarsh says
Hey what does ‘twentythirteen’ in
“_x(‘Movies’, ‘Post Type General Name’, ‘twentythirteen’)”
Jim says
Also notice repeated usage of twentythirteen, this is called text domain. If your theme is translation ready and you want your custom post types to be translated, then you will need to mention text domain used by your theme. You can find your theme’s text domain inside style.css file in your theme directory. Text domain will be mentioned in the header of the file.
Angela says
Hello and thank you for this post (and several others).
I have created the new custom post type of “stories” and its showing up in my WP dashboard. I can create a new post but when I try to open the Beaver Builder page builder to build the post, it won’t open and goes to “Sorry, this page doesn’t exist” error page.
Can you help?
Thank you,
Angela
WPBeginner Support says
Hi Angela,
First, you should try updating your permalinks. Simply visit Settings » Permalinks and then click on the save changes button without changing anything.
If this doesn’t resolve your issue, then contact plugin’s support.
Admin
Angela says
Hi and thank you for your reply. I did what you suggested and it didn’t help. My plugin is created using the customer post type code above and is placed in a site-specific plugin, so I have no plugin support source from which to seek help other than you
I deleted the site-specific plugin (which of course included the CPT code) and new posts and pages still won’t load using the Beaver Builder theme page builder function, but they will at least show the page with a large white bar loading endlessly. I deactivated Ultimate Add-ons for Beaver Builder plugin and new posts and pages will now load using page builder. I think there may have been a conflict between UABB plugin and the CPT plugin and now the conflict remains in UABB plugin.
Any suggestions would be much appreciated. I also have put in a request to UABB. Maybe between the two of you, you could help resolve this issue and make note of this conflict for future reference.
JonO says
Great site BTW, really really helpful so thanks for creating.
I’m super stuck and have been reading tutorials all over the web and not found the answers I need.
I want to create a user opt-in custom taxonomy (Let’s call it user_interests) that can be used to display a custom list of posts that are unique to that particular user.
User will opt-in to user_interest tags/catergories/whatever during sign up or when editing profile.
Then the WP loop should include these values to display posts
Any ideas, help would be really appreciated, thanks.
Jonathan says
How do I get my user/visitors to my site be able to enter information to a form, and have that submitted data be displayed on which ever page or location I like? I want to allow my users be able to submit complaints and have other users able to like/reply to the main complaint submitted.
Am I able to do this with Custom Post Type?
R Davies says
You have a syntax error in your second (more detailed) example, code does not work in latest WordPress 7.4.3
) Warning: call_user_func_array() expects parameter 1 to be a valid callback, function ‘custom_post_type’ not found or invalid function name
Any chance of an update / correction?
WPBeginner Support says
Hi R Davies,
We checked and it worked perfectly.
Admin
Archit says
Is the comma at the end if the supports array (in the options for the custom post type) deliberate?
Robert Stuart says
On line 31? Yes, that’s normal PHP code.
“The comma after the last array element is optional and can be omitted. This is usually done for single-line arrays, i.e. array(1, 2) is preferred over array(1, 2, ). For multi-line arrays on the other hand the trailing comma is commonly used, as it allows easier addition of new elements at the end.”
saurabh says
How to enable ‘Post Settings’ in Custom_Post_type (using Custom Post Type UI Plugin)?
Arias says
Hello, I have been having problems with this plugin.
It has disabled the option to create categories and tags,
I have been looking for an example to place them manually but I still have not found anything.
I am trying to undo if with this method I can fix the problem but I would greatly appreciate your help.
stormonster says
In your $args array, on the ‘taxonomies’ index, add ‘category’ and ‘post_tag’.
That should do the trick.
John D says
Way too much coding. WordPress need to keep things more simple.
Ilija says
This is why I use my own CMS where I can create new post types in a fraction of a second directly through cms itself. Without any coding, unfortunately big agencies want WordPress developers and have to learn it, seems so complicated..
Sarah A says
Hi, i’ve succeded to display group of CPT with a specific design in a pop-up when you click on a image like the first one But it opens a new page and when you click out of the pop-up to quit you don’t return to the homepage, and i don’t want that. I want all on the homepage.
I’ve put the code of the CPT to display as the pop-up on “single-chg_projet.php” and open and close the pop-up with javascript. I’ve already tried to put all the code of single-chg_projet.php on the index, but it display nothing. Or i may be failed somewhere. Please help me. Thanks
Ghulam Mustafa says
Hi,
Thanks for the great code. Just a minor correction to the code. The endwhile; statement is missing before else: statement in the Querying Custom Post Types section =)
Tony Peterson says
THIS! Please update your code to reflect this syntax error as it caused me a bit of heartache until I found Ghulam’s comment. It’s working now.
Arkanum says
Yes! True. It’s miss befire wp_reset_postdate();
The cycle while does not end
Azamat says
Typo: “When doi I need a custom post type?”
WPBeginner Support says
Thanks for notifying us We have updated the article.
Admin
Jhon says
hey, can you guide me in the process of making a custom glossary like you have on your site?
WPBeginner Support says
We use a custom fields and a custom template to display Glossary terms.
Admin
Anil Reddy says
I want to create list type for posts in the category page for my website
david ben oren says
how do i clone a post type which has a speicifc table in it, i need to create a seperate post type for other tables.
betty says
How do I add a custom field to a Post Type?
WPBeginner Support says
Please see our guide WordPress Custom Fields 101.
Admin
Megan says
I’ve downloaded the plugin and want to add two custom post types. 1. Fanfiction for all of my writings and 2. Fanart for all of my art.
For Fanfiction – I want the ability to link chapters together into a story and be able to upload chapters to a story as I write them.
For Fanart – I’d like to have the focus be on an image (obviously) with a description underneath it
Is this article what I need or this something completely different?
Thanks,
Megan
Zubair Abbas says
Hi,
I simply copied the code to my site’s functions.php. The new post type is visible in the dashboard but when I try to see a post after publishing it, a blank page appears. Later I realised that even the default posts are not opening.
When I remove the code from functions.php everything works fine again.
Please help
Thanks,
Zubair Abbas
Jouke Nienhuis says
If you see a blank page, it often means that you forgot a character. The fact that you see the posts if you delete your custom code, confirms that you have a typo. Check for semi-colons ” ; ” and the opening and closing brackets.
To see exactly where you made a mistake, you could edit the wp-config file. Look for ERROR REPORTING and set this value to true. After that test again and there you get an error and a line with the omission.
Alex says
I have created the CPT and is working beautifully, but Google cannot find it even after updating sitemaps, using SEO plugins or fetching on Google Webmaster Tools. Any thoughts on why is that happening?
WPBeginner Support says
It takes Google sometime to start showing new content in search results. Just to be on safe side, check your SEO plugin settings to make sure you are not blocking indexing of your CPTs or CPT archive pages.
Admin
Amunet says
Creating Custom Post Type can be easy especially with a plugin. The real trick is to show them on the page. Usually you need quite advanced custom development or theme specific plugins like that for Avada.
Unfortunately there is no universal way to display CPT in WordPress.
WPBeginner Support says
Actually, there are straight forward and standard ways to display CPTs in WordPress. We have mentioned one in the article above.
Admin
Jouke Nienhuis says
Like the author said, but I will repeat the answer.
In a nutshell create a link in your navigation menu
Advanced answer in a nutshell: create an archive page and a single page
Chuck says
Great article. How can you modify single post CPT post info based on the custom taxonomy? For instance:
Date | Author | Series | Book | Topic
This is easy to write but I want to figure out how to display a modified post info if one the missing taxonomy of Series, like:
Date | Author | Book | Topic
Otherwise the default post info displays as:
Date | Author | | Book | Topic