Uno dei nostri lettori ci ha chiesto come creare template personalizzati per singoli post in WordPress.
Noi di WPBeginner abbiamo aiutato molti proprietari di siti web a migliorare i loro blog con layout unici per i singoli post. I template personalizzati per singolo post consentono di utilizzare diversi design per i post del blog, dando a ciascuno un aspetto distinto. Molti temi per WordPress offrono alcuni template di pagina, ma se necessario è possibile crearne di propri.
In questo articolo vi mostreremo diversi metodi per creare facilmente template personalizzati per i post singoli in WordPress, in modo che possiate scegliere quello più adatto alle vostre esigenze.
Quando è necessario un template personalizzato per i post singoli?
A volte, si può desiderare un aspetto diverso per alcuni articoli pubblici sul proprio sito web WordPress. Ad esempio, potreste voler utilizzare un layout diverso per gli articoli in caratteristica o per le storie di una particolare categoria.
In questo caso è necessario un modello di post singolo personalizzato in WordPress.
Per impostazione predefinita, WordPress utilizza il modello di post singolo basato sulla gerarchia dei template di WordPress. Tutti i temi sono dotati di un template single.php, che viene utilizzato di default per tutti i post singoli.
Alcuni temi possono anche includere modelli aggiuntivi o scelte di layout da utilizzare.
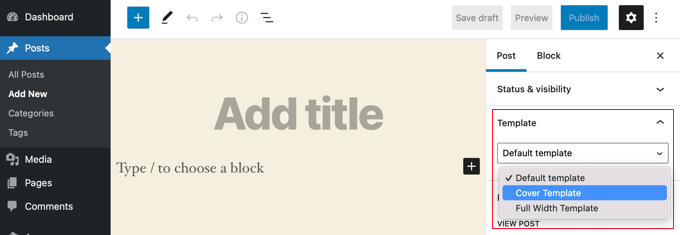
È molto simile alla creazione di un modello di pagina personalizzato. La maggior parte dei temi WordPress è dotata di modelli di pagina che si possono utilizzare durante la modifica di un post o di una pagina in WordPress.
Detto questo, vediamo come creare facilmente modelli di post singoli personalizzati in WordPress. Vi mostreremo diversi metodi, in modo che possiate utilizzare quello che funziona meglio per voi.
- Creazione di template per singole pubblicazioni con l’editor a blocchi
- Creare template personalizzati per le pubblicazioni singole con SeedProd
- Utilizzo delle impostazioni del tema per creare layout per singole pubblicazioni
- Creare manualmente template pubblici personalizzati con il codice
- Creazione di template personalizzati per singola pubblicazione per categoria
- Creazione di template personalizzati per singole pubblicazioni per autori specifici
Creare modelli di post singoli utilizzando l’editor di blocchi
Questo metodo non crea un vero e proprio modello di post e ha una flessibilità limitata. Tuttavia, è il modo più semplice per salvare i layout dei singoli post e riutilizzarli.
L’editor di blocchi predefinito di WordPress è dotato di una funzione integrata che consente di salvare e riutilizzare i blocchi. Uno di questi blocchi riutilizzabili è il blocco gruppo.
Il blocco di gruppo consente di inserire diversi blocchi e interi layout di post in un unico gruppo. È possibile salvare questo blocco di gruppo e riutilizzarlo in altri post.
Vediamo come utilizzare il blocco gruppo per salvare i modelli di post personalizzati.
Innanzitutto, è necessario creare un nuovo post in WordPress. Dopodiché, è sufficiente aggiungere un blocco di gruppo all’area dei contenuti.
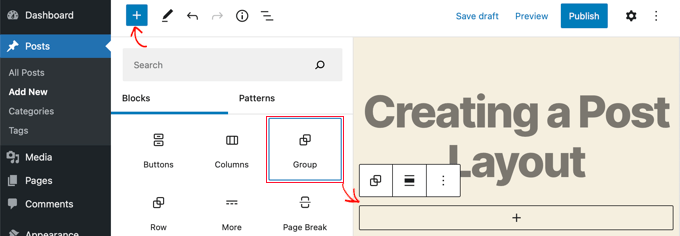
Ora si può iniziare ad aggiungere blocchi al blocco di gruppo per creare un layout di post singolo per il blog WordPress.
È possibile aggiungere tutti i blocchi desiderati, comprese le colonne, i media e il testo, le immagini di copertina e altro ancora.
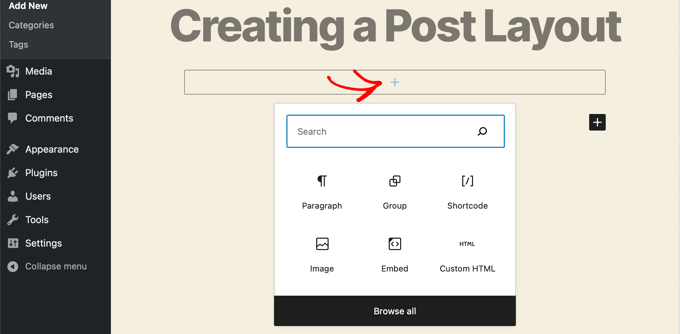
Una volta soddisfatti del layout creato, è necessario sollevare il mouse e selezionare il blocco di gruppo.
È sufficiente fare clic sull’icona del menu a tre punti e selezionare l’opzione “Aggiungi ai blocchi riutilizzabili”.
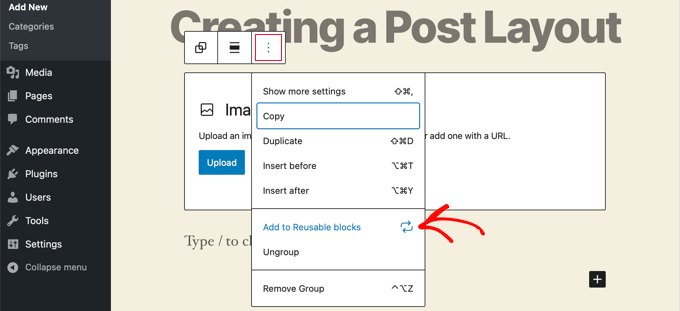
Successivamente, è necessario fornire un nome al blocco riutilizzabile e fare clic sul pulsante Salva. WordPress salverà il blocco riutilizzabile, compresi tutti i blocchi all’interno del blocco di gruppo.
È quindi possibile modificare qualsiasi pubblicazione esistente sul sito web o crearne una nuova. Nella schermata di modifica dei post, è sufficiente fare clic sul pulsante add-on e cercare il blocco salvato nella scheda “Riutilizzabile”.
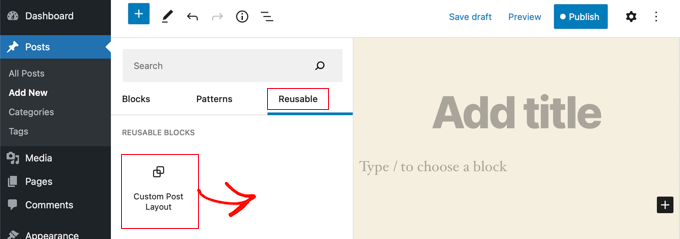
Aggiungete il blocco alla vostra pubblicazione e WordPress caricherà l’intero blocco di gruppo con tutti i blocchi e le impostazioni salvate.
Questo metodo consente di salvare i layout personalizzati. Tuttavia, non consente di modificare la gestione dei singoli post da parte del tema.
Se desiderate una maggiore flessibilità, continuate a leggere il passo successivo.
Creare modelli di post singoli personalizzati con SeedProd
Il modo più semplice per creare un modello di post singolo personalizzato è utilizzare SeedProd. È il miglior plugin per la creazione di siti web in WordPress e può creare bellissimi layout di siti web e modelli personalizzati senza scrivere alcun codice.
È possibile utilizzare il costruttore drag-and-drop di SeedProd per creare un tema WordPress completamente personalizzato, compresi i modelli di post singoli personalizzati.
La prima cosa da fare è installare e attivare il plugin SeedProd. Per maggiori dettagli, consultate la nostra guida passo-passo su come installare un plugin di WordPress.
Al momento dell’attivazione, è necessario inserire la chiave di licenza. Queste informazioni si trovano nel proprio account sul sito web di SeedProd.

Dopodiché, è il momento di creare un tema WordPress personalizzato. È molto più semplice di quanto sembri.
Creare un tema WordPress personalizzato
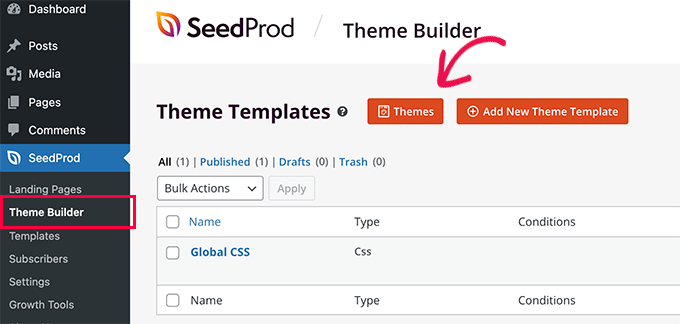
Per prima cosa, è necessario andare alla pagina SeedProd ” Theme Builder. Qui si utilizzerà uno dei temi già pronti di SeedProd come punto di partenza. Questo sostituirà il vostro tema WordPress esistente con un nuovo design personalizzato.
È possibile farlo facendo clic sul pulsante “Temi”.
Vi verrà mostrato un elenco di temi progettati professionalmente per diversi tipi di sito web. Ad esempio, ci sono template chiamati “Modern Business”, “Marketing Agency” e “Mortgage Broker Theme”.
Date un’occhiata alle opzioni e selezionate quella più adatta alle vostre esigenze facendo clic sull’icona del segno di spunta.
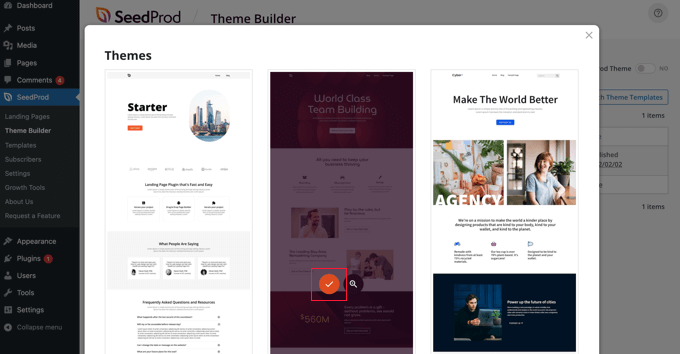
Una volta scelto il tema, SeedProd genera tutti i modelli di tema necessari, tra cui uno per le singole pagine e un altro per i singoli post.
Ogni modello viene fornito con layout accattivanti e contenuti segnaposto facili da personalizzare.
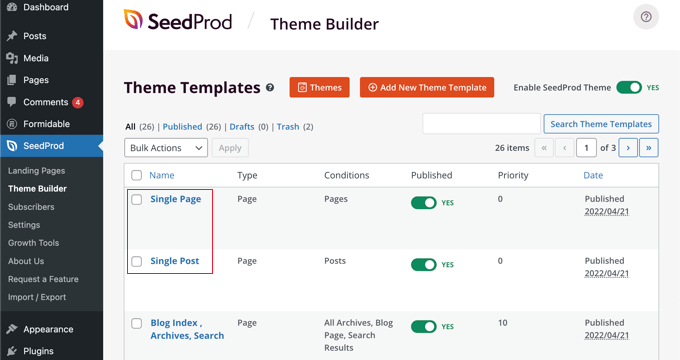
Per saperne di più sulla creazione di un tema con SeedProd, consultate la nostra guida su come creare facilmente un tema WordPress personalizzato senza alcun codice.
Personalizzazione del modello di post singolo predefinito
SeedProd consente di personalizzare facilmente il template predefinito “Post singolo” utilizzando un builder di pagine con trascina e rilascia.
È sufficiente fare clic sul link “Modifica design” che si trova sotto il modello. Questo aprirà il modello del post nell’editor visuale di SeedProd.

L’editor visivo di SeedProd ha un layout a 2 colonne. Add-on si trovano i blocchi e le sezioni che si possono aggiungere al progetto.
Sulla destra si vede l’anteprima del template, dove si possono vedere le modifiche in tempo reale.
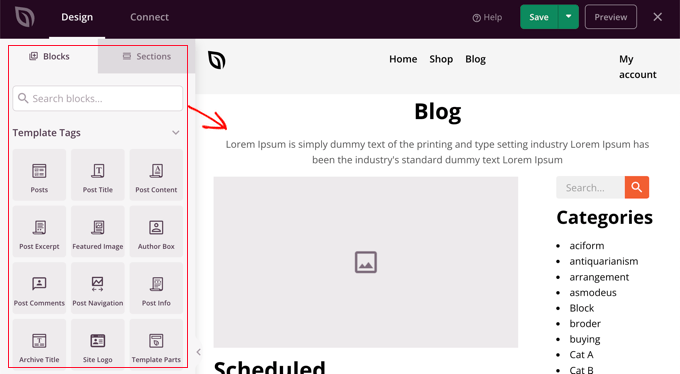
È anche facile personalizzare il layout del modello del post. È sufficiente fare clic su qualsiasi blocco per visualizzare le sue impostazioni nella colonna di sinistra.
Ad esempio, se si fa clic sul titolo del post, si potranno vedere le sue impostazioni. A questo punto è possibile modificare l’allineamento, la dimensione dei caratteri, il livello dei titoli e altro ancora.
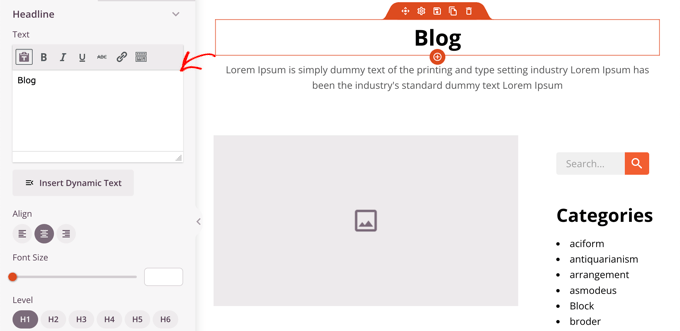
Facendo clic sulla scheda Avanzate è possibile modificare i colori dei caratteri, la spaziatura e altri stili.
È possibile aggiungere altri blocchi trascinandoli dalla colonna di sinistra a quella di anteprima. SeedProd utilizza i tag dei modelli per inserire contenuti dinamici come titoli dei post, immagini in evidenza, commenti e altro. Ciò consente di aggiungere contenuti al modello senza dover modificare ogni singolo post.
Ad esempio, è possibile aggiungere un blocco Messaggi alla fine del contenuto del post. In questo modo verranno visualizzati i post recenti che i visitatori potrebbero voler leggere una volta terminato il post corrente. Questo blocco verrà visualizzato automaticamente su tutti i post che utilizzano questo modello.
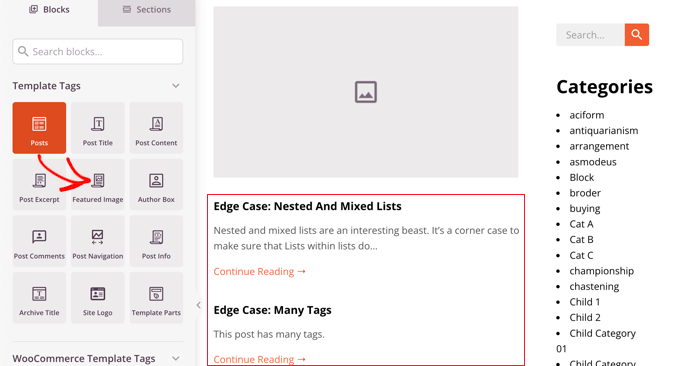
Successivamente, è possibile modificare le impostazioni del blocco Messaggi per personalizzare il contenuto visualizzato.
Ad esempio, è possibile visualizzare i contenuti di categorie specifiche, utilizzare un layout a due colonne e modificare il numero di post visualizzati.
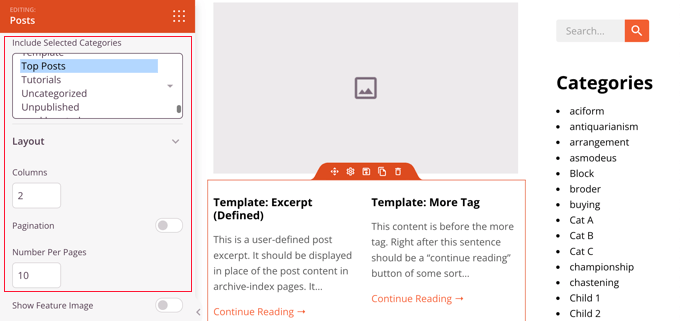
Sentitevi liberi di sperimentare con i diversi blocchi e di esplorare le loro impostazioni.
Dopo aver creato qualcosa che si desidera utilizzare come modello di post, è il momento di salvarlo facendo clic sul pulsante verde “Salva” nell’angolo in alto a destra. Dopodiché, è possibile chiudere l’editor visuale di SeedProd facendo clic sull’icona di chiusura “X”.
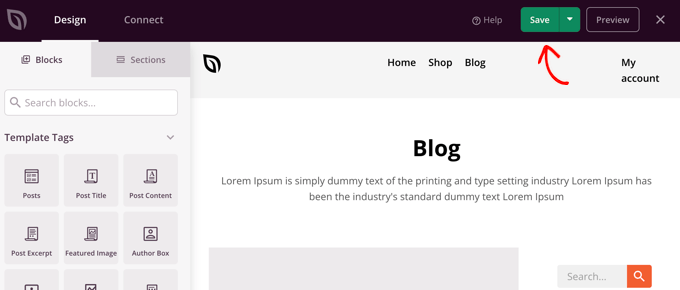
È possibile personalizzare il resto del tema WordPress allo stesso modo. Ma se avete bisogno di un po’ di aiuto, consultate la nostra guida passo-passo su come creare un tema WordPress personalizzato con SeedProd.
Quando si è soddisfatti dell’aspetto, assicurarsi che l’interruttore “Abilita tema SeedProd” sia attivo/disattivo. Il sito WordPress utilizzerà ora il tema SeedProd e il template personalizzato per singolo post.

Usare le impostazioni del tema per creare layout di post singoli personalizzati
Molti temi WordPress popolari sono dotati di impostazioni integrate per personalizzare l’aspetto del template di un singolo post.
Se il tema in uso supporta queste impostazioni, sarà possibile trovarle nella schermata di modifica della pubblicazione. Le opzioni disponibili possono cambiare a seconda del tema utilizzato.
Ad esempio, il tema Astra offre opzioni personalizzate per la modifica di una singola pubblicazione. Grazie a queste opzioni, è possibile modificare le barre laterali, nascondere header, titoli, menu e altro ancora.
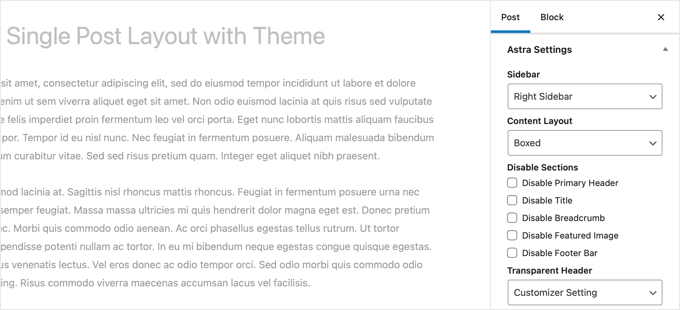
D’altra parte, molti dei migliori temi WordPress sono dotati di modelli pronti all’uso che potete utilizzare.
Se il vostro tema include modelli di post singoli, li troverete nel pannello “Template” o “Post Attributes” durante la modifica di un post.
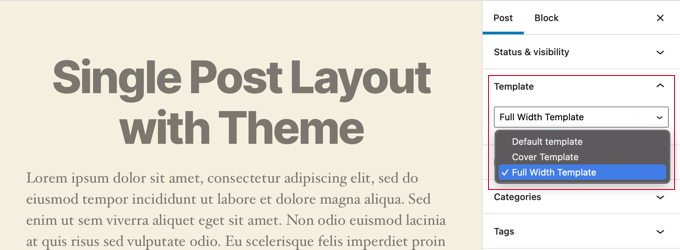
Questi modelli sono layout completi che possono essere utilizzati senza alcuna configurazione.
Creare manualmente modelli di post singoli personalizzati con il codice
Questo metodo è un po’ avanzato, poiché richiede la modifica dei file del tema, il copia e incolla del codice e l’aggiunta di CSS personalizzati. Se non l’avete mai fatto prima, consultate il nostro tutorial su come copiare e incollare codice in WordPress.
Per prima cosa, è necessario aprire un editor di testo semplice sul computer, come Notepad, e incollarvi il seguente codice:
<?php
/*
 * Template Name: Featured Article
 * Template Post Type: post, page, product
 */

 get_header();  ?>
Questo codice definisce un nuovo modello chiamato “Articolo in primo piano” e lo rende disponibile per i tipi di post, pagine e prodotti.
Si deve salvare questo file come wpb-single-post.php sul desktop. Successivamente, è necessario aggiungere il modello al proprio sito WordPress. Per farlo, è necessario utilizzare un client FTP per caricare il file nella cartella del tema corrente.
Ora è possibile accedere all’area di amministrazione di WordPress e creare o modificare una pubblica. Scorrendo un po’ verso il basso nella schermata di modifica del post, si noterà un nuovo pannello ‘Template’ o meta boxed ‘Post Attributes’ con un’opzione per selezionare il template.
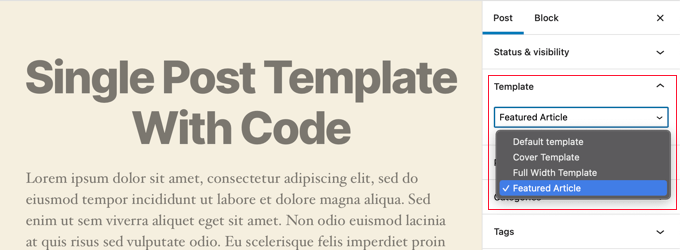
Vedrete il vostro modello personalizzato “Articolo in primo piano” elencato lì.
In questo momento il template è essenzialmente vuoto, quindi selezionandolo si visualizza semplicemente una schermata bianca.
Risolviamo questo problema.
Il modo più semplice per farlo è copiare il codice dal file single.php del tema e usarlo come punto di partenza. Dovrete aprire il file single.php e copiare tutto ciò che si trova dopo la riga get_header().
Successivamente, è necessario incollare questo codice alla fine del file wpb-single-post.php. Ora si può salvare il file e caricarlo sul server.
Tuttavia, l’aspetto sarà identico a quello del template pubblico attuale. Ora è possibile iniziare ad apportare modifiche al template personalizzato per singolo post.
È possibile aggiungere classi CSS personalizzate, rimuovere le barre laterali, creare un modello a tutta larghezza o qualsiasi altra cosa si desideri.
Creare modelli di post singoli personalizzati per categoria
Desiderate utilizzare un modello di post singolo personalizzato in base alle categorie? Ad esempio, potete dare ai post della categoria viaggi un layout diverso da quello dei post della categoria fotografia.
È possibile farlo utilizzando il costruttore di temi SeedProd o il codice.
Creare modelli di post singoli personalizzati per categoria utilizzando SeedProd
In precedenza abbiamo coperto come personalizzare il template predefinito del SeedProd Theme Builder per i singoli post. Ma non finisce qui. Con SeedProd è possibile aggiungere tutti i template personalizzati che si desidera, ad esempio un layout diverso per ogni categoria di post.
Per aggiungere un nuovo modello di post singolo, basta fare clic sul link “Duplica” sotto il modello di post originale. Verrà creato un nuovo modello chiamato ‘Post singolo – Copia’, che verrà aggiunto in cima alla pagina dei modelli del tema.
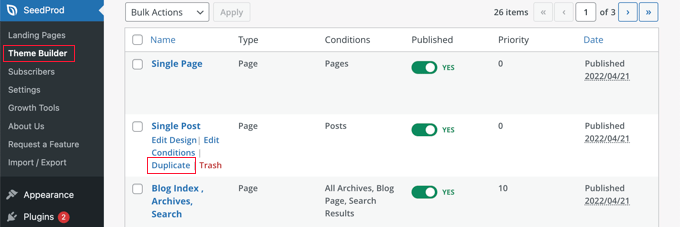
È possibile personalizzare il nuovo modello nello stesso modo in cui si è personalizzato il modello predefinito di Post singolo. Basta fare clic sul link “Modifica design” del modello e apportare le modifiche desiderate utilizzando l’editor visuale di SeedProd.
Una volta terminata la personalizzazione del modello, sarà necessario aggiungere alcune condizioni, in modo che SeedProd sappia quali post devono utilizzare questo modello. In questo caso, vogliamo che venga visualizzato quando si visualizzano i post di una singola categoria.

È possibile farlo facendo clic sul link “Modifica condizioni” del modello e si aprirà una nuova finestra.
Qui è possibile assegnare al template un nome e una priorità. Il template predefinito per le pubblicazioni singole ha una priorità pari a 0. Assicuratevi di assegnare a questo template una priorità più alta, in modo da visualizzarlo sulle categorie in corrispondenza.
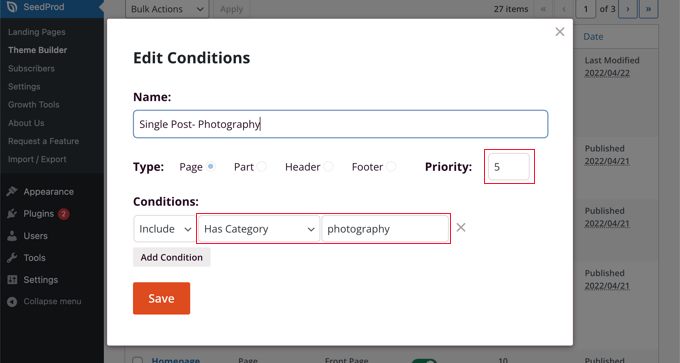
In “Condizioni”, selezionare “Ha categoria” dal secondo menu a discesa, quindi digitare il nome della categoria nell’ultimo campo. Ad esempio, se si desidera che solo i post della categoria fotografia utilizzino questo layout, digitare “fotografia”.
Quando avete finito, fate clic sul pulsante “Salva” e ora questo modello sarà utilizzato per tutti i post della categoria corrispondente.
Questo è il modo più semplice per creare più modelli di post personalizzati in WordPress. Non richiede alcuna conoscenza del codice e non incasinerà accidentalmente i file del tema.
Creare modelli di post singoli personalizzati per categoria usando il codice
Questo è un altro metodo per coloro che si sentono a proprio agio nell’aggiungere codice ai file del tema.
Per prima cosa, è necessario aggiungere questo codice al file functions.php del tema o a un plugin di snippets di codice.
/*
* Define a constant path to our single template folder
*/
define(SINGLE_PATH, TEMPLATEPATH . '/single');

/**
* Filter the single_template with our custom function
*/
add_filter('single_template', 'my_single_template');

/**
* Single template function which will choose our template
*/
function my_single_template($single) {
global $wp_query, $post;

/**
* Checks for single template by category
* Check by category slug and ID
*/
foreach((array)get_the_category() as $cat) :

if(file_exists(SINGLE_PATH . '/single-cat-' . $cat->slug . '.php'))
return SINGLE_PATH . '/single-cat-' . $cat->slug . '.php';

elseif(file_exists(SINGLE_PATH . '/single-cat-' . $cat->term_id . '.php'))
return SINGLE_PATH . '/single-cat-' . $cat->term_id . '.php';

endforeach;
}
Questo codice controlla innanzitutto se WordPress sta richiedendo un post singolo. In caso affermativo, dice a WordPress di cercare il modello nella cartella /single/ del tema di WordPress.
Ora è necessario aggiungere i template file definiti da questo codice.
Collegatevi al vostro hosting WordPress utilizzando un client FTP o il File Manager di cPanel e andate a /wp-content/themes/your-theme-folder/.
All’interno della cartella del tema corrente, è necessario creare una nuova cartella chiamata ‘single’. Successivamente, è necessario aprire questa cartella e creare un nuovo file. Si chiami questo file single-cat-{category-slug}. Sostituire {category-slug} con il proprio slug di categoria.
Ad esempio, se si ha una categoria chiamata “Notizie”, si creerà il file single-cat-news.php. Se si ha una categoria chiamata “Consigli di viaggio”, si creerà un template single-cat-travel-tips.php e così via.
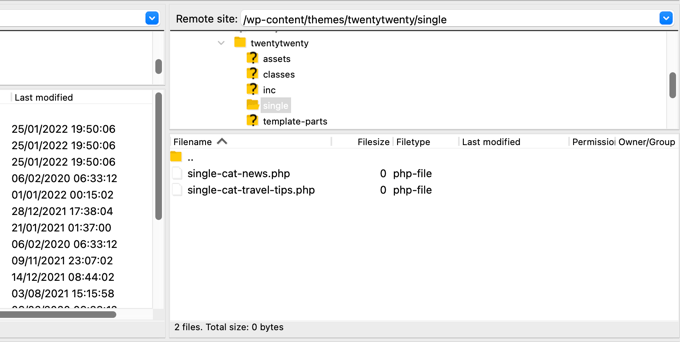
Ora, questi file di template saranno completamente vuoti. Come punto di partenza, si può copiare il contenuto del file single.php dalla cartella del tema e incollarlo all’interno di ciascuno di questi template. Successivamente, sarà necessario modificare questi modelli per apportare le modifiche desiderate.
Una volta terminato, si può andare sul proprio sito web e visualizzare un post. Verrà utilizzato il modello creato per la categoria in cui è inserito il post.
Supponiamo di avere una pubblica in due categorie: Novità: e Consigli di viaggio. WordPress mostrerà automaticamente il template di “Notizie” perché appare per primo in ordine alfabetico.
D’altra parte, se avete archiviato un post in una categoria e non avete creato un modello per quella categoria, WordPress tornerà al modello single.php predefinito del vostro tema.
Creare modelli di post singoli personalizzati per autori specifici
Supponiamo di volere che i post scritti da un autore specifico abbiano un aspetto diverso sul vostro sito web. È possibile farlo utilizzando il codice, seguendo la stessa tecnica mostrata per le categorie.
Per prima cosa, è necessario aggiungere questo codice al file functions.php del tema o a un plugin di snippets di codice.
/**
* Define a constant path to our single template folder
*/
define(SINGLE_PATH, TEMPLATEPATH . '/single');

/**
* Filter the single_template with our custom function
*/
add_filter('single_template', 'my_single_author_template');

/**
* Single template function which will choose our template
*/
function my_single_author_template($single) {
global $wp_query, $post;

/**
* Checks for single template by author
* Check by user nicename and ID
*/
$curauth = get_userdata($wp_query->post->post_author);

if(file_exists(SINGLE_PATH . '/single-author-' . $curauth->user_nicename . '.php'))
return SINGLE_PATH . '/single-author-' . $curauth->user_nicename . '.php';

elseif(file_exists(SINGLE_PATH . '/single-author-' . $curauth->ID . '.php'))
return SINGLE_PATH . '/single-author-' . $curauth->ID . '.php';

}
Successivamente, è necessario collegarsi al proprio sito web utilizzando l’FTP o il file manager di cPanel e quindi andare a /wp-content/themes/your-theme-folder/. Se non avete ancora creato una cartella chiamata /single/ al suo interno, procedete a crearla ora.
All’interno di questa cartella, è necessario creare un template utilizzando il nome utente dell’autore nel nome del template. Per esempio, single-author-johnsmith.php.
Questo modello sarà vuoto, quindi si può copiare e incollare il contenuto del modello single.php del proprio tema e usarlo come punto di partenza.
È ora possibile visitare il proprio sito web per visualizzare un post creato da un autore specifico. Verrà utilizzato il modello creato.
Speriamo che questo articolo vi abbia aiutato a imparare come creare modelli di post singoli personalizzati in WordPress. Potreste anche voler imparare a tracciare i visitatori del vostro sito WordPress o consultare il nostro elenco di plugin WordPress indispensabili per far crescere il vostro sito.
Se questo articolo vi è piaciuto, iscrivetevi al nostro canale YouTube per le esercitazioni video su WordPress. Potete trovarci anche su Twitter e Facebook.


allah ditta
i want to create a post template like wpbeginer is it possible?
WPBeginner Support
If there is part of our design you like you could recreate that on your site.
Admin
Jasmine
I am getting this message when I try to use the code:
Warning: call_user_func_array() expects parameter 1 to be a valid callback, function ‘my_single_template’ not found or invalid function name.
Any ideas as to why?
WPBeginner Support
You would want to ensure you properly copied the entire code, we have a guide that may be able to assist below:
https://www.wpbeginner.com/beginners-guide/beginners-guide-to-pasting-snippets-from-the-web-into-wordpress/
Admin
Iulian
All good but it breaks the default single.php.
In other words this “On the other hand, if you filed a post in a category and didn’t create a template for that category, then WordPress will fallback to the default single.php template of your theme.” is not working.
Any solution?
WPBeginner Support
You may need to reach out to your theme’s support to ensure there isn’t a different template that you are running into. For understanding what we mean you may want to take a look at our article below:
https://www.wpbeginner.com/wp-themes/wordpress-template-hierarchy-explained/
Admin
Thomas
Hi, I am trying to follow the step:
Open the single.php file and then copy everything after the get_header() line.
Under:
Manually Creating Custom Single Post Templates in WordPress
However, I don’t have any “get_header()” function in that file.
WPBeginner Support
Your specific theme may have some unique coding, we would recommend reaching out to the support for your specific theme and they should be able to assist.
Admin
bob
Thanks for this. All my auto generated files (author, not found etc) are using my site template then putting a white section with white text on thepage. its also starting at the top of the page (so its white text on a white background mostly hidden behind a page header)
I believe your article will help me sort this mess out.
Thank you
WPBeginner Support
Our article should help and if you reach out to your theme’s support they may be able to assist as well
Admin
Jojo
I cannot find the template option in Beaver Builder.
WPBeginner Support
The templates should still be found under the top right section in the content panel
Admin
John
Am I correct in thinking that once you create a custom post template php file, for it to work as a template, you still need to code the php file, as there is no way to save a new post as a template. Is this correct?
Thank you for your help.
WPBeginner Support
That is correct, for changing the template unless you are using a page builder there is not a method to set it up without coding.
Admin
Ali Jahani
Hi
wpbeginner is veryyyyyyyyyy good
thanks for publish best article
WPBeginner Support
Glad you like our content
Admin
Gregory
This is a awesome tutorial about WP custom post page.
Thanks about your help.
WPBeginner Support
You’re welcome, glad you found our tutorial helpful
Admin
Haripal Reddy
Hello Author,
I followed the steps as you mentioned. I have CPT albums. single-albums.php copied same code to other file wpb-single-albums.php and added template code like /*
* Template Name: custom template
* Template Post Type: albums
*/
and changed some required changes. But after selecting this template in edit post but it displays default one (single-albums.php) page.
How can i fix this please help
WPBeginner Support
You may want to check the current working template to ensure you have the post type correct
Admin
Alice
Thanks for your great post. I have 2 questions: Are single post templates the same with custom post type templates? If the are different, can you show me how to create a custom post type template?
WPBeginner Support
They can be different if you want but if you create on specifically for the post type, otherwise WordPress will default to the post template. You would want to take a look at our article here: https://www.wpbeginner.com/wp-themes/wordpress-template-hierarchy-explained/
Admin
aziz
hello
than you for the post
i did everything and worked like i wanted.
but i had a small problem
after adding the code to function.php single.php stopped showing data
is there anything i can do?
WPBeginner Support
You would need to create the folder as we explain after the code in the article
Admin
Binesh
Hi, Thanks for your Tutorial…
As per your tutorial I have created a custom Post type. But now I am facing an issue with comment. While submitting the comment it redirected to search…
Pls suggest a solution for this..
Thanks in Advance
WPBeginner Support
If its redirecting you to a 404 page, you would want to take a look at our troubleshooting article here: https://www.wpbeginner.com/wp-tutorials/how-to-fix-wordpress-posts-returning-404-error/
Admin
Mike
Hello.
I’m using this & enjoying it greatly!
However, I’m finding the following warning in my error logs around this code:
[warn] mod_fcgid: stderr: PHP Warning: Use of undefined constant SINGLE_PATH – assumed ‘SINGLE_PATH’ (this will throw an Error in a future version of PHP)
Any thoughts on how to fix that?
Your snippet starts with “define(SINGLE_PATH,…” so I’m not sure what else to do here.
WPBeginner Support
That error is saying it wants SINGLE_PATH to be surrounded by single quotes (”) which you can do for that warning
Admin
Jojo
So I followed your steps and its working for the new category slug single page but not for the default single.php.
How can I get this to work? Perhaps the default single.php path is wrong?
Thanks!
WPBeginner Support
If you wanted to edit the default single.php file then you would first want to create a child theme: https://www.wpbeginner.com/wp-themes/how-to-create-a-wordpress-child-theme-video/
and then you could edit your single.php file without worrying about the changes being removed when you create your own single.php.
Admin
Jagdish
I’m one of your silent readers, thoroughly love your blog <3
WPBeginner Support
Thank you, glad you’ve been enjoying our content
Admin
Hil
Hi,
I am overthinking this but…if I want every blog post to look the same, do I just create the Layout (I use Divi theme), use the above first method (make a new version of single.php named properly) and choose that every time I want to create a post? That simple?
Also, to add the custom CSS, do you add to the php file, and how? Where within it do you add it? How should it look? That’s the part that I haven’t yet found any reference on how to do. Can you do an example based on just having every blog post look one way?
Thank
WPBeginner Support
Blog posts should use the single.php by default and look the same that way but you can create a custom post template if you wanted to modify the look. For custom CSS you would want to take a look at our article here: https://www.wpbeginner.com/plugins/how-to-easily-add-custom-css-to-your-wordpress-site/
Admin
Malgorzata
Hi, thanks dfor great tutoriasl. It is working amazing but not for new categories, which doesnt have special template. Unfortunatley it is not getting the code from default single.php file. I will appreciate some help how to make it work.
Christopher Krohn
Fantastic tutorial. Thanks!
STEVE
Hi, Thanks for the tutorial!
I have a question. How would we apply custom CSS that would only effect the Posts pages?
Thanks
TRAVIS
What if you want to make your new template the default for everything. So that anytime a post is created it is automatically selected as the default template?
Jarrod
Just put the code for the template you want to create into single.php.
Jae
I bet there are plugins that you can use to do the job without the hassle of coding and child themes. It would’ve been great if you’d researched and shared that in this post too.
Mahbub
@JAY why not u done that on ur own?
peyman
I use your method but I can’t set custom css for this posts.
for example in function.php when I check is_page_template(‘single-cat-news’) the statement not getting true and my custom css for this kind of post not running. what should I do in this case?
Bikram
True.
I’m also having this problem. The full-width template works well for post and pages but when it comes to custom post type, the CSS codes don’t work and goes back to normal page size without a sidebar.
I’m having a hard time finding a solution to that problem.
Mike
Need some additional help with this…
Following the instructions on this page (along with the small modifications noted within my comments on 12/2/17 and 12/12/17), I’ve been able to get this working reliably.
HOWEVER, I’ve run into the issue where using this method to call a custom template does not seem to get registered with the call of body_class classes.
For example, if I set a custom template on a page (where I’m using WordPress’ “Template” drop-down within the “Page Attributes” sidebar in the editing view – then the body_classes that are output would include that template name.
Such as:
<body class="page-template-my_custom_template page page-id-2..."But, using this method, the body classes just return:
<body class="page-template-default page page-id-2..."Any idea on how to ensure the body classes reflect a custom single post template?
Mike
Here’s the answer (for my theme, at least – your experience may vary).
Adding the following to [b]functions.php[/b] did the trick for me:
add_filter('body_class','add_category_to_single'); function add_category_to_single($classes) { if (is_single() ) { global $post; foreach((get_the_category($post->ID)) as $category) { // add category slug to the $classes array, starting with 'category-'... $classes[] = "category-$category->category_nicename"; } } // return the $classes array return $classes; }Dzungx Corn
I created a single-cat-news.php file for “News”. My “News” category has two child: “Camera” and “Smartphone”. The post in “Smartphone” display in single-cat-news.php (S after N in alphabet), but the post in “Camera” display in default single.php (C before N in alphabet). I want post in “Camera” display in single-cat-news.php, what must I do? I selected both “News” and “Camera” for my post.
Sarmad Gardezi
Im viewing your Blog from last 2 years. I explored whole web to find this but i got the correct working code from here i just love your Blog keep it up
Mike
When using this approach to specify a custom post template for a single post within a specific category, I was finding that WordPress was NOT defaulting back to single.php in instances where a single-cat-WHATEVER.php file didn’t exist for a specific category.
I fixed this by adding the following line before the end of the function:
elsereturn SINGLE_PATH . '/single.php';
So that, this code:
/**
* Checks for single template by category
* Check by category slug and ID
*/
foreach((array)get_the_category() as $cat) :
if(file_exists(SINGLE_PATH . '/single-cat-' . $cat->slug . '.php'))
return SINGLE_PATH . '/single-cat-' . $cat->slug . '.php';
elseif(file_exists(SINGLE_PATH . '/single-cat-' . $cat->term_id . '.php'))
return SINGLE_PATH . '/single-cat-' . $cat->term_id . '.php';
endforeach;
}
Became this:
/**
* Checks for single template by category
* Check by category slug and ID
*/
foreach((array)get_the_category() as $cat) :
if(file_exists(SINGLE_PATH . '/single-cat-' . $cat->slug . '.php'))
return SINGLE_PATH . '/single-cat-' . $cat->slug . '.php';
elseif(file_exists(SINGLE_PATH . '/single-cat-' . $cat->term_id . '.php'))
return SINGLE_PATH . '/single-cat-' . $cat->term_id . '.php';
else

return SINGLE_PATH . '/single.php';
endforeach;
}
Does this seem like the right approach? Or, is there something else that I may have done to break the default functionality?
Mike
Thank you for this clear ‘how to.’
One note: for those of us using a CHILD THEME, I’ve found that changing…
define(SINGLE_PATH, TEMPLATEPATH . ‘/single’);
to:
define(SINGLE_PATH, get_stylesheet_directory() . ‘/single’);
(within the “Define a constant path to our single template folder” section) ensures that child theme’s directory is checked for single templates instead of the parent theme’s directory.
This may also be the reason that it’s not working for some of the other commenters above.
Good luck, everyone!
Stephanie Lewis
Thank you so much for your help! I was wondering why it kept pointing me back to the parent theme instead of the child theme.
Ashley
I cannot get this to work for me, the template never shows in the post editor even after clearing my cache.
Olayinka
Thank you for this article.
I will want to know how I can further customise the layout of this single custom post template, like placing an image in the post before the content and in the footer.
oussama
Hi,
I need to change the order of 3 things in the post page which they are in the bottom of the article:
1-a pagination plugin.
2-an ad.
3-social share icons.
I want to make them in the following order (vertically):
1-the ad
2-the social share icons
3-the pagination plugin
How can I do that please?
Linda Holiner
Thank you for your great tutorials. I am having trouble with this one. I added the code to my functions.php but I’m not getting the single post template. Do I need to make a call to the function or does WordPress do that? Is there some way I can debug the function?
I just want posts of a particular category to display differently when you link to them.
Taufiq Mahmud
I wanted to make a custom post page where registered user of my site can able to post without using wordpress’s default post.php
Pierrick
Hi! Thank you for this tutorial, but I’m quite new to web design and I started creating a whole wordpress theme. Everything works fine on my website, but I am trying to make it possible to add pages that all use a template I created, (like the page of a product in a catalogue) but I have no idea how to do that. I first tried to do so by creating a page template in which I put loops that display the content of an article or a page, such as its title, its text and the values of some custom fields. To do so I used a query_posts, but it requires to put the post’s or page’s id with “page_id=” or “p=”, which means the template is for one specific page, and I would have to create a template for each new page I add to this catalogue , and precising the id of the page/post manually in it, while what I wanted was to create a single template for all the pages of the catalogue…
So while doing my research to find a solution, I found your article, and I tried to create a post using the new single post template, but no matter which template I select in the list, when I go to the url of the post it displays my home page… I’m probably doing everything wrong, and I’m not even sure I understood what a single post is and if it’s really what I need… I would really appreciate it if you could give me some clues on what I should do to solve my problem, or if there’s some tutorial somewhere that could help me…
Thank you,
Pierrick.
WPBeginner Support
Hi Pierrick,
We are not sure we understand your problem completely. However, if you just want to create a template to be used by any page then custom page template is the right approach. Since you want users to be able to see any page, this means you don’t need to use query_posts, your loop will begin with the standard
1-click Use in WordPress
Admin
alex
Hi,
I have a local setup with WP 3.7.x and Template Post Type: post, page, product is not available.
How can i create seperate caterory php files for each post category???
single-{slug}.php
category-{slug}.php
all doesn’t seem to work
Any tips?
Mark
I have set this up to work with categories, however when I select a post that does not have a category it fails to pick up the default template and does not display the post. I suspect my theme may be at fault. How would I hard code the single.php in the parent directory as the default to use if no category template exists ?
Works perfectly if I copy the single.php into the /single/single-cat-name.php file but I don’t want 40+ duplicate files.
Eric Besso
first copy single.php to the /single folder
then include this code right before the endforeach;
else
return SINGLE_PATH . ‘/single.php’;
Garikai Dzoma
This has been a great help to me.
Lyssie
This is exactly what I was looking for, thank you for spelling this out so simply! It leaves me with a question though: I removed my sidebar but now there’s just an empty space where it used to be. How can I stretch the main content section to cover the entire space? Thanks again!
WPBeginner Support
Hi Lyssie,
That’s because your theme has defined content area width relative to the sidebar. You need to use inspect tool to find out which CSS class your conntent-area uses and then adjust by adding custom CSS to make it full width.
.page-template-full-width .content-area { width: 100%; margin: 0px; border: 0px; padding: 0px; } .page-template-full-width .site { margin:0px; }1-click Use in WordPress
Please see our guide on how to create full width page in wordpress
Admin
Lyssie
Thanks for the fast response! This was very helpful! Now, if I see:
div id=”primary” class=”content-area”>
when I use the inspect tool, which is the class my content area uses?
Lyssie
Oops, that didn’t come out right.
div id=”primary” class=”content-area”
main id=”main” class=”site-main” role=”main”
article id=”post-4773″ class=”post-4773 post type-post status-draft format-standard hentry category-travel-2″
div id=”featured-image”
/div
WPBeginner Support
Hi Lyssie,
Your theme uses content-area class to define the content block’s width. You should be able to see its width when using the inspect tool.
Joe Yee
That’s a great article and should helps a no-coder person like me. Customization of template would be something scary that you might break the theme altogether. Do you recommend make the custom template on a child theme or is it okay to do it right on the theme. Thanks a bunch.
WPBeginner Support
Hi Joe,
You will not be changing any of your theme’s existing files. Instead, you will be creating a new file. If anything goes wrong you can simply delete the template and your site will be back to normal.
Yes creating a child theme is the recommended best practice.
Admin
Danielle
When I put the file in my child theme, I see it in the drop down box but it doesn’t actually apply.