Haben Sie sich von Ihrer WordPress-Website ausgesperrt?
Manchmal sperren Hacker Sie von Ihrer eigenen Website aus, indem sie Ihr Administratorkonto aus der Datenbank löschen.
In diesem Artikel zeigen wir Ihnen, wie Sie der WordPress-Datenbank über MySQL einen Admin-Benutzer hinzufügen können, damit Sie Ihren Zugang zurückbekommen.
Warum einen Admin-Benutzer über MySQL zur WordPress-Datenbank hinzufügen?
Wir sind einmal auf ein Problem gestoßen, bei dem die Website eines Benutzers gehackt wurde und sein Administratorkonto aus der Datenbank gelöscht wurde. Dadurch wurde er von seiner WordPress-Website ausgesperrt.
Wir konnten ihnen helfen, Zugang zu ihrer Website zu erhalten, indem wir einen neuen Administrator-Benutzer direkt auf der WordPress-Website anlegten. Dazu verwendeten wir phpMyAdmin, ein webbasiertes Tool, mit dem Sie MySQL-Datenbanken über Ihren Webbrowser verwalten können.
Wenn Sie sich aufgrund von Hackern oder weil Sie Ihr Passwort vergessen haben, aus Ihrem WordPress-Administrationsbereich ausgesperrt haben, können Sie dies ebenfalls tun.
Sie sollten jedoch immer eine Sicherungskopie Ihrer Datenbank erstellen, bevor Sie irgendwelche MySQL-Bearbeitungen vornehmen. Sobald Sie sich wieder in Ihre Website einloggen können, sollten Sie unseren Leitfaden für Anfänger befolgen, um Ihre gehackte WordPress-Website zu reparieren.
Schauen wir uns also an, wie man einen Admin-Benutzer über MySQL zur WordPress-Datenbank hinzufügt.
Hinzufügen eines Admin-Benutzers zur WordPress-Datenbank mit phpMyAdmin
phpMyAdmin ist bei den meisten führenden WordPress-Hosting-Unternehmen vorinstalliert. Sie finden es im cPanel-Dashboard Ihres Hosting-Kontos im Bereich Datenbanken.
Hier ist ein Screenshot aus dem Bluehost-Kontrollzentrum:
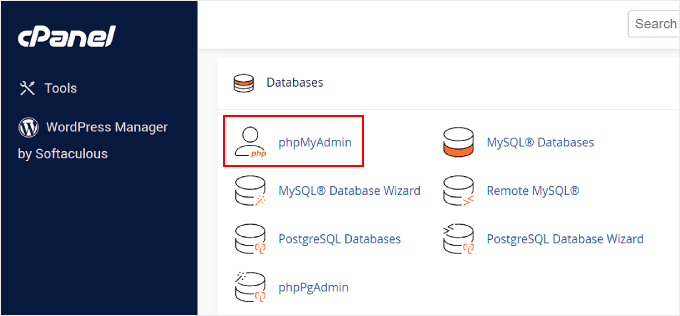
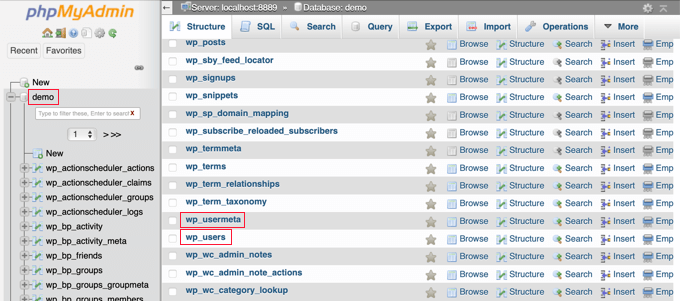
Wenn Sie auf das Symbol klicken, öffnet sich die phpMyAdmin-Oberfläche. Sie müssen Ihre WordPress-Datenbank in der linken Spalte auswählen.
Danach zeigt phpMyAdmin alle Tabellen in Ihrer WordPress-Datenbank an. Sie werden Änderungen an den Tabellen wp_users und wp_usermeta vornehmen.
Hinzufügen eines Benutzers zur Tabelle wp_users
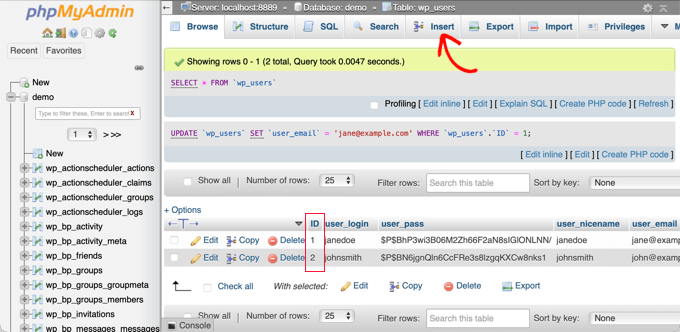
Zunächst müssen Sie die Tabelle wp_users finden und anklicken. Daraufhin werden die derzeit in der Tabelle aufgeführten Benutzer angezeigt.
Im Screenshot unten sehen Sie, dass es zwei Benutzer-IDs in der Tabelle unserer Demo-Website gibt, 1 und 2. Wenn wir einen neuen Benutzer für unsere Demo-Website anlegen, muss diese ID eindeutig sein, also geben wir die Nummer 3 ein.
Klicken Sie auf die Registerkarte „Einfügen“ am oberen Rand des Bildschirms, damit Sie die Informationen für einen neuen Verwaltungsbenutzer eingeben können.
Fügen Sie die folgenden Informationen in die Felder des Formulars „Einfügen“ ein:
ID: Wählen Sie eine eindeutige Nummer (in unserem Beispiel verwenden wir 3)user_login: der Benutzername, der beim Einloggen verwendet wirduser_pass: Fügen Sie ein Passwort hinzu und stellen Sie sicher, dass Sie MD5 im Funktionsmenü auswählen (siehe Screenshot unten)user_nicename: der vollständige Name oder Spitzname des Benutzersuser_email: die E-Mail-Adresse des Benutzersuser_url: Ihre Website-Adresseuser_registered: Wählen Sie das Datum und die Uhrzeit der Registrierung des Benutzers über den Kalender aus.user_activation_key: leer lassenuser_status: setzen Sie diesen Wert auf 0display_name: der vollständige Name des Benutzers oder sein Anzeigename
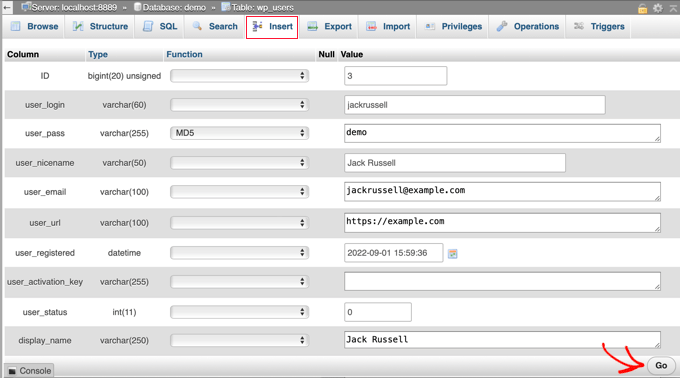
Wenn Sie fertig sind, klicken Sie auf die Schaltfläche „Go“, um den neuen Benutzer zu speichern.
Hinzufügen eines Benutzers zur wp_usermeta-Tabelle
Jetzt müssen Sie die Tabelle wp_usermeta finden und anklicken. Danach sollten Sie auf die Registerkarte „Einfügen“ klicken, wie Sie es im vorherigen Schritt getan haben.
Als Nächstes müssen Sie die folgenden Informationen in das Formular „Einfügen“ eingeben:
unmeta_id: leer lassen (sie wird automatisch generiert)user_id: die Benutzer-ID, die Sie im vorherigen Schritt verwendet habenmeta_key: dies solltewp_capabilitiesseinmeta_value: insert this:a:1:{s:13: "administrator";s:1: "1";}
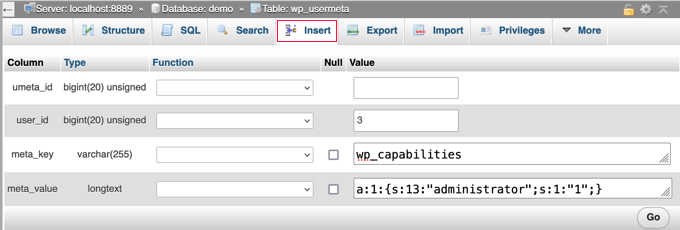
Wenn Sie dann nach unten scrollen, sollten Sie Felder für eine zweite Zeile finden. Sie müssen die folgenden Informationen hinzufügen:
unmeta_id: leer lassen (sie wird automatisch generiert)user_id: die Benutzer-ID, die Sie in den vorherigen Schritten verwendet habenmeta_key: Sie müssenwp_user_leveleingebenmeta_wert: 10

Wenn Sie alle Informationen in die Felder eingegeben haben, müssen Sie auf die Schaltfläche „Go“ klicken. Herzlichen Glückwunsch, Sie haben einen neuen Administrator-Benutzernamen erstellt!
Jetzt sollten Sie in der Lage sein, sich mit dem Benutzernamen und dem Passwort, die Sie für diesen Benutzer angegeben haben, in Ihrem WordPress-Administrationsbereich anzumelden.
Sobald Sie sich angemeldet haben, müssen Sie zu Benutzer “ Alle Benutzer navigieren und dann auf den gerade erstellten Benutzernamen klicken.
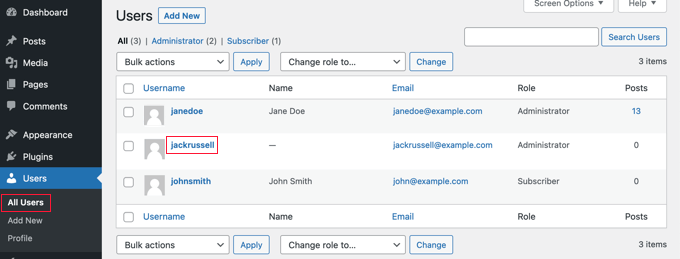
Blättern Sie nun, ohne etwas zu ändern, zum Ende der Seite und klicken Sie auf die Schaltfläche „Speichern“.
Dadurch kann WordPress den soeben erstellten Benutzer bereinigen und einige zusätzliche Informationen hinzufügen, die erforderlich sind.
Hinzufügen eines Admin-Benutzers zur WordPress-Datenbank mithilfe einer SQL-Abfrage
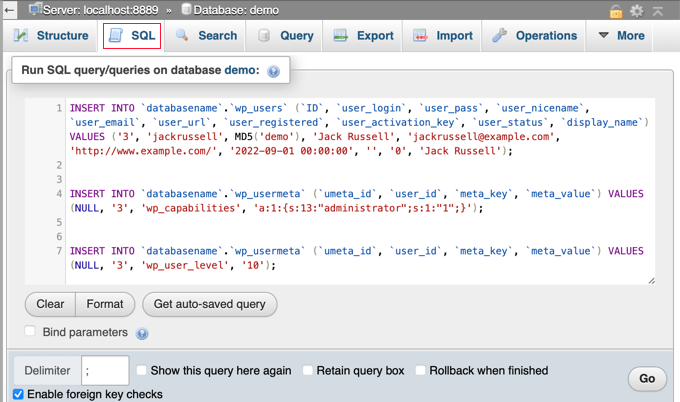
Wenn Sie ein Entwickler sind, können Sie den Prozess mit Code beschleunigen.
Legen Sie diese SQL-Abfrage einfach in Ihrer Datenbank ab:
INSERT INTO `databasename`.`wp_users` (`ID`, `user_login`, `user_pass`, `user_nicename`, `user_email`, `user_url`, `user_registered`, `user_activation_key`, `user_status`, `display_name`) VALUES ('3', 'demo', MD5('demo'), 'Your Name', 'test@example.com', 'http://www.example.com/', '2022-09-01 00:00:00', '', '0', 'Your Name');


INSERT INTO `databasename`.`wp_usermeta` (`umeta_id`, `user_id`, `meta_key`, `meta_value`) VALUES (NULL, '3', 'wp_capabilities', 'a:1:{s:13:"administrator";s:1:"1";}');


INSERT INTO `databasename`.`wp_usermeta` (`umeta_id`, `user_id`, `meta_key`, `meta_value`) VALUES (NULL, '3', 'wp_user_level', '10');
Stellen Sie sicher, dass Sie „databasename“ in die Datenbank ändern, mit der Sie arbeiten.
Vergessen Sie auch nicht, die anderen Werte so zu ändern, wie Sie es für den neuen Benutzer wünschen, wie wir es in der ersten Methode erklärt haben.
Expertenratschläge, was zu tun ist, wenn man aus dem WordPress-Admin ausgesperrt ist
Da Sie nun wissen, wie Sie einen Admin-Benutzer über MySQL hinzufügen können, möchten Sie vielleicht einige Artikel darüber lesen, wie Sie Ihre Website reparieren können, wenn Sie aus dem WordPress-Administrationsbereich ausgesperrt sind.
- Was ist zu tun, wenn Sie aus dem WordPress-Administrationsbereich (wp-admin) ausgesperrt sind?
- Wie man den WordPress-Wiederherstellungsmodus verwendet
- Wie man ein WordPress-Passwort von phpMyAdmin aus zurücksetzt
- Wie man die Beschränkung der Login-Versuche in WordPress aufhebt
- Deaktivieren aller Plugins, wenn kein Zugriff auf WP-Admin möglich ist
- Wie man den WordPress White Screen of Death behebt (Schritt für Schritt)
- Wie man den kritischen Fehler in WordPress behebt (Schritt für Schritt)
- Wie behebt man das Problem der Aktualisierung und Weiterleitung der WordPress-Login-Seite?
- So beheben Sie den Fehler beim Herstellen einer Datenbankverbindung in WordPress
- Wie man den Fehler „Diese Website kann nicht erreicht werden“ in WordPress leicht behebt
Wir hoffen, dass dieses Tutorial Ihnen geholfen hat, zu lernen, wie man einen Admin-Benutzer zur WordPress-Datenbank über MySQL hinzufügt. Vielleicht interessieren Sie sich auch für unseren ultimativen WordPress-Sicherheitsleitfaden oder unsere Liste der häufigsten WordPress-Fehler und deren Behebung.
Wenn Ihnen dieser Artikel gefallen hat, dann abonnieren Sie bitte unseren YouTube-Kanal für WordPress-Videotutorials. Sie können uns auch auf Twitter und Facebook finden.


Syed Balkhi says
Hey WPBeginner readers,
Did you know you can win exciting prizes by commenting on WPBeginner?
Every month, our top blog commenters will win HUGE rewards, including premium WordPress plugin licenses and cash prizes.
You can get more details about the contest from here.
Start sharing your thoughts below to stand a chance to win!
zohaib says
Thanks a lot, Yes I got my problem solved and this was due to the the role assigned to my user name. Cheers
Bichir Mihail says
Thanks, really helpfull
Rastislav Nichta says
Really very simple and clear guide to how to create a user through MYSQL WordPress database, thank you.
Mary Janis says
This info is outdated cause HG format has all changed. Where the heck is wp_user?
Susan Marshall VA says
Thank you so much for this. Just had a client that locked herself out of her site and I was able to get her back in with these instructions.
Kumar Mritunjay says
I’ve used this on my websites. Works like a charm…very easy to follow!
Thank you for this amazing time saver technique.
sara asadiha says
i did everything u said, but it did not work what else should i do?
Peter Gough says
Thanks for this. Really helped when I was locked out of WordPress
Michael Sineni says
I have changed my admin access to editor because i was trying to change role capabilities to edit gravity forms. Suddenly i no longer see edit cornerstone or have access!! HELP!
Ayesi says
Really good, everything works perfect, thanks a million!!
Stella says
Thanks a lot! This saved my day. Whew!
Nilo Velez says
I don’t now if it is an update to WordPress data structure, but I’ve just encounter a site in which I’ve had to enter the wp_options meta_key values as:
[table_prefix]capabilities instead of wp_capabilities
[table_prefix]user_level instead of wp_user_level
I leave this here as it might be of help.
Takis Pan says
You sir are awesome!
I guess it uses the database prefix but in case the site has been moved, or someone changed the prefix from „wp_“ to something else, capabilities and user_level should be changed accordingly.
Abraham Quilca says
Thanks, this comment helped a lot.
I had to double-check and get the exact table_prefix value from our wp-config.php file. Ours meta_key values were correct except for capitalization. I believe some hosting companies with single-click wordpress installs will set their own table_prefixes, so be sure to check for that as well.
Cheryl says
this worked for me too, thank you Abraham
Loren Helgeson says
I’ve used this on three different websites so far. Works like a charm!
Thank you for this amazing time saver.
Steve Day says
BRILLIANT!!!
Thank you – saved my day
Kirst says
It looks like there’s been a database change in the most recent version of WP, so this post may need to be updated.
I’s been an awesome resource, thank you!
Loren Helgeson says
I can’t verify this with previous versions of WordPress, but I just tested this with the latest version of WordPress, and it worked fine for me. Can anyone also confirm if this was a fluke?
Abid says
I have done same sql quires to make admin user. User created and logged but showing Sorry, you are not allowed to access this page error. Please help me about this.
Jade says
THANK YOU SO MUCH! I had an issue with WooCommerce Product Vendors, where I have applied as a vendor while logged in as admin. From that point on I couldn’t log in and I was receiving a message“You will be notified once your account has been approved“ O_o
Previously I had to re-install WP because of this!!! Now I found your post and it was such a help!!! Thank you so much for sharing this x
x
Ben says
Didn’t work at all for me. I get a „ERROR: Incorrect username or password.“
Yeah yeah, I’ve check it. Password and user are correct.
So what now? I used to have admin access but now only have a lower basic level that doesn’t show the user settings.
Loren Helgeson says
This worked perfectly on the past two sites I’ve had to use it on.
SHAILENDRA RAJAVARAM says
Awesome….saved me tons of hardship like for other issues. I saw that for some reason all the administrators in my site became something else…
GREAT HELP !!
The guys who discussed about wp_prefixes…..perfect….
Ah !!!
Werner Ullrich says
For me it is a great helpful post. I have modified this SQL script and re-animated my door to the administrator entry of my wordpress homepage. Thanks.
Werner Ullrich
Smithg0 says
Okay this YouTube video is much enhanced than last one, this one has pleasant picture feature as well as audio.
Jerry L says
I wanted to change several „Nicename“ entries to other values than that user’s Login ID. From within PhpMyAdmin, I exported the „wp_users“ table.
Then I made the necessary changes in my code editor.
Then after saving a backup of the original users table and the entire database, I „Import“ed just the „wp_users“ table back into the database using PhpMyAdmin.
Worked fine for me.
Brad says
Worked like a charm! Thanks!
kali says
I followed this and was able to login but cannot go to the dashboard. I get this error: You do not have sufficient permissions to access this page.
Oleg says
I have the same issue.
Eileen says
I had the same problem but in wp_usermeta where we are told to write:
meta_value – insert this: a:1:{s:13:“administrator“;s:1:“1″;}
I changed the value to:
a:1:{s:13:“administrator“;b:1;}
and it worked. I found this value in the corresponding value further up in the table for the original administrator account. Check your table and see if there are any other previous administrators, and copy the same value (just in case it differs to my value).
Mark P says
This worked for me thank you!
Ardestani says
It works , thank you , really thank you
Jason Coleman says
This didn’t work for me
Daniel Payne says
For this to work with the latest WordPress 4.4.2 I had to update the meta_key names because my WordPress install was using a table prefix of wp_brnq_ instead of the typical wp_ prefix.
Rose says
What do you mean? This is no working for me either.
Robert Drummond says
Thank you for this! It saved me from an errant plugin that over-wrote my admin record in the users table!
Nadia says
I am currently fixing the website of my mom for her own company and I am a kind of wordpress-dummy. I couldn’t properly log in because she sent me the wrong password. After three failed attempts it said I should look in the data. Message: ‚Username or password are not correct. Please check your data.‘
I followed these steps here and I followed all of these steps very precisely, but still, with my new username and password, I am unable to log in. My prefix was different than wp_ what this article stated, so I changed the prefix as well – but can’t come through. Now I am locked out until tomorrow.
What happened, can someone maybe help me / explain me what I did wrong and how can I fix this. I really promised my mom to build her website, and it needs to be updated really soon!
Joe Harkins says
you were doing a great job of step by step until you got to
„meta_key – this should be wp_capabilities“
What does „should be“ mean in this context? Does it mean that it should already say that that in that field, perhaps generated from something prior? If is not there what is required?
There’s a drop down field to the right of meta_key. That file name „wp_capabilities“ does not exist as a selection. There’s a blank field to the right of that. Do I paste wp_capabilities into it? Is there a value of that name somewhere that I should be putting in that field?
And I see more trouble ahead. You say „insert another row.“
I take the word insert as a verb. Where and how do I do that? I am already on the Insert page. There is nothing on it says „Insert new row.“
Looking further down – all the way at thre bottom – skipping over the next section (which I an told to do) I see a field that says „Insert as a new row.“
But „insert a new row“ and being told to go to a field that contains the phrase „Inert as a new row“ are not all the same thing.
and there is a checked box that says „ignore“ right above it. What’s the point of going further if that box is still checked ignore – and is „insert a new row“ the same as „insert a new row?“
And I see the same „should be“ confusion ahead again in the next set of instructions.
But I’m stuck back the first „should“ because I am literal minded. Please clarify?
Jeff says
Hi Joe,
“meta_key – this should be wp_capabilities” means that the meta_key value (the textbox in phpmyadmin) should be wp_capabilities
When he refers to inserting a new row, you can do so by clicking insert from the navigation at the top of phpmyadmin this tutorial assumes you have already done the first insert and are on the browse tab.
Rich says
I had a multiple site setup. After doing this I can access both sites, however I have no Network Admin capability and not Plugin management… Under „My Sites“ I see my two sites, but no „Network“ option. On the vertical menu area for my site I seem to have everything other than „Plugins.“
Seems I do not have Administration over my WP Network for multiple sites?
sapere aude says
that was awesome! thanks.
Bouasone says
Many thank it very helpful
Russ says
Thanks for the great tutorial! I was able to successfully log in.
Arpan Das says
Thanks a lot. Working fine…
Rodolfo says
This saved my life today – thank you!
Phil says
This worked for me with the following modification: the wp_capabilities value had to be taken from another admin users row because it had additional permissions or whatever those are. copy the values in that case from an existing user if necessary
Reid Walley says
If you’ve gone through all of the steps and you’re STILL getting the „You do not have sufficient permissions to access this page“ error message when trying to log in…
I had to replace the first example meta_key (wp_capabilities) with my own prefix: change wp_capabilities to whateveryourprefixis_capabilities
Same with the second meta_key example (wp_user_level). I changed it to my specific prefix: change wp_user_level to whateveryourprefixis_user_level
Yoana says
Thanks, that fixed it
Terry Hale says
Such a helpful article. Perfectly done, easy to understand. Thanks for the time you spent putting it together.
Andre says
This has been very helpful for me on several occasions. Thank you for putting this together!!!
2046 says
for those who still got the You do not have sufficient permissions to access this page.
you might want to check that the wp_capabilities adn stuff follows your db prefix name..
like if your normally wp_usersmeta has blab787_usersmeta the wp_capabilities will be blab787_capabilities etc.
Lydia B says
Thank you, your solution to the „you do not have sufficient permissions“ error message worked perfectly for me.
Terry Hale says
Thanks for posting! I ran into that problem, and you solved it.
Cristian Deraco says
Thank you !!! it worked for me yeah!
Rony says
I can not see the table with user infomations, have any idea?
Denny says
Fantastic walk-through. This is spot on with multiple versions of phpmyadmin so ignore the differences in the screenshots. Thanks for the write-up!
-D
Denny says
WordPress 3.6.1. I will test this with 4 and confirm as well.
Ludwik C. Siadlak says
Same here, in September 2015 I get „You do not have sufficient permissions to access this page.“ error after using the SQL code provided. Which is strange, since this article is only 6 months old!
Harm says
I followed your instructions to the letter but something went wrong (don’t know what) and now I don’t have access to my website. I get the message: database error.
Can I undo the changes I made? Please help.
Kiel says
all I had to do was revert the meta data back to admin and it worked great. Thanks for the article.
Matthew Galvin says
Pretty much useless in > version 3. Nice start tho.
Chris Hewlett says
Hello, I dug a little deeper into the problem and found that existing entries in the „usermeta“ table had a prefix that was unique to my site. My wordpress tables all begin with ar_, and once I edited those 2 rows to reflect that, my login was complete, with all priveleges.
Regards,
Chris
Chris Hewlett says
Hello, and thank you for the above write-up on this subject. I have been locked out of my local site (XAMPP) and other articles I have read deal with changing the existing admin user password using phpMyAdmin. I did not have success with those methods.
I followed your instructions above and the login screen did accept the credentials.
Unfortunately I was redirected to domain//wp-admin/profile.php and the phrase „You do not have sufficient permissions to access this page“.
From the front end of the site, I can see I am logged in but when I click on Dashboard, the same phrase appears.
Do you have any suggestions that would allow me access?
Thanks in advance,
Chris
Abishai says
Hi, tried the fix by following it to the „T“ yet when I try logging in: url/wp-admin takes me to a url/25/ page as before. Wonder what I did wrong. Please advice. Thanks in advance.