Potrzebujesz wysyłać e-maile z instalacji WordPress na localhost?
Uruchamianie WordPressa z localhost na twoim własnym komputerze jest wygodne podczas tworzenia lub testowania nowej witryny, wtyczki lub motywu. Jednak skonfigurowanie poczty e-mail WordPress na localhost jest trudne, ponieważ twoja witryna jest offline, więc e-mail nie jest domyślnie włączony.
W tym artykule pokażemy, jak odbierać e-maile WordPress z localhost.

Dlaczego warto uruchamiać WordPress na Localhost?
Przed wprowadzeniem większych zmian w witrynie WordPress warto najpierw przetestować te zmiany na innej witrynie, która nie jest widoczna dla twoich użytkowników.
Witryna testowa to klon twojej działającej witryny internetowej, który służy do testowania zmian przed wprowadzeniem ich na żywo. Witryny pomostowe pomagają wychwycić błędy, dzięki czemu nie zepsujesz swojej witryny internetowej.
Wielu użytkowników instaluje swoje witryny pomostowe WordPress lokalnie na komputerach z systemem Windows lub Mac. Po przetestowaniu witryny po prostu przesyłają te zmiany z lokalnego hosta na serwer na żywo.
Jednak skonfigurowanie poczty e-mail na lokalnym serwerze WordPress może być trudne i może pojawić się komunikat o błędzie „Nie można było utworzyć instancji funkcji poczty”, gdy WordPress próbuje wysłać e-mail. Dzieje się tak, ponieważ poczta e-mail nie jest domyślnie włączona na stosach serwerów WAMP i MAMP.
Mając to na uwadze, przyjrzyjmy się, jak odbierać e-maile WordPress z lokalnego hosta.
Jak odbierać e-maile WordPress z Localhost
Pierwszą rzeczą, którą musisz zrobić, jest zainstalowanie i włączanie wtyczki WP Mail SMTP w instalacji WordPress na twoim regionalnym serwerze. Aby uzyskać więcej szczegółów, zobacz nasz przewodnik krok po kroku, jak zainstalować wtyczkę WordPress.
WP Mail SMTP przejmie domyślną funkcję wysyłania e-maili w WordPress, dzięki czemu twoje e-maile będą kierowane przez dostawcę SMTP. Oznacza to, że będziesz otrzymywać powiadomienia e-mail z Twojej witryny, nawet jeśli nie jest ona dostępna w Internecie.
Więcej informacji na temat korzystania z wtyczki WP Mail SMTP można znaleźć w naszej recenzji WP Mail SMTP.
Konfiguracja WP Mail SMTP
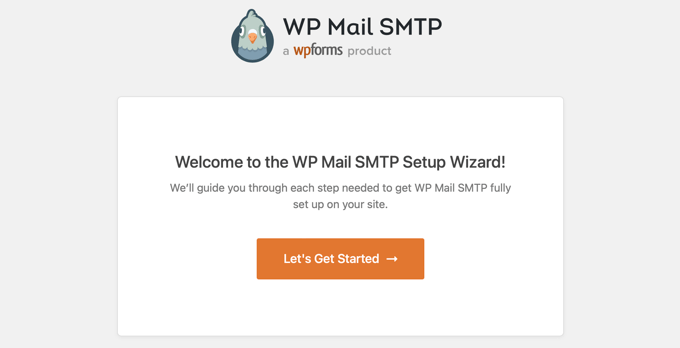
Po włączaniu wtyczki kreator konfiguracji WP Mail SMTP uruchomi się automatycznie.
Pierwszą rzeczą, którą należy zrobić, jest wybór dostawcy usług SMTP.
Możesz zapoznać się z naszym przewodnikiem po najlepszych dostawcach usług SMTP z wysoką dostarczalnością e-maili, aby uzyskać pomoc w wyborze dostawcy. Jeśli nie masz pewności, Sendinblue jest dobrym wyborem dla większości witryn WordPress.
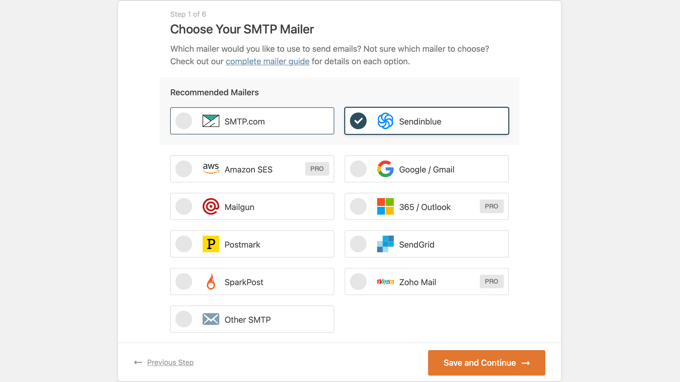
Postępuj zgodnie z kreatorem WP Mail SMTP krok po kroku. Jeśli potrzebujesz pomocy, możesz skorzystać z naszych przewodników na temat konfiguracji WP Mail SMTP z Sendinblue, Gmail, Microsoft Outlook lub Amazon SES.
Uwaga: Jeśli chcesz korzystać z Amazon SES, Microsoft Outlook lub Soho Mail jako usługi pocztowej SMTP, musisz zakupić licencję WP Mail SMTP Pro.
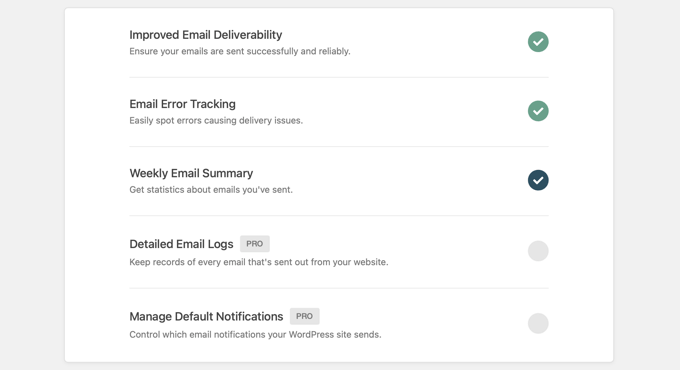
Podczas konfiguracji dostarczalność e-maili i śledzenie błędów zostaną włączone automatycznie. Użytkownicy wersji Pro mogą również włączyć logowanie się do poczty e-mail i zarządzać domyślnymi powiadomieniami.
Wysyłanie testowego e-maila
Po zakończeniu konfiguracji WP Mail SMTP można wysłać testowego e-maila, aby upewnić się, że wtyczka jest poprawnie skonfigurowana.
Aby to zrobić, musisz udać się do WP Mail SMTP ” Narzędzia w twoim menu administratora, gdzie zobaczysz stronę „Test e-mail”. Domyślnie testowy e-mail zostanie wysłany na adres e-mail administratora twojej witryny, ale możesz to zmienić, wpisując inny adres e-mail w polu „Wyślij do”.
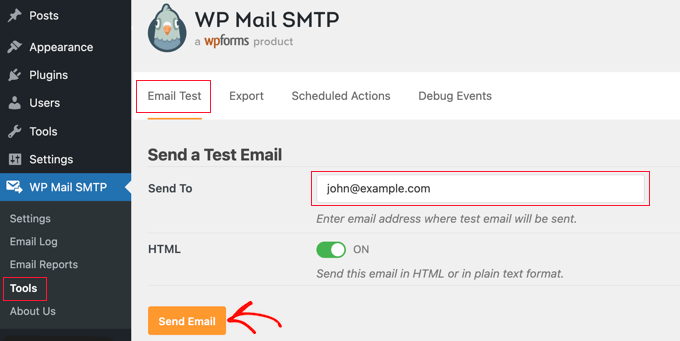
Zalecamy pozostawienie ustawienia „HTML” w pozycji „Włączone”, a następnie po prostu kliknięcie przycisku „Wyślij e-mail”. WordPress spróbuje wysłać testowy e-mail na wpisz adres.
Jeśli wystąpią problemy z konfiguracją twojego e-maila, zobaczysz komunikat opisujący problem wraz z kilkoma krokami, które możesz podjąć, aby go rozwiązać.
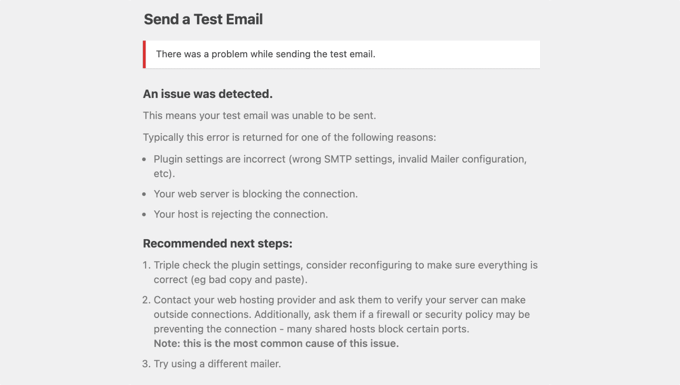
Po wykonaniu kroków mających na celu poprawienie problemów, powinieneś wysłać kolejny testowy e-mail, aby potwierdzić, że Twój e-mail WordPress działa.
Jeśli twoja konfiguracja WP Mail SMTP jest poprawna, to powinieneś znaleźć e-mail w swojej skrzynce odbiorczej.
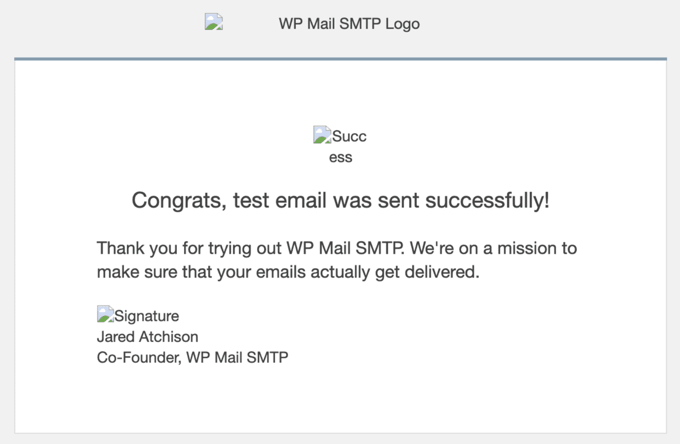
Zauważysz, że testowy e-mail ma uszkodzone obrazki i jest to całkowicie normalne podczas wysyłania e-maili z localhost. Dzieje się tak, ponieważ obrazki są normalnie wczytywane z Internetu, ale twoja witryna internetowa localhost nie jest online.
Nawet jeśli testowy e-mail się powiódł, WP Mail SMTP mógł wykryć problem z twoimi rekordami DMARC, DKIM lub SPF, co może skutkować problemami z dostarczalnością. Zobaczysz odnośniki do przewodników krok po kroku, które pomogą ci poprawnie skonfigurować twoje rekordy DNS.
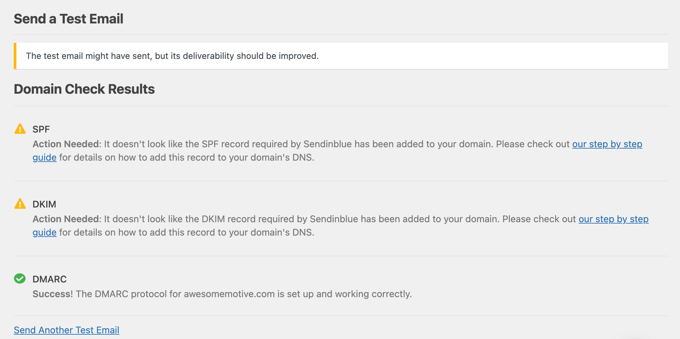
Więcej dowiesz się z przewodnika jak wysłać testowego e-maila z WordPressa.
Po zakończeniu poprawek należy wysłać kolejny testowy e-mail, aby upewnić się, że wszystko działa poprawnie.
Wyłączanie powiadomień e-mail WordPress – użytkownicy Pro
Teraz zaczniesz otrzymywać e-maile WordPress z localhost. Obejmuje to e-maile z powiadomieniami o aktualizacjach wtyczek, motywów i rdzeni. Będziesz także otrzymywać e-maile o zmianach administratora witryny, resetach haseł, rejestracjach nowych użytkowników i nie tylko.
Możesz mieć wrażenie, że otrzymujesz zbyt wiele e-maili. Możesz też chcieć wyłączyć niektóre powiadomienia e-mail podczas tworzenia i testowania twojej witryny internetowej.
UżytkownicyWP Mail SMTP Pro mogą kontrolować, które e-maile są wysyłane przez localhost. Musisz udać się do WP Mail SMTP ” Ustawienia. Tam należy kliknąć kartę „Kontrola e-maili” u góry strony. Tutaj możesz wyłączyć wszystkie e-maile, których nie chcesz otrzymywać.
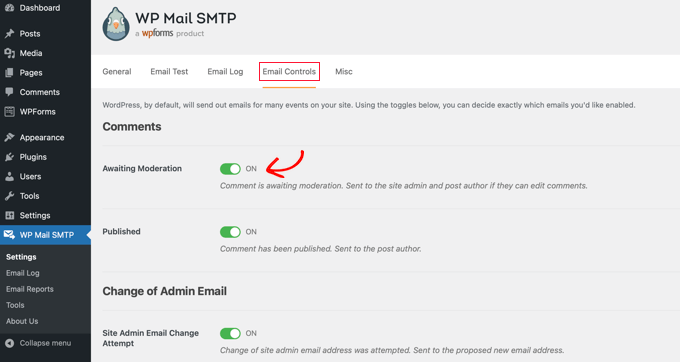
Na przykład, jeśli nie chcesz otrzymywać e-maili o komentarzach oczekujących na moderację, wystarczy przełączyć to ustawienie na pozycję wyłączoną.
Mamy nadzieję, że ten poradnik pomógł ci dowiedzieć się, jak odbierać e-maile WordPress z localhost. Możesz również dowiedzieć się, jak uzyskać bezpłatną domenę e-mail lub zapoznać się z naszą listą typowych błędów WordPress i sposobów ich poprawki.
If you liked this article, then please subscribe to our YouTube Channel for WordPress video tutorials. You can also find us on Twitter and Facebook.


Geoff
This post is WAY out of date. You now need to set up an API and OAuth on Google. The WP Forms website has full details, but allow 15-20 minutes to do so.
WPBeginner Support
The post was last updated in 2014, thank you for letting us know we should look into updating this post
Admin
Gerard Chartier
I have just tried this out and it does still work but you have to set „Allow less secure apps: ON” in your Google account, which is not recommended.
WPBeginner Support
Thank you for sharing that this still works and how to get it to work.
Prashant Sontale
I installed the plugin but I cant see the options such as those iin Mailer and also cant view the option of SMTP Host, Port, Authentication, Username, Password, etc. In mailer I haveoptions such as PHP, Google, Maligun, Sendgrid, Other SMTP. If I click on Google, they ask Client ID and Client Secret.
What to do?
Carla
That is to send… smtp… not to recieve the email on wordpress… POP3
swarna
my email is not working
Barka Piy Ndahi
Thanks for the tutorial.
I have xampp and i tried above. It showed test message sent, though below i saw: 2017-10-20 13:06:18 SMTP Error: Could not connect to SMTP host.
And i didnt see in my yahoo box.
Please can you help me make this to work.
Thank you.
Ashan Rupasinghe
That’s Worked. Thanks.
sudhakar
Hi i did the same but i have did not get any email for contact form and product enquiry form think that in localhost mail system does not works or there is an idea means please help me
Vivekraj
Hi new user registration mail contact us mail are working but woocommerce order mail and all not sending to the customers.
mukesh
i m mukesh
this is too good
surati
not work so work for me thnq…
Maksym
Works very good! Thank you
Steve
You have to go into your Google account and turn on the feature „Sign In & Security > Connected Apps & Sites > Allow Less Secure Apps > ON”.
Warren
Hi Steve
What’s the navigation to get to the sign in and security > connected apps etc? Loads of tabs on the top once in settings, each with multitude of options.
Thanks,
Shashank Chattopadhyaya
From your Google account:
[Settings -> Accounts and Import -> Other Google Account settings -> Sign-in & security -> Connected apps & sites -> Allow less secure apps (turn ON)]
Sharon
Same here. Otherwise gmail would authenticate because of the „Less secured application”
saurabh
awesome..blowsome.. worked!!
make sure your gmail has access to third party apps to send email.nothing else is needed than this video. good work . loved it.
Pam Marshall
Just what I needed to do my testing.
Roger Moore
I worked well after I enable access to less secure apps in my gmail account. Thanks
Chetan Buddh
array (size=18)
'authenticate’ => string 'SMTP Error: Could not authenticate.’ (length=35)
'connect_host’ => string 'SMTP Error: Could not connect to SMTP host.’ (length=43)
'data_not_accepted’ => string 'SMTP Error: data not accepted.’ (length=30)
’empty_message’ => string 'Message body empty’ (length=18)
'encoding’ => string 'Unknown encoding: ’ (length=18)
'execute’ => string 'Could not execute: ’ (length=19)
'file_access’ => string 'Could not access file: ’ (length=23)
'file_open’ => string 'File Error: Could not open file: ’ (length=33)
'from_failed’ => string 'The following From address failed: ’ (length=35)
'instantiate’ => string 'Could not instantiate mail function.’ (length=36)
'invalid_address’ => string 'Invalid address’ (length=15)
'mailer_not_supported’ => string ’ mailer is not supported.’ (length=25)
'provide_address’ => string 'You must provide at least one recipient email address.’ (length=54)
'recipients_failed’ => string 'SMTP Error: The following recipients failed: ’ (length=45)
'signing’ => string 'Signing Error: ’ (length=15)
'smtp_connect_failed’ => string 'SMTP connect() failed.’ (length=22)
'smtp_error’ => string 'SMTP server error: ’ (length=19)
'variable_set’ => string 'Cannot set or reset variable: ’ (length=30)
this error come what can i do now?
i can’t understand.
plz help me guyz.
Dan Canetti
Hi,
Looks as though it’s failed to Authenticate. Try ensuring your Email and Password are entered correctly.
Gabriel Hernández
Thanks! Works!=)
I will save this great website.
Daniel
Works! Thamks for the manual. Google asks to ‘Enable access for less secure apps’ in Gmail, but for testing purposes I see no problem..
deepika
It shows 'Test message sent’ but I didn’t get any mail.
CarolineElisa
Thanks for this suggestion, but I can only get it to work if I 'Enable access for less secure apps’ in Gmail, which Google does not recommend. Any other tips?
Marty
Tried this, no luck Any other suggestion? Thanks!
Marty
Hi! Thank you for a great article. I’m trying it all out, but still get an error when sending the test email: SMTP -> ERROR: Failed to connect to server: Operation timed out (60). So I did as suggested, added extension=php_openssl.dll. But nothing seems to work Anyone have another idea? Thanks!
Jesse Brownstein
After sending the test email, the browser loads infinitely without any indication of success/failure. How can I fix?
jam
Thanks very much for sharing your knowledge
Joker
This suggestion should work, But if you got error saying „Failed to connect to server: Unable to find the socket transport „ssl” ” ,
Then Please do the following
1. Edit your php.ini from your installed php folder
2. Search for extension=php_openssl.dll
3. The initial will look like this ;extension=php_openssl.dll
Remove the ’;’ and it will look like this extension=php_openssl.dll
If you can’t find the extension=php_openssl.dll, add this line extension=php_openssl.dll.
4.Then restart your Xampp or LAMP or APACHE server (depends upon which of these you’re using).
Syed
Nice article. Helped me. Works for me. Thanks.
Komalchand
I used your setting for localhost but it din’t works where it works for my test server. so ur suggestion will be helpful for me. Thanks
Easy
sory if my question sounds sily bt which inbox am I to check?. am on a local machine without an internet service. or do I need internet to receive the mail?
WPBeginner Support
yes you will need an internet connection to receive email.
Admin
Bhargav
I didnt get email. Please help me.
WPBeginner Support
Make sure that you have correctly entered Gmail SMTP settings.
Admin
Cristian Nebunu
This is actually really helpfull. I needed to test some custom features and now i know how.
adolf witzeling
Very helpful. Thanks for sharing.