State cercando annunci di retargeting su Facebook? Volete installare il pixel di Facebook in WordPress?
L’impostazione di campagne pubblicitarie su Facebook mirate a persone che hanno precedentemente visualizzato i vostri contenuti è un ottimo modo per riportare più traffico sul vostro sito.
In questo articolo vi mostreremo come aggiungere il pixel di Facebook in WordPress, passo dopo passo, per impostare gli annunci di retargeting.
Perché utilizzare il Pixel di retargeting di Facebook per aumentare la vostra portata sociale
Syed Balkhi, il nostro fondatore e CEO, ha pubblicato un caso di studio su come abbiamo incrementato il traffico Facebook di WPBeginner del 332% nel 2015. Questo ha scatenato un interesse travolgente da parte dei nostri lettori, che volevano sapere come poter fare lo stesso per i loro siti web.
Quando incrementate i post della pagina Facebook utilizzando le inserzioni di Facebook, potete selezionare un’ampia gamma di destinatari. Il retargeting vi permette di restringere il pubblico e di ottenere risultati migliori con una spesa minore.
Potete mostrare i vostri annunci a persone che sono già interessate al vostro sito web. Queste persone sono molto più propense a rispondere ai vostri post e alle vostre inserzioni su Facebook.
Che cos’è un pixel di retargeting di Facebook?
Avete notato che dopo aver visitato un sito web, iniziate a vedere i suoi annunci su Facebook? Questo fenomeno si chiama retargeting o remarketing.
Questi siti web utilizzano la tecnologia di retargeting di Facebook, comunemente nota come Facebook Pixel o Meta Pixel.
Il pixel di retargeting non aggiunge nulla di visibile al vostro sito web. Invia semplicemente un cookie del browser ai visitatori.
Ciò consente a Facebook di ritargettizzare gli utenti che visitano il vostro sito web su Facebook.
Vediamo come aggiungere un pixel di retargeting di Facebook al vostro sito WordPress.
Passo 1. Creazione di un pixel di retargeting di Facebook (Meta Pixel)
Per semplificare le cose, abbiamo creato un video tutorial su come installare un plugin di WordPress che potete vedere qui sotto.
Tuttavia, se volete seguire solo le istruzioni testuali, potete seguire il nostro tutorial passo passo su come installare il pixel di retargeting di Facebook in WordPress.
Innanzitutto, è necessario accedere al proprio account Facebook e visitare la Meta Business Suite. Quindi, fate clic su Tutti gli strumenti ” Gestione eventi.
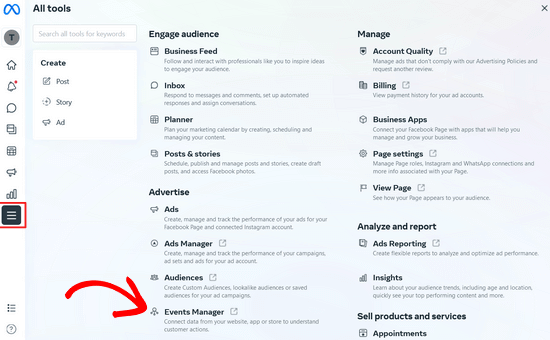
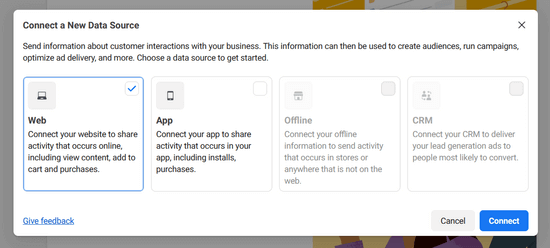
Quindi, fare clic sul pulsante “+ Connetti a fonti di dati” nel menu di sinistra e selezionare l’opzione “Web”.
Quindi, fare clic sul pulsante “Connetti”.
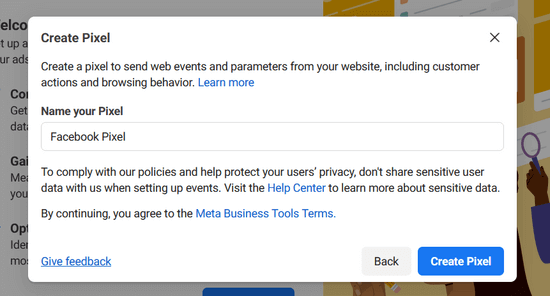
Nella finestra a comparsa successiva, è necessario inserire un nome per il pixel, che può essere il nome dell’azienda o del prodotto.
Quindi, fare clic sul pulsante “Crea pixel” per continuare.
Quindi, è sufficiente inserire l’URL del vostro sito web e fare clic sul pulsante “Controlla” per verificare se il vostro sito è idoneo all’integrazione con i partner supportati come WordPress e Shopify.
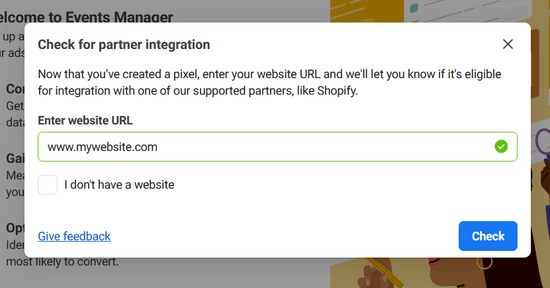
Se il vostro sito è idoneo all’integrazione, vedrete un segno di spunta verde e potrete fare clic sul pulsante “Avanti” per continuare.
Successivamente, è necessario scegliere come collegare il proprio sito web e inviare le attività a Facebook.
Per questa esercitazione, selezioneremo l’opzione “Solo Meta Pixel”. È sempre possibile impostare l’API di conversione in aggiunta al pixel in un secondo momento.
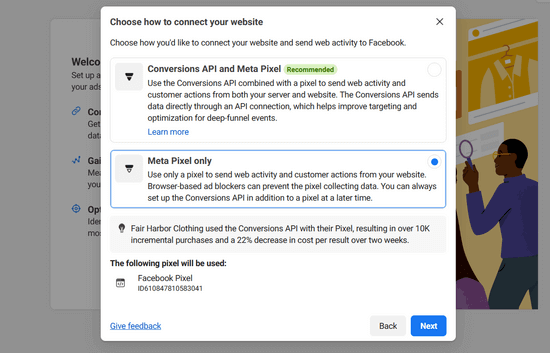
Fare clic su “Avanti” per continuare.
Ora è necessario selezionare un metodo per aggiungere il codice pixel al sito web.
Se qualcun altro gestisce gli aspetti tecnici del vostro sito web, potete inviargli il codice pixel via e-mail. Altrimenti, fate clic sul pulsante “Installa il codice manualmente” per installarlo da soli.

Facebook vi mostrerà ora il codice del pixel da installare sul vostro sito WordPress.
Basta fare clic sul pulsante “Copia codice” per copiare il codice del pixel e vi mostreremo come installarlo in WordPress.

Passo 2. Installazione del Pixel di Facebook in WordPress (+ tracciamento eCommerce)
È necessario aggiungere il codice del pixel di Facebook subito prima dell'</head> nel vostro tema WordPress.
Il modo più semplice per farlo è utilizzare il plugin gratuito WPCode.
WPCode è il miglior plugin per gli snippet di codice per WordPress. Consente di inserire facilmente il codice nelle intestazioni e nei piè di pagina del sito WordPress senza dover modificare i file del tema.
Per iniziare, è necessario installare e attivare il plugin WPCode. Per istruzioni dettagliate, consultare la nostra guida su come installare un plugin di WordPress.
Dopo aver installato e attivato il plugin, è necessario andare alla pagina Code Snippets ” Header & Footer.
Quindi, è sufficiente incollare il codice del pixel di Facebook nella casella dell’intestazione.

Al termine, non dimenticate di premere il pulsante “Salva modifiche”.
Per istruzioni dettagliate, consultare la nostra guida su come aggiungere il codice dell’intestazione e del piè di pagina in WordPress.
In questo modo, avete installato con successo il pixel di Facebook sul vostro sito web WordPress.
Alternativa: Aggiungere il Pixel di Facebook per WooCommerce con il tracciamento dell’ecommerce
Se avete un negozio online, potete passare alla versione premium di WPCode per aggiungere pixel di tracciamento eCommerce e migliorare le prestazioni degli annunci.
L’addon Conversion Pixels di WPCode consente di aggiungere facilmente pixel di tracciamento dell’e-commerce per piattaforme popolari come Facebook, Google Ads, Pinterest e TikTok in un solo clic.
Si integra perfettamente con WooCommerce e Easy Digital Downloads, quindi non è necessaria alcuna configurazione aggiuntiva.
È possibile scegliere rapidamente quali eventi eCommerce tracciare, come la visualizzazione della pagina del prodotto, l’aggiunta al carrello, il checkout e l’acquisto, in modo da comprendere meglio il rendimento degli annunci e migliorare il ROAS (Return-on-Ad-Spend).
Innanzitutto, è necessario installare e attivare il plugin premium WPCode. Per accedere all’addon Conversion Pixels è necessario il piano Plus o superiore. Per le istruzioni passo passo, consultate la nostra guida su come installare un plugin di WordPress.
Successivamente, seguite le stesse istruzioni del passo 1 per creare un pixel di Facebook per WooCommerce.
Successivamente, copiate l’ID del pixel, che potete trovare alla voce “Origini dati” nella Gestione eventi di Facebook del vostro account Facebook Business.
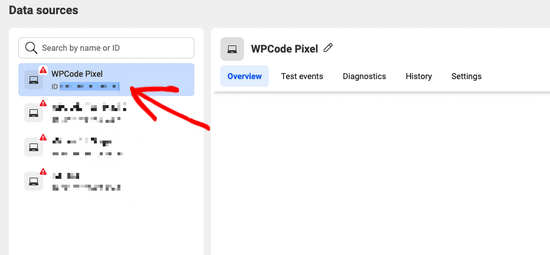
Quindi, andate su Code Snippets “ Pixel di conversione dalla vostra dashboard di WordPress e incollate l’ID del vostro pixel nel campo “Facebook Pixel ID”.

Successivamente, è necessario aggiungere il proprio Facebook Conversion API Token per impostare il tracciamento dell’eCommerce.
Per farlo, tornate alla schermata “Origini dati” dal Gestore eventi di Facebook e fate clic sul vostro pixel. Una volta selezionato il pixel, fate clic sulla scheda “Impostazioni” e poi sul link “Genera token di accesso”.
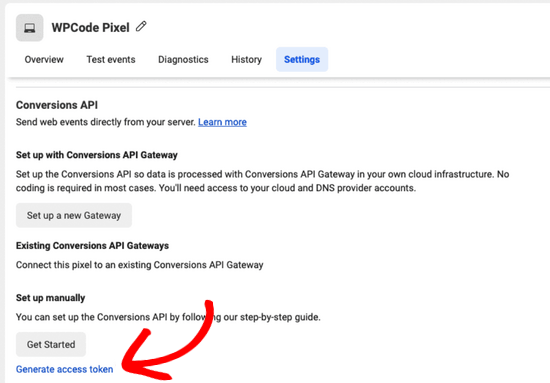
Dopo aver fatto clic sul link, il token di accesso verrà generato automaticamente. È sufficiente copiare il token di accesso e incollarlo nel campo “Conversions API Token” di WPCode.
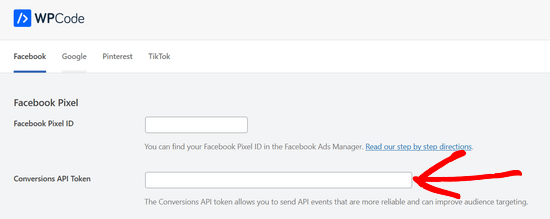
A questo punto, è possibile scorrere la pagina per scegliere il tipo di eventi eCommerce da monitorare.
Per impostazione predefinita, tutti gli eventi sono tracciati. Tuttavia, se si desidera disattivare il tracciamento degli eventi per una qualsiasi delle opzioni, è sufficiente spostare l’interruttore su “Off”.
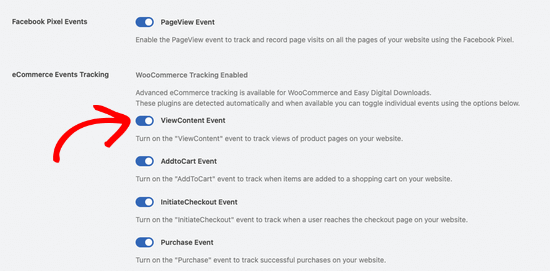
Non dimenticate di premere il pulsante Salva modifiche in fondo alla pagina.
Ecco fatto, avete aggiunto con successo il pixel di Facebook per WooCommerce e siete pronti a tracciare gli eventi del commercio elettronico.
Passo 3. Creazione di pubblici personalizzati con il Pixel di Facebook
Ora che avete installato con successo il Pixel di Facebook sul vostro sito WordPress, il passo successivo è creare un pubblico personalizzato per le vostre campagne di retargeting su Facebook.
Le Custom Audiences vi permettono di indirizzare gli annunci di Facebook a utenti che già conoscete. Questi utenti possono essere i visitatori del vostro sito web, gli utenti a cui piace la vostra pagina o gli utenti che si sono iscritti alla vostra mailing list.
Ecco come creare un pubblico personalizzato su Facebook.
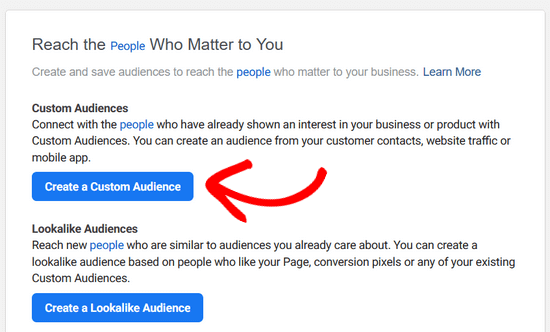
È sufficiente visitare la dashboard di Meta Business Suite e accedere alla sezione Tutti gli strumenti ” Audiences.
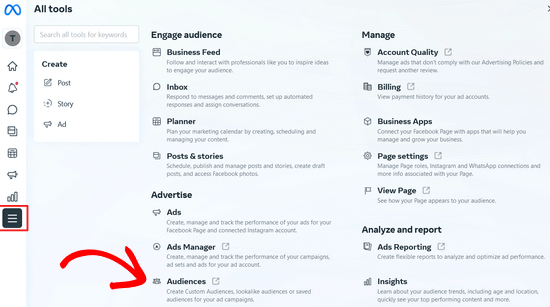
Nella pagina successiva, fare clic sul pulsante “Crea un pubblico personalizzato”.
Si aprirà una finestra a comparsa in cui dovrete scegliere la fonte di pubblico a cui volete rivolgervi su Facebook.
È possibile scegliere il sito web, l’elenco dei clienti, l’attività dell’app e altro ancora. Per questa esercitazione, sceglieremo l’opzione “Sito web”.
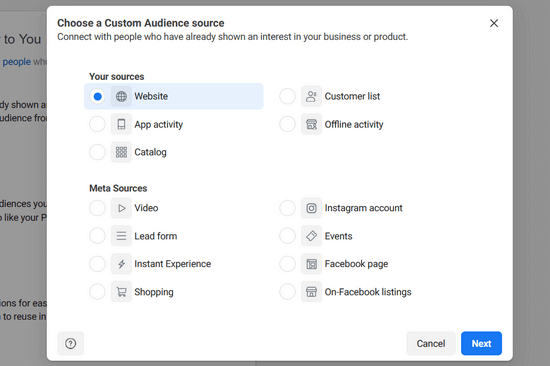
Quindi, fare clic sul pulsante “Avanti”.
Ora Facebook vi chiederà a quale pubblico del sito web volete rivolgervi. Potete scegliere tutti i visitatori del sito web, le persone che visitano pagine specifiche o i visitatori in base al tempo trascorso.
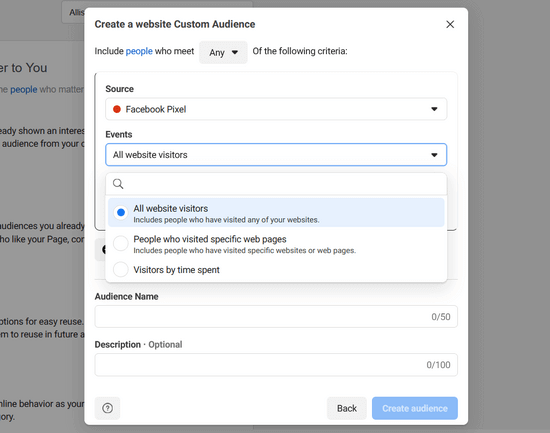
Successivamente, è necessario scegliere una durata di un certo numero di giorni. Infine, è necessario fornire un nome al pubblico. Utilizzate qualcosa che vi aiuti a identificare facilmente questo pubblico nei vostri approfondimenti.
Una volta terminato, fare clic sul pulsante “Crea pubblico” per terminare la creazione del primo pubblico personalizzato.
Ripetete il processo per creare altri pubblici personalizzati con il retargeting di Facebook.
Passo 4. Mostrare gli annunci a pubblici personalizzati utilizzando il Pixel di retargeting di Facebook
Il vero divertimento inizia con il coinvolgimento del pubblico personalizzato utilizzando gli annunci di Facebook.
Iniziate creando una nuova inserzione in Facebook. È possibile eseguire diversi tipi di inserzioni per obiettivi diversi. Ad esempio, incrementare i post della vostra pagina, inviare traffico al vostro sito web, aumentare le conversioni e così via.
A seconda dell’obiettivo scelto, sarà possibile selezionare il pubblico di destinazione a un certo punto della creazione dell’annuncio.
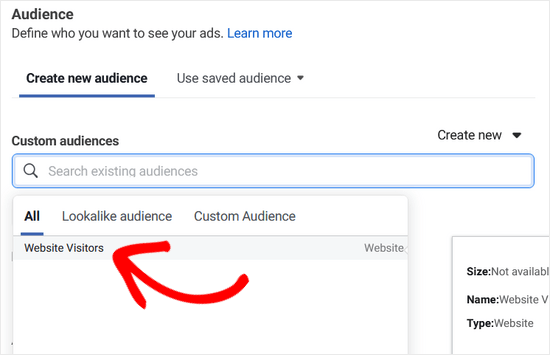
Nella stessa selezione del pubblico, Facebook vi mostrerà un pubblico personalizzato, che potrete selezionare per indirizzare la vostra campagna pubblicitaria.
Speriamo che questo articolo vi abbia aiutato a installare il pixel di remarketing/retargeting di Facebook in WordPress. Potreste anche voler consultare la nostra guida su come installare e impostare i commenti di Facebook in WordPress e la nostra scelta dei migliori plugin di WordPress per Facebook per far crescere il vostro blog.
Se questo articolo vi è piaciuto, iscrivetevi al nostro canale YouTube per le esercitazioni video su WordPress. Potete trovarci anche su Twitter e Facebook.


Syed Balkhi says
Hey WPBeginner readers,
Did you know you can win exciting prizes by commenting on WPBeginner?
Every month, our top blog commenters will win HUGE rewards, including premium WordPress plugin licenses and cash prizes.
You can get more details about the contest from here.
Start sharing your thoughts below to stand a chance to win!
crystal says
Can you make an updated version of this? Now FB has a partners integration option. I have tried this version of doing (downloading a plugin) and I’ve tried their partners way of doing it and neither way is working for me.
WPBeginner Support says
We will be sure to take a look
Admin
Jeff Cope says
Thank you for the post and even though it does need updating since Facebook has changed the links and process, I finally added the pixel to my website. Note with the improvement in the WordPress Customizer, a plugin is no longer needed to add the pixel code above the /head.
WPBeginner Support says
Thank you for your feedback and we still recommend the plugin to ensure it is included on every page on the site
Admin
Joseph Abokhai says
I was using the Facebook for woocommerce plugin that automatically sets up a Facebook pixel on a particular website.
I started a new hosting account and redirected my domain name servers to point to the new hosting account.
My question is, since I changed my hosting account and started building the site from scratch, will the pixel still be attatched to my domain?
WPBeginner Support says
Sadly, for that plugin, you would need to check with the plugin’s support for how they handle a change like that
Admin
Andrew Wilkerson says
Well I think it’s done right, thanks WpBeginner! Still not sure what I should be doing with the second bit of code from Facebook in order to track people who have gone to one particular page. I clicked around for over 2 hours on FB then my wp site, then gave up as usual.
I’m not even sure how this works, where does the headers and footers plugin put the code, in to every page? Do I just add the second bit of FB code beneath this? it needs to go after the . Does it go in the page template? Posts template? I’m lost as usual, until FB make this easier I’m not going to bother. Selecting your audiences, demographics, countries, Events? and all that, it’s just too overwhelming for most business owners. Those who have money will survive online, they can pay someone else to do it, one-man businesses like mine will eventually disappear. I can’t make any money wasting time on things like this so it just gets worse. Already slipped off the first page of Google after 14 years on there, all down hill from here I’m afraid, time to do something else.
Angie Sherbondy says
Thank you! I followed the instructions. I already had headers and footers installed and there was already code in the header section so I put this above it. Is that OK?
Thanks,
Angie
Shivam Bhateja says
Yes, it is okay. I used the analytics code and pixel code both in the headers section.
Shodkk says
Ya, there is no Problem in doing So. It is Completely Fine this only a Code.
This Code load each time when your site page run. there is no problem in that OK. Both Code run and send the Respected data back to FB and Google by their Respective code.
Andre says
Hi there. There is one question that I have on the FB pixel I just can’t seem to find an answer for anywhere. Shopify has an app called Trackify that allows you to segment the events, per product for example, and in doing so allows you to super target people who have purchased a particular product without setting up custom events. Is there a similar plugin for WordPress. Please if you could help that would be great! I am at my wits end with searching for a solution.
Maryann says
I am so glad I came across your site. Very helpful and informative.
Thank you
vinton samms says
Thank you most kindly for this tutorial. I really did not how how to use the FB pixel. Thanks again.
Vinton
Nathan says
I’ve installed the pixel using the plugin.
Will the pixel automatically be place on every page?
Thanks
Claudio says
It seems like Facebook has changed some of the details for doing this since this post was written. They now have a new pixel which also includes having to copy event code. How/where do we do this within the context of this article and plugin?
Matthew says
How do you install the pixel to fire on page load given the plugin constraint?
I’ll clarify- Facebook states that if you want an event to fire on page load the code for that specific event has to be pasted BELOW the head tag.
The plugin in you recommend, as well as all the others I’ve seen available for WP, don’t address this issue.
Recommendations?
John Henry Gaspay says
Is it also possible to add the code on the footer instead in the header portion? usually if it’s for tracking purposes better implementation would be on the footer part, your know for SEO purposes.
Pat says
I went ahead and installed the pixel because i wanted more visits to my music site. I started filling in the remarketing stuff in FB, then I came to the part about paying! I didn’t realise I had to pay so I’ve uninstalled the remarketing pixel in WP and delete everything in FB that I’d filled out. I hope I don’t start getting demands for money. Maybe you could add a note to your article that there will be payment involved in FB marketing. I guess I should have realised.
Jim says
You didn’t think you had to pay for marketing or advertising? Where have you been for the past one thousand years?
Michael says
Is there any way to use a Facebook pixel if I am at wordpress.com?
WPBeginner Support says
Please see our guide on the difference between self hosted WordPress.org vs free WordPress.com blog.
Admin
Alex says
Great article! Thanks
I use wordpress on mys ite – I’ve managed to install the facebook pixel using the “insert headers and footers app” and facebook says it is successfully installed
in wordpress, what’s the best way to install a standard event code? I have a “thank you” page that I would like to use as my conversion referecence – the thank you page appears after the viewer has submitted a form
Thanks!
Karl says
I have also successfully installed the facebook pixel code through insert headers and footers by wpbeginner, now I want to know how to add standard event codes. Can anyone teach us how to? Big thanks to WPBeginner for this
Terry Green says
I added the FB retargeting pixel about a month or so ago to my WP site, and the Facebook Pixel Helper showed it was installed and working. Now I “hear” there is a new Facebook Pixel, AND my Facebook Pixel Helper shows “there are no Facebook pixels” on my site.
The article I read goes all over the world and back about everything I don’t want to know about. All I want to know is how to replace the pixel. You are a trusted source so I thought I would ask … is there a new pixel out? And can I add it (or replace the old one) as easily as it was to add it the first time (with a plugin), or will it require manually adding code to each page?
Nina says
How do we add other rules, like these Search fbq(‘track’, ‘Search’);
Add to cart fbq(‘track’, ‘AddToCart’);
Add to wishlist fbq(‘track’, ‘AddToWishlist’);
do we simply add it to the code?
Yev says
I need to re-copy the Facebook pixel if I add standard/custom events for Conversion Tracking, to paste the new one into the website.
Does that mean I only have PageView data up until I update the code on the website, or does any type of data backtrack and becomes available as long as I had the original/basic Pixel installed?
Darren says
Hi,
I have done this and the Facebook pixel is tracking. However I am using the sign up form as well with the mailchimp API and I added the Lead and Complete registration aspects to the pixel in the header. They are firing as the chrome addon shows that however the sign up form isnt triggering as a sign up or registration complete. I am not sure if I am explain my problem well. So in business manage and the pixel I can see people visiting my site. But when they sign up the value for lead or complete registration is still 0. Any ideas why this occurs? I used the old FB conversion pixel and that was fine just this new one is so annoying!
Cheers
Ron Hudson says
Wow! Thank you very much for writing this post and recording a video to help your audience implement this important tool.
WPBeginner Support says
Glad you found it helpful.
Admin
Prakash Thakur says
hi wp beginner
Great job by making this article..
one question only…
can i uninstall that plugin after uploading script in the header section???
Brendon Osborne says
Great video, super simple and helpful!!
moon says
Hi,
I need to add ” Facebook Pixel Code ” in my wordpress site.
May I know if this plugin suitable for it.
Thanks
Elle Van Buren says
Dear author, I have a question on the “Add conversion tracking” feature. Like you instructed, if we place the Facebook pixel into the header section of the plugin, that piece of code will be on every page. But if I have a conversion page, how do I single out that particular page and add in a custom event such as fbq(‘track’, ‘Lead’); to the middle of the Facebook pixel?
Usually with WordPress or other CMS, once something is in the header, it is on every page. How do we then put up something different for a particular page?
Thanks!
I Have The Same Exact Question! says
I have the same question! How do you I single out a particular page (Thank You Page) and add in a custom event?
Marvin says
I too have this question.
Stephen says
Has anyone gotten a solution for this?
Adrien says
Still have this question remaining… any solution ?
Cheers
Luke says
THANK YOU!
So much easier to understand than the official FB instructions.
Hammad Afzal says
Great article, Can I use this feature right away or first I have to buy facebook ad campaign. I means paid Facebook advertising.
Thanks alot syed balkhi for a cool post.
WPBeginner Support says
You can see information about your visitors right away. You can run a paid campaign later on.
Admin
Hammad Afzal says
Thank you so much
fajar siagian says
hello
i want to ask about this
is this using facebook ads first. become subscriber user facebook ads
thank you,
Kingsley says
Great, thanks for this tutorial
Angelica Costa says
This is perfect. I am starting to experiment on Facebook Ads.
On other note, is there a way to tell where are facebook visitors coming from? Sometimes I get a load of new user and have no idea who shared a link to my website.