Volete creare immagini di dimensioni aggiuntive in WordPress?
Ogni volta che si carica un’immagine, WordPress ne crea automaticamente diverse copie di diverse dimensioni. Anche alcuni temi e plugin di WordPress creano le proprie copie di varie dimensioni.
In questo articolo vi mostreremo come creare facilmente immagini di dimensioni aggiuntive in WordPress e utilizzarle sul vostro sito web.

Perché creare dimensioni aggiuntive per le immagini in WordPress?
In genere, i temi e i plugin WordPress più diffusi creano automaticamente dimensioni aggiuntive per le immagini. Ad esempio, il tema può creare dimensioni diverse da utilizzare come miniature nelle pagine di archivio o nella home page personalizzata.
Tuttavia, a volte queste immagini potrebbero non soddisfare perfettamente le vostre esigenze. Ad esempio, è possibile che si vogliano utilizzare immagini di dimensioni diverse in un tema figlio o in un layout a griglia.
A tal fine, è necessario creare immagini di dimensioni aggiuntive in WordPress e poi richiamare l’immagine giusta quando serve.
Tenendo presente questo aspetto, vediamo come creare immagini di dimensioni aggiuntive in WordPress.
Registrazione di dimensioni di immagini aggiuntive per il vostro tema
La maggior parte dei temi WordPress supporta le immagini in evidenza, note anche come miniature dei post.
Tuttavia, se state creando un tema WordPress personalizzato, dovrete aggiungere il supporto per le immagini in primo piano aggiungendo il seguente codice al file functions.php del vostro tema:
add_theme_support( 'post-thumbnails' );
Una volta aggiunto il supporto per le miniature dei post, è possibile registrare ulteriori dimensioni delle immagini utilizzando la funzione add_image_size().
Si utilizzerà la funzione add_image_size nel seguente formato:
add_image_size( 'name-of-size', width, height, crop mode );
Ecco alcuni esempi di come potrebbe apparire la funzione completa:
add_image_size( 'sidebar-thumb', 120, 120, true ); // Hard Crop Mode
add_image_size( 'homepage-thumb', 220, 180 ); // Soft Crop Mode
add_image_size( 'singlepost-thumb', 590, 9999 ); // Unlimited Height Mode
Qui abbiamo specificato tre diverse dimensioni di immagine. Ognuna di esse ha modalità diverse, come il ritaglio rigido, il ritaglio morbido e l’altezza illimitata.
Vediamo come utilizzare ciascuna modalità sul vostro blog o sito web WordPress.
1. Modalità ritaglio duro
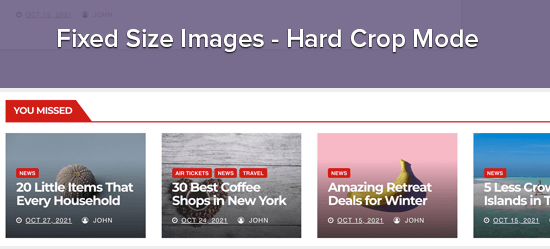
Nell’esempio precedente, abbiamo usato il valore ‘true’ dopo l’altezza. Questo indica a WordPress di ritagliare l’immagine alla dimensione esatta che abbiamo definito, che in questo caso è di 120px per 120px.
Questa funzione ritaglia automaticamente l’immagine dai lati o dall’alto e dal basso, a seconda delle dimensioni. In questo modo, potrete assicurarvi che tutte le vostre immagini siano proporzionate e abbiano un bell’aspetto sul vostro sito WordPress.
2. Modalità Ritaglio morbido
Come si può vedere nel nostro esempio di ritaglio morbido, non abbiamo aggiunto un valore ‘vero’ dopo l’altezza:
add_image_size( 'homepage-thumb', 220, 180 );
Questo perché la modalità di ritaglio morbido è attivata per impostazione predefinita.
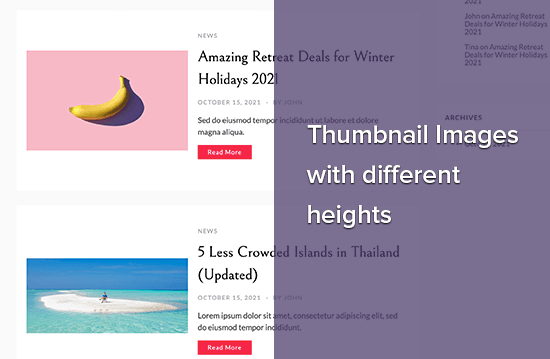
Il ritaglio morbido ridimensiona l’immagine in modo proporzionale senza distorcerla, pertanto è possibile che non si ottengano le dimensioni esatte desiderate. Di solito, il ritaglio morbido corrisponde alle dimensioni della larghezza, ma le dimensioni dell’altezza possono essere diverse in base alle proporzioni di ciascuna immagine.
Ecco un esempio di come potrebbe apparire:
3. Modalità altezza illimitata
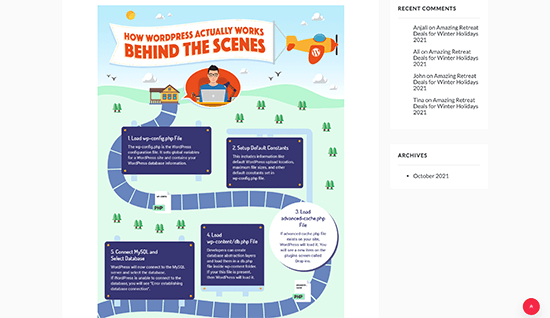
A volte si possono avere immagini lunghe che si desidera utilizzare sul proprio sito web, limitandone però la larghezza. Ad esempio, potreste aver creato un’infografica per il vostro sito web aziendale. Le infografiche tendono a essere molto lunghe e di solito sono più larghe della larghezza del contenuto.
La modalità di altezza illimitata consente di specificare una larghezza che non interrompe il layout, senza limitare l’altezza.
Visualizzazione di immagini di dimensioni aggiuntive nel tema WordPress
Una volta aggiunte altre dimensioni di immagini al vostro sito web, è il momento di visualizzarle nel vostro tema WordPress.
È sufficiente aprire il file del tema in cui si desidera utilizzare un’immagine di dimensioni diverse e aggiungere il seguente codice all’interno del ciclo del post:
<?php the_post_thumbnail( 'your-specified-image-size' ); ?>
È possibile aggiungere alcuni elementi di stile, in modo che l’immagine si adatti perfettamente al resto del sito. Tuttavia, questo è tutto ciò che serve per visualizzare immagini di dimensioni aggiuntive nel vostro tema.
Rigenerazione di immagini di dimensioni aggiuntive
La funzione add_image_size() crea dimensioni aggiuntive solo quando si carica una nuova immagine. Ciò significa che le immagini caricate prima della creazione della funzione add_image_size() non avranno le nuove dimensioni.
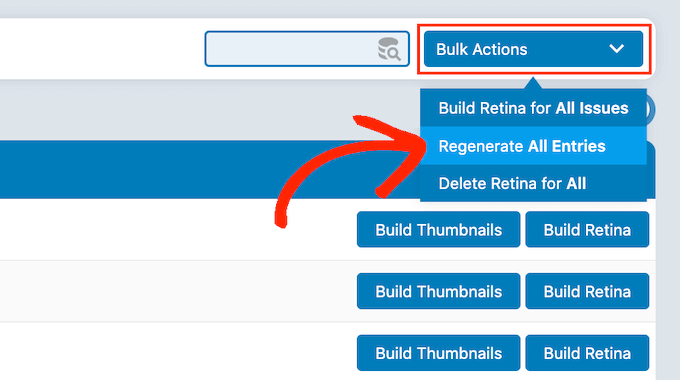
Per risolvere questo problema, è necessario rigenerare le miniature del sito WordPress utilizzando Perfect Images. Questo plugin rigenera le immagini in primo piano, le immagini retina e aggiorna i metadati dei media.
Per prima cosa, è necessario installare e attivare il plugin. Se avete bisogno di aiuto, consultate la nostra guida su come installare un plugin di WordPress.
Dopo l’attivazione, andate su Media “ Perfect Images. Perfect Images eseguirà la scansione della libreria multimediale di WordPress, per cui potrebbe essere necessario attendere qualche istante prima che finisca.
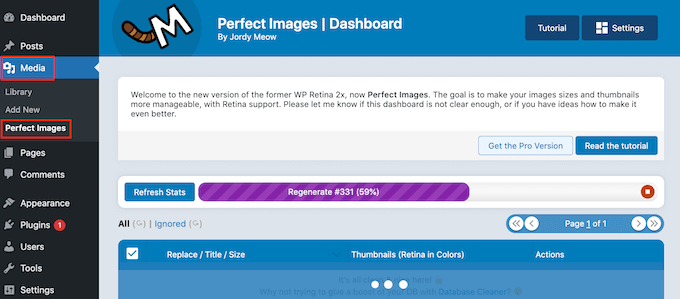
Una volta terminata l’operazione, aprire il menu a discesa, che per impostazione predefinita mostra “Azioni in blocco”, e selezionare “Rigenera tutte le voci”.
Perfect Images ora rigenera tutte le miniature.
Per ulteriori informazioni su questo argomento, consultare il nostro articolo su come rigenerare facilmente le nuove dimensioni delle immagini.
Abilitare le dimensioni delle immagini aggiuntive per il contenuto dei post
Anche se sono state aggiunte nuove dimensioni per le immagini, attualmente è possibile utilizzarle solo nel tema di WordPress e non nel contenuto del post.
Per rendere disponibili queste nuove dimensioni nell’editor di contenuti di WordPress, è necessario aggiungere il seguente codice al file functions.php del vostro tema:
function wpb_custom_image_sizes( $size_names ) {
    $new_sizes = array(
        'homepage-thumb' => 'Homepage Thumbmail',
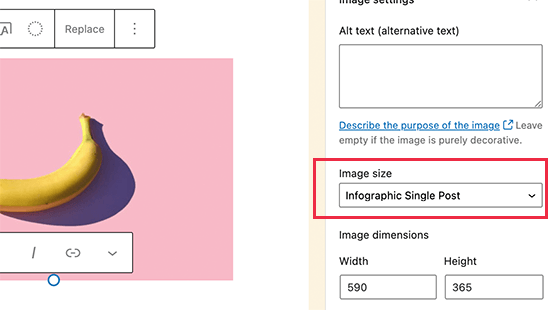
        'singlepost-thumb' => 'Infographic Single Post'
    );
    return array_merge( $size_names, $new_sizes );
}
add_filter( 'image_size_names_choose', 'wpb_custom_image_sizes' );
Non dimenticate di salvare le modifiche dopo aver aggiunto il codice.
Ora, quando caricate un’immagine su WordPress, vedrete tutte le dimensioni personalizzate sotto la voce “Dimensione immagine”. Ora è possibile modificare le dimensioni dell’immagine quando si lavora su qualsiasi pagina o post.
Speriamo che questo articolo vi abbia aiutato a capire come creare immagini di dimensioni aggiuntive in WordPress. Potreste anche voler consultare la nostra selezione dei migliori plugin Instagram per WordPress e la nostra guida su come scegliere il miglior software di web design.
Se questo articolo vi è piaciuto, iscrivetevi al nostro canale YouTube per le esercitazioni video su WordPress. Potete trovarci anche su Twitter e Facebook.


Syed Balkhi says
Hey WPBeginner readers,
Did you know you can win exciting prizes by commenting on WPBeginner?
Every month, our top blog commenters will win HUGE rewards, including premium WordPress plugin licenses and cash prizes.
You can get more details about the contest from here.
Start sharing your thoughts below to stand a chance to win!
Jiří Vaněk says
Thanks for the tutorial, I’m trying to do the same thing using another tutorial but it didn’t work. This works perfectly.
axel says
That was easy, thanx.
Something harder:
How do i get rid of old, unused thumbnail sizes?
(best without a plugin)
Kind regards
axel
WPBeginner Support says
We cover how you can remove the unused image sizes in our article below:
https://www.wpbeginner.com/wp-tutorials/how-to-prevent-wordpress-from-generating-image-sizes/
We recommend plugins to simplify the process, if you’re worried about the number of plugins on your site, we would recommend taking a look at our article below:
https://wpbeginner.com/opinion/how-many-wordpress-plugins-should-you-install-on-your-site/
Admin
B Toro says
Very simple and helpfull
WPBeginner Support says
Glad our guide was helpful
Admin
JKLYN says
Quite helpful tutorial. But how to set class for image??
Kim says
Thanks WPBeginner, this worked a treat!
Thiago says
Hi,
Great article! However, I still do not understand the usefulness of hard crop tool; I uploaded an image with 306×165, and after that I created two custom sizes: 256×148 (Soft Crop) and 256×148 (Hard Crop), however, as you can see in this print taken from the post: [http://prnt.sc/eromp3] both Options remain the same. I created a file in Photoshop containing 256×148 and I dragged the original image without resizing anything, and the result you can see in example 4 of the image above. So, my question is this: should image 2 not look like the image generated by Photoshop?
Follows below the code used on functions.php:
//Soft Crop used in example 2
if ( function_exists( ‘add_image_size’ ) ) {
add_image_size( ‘new-size8’, 256, 148 );
}
add_filter(‘image_size_names_choose’, ‘my_image_sizes8’);
function my_image_sizes8($sizes) {
$addsizes = array(
“new-size8” => __( “New Size8”)
);
$newsizes = array_merge($sizes, $addsizes);
return $newsizes;
}
////Hard Crop used in example 3
if ( function_exists( ‘add_image_size’ ) ) {
add_image_size( ‘new-size9’, 256, 148, true, array( ‘center’, ‘center’ ) ); //(cropped)
}
add_filter(‘image_size_names_choose’, ‘my_image_sizes9’);
function my_image_sizes9($sizes) {
$addsizes = array(
“new-size9” => __( “New Size9”)
);
$newsizes = array_merge($sizes, $addsizes);
return $newsizes;
}
Thanks in advance!
Kevin says
This works great, but on thing that always bothers me is that if someone uploads an image that is smaller than one of your cropped sized then that image will not be created, which ruins the layout if you wanted equal height images
Matt Rock says
Struggling with the same issue, Kevin (uploading smaller image does not create cropped size). I understand why this might make sense (system will not produce unnecessary images), but a low/poor resolution would look better than an ill-cropped one…
gonza says
Thanks for the info
you help me so much!
Sakshi says
I write this code can.
Actually i want to set the post thumbnail size for the banner image.Which i was uploading through featured image in the background please suggest me.
Aakash says
Hi,
I m new in wordpress,and accept i have many problems,and the first is,i created lot of post in wordpress,suppose A B C D,and when i update this in my website they look like first is D and then c and then b and then a means when i upload first they are show in last.if any solution that first they look in series not DCBA like ABCD…plz help
Daniel Knoflicek says
awsome… so helpfull for a lot of gallery plugins…
Lavinia Manzanarez says
Excellent! I read the use of this function on the Codex of WordPress but sometimes I need a step by step thing, thank you!
WPBeginner Staff says
Yes it is possible.
Farmer John says
I too want to do the same as Ali Rohan wants to do. can you kindly elaborate pleas.. ‘coz i tried to implement the method explained by you but could not succeed. I can’t understand where I am doing wrong. How do I link the text of resolution to image file?
Ali Rohan says
Thanks for nice article.
I wanna start a wallpapers website in wordpress so is it possible that when i upload one big wallpaper then it auto resized to many resolutions for users. For example when i upload 1920×1280 wallpaper then it must be resized to 1024×768, 800×600 etc resolution … so users can easily view and download desired size wallpaper ?
Aayush says
Hi Dear. i need your urgent help. i have a problem with the images size. actually i am using a plugin WP Gallery Custom Links. i have uploaded lot of images in a post but every images has a different height and width so they are appearing with different different sizes. i want to set them with the same size which i want to set. please tell me any idea to solve this problem.
Here says
I just needed to say thanks for saying this. You’re right on.|
Shoaib says
Excellent explanation
Andrew says
I’ve set this up and it’s working splendidly minus the suggestion MIKE LITTLE made above – the thumbnail is changed and it shows up that way in the backend in the media gallery – but on the frontend where my loop is – the image thumb is still what WP defaults to – i’ve even run REGEN THUMBS and it still doesn’t fix the issue – anyone else having this problem or know the fix???
WPBeginner Support says
Look at your loop and use
<?php the_post_thumbnail('your-specified-image-size'); ?>instead ofthe_post_thumbnail()Admin
Tomasz says
Nice tutorial!
Please check out the plugin which allows to manually crop the registered image sizes:
http://wordpress.org/plugins/manual-image-crop
WPBeginner Support says
Thanks, looks like a nice plugin. We will look into it.
Admin
Marc C says
Good tutorial – many thanks WPBEGINNER.
I too was having the problem of not being able to crop the new registered image sizes but the plugin posted by TOMASZ does the job nicely – thanks TOMASZ!
Robbe Clerckx says
Still helpfull after all this time :). Thank you.
Danny says
Thank you for this very clear and helpful tutorial. It saved me a lot of time since the WP documentation is very cryptic.
lydia karanja says
I have a wordpress account but I did not know how to manage it but now I know all thanks to this tutorial, thank you very much for helping people understand more on how to create and manage their websites.
andy19at says
@jezThomp Great if your images work
jezThomp says
@andy19at Link…?
andy19at says
@jezThomp A link? I didn’t post it cos it didn’t work.
jezThomp says
@andy19at http://t.co/YvmiX9hR
mikelittle says
You say: “The downside of hard cropping is that you cannot control which part of the image is displayed.” Not true.
When you have uploaded an image and before you insert into post, you can click on ‘edit image’ and from there change the thumbnail or the whole image, scale, rotate, or flip the image , and for the thumbnail select the exact portion of the image you want.
wpbeginner says
@mikelittle Thanks for the correction Mike. Just edited the article
clelandillustration says
I can’s seem to get the custom crop to work for new image sizes. The custom crop will work for the default “thumbnail” size version, but that crop won’t apply to new image sizes. It seems the crop is still uncontrollable for custom image sizes.
Brent Norris says
good insight into the edit flow…
TdGon says
Good article ..and photos to go along with it too…nice. I saw in a few places how to do this but they did not explain it as well as you do here. I am off to try it out.
Thanks a lot ! (0.o)
PaulDeWoutersd'Oplinter says
excellent explanation for a confusing topic. and very useful plugin
mssbee says
Great tutorial! Thanks for explaining the different crop options. It really helped me to understand how they work.
tjhakan says
Nice tutorial. good job
defries says
Nice round up of what can be done with just the default featured image feature. One extra tip: you can also set the width of your content area as a featured image and define that same width in Settings > Media. This way you can select a featured image to use in your theme and it will be automatically the maximum size of the content area.
Also great having those values in there for <a href=”http://codex.wordpress.org/Embeds”>oEmbed</a>.
Ordinary Randomness says
Thanks for this tutorial, I was wondering why sometimes I had images that were not cropping to the size I had coded.