Volete aggiungere una casella di controllo per la privacy dei commenti GDPR in WordPress?
La legge GDPR dell’Unione Europea stabilisce che è necessario ottenere un consenso esplicito per memorizzare le informazioni personali di un utente. Se sul vostro sito web sono abilitati i commenti, dovete aggiungere una casella di controllo sulla privacy dei commenti per conformarvi al GDPR ed evitare di ricevere una multa salata.
In questo articolo vi mostreremo come aggiungere una casella di controllo opt-in per la privacy dei commenti GDPR al vostro sito web WordPress.
Perché aggiungere una casella di controllo per la privacy dei commenti in WordPress?
Il Regolamento generale sulla protezione dei dati (GDPR) mira a dare ai cittadini dell’UE un maggiore controllo sui loro dati personali.
Quando questa legge è stata introdotta, ha cambiato il modo in cui molte organizzazioni si sono avvicinate alla privacy dei dati. Per saperne di più su questo argomento, consultate la nostra guida definitiva su WordPress e la conformità al GDPR.
Se non siete conformi al GDPR, potreste essere multati o addirittura finire in prigione. Ecco perché ogni parte del vostro sito dovrebbe essere conforme al GDPR, compreso il modulo dei commenti.
Un modulo per i commenti raccoglie informazioni personali dai visitatori, compresi i loro nomi e indirizzi e-mail. WordPress memorizza queste informazioni anche in un cookie del browser, in modo da poter inserire automaticamente le informazioni dell’utente in futuro.
Per impostazione predefinita, il modulo dei commenti di WordPress mostra una casella di controllo per la privacy dei commenti.
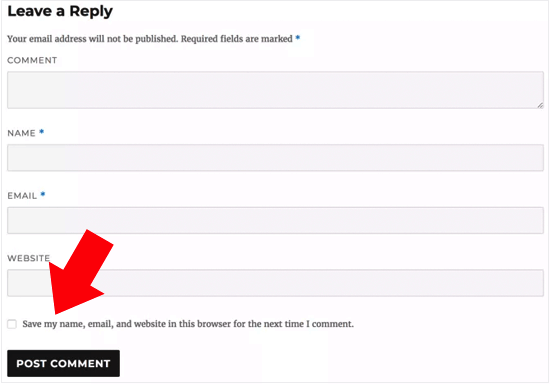
Tuttavia, se non vedete questa casella di controllo sul vostro sito web, è possibile che sia disattivata dal vostro tema WordPress.
Come attivare la casella di controllo per la privacy dei commenti in WordPress
Prima di creare il proprio box per la privacy dei commenti, è bene verificare se il proprio tema ha già questa funzione incorporata.
Per prima cosa, controlliamo che sia il tema che il nucleo di WordPress siano aggiornati andando su Dashboard ” Aggiornamenti.
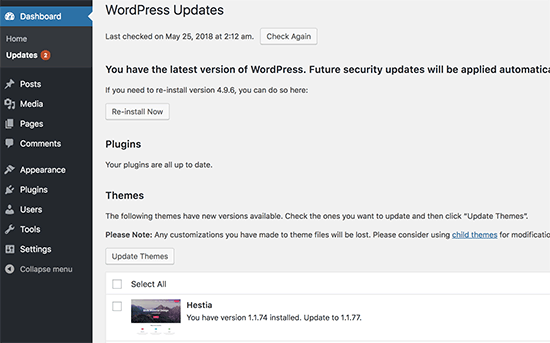
Se sono disponibili aggiornamenti, procedete all’installazione. Se avete bisogno di aiuto, consultate la nostra guida su come aggiornare WordPress in modo sicuro.
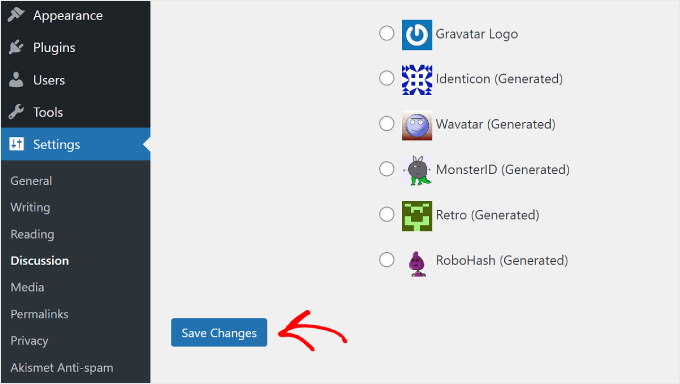
Successivamente, andare su Impostazioni ” Discussione e scorrere fino a “Altre impostazioni dei commenti”. Qui, selezionare la casella accanto a “Mostra i cookie dei commenti opt-in checkbox….”.

A questo punto, è sufficiente fare clic su “Salva modifiche” per memorizzare le impostazioni.
Ora, potete visitare il vostro sito web WordPress per verificare se queste modifiche hanno aggiunto la casella di controllo mancante.
Se siete completamente aggiornati e non riuscite ancora a vedere la casella di controllo della privacy dei commenti, significa che il vostro tema sta sovrascrivendo il modulo dei commenti predefinito di WordPress.
Per questo motivo, consigliamo di chiedere allo sviluppatore del tema di risolvere il problema aprendo un ticket di assistenza. Per consigli, consultate la nostra guida su come richiedere correttamente l’assistenza di WordPress.
Un’altra opzione è quella di aggiungere la casella di controllo della privacy dei commenti al vostro tema WordPress. Esistono diversi modi per farlo, quindi utilizzate i collegamenti rapidi qui sotto per passare direttamente al metodo che desiderate utilizzare:
Nota: prima di seguire le esercitazioni riportate di seguito, si consiglia vivamente di eseguire un backup del sito web in caso di errori imprevisti. È possibile utilizzare un plugin di backup come Duplicator.
Inoltre, si consiglia di creare un tema figlio, che consente di aggiornare il tema di WordPress senza perdere la personalizzazione.
Metodo 1: Aggiungere una casella di controllo per la privacy dei commenti al vostro tema WordPress (consigliato)
È possibile aggiungere una casella di controllo per la privacy dei commenti al modulo dei commenti del tema utilizzando un codice personalizzato.
Questo metodo richiede la modifica dei file del tema, quindi non è il metodo più adatto ai principianti. Tuttavia, dovrebbe funzionare per la maggior parte dei temi WordPress. Inoltre, manterrà intatti lo stile e il layout dei moduli del vostro tema.
Per prima cosa, è necessario collegarsi al proprio sito WordPress utilizzando un client FTP come FileZilla, oppure si può utilizzare il file manager del cPanel del proprio hosting WordPress. Se siete clienti di SiteGround, potete utilizzare il file manager nella dashboard di Site Tools.
Se è la prima volta che utilizzate l’FTP, potete consultare la nostra guida completa su come connettersi al vostro sito utilizzando l’FTP.
Una volta collegati, dovete andare in /wp-content/themes/ e aprire la cartella del vostro tema WordPress attuale.
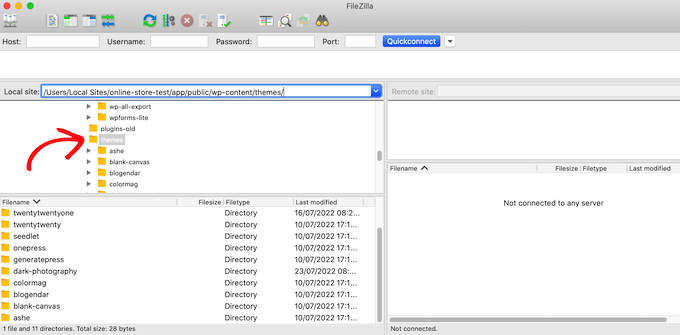
È necessario trovare il codice che sovrascrive il modulo dei commenti predefinito di WordPress. Normalmente, lo si trova nel file comments.php o functions.php nella cartella del tema.
Dopo aver aperto uno di questi file, cercate il codice che contiene il filtro comment_form_default_fields. I temi utilizzano questo filtro per sovrascrivere il modulo dei commenti predefinito di WordPress.
Conterrà le righe per tutti i campi del modulo di commento. Ogni tema è diverso, ma ecco un esempio del codice che si sta cercando:
$comments_args = array(
            // change the title of send button
            'label_submit'=> esc_html(__('Post Comments','themename')),
            // change the title of the reply section
            'title_reply'=> esc_html(__('Leave a Comment','themename')),
            // redefine your own textarea (the comment body)
            'comment_field' => '
            <div class="form-group"><div class="input-field"><textarea class="materialize-textarea" type="text" rows="10" id="textarea1" name="comment" aria-required="true"></textarea></div></div>',

            'fields' => apply_filters( 'comment_form_default_fields', array(
                'author' =>'' .
                  '<div><div class="input-field">' .
                  '<input class="validate" id="name" name="author" placeholder="'. esc_attr(__('Name','themename')) .'" type="text" value="' . esc_attr( $commenter['comment_author'] ) .
                  '" size="30"' . $aria_req . ' /></div></div>',

                'email' =>'' .
                  '<div><div class="input-field">' .
                  '<input class="validate" id="email" name="email" placeholder="'. esc_attr(__('Email','themename')) .'" type="email" value="' . esc_attr(  $commenter['comment_author_email'] ) .
                  '" size="30"' . $aria_req . ' /></div></div>',

                'url' =>'' .
                  '<div class="form-group">'.
                  '<div><div class="input-field"><input class="validate" placeholder="'. esc_attr(__('Website','themename')) .'" id="url" name="url" type="text" value="' . esc_attr( $commenter['comment_author_url'] ) .
                  '" size="30" /></div></div>',
                )
            ),
        );

    comment_form($comments_args);   ?>
In questo codice, si noterà che il filtro comment_form_default_fields è usato per modificare i campi autore, email e URL.
Il programma visualizza ogni campo nel seguente formato:
'fieldname' => 'HTML code to display the field',
'anotherfield' => 'HTML code to display the field',
Ora, aggiungeremo il campo di controllo dei commenti sulla privacy verso la fine del blocco di codice, prima della riga comment_form($comments_args); ?>.
Questo è l’aspetto che dovrebbe avere il codice, ma si può semplicemente copiare e incollare il codice dalla pagina // Ora aggiungeremo il nostro nuovo commento opt-in alla casella di controllo della privacy:
$comments_args = array(
            // change the title of send button
            'label_submit'=> esc_html(__('Post Comments','themename')),
            // change the title of the reply section
            'title_reply'=> esc_html(__('Leave a Comment','themename')),
            // redefine your own textarea (the comment body)
            'comment_field' => '
            <div class="form-group"><div class="input-field"><textarea class="materialize-textarea" type="text" rows="10" id="textarea1" name="comment" aria-required="true"></textarea></div></div>',

            'fields' => apply_filters( 'comment_form_default_fields', array(
                'author' =>'' .
                  '<div><div class="input-field">' .
                  '<input class="validate" id="name" name="author" placeholder="'. esc_attr(__('Name','themename')) .'" type="text" value="' . esc_attr( $commenter['comment_author'] ) .
                  '" size="30"' . $aria_req . ' /></div></div>',

                'email' =>'' .
                  '<div><div class="input-field">' .
                  '<input class="validate" id="email" name="email" placeholder="'. esc_attr(__('Email','themename')) .'" type="email" value="' . esc_attr(  $commenter['comment_author_email'] ) .
                  '" size="30"' . $aria_req . ' /></div></div>',

                'url' =>'' .
                  '<div class="form-group">'.
                  '<div><div class="input-field"><input class="validate" placeholder="'. esc_attr(__('Website','themename')) .'" id="url" name="url" type="text" value="' . esc_attr( $commenter['comment_author_url'] ) .
                  '" size="30" /></div></div>',

// Now we will add our new privacy checkbox opt-in

                'cookies' => '<p class="comment-form-cookies-consent"><input id="wp-comment-cookies-consent" name="wp-comment-cookies-consent" type="checkbox" value="yes"' . $consent . ' />' .
                                             '<label for="wp-comment-cookies-consent">' . __( 'Save my name, email, and website in this browser for the next time I comment.' ) . '</label></p>',
                )
            ),
        );

    comment_form($comments_args);   ?>
Dopo aver apportato questa modifica, assicuratevi di salvare e caricare il file sul vostro account di hosting WordPress.
Una volta terminato, potete visitare il vostro blog WordPress per vedere le modifiche in azione.
Metodo 2: Sostituire il modulo di commento del tema con il modulo predefinito di WordPress
Questo metodo sostituisce semplicemente il modulo di commento del vostro tema con il modulo di commento predefinito di WordPress.
Questo metodo può cambiare l’aspetto del modulo dei commenti, quindi non è il metodo migliore se si vuole mantenere lo stile e il layout del modulo. Tuttavia, dopo aver apportato questa modifica, è sempre possibile modellare il modulo dei commenti utilizzando CSS personalizzati.
Come nel metodo precedente, il primo passo consiste nel connettersi al server utilizzando l’FTP o aprendo il file manager del vostro host.
Successivamente, aprire il file comments.php e cercare una riga con la funzione comment_form(). Il vostro tema avrà un argomento, una funzione o un modello definito che utilizza per caricare il modulo di commento personalizzato del vostro tema. La riga comment_form avrà un aspetto simile a questo:
<?php comment_form( custom_comment_form_function() ); ?>
È necessario sostituire questa riga con la seguente:
<?php comment_form(); ?>
Una volta fatto ciò, salvare le modifiche.
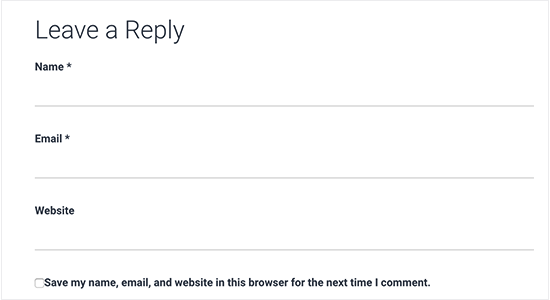
Ora, se visitate il vostro sito web, vedrete il modulo dei commenti predefinito di WordPress con la casella di controllo per la privacy dei commenti.
Suggerimento bonus: migliorare la conformità al GDPR con MonsterInsights
L’attivazione di una casella di controllo per la privacy dei commenti è un modo per rendere il vostro sito web più conforme al GDPR. Se raccogliete altri dati e volete assicurarvi che il vostro sito web sia conforme al GDPR, vi consigliamo di installare MonsterInsights.
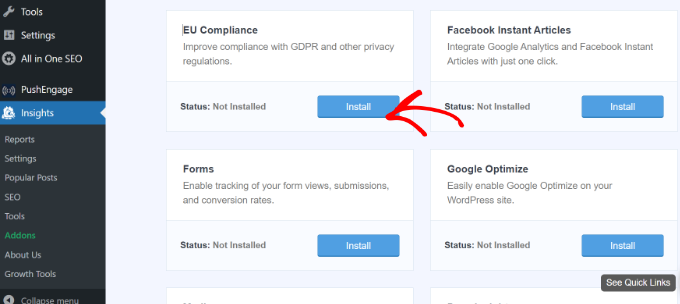
MonsterInsights è un plugin che semplifica la connessione del vostro sito web con Google Analytics. Non solo, è dotato di un componente aggiuntivo per la conformità all’UE per rendere il monitoraggio conforme al GDPR.
In questo modo, MonsterInsights aspetterà il consenso dell’utente per tracciare le sue attività, invece di farlo quando arriva sul vostro sito.
Per ulteriori informazioni su MonsterInsights, potete leggere la nostra recensione di MonsterInsights e il nostro elenco dei migliori plugin GDPR per WordPress.
Speriamo che questo articolo vi abbia aiutato a capire come aggiungere la casella di controllo GDPR per la privacy dei commenti in WordPress. Potreste anche consultare la nostra guida su come consentire la registrazione degli utenti sul vostro sito WordPress e la nostra scelta dei migliori plugin per i moduli di contatto.
Se questo articolo vi è piaciuto, iscrivetevi al nostro canale YouTube per le esercitazioni video su WordPress. Potete trovarci anche su Twitter e Facebook.


Syed Balkhi says
Hey WPBeginner readers,
Did you know you can win exciting prizes by commenting on WPBeginner?
Every month, our top blog commenters will win HUGE rewards, including premium WordPress plugin licenses and cash prizes.
You can get more details about the contest from here.
Start sharing your thoughts below to stand a chance to win!
Kris says
What I just don’t understand or maybe I am missing something, is how to put the Privacy Policy checkbox as in what you have on your comments. Something like, “by using this form you agree to us collecting and storing data as per our privacy policy. Nobody seems to have this information – just the usual comment checkbox which is straight forward to do.
WPBeginner Support says
If I understand what you’re looking to do, you can change the text by editing the text on line 29 in our code above that currently has ‘Save my name, email, and website in this browser for the next time I comment.’ when replacing, ensure you keep the single quotes.
Admin
Stephen Ho says
Thank!
mike carpenter says
Got this working and checked that the cookie was being created as expected, but when I browse away from the blog page and then return to it, I expected the form values to be pre-populated with the values stored in the cookie, but this doesn’t happen and the fields are left blank! I think I assumed that the line $commenter = wp_get_current_commenter(); and subsequent lines esc_attr( $commenter[‘comment_author_url’] ) etc. would retrieve the stored field values from the cookie. Have I missed something, or am I msundersatding the way the checkbox is supposed to work?
Sefket says
Do you have one for contact forms?
WPBeginner Support says
Hi Sefket,
Please see our article on how to create GDPR compliant forms in WordPress.
Admin
Tara says
I normally find great info on your site, but I have to speak up and say in this case, this is not accurate to be ready for GDPR, you need get consent to save their data for the comment/email/name/ip etc in your website database, whether or not they choose to save their details in a cookie for faster commenting at a later time.
I used css to hide this checkmark and installed a GDPR plugin, unfortunately now that plugin is not prompting people that they have to checkmark to leave their comment, so now we are losing comments. What’s also frustrating is that it appears for all users with no option to show only for EU. Another frustration is that with hiding the wordpress added checkmark, now the users do not see “your comment is awaiting moderation”.
parijatak ayurveda says
Thanks for the sharing of information.
Mirko says
What if I don’t want the commenters to store a cookie with their personal data at all? Is there a way to deactivate the whole process and to hide this cookie consent for good?
Uphoria says
What if the code is there in my theme already? It’s still not showing up, but it has each of the fields there.
Peter says
Thx for the guide,
but everything described doesn’t seem to be possible, if it’s a wordpress.com page (free/no plan).
There is no updating and there is nothing in the settings to add an opt-in check box or any other specific code. The only thing in the settings, that implies a possibility to achieve GDPR-compliance is to add a short info, that data will be provided to and stored at automaticc with a link to their privacy disclaimer. Furthermore, plug-ins and access via ftp can not be used.
—
Any suggestions on how to include an opt-in check box for users who only use the free wordpress.com solution?
Or is it not even needed due to the fact that user access to the web space is only possible via the rather limited wordpress configuration page – or due to any other means?
WPBeginner Support says
Hi Peter,
Please reach out to WordPress.com support, they will be able to help you better.
Admin
Bryan says
Hello, I was able to add this in my theme and it works, but there is one problem. I check consent box. Next time, my name and email are filled in, but I have to check consent box again. In default WP theme, if I check remember name, email fields box once, next time it comes checked by default. Is there problem with my theme or this code can be improved?
Jim says
Hey there! Great instruction! I am trying to get some sites GDPR compliant as well.
I was wondering about Genesis websites, I couldn’t find this code in either comments.php OR functions.php so I first tried loading the code from Method 1 in via Simple Hooks after the comment form then I used the code you gave to Mateja in my functions.php. Both gave me a checkbox but… is it supposed to do anything else? Is there somewhere that I can see whether a commenter has checked this box? Thanks in advance for any help.
Jim
Elisa says
Unfortunately I cannot apply any of the mentioned solutions as none of the CSS can be found. Contacted the comoany I got my theme from, hope they can help.
Alexander says
Hi,
I was not helped by Method 1 and Method 2.
I could not find the code I needed to edit.
I’m using the “publisher” (themeforest) template.
Can you tell me how to configure the “publisher” template?
Thank you
WPBeginner Support says
Hi Alexander,
Unfortunately, it is not possible for us to come up with a solution for each theme as they use different methods. It would be best to contact your theme developer for support.
Admin
Samantha says
I also got the “Undefined variable: consent” message when I tried to do this, although the checkbox appeared along with the message.
Vicdayo says
What if I’m using facebook comment system on my blog?
Mateja says
Hi, I disabled the Jetpack comment form and now I can see the checkbox. All good. BUT, I don’t like how the text looks like….save my name, address and so on…..I would like to insert my own text with a link to the privacy policy,,,,,….is that possible? and how I do that? Thank you
WPBeginner Support says
Hi Mateja,
You can try this code in your theme’s functions.php file. You’ll be able to change the label text for the consent checkbox.
function wpb_comments_privacy($arg) { $arg['cookies'] = '<p class="comment-form-cookies-consent"><input id="wp-comment-cookies-consent" name="wp-comment-cookies-consent" type="checkbox" value="yes"' . $consent . ' />' . '<label for="wp-comment-cookies-consent">' . __( 'Save my name, email, and website in this browser for the next time I comment.' ) . '</label></p>'; return $arg; } add_filter('comment_form_default_fields', 'wpb_comments_privacy');1-click Use in WordPress
Admin
Inayatali says
Thank you so much.
WPBeginner Support says
You’re welcome
Kamran Khan says
Thank you sir. I have applied the 1st method. Its working but after inserting the code some of the code elements also shown with the checkbox and message which I manually removed. Is it OK? Now its working fine but the checkbox is showing above the message and not inline. How I can inline both the checkbox and the message.
WPBeginner Support says
Hi Kamran,
No, there is probably something missing in the code. Most likely a quote or a php start or end tag. Carefully review the code to make sure that all quotes are closed and code is properly formatted.
For styling you will need to use custom CSS to adjust the field.
Admin
Carey says
Ok, I am ignorant about adding code. I am using the K2 theme, which does not seem to have the updated comments form. I installed Code Snippets, but I don’t understand – does it just know where to put the snippet? I looked at the comments code in the theme files, but it doesn’t look anything like your example here. In fact it has 189 lines of code for comments. Do I just add your “new privacy checkbox optin” code to snippets and click activate and it inserts it in the correct place? So confused…
WPBeginner Support says
Hi Carey,
If you find editing theme files difficult, then ask your theme author to release an update.
Admin
Brian Sanderson says
Hi! I do not have the above code in your article, as is, but i do have the following code in the comments.php file. The code includes the 4 fields;
Could you please advise how my code could be edited? Thanks in advance.
WPBeginner Support says
Hi Brian,
It depends on rest of the code in your theme. Unfortunately, we cannot cover all the possible ways in which a theme may display a comment form. You will need to reach out to your theme author for support.
Admin
Mark Corder says
Thanks for this – I know it was quick work on your part too!
Thomas says
I tried using this and got the following notice in place of the checkbox:
Undefined variable: consent
So you didn’t define it? How do I do that?
Mark Corder says
Huh… It’s working for me. I just need to get the checkbox and label lined-up to match the rest of my form…
Thomas says
Just so everyone knows I opened up comments-template.php file from the wp-includes folder and found this:
$consent = empty( $commenter[‘comment_author_email’] ) ? ” : ‘ checked=”checked”‘;
Adding this to the above defines the consent and in doing so will remove the notice if you have debug turned on.
You have to add it before the $comments_args = array. This all depends on how you have your template configured.
Hope it helps.