Fragen Sie sich, ob es eine Möglichkeit gibt, Bilder in WordPress automatisch in Graustufen zu setzen, wenn Sie sie hochladen?
Normalerweise benötigen Sie ein Bildbearbeitungsprogramm, um Ihre Bilder in Graustufen umzuwandeln. Dies kann jedoch zeitaufwändig sein, da Sie jedes einzelne Bild bearbeiten müssen, bevor Sie es auf Ihre Website hochladen.
In diesem Artikel zeigen wir Ihnen, wie Sie Bilder in WordPress beim Hochladen auf Ihre Website in Graustufen umwandeln können.

Wann sollten Sie Graustufenbilder in WordPress verwenden?
Graustufenbilder enthalten nur Informationen über die Lichtmenge im Bild. Die Bildfarben zeigen verschiedene Grautöne, die zwischen Schwarz und Weiß liegen.
In bestimmten Situationen kann die Verwendung von Graustufenbildern für Ihre WordPress-Website von Vorteil sein. Zum Beispiel können Sie damit die Lesbarkeit der im Bild dargestellten Objekte verbessern.
Andererseits werden Graustufenbilder wegen ihrer geringen Größe häufig für die Bildverarbeitung verwendet. Dadurch können Entwickler komplexe Operationen in kürzerer Zeit durchführen.
Sehen wir uns also an, wie Sie Ihre Bilder in WordPress in Graustufen umwandeln können, wenn Sie sie hochladen.
Vergrauen von Bildern beim Hochladen in WordPress
Wenn es darum geht, Bilder in WordPress hinzuzufügen, müssen Sie sie vor dem Hochladen mit einem Bildbearbeitungsprogramm wie Photoshop bearbeiten und farbige Bilder in Graustufen umwandeln.
Wenn Sie Hunderte oder Tausende von Bildern hochladen müssen, kann es sehr zeitaufwändig sein, jedes einzelne Bild manuell zu bearbeiten.
Sie können sie jedoch beim Hochladen automatisch in Graustufenbilder umwandeln. Dazu müssen Sie lediglich den folgenden Code in die Datei functions.php Ihres Themes einfügen:
add_filter('wp_generate_attachment_metadata','rb_bw_filter');

function rb_bw_filter($meta) {

    $path = wp_upload_dir(); // get upload directory
    $file = $path['basedir'].'/'.$meta['file']; // Get full size image

    $files[] = $file; // Set up an array of image size urls

    foreach ($meta['sizes'] as $size) {
        $files[] = $path['path'].'/'.$size['file'];
    }

    foreach ($files as $file) { // iterate through each image size

        // Convert image to grayscale credit to http://ottopress.com/2011/customizing-wordpress-images/

        list($orig_w, $orig_h, $orig_type) = @getimagesize($file);
        $image = wp_load_image($file);
        imagefilter($image, IMG_FILTER_GRAYSCALE);
        switch ($orig_type) {
            case IMAGETYPE_GIF:
                imagegif( $image, $file );
                break;
            case IMAGETYPE_PNG:
                imagepng( $image, $file );
                break;
            case IMAGETYPE_JPEG:
                imagejpeg( $image, $file );
                break;
        }
    }
    return $meta;
}
Eine einfache Möglichkeit, Code zu den Themedateien hinzuzufügen, ist die Verwendung des WPCode-Plugins für WordPress.
Es ist das beste Code-Snippets-Plugin, mit dem Sie Code-Snippets ausführen können, ohne die Datei function.php Ihres Themes manuell bearbeiten zu müssen. Auf diese Weise müssen Sie sich keine Sorgen machen, dass Ihre Website kaputt geht.

Zunächst müssen Sie das kostenlose WPCode-Plugin herunterladen und auf Ihrer Website installieren. Wenn Sie Hilfe benötigen, folgen Sie bitte unserer Anleitung zur Installation eines WordPress-Plugins.
Hinweis: Die kostenlose Version von WPCode bietet alles, was Sie zum einfachen Hinzufügen von benutzerdefiniertem Code in WordPress benötigen. Für erweiterte Funktionen wie eine private Cloud-Snippet-Bibliothek, geplante Snippets, Konvertierungspixel und mehr können Sie auf WPCode Pro upgraden.
Nach der Aktivierung können Sie in Ihrem WordPress-Dashboard auf Code Snippets “ + Add New gehen.
Navigieren Sie dann zur Option „Eigenen Code hinzufügen (neues Snippet)“ und klicken Sie auf die Schaltfläche „Snippet verwenden“.

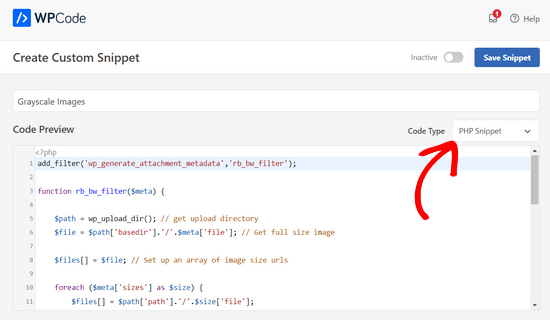
Geben Sie nun einen Namen für Ihr Snippet ein und fügen Sie den obigen Code in den Bereich „Codevorschau“ ein.
Außerdem müssen Sie in der Dropdown-Liste auf der rechten Seite „PHP Snippet“ als Codetyp auswählen.

Nachdem Sie den Code eingegeben haben, können Sie zum Abschnitt „Einfügen“ blättern.
Hier können Sie die Option „Automatisch einfügen“ aktiviert lassen. Dadurch wird der Code automatisch für Sie eingefügt und ausgeführt.

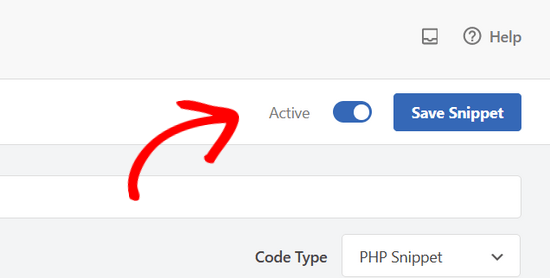
Gehen Sie abschließend zurück zum oberen Bildschirmrand, schalten Sie den Schalter von „Inaktiv“ auf „Aktiv“ um und klicken Sie auf die Schaltfläche „Snippet speichern“.

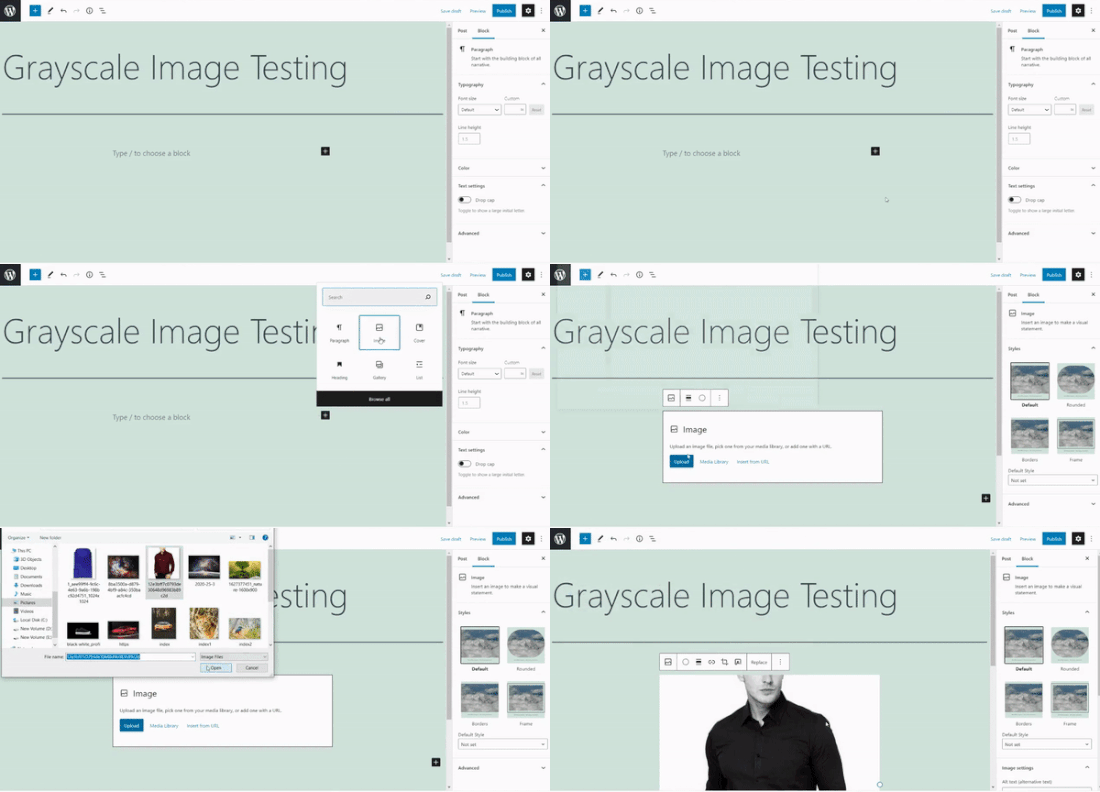
Als Nächstes können Sie den Code testen, indem Sie eine neue Seite bearbeiten oder hinzufügen. Wenn Sie sich im WordPress-Editor befinden, klicken Sie auf die Schaltfläche „+“ und fügen Sie einen Bildblock hinzu.
Sie können nun jedes beliebige Bild in Ihrem WordPress-Blog hochladen und es wird automatisch in ein Graustufenbild umgewandelt.

Wir hoffen, dass dieser Artikel Ihnen geholfen hat, zu lernen, wie man Bilder in WordPress in Graustufen umwandelt. Sehen Sie sich auch unseren Leitfaden zur Auswahl der besten Blogging-Plattform und unsere Expertenauswahl der besten Webdesign-Software an.
Wenn Ihnen dieser Artikel gefallen hat, dann abonnieren Sie bitte unseren YouTube-Kanal für WordPress-Videotutorials. Sie können uns auch auf Twitter und Facebook finden.


Syed Balkhi says
Hey WPBeginner readers,
Did you know you can win exciting prizes by commenting on WPBeginner?
Every month, our top blog commenters will win HUGE rewards, including premium WordPress plugin licenses and cash prizes.
You can get more details about the contest from here.
Start sharing your thoughts below to stand a chance to win!
Tomas Kapler says
Great tip, i would just like to mention, that for many usages it might be better to simply do this via CSS filter, e.g.
img.bw {
filter: grayscale(1);
}
you can even e.g. show b/w by default and color on hover, or you can do animation from greyscale to full color and back, e.g.
img.bw {
filter: grayscale(0);
}
img.bw.grey {
filter: grayscale(1);
transition-property: filter;
transition-duration: 1s;
}
i also do not think, that wp_generate_attachment_metadata filter is the proper one, that should be used because of its calling in meta creation not only image creation and making second image manipulation, but the proper solution would be much longer, so i understand why it is done this way
rok says
It works nice but when uploading, WP 4.3 throws error in media library.
i think have applied all fixes written in comments, but still error.
my code looks like this:
add_filter(‚wp_generate_attachment_metadata‘,’themename_bw_filter‘);
function themename_bw_filter($meta) {
$time = substr( $meta[‚file‘], 0, 7); // <- get the correct time of the upload
$file = wp_upload_dir( $time ); // <- locates the correct upload directory
$file = trailingslashit($file[‘path’]).$meta['sizes']['slide-pic']['file'];
if( $file ) {
list($orig_w, $orig_h, $orig_type) = @getimagesize($file);
}
$image = wp_load_image($file);
imagefilter($image, IMG_FILTER_GRAYSCALE);
switch ($orig_type) {
case IMAGETYPE_GIF:
imagegif( $image, $file );
break;
case IMAGETYPE_PNG:
imagepng( $image, $file );
break;
case IMAGETYPE_JPEG:
imagejpeg( $image, $file );
break;
}
return $meta;
}
Kim says
Will this change all pictures in word press to grayscale or only newly updates ones?
Tomaž Zaman says
I know I’m a bit late to the discussion, but I just had the same problem with an error (that others report):
imagefilter() expects parameter 1 to be resource, string givenThis happens when you try to upload image through media modal while editing a post, older than the current month which apparently confuses WordPress which directory the original image is in and which directory it should save the grayscaled image in.
This is the solution:
<?php

add_filter('wp_generate_attachment_metadata','themename_bw_filter');

function themename_bw_filter($meta) {

$time = substr( $meta['file'], 0, 7); // <- get the correct time of the upload

$file = wp_upload_dir( $time ); // <- locates the correct upload directory

$file = trailingslashit($file['path']).$meta['sizes']['themename-bw-image']['file'];

list($orig_w, $orig_h, $orig_type) = @getimagesize($file);

$image = wp_load_image($file);

imagefilter($image, IMG_FILTER_GRAYSCALE);

switch ($orig_type) {

case IMAGETYPE_GIF:

imagegif( $image, $file );

break;

case IMAGETYPE_PNG:

imagepng( $image, $file );

break;

case IMAGETYPE_JPEG:

imagejpeg( $image, $file );

break;

}

return $meta;

}
endul says
how to change, result filter image to specific folder/directory
geertvdheide says
One addition: I’ve added a few lines to get around the issue of having two images with the same file name, caused by having two add_image_size calls with the same size. The additional code was found here:
http://bavotasan.com/2011/create-black-white-thumbnail-wordpress/
mklemme says
@geertvdheide
If you wanted to add multiple size support, try what I use:
if ( function_exists( ‚add_theme_support‘ ) ){
add_theme_support( ‚post-thumbnails‘ );
set_post_thumbnail_size( 50, 50, true );
add_image_size( ‚medium-thumb‘, 660, “, true );
add_image_size( ‚large-thumb‘, 960, “, true );
add_image_size( ’small-thumb‘, 100, “, true );
}
(The height is not defined, only the width.)
you would have to add the different names to make the function apply to them all:
[‚medium-thumb‘ , ‚large-thumb‘ , ’small-thumb‘] in the filter code.
Calling the thumbnail in your theme is the same listed in the article:
Mike Logan says
Excellent idea, almost 10 years later this is still handy.
geertvdheide says
Thanks for sharing this code! Except I’m running into a weird issue when trying to implement it. It’s related to the uploaded image’s size (pixel size, meaning its dimensions). Copied the code literally to my theme’s functions.php, and it works a charm with images larger than the size specified in the add_image_size call. But when using an image smaller than or equal to the size specified, the uploader in WordPress gives me errors and doesn’t process the image size (either from the media section of the admin environment, or from a specific post or page). The error:
Warning: imagefilter() expects parameter 1 to be resource, string given.
Ssome other stuff in the error as well, but this seems to be the main cause. The image data given to the imagefilter function must not be valid or doesn’t exist?
Any idea what’s causing this? The only real difference between my situation and a clean install is that I’ve also added a few other add_image_size calls for other purposes in my site. I’m also adding the same size twice (one black/white, one regular), but that doesn’t seem to be a problem with the larger images.
Ed Nailor says
@GEERTVDHEIDE
and for others that need this:
When the script is converting the image to greyscale and the file uploaded does not fit the file size, this causes the script to break. To prevent this, simply add a quick if() conditional to make sure you have the $file.
$file = trailingslashit($file[‚path‘]).$meta[’sizes‘][‚themename-bw-image‘][‚file‘];
if( $file ) {
list($orig_w, $orig_h, $orig_type) = @getimagesize($file);
——– remainder of code until ——–
return $meta;
}
This will check to make sure the file size you have requested exists before it tries to convert it.
Hope that helps!
frankiegershwin says
@Otto42 Thanks for offering. I will.
Otto42 says
@frankiegershwin bummer! Feel free to email me directly for code help. otto@wordpress.org
frankiegershwin says
@Otto42 thank you! I had a bit of a hard time, actually and had to undoe it will pick it up tomorrow. It’s a good way to mix it up onsite
Otto42 says
@frankiegershwin Lemme know if you need help. I added a way to do sepia tones too in my comments on the original post: http://t.co/avDNNEX
rodhk says
@rodriguezhernan vaya idiotez de truco…. madremua tocar el codigo para eso
wpbeginner says
@Otto Thanks for the comment Otto. Updated the post as well
Otto says
Note that people should change „themename“ to be the name of their theme instead.