Siete alla ricerca di un modo semplice per verificare il vostro sito WordPress su Pinterest?
La verifica del vostro sito web su Pinterest vi consentirà di sbloccare funzioni eccezionali come l’analisi di Pinterest, il programma di annunci, le statistiche per le vostre foto e altro ancora.
In questo articolo vi mostreremo come verificare facilmente il vostro sito WordPress su Pinterest.
Perché dovreste verificare il vostro sito WordPress su Pinterest?
Pinterest è una delle piattaforme di social media più popolari per la condivisione di foto, video e altri contenuti visivi. Consente di creare un account e di gestire le immagini come Instagram o Flickr.
Inoltre, consente ad altri utenti di raccogliere link a siti web e altri contenuti visivi attraverso la creazione di bacheche.
Se gestite un sito web di fotografia o qualsiasi altro tipo di blog con immagini e video, Pinterest può essere un’importante fonte di traffico.
La verifica del vostro sito web su Pinterest vi aiuterà a conoscere meglio i vostri visitatori grazie a Pinterest Analytics. Potrete inoltre partecipare al loro programma di annunci e pianificare una strategia per far crescere il vostro traffico su Pinterest.
Detto questo, vediamo come verificare facilmente il vostro blog WordPress su Pinterest.
Come verificare il vostro sito WordPress su Pinterest
Prima di iniziare, è necessario aggiornare il proprio profilo Pinterest a un account business. Questo vi permetterà di utilizzare tutti gli strumenti Pro, come le analisi, il programma di annunci e altro ancora. L’account business di Pinterest è gratuito e facile da configurare.
Allora, iniziamo.
Video tutorial
Se preferite le istruzioni scritte, continuate a leggere.
Passo 1: Aggiornare l’account Pinterest a Business
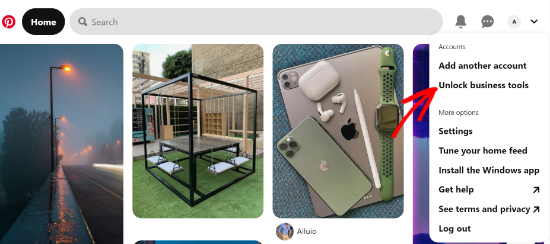
Per prima cosa, è necessario accedere al proprio account Pinterest e cliccare sulla freccia in basso nell’angolo in alto a destra dello schermo. Quindi, fate clic sull’opzione “Sblocca strumenti commerciali”.
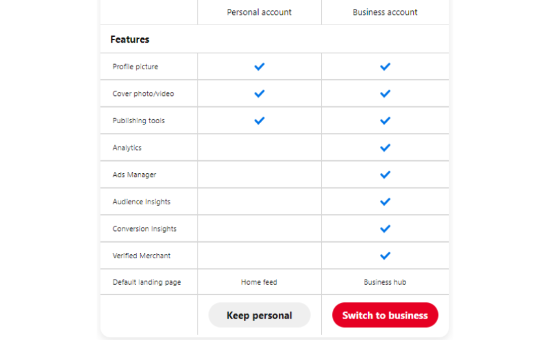
Nella schermata successiva, viene visualizzato un elenco delle funzionalità offerte dall’account business.
Per aggiornare il vostro account personale e utilizzare queste caratteristiche, fate clic sul pulsante “Passa al business”.
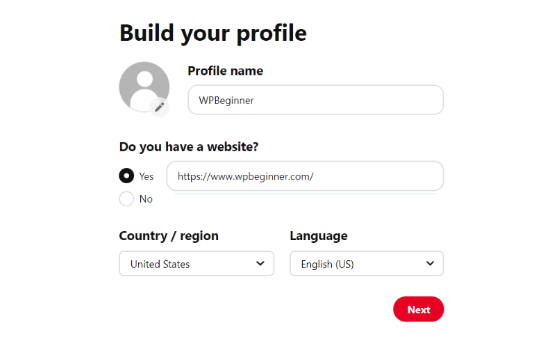
Quindi, inserite i dettagli del vostro account aziendale, come il nome del profilo, l’URL del sito web, il Paese e la lingua.
Una volta inseriti tutti questi dati, fare clic sul pulsante “Avanti”.
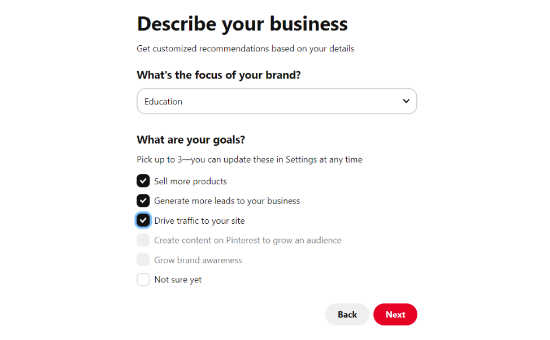
Pinterest vi chiederà ora di descrivere la vostra attività. È possibile selezionare un settore dal menu a tendina e scegliere 3 obiettivi tra le opzioni proposte.
Quindi, fare clic sul pulsante “Avanti”.
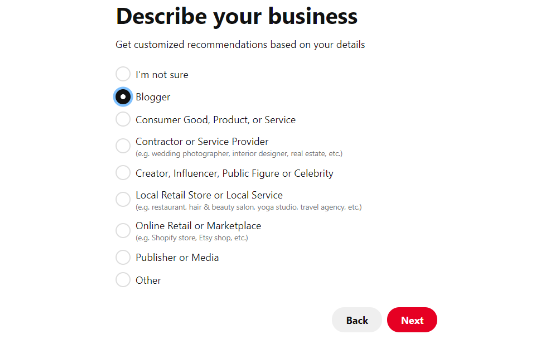
Nella schermata successiva, vi verrà chiesto di selezionare un’opzione per ottenere raccomandazioni personalizzate.
Una volta fatto questo, assicuratevi di fare clic sul pulsante “Avanti”.
A questo punto, vi verrà chiesto di selezionare un’opzione se siete interessati alla pubblicità su Pinterest e di cliccare sul pulsante “Avanti”.
Per questa esercitazione, è possibile selezionare l’opzione “No, non ho intenzione di fare pubblicità”.

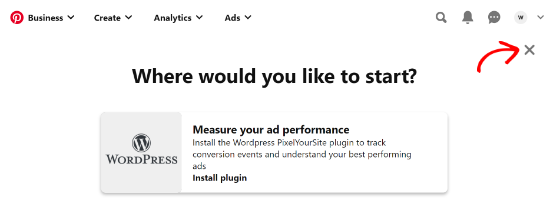
Successivamente, Pinterest vi mostrerà diverse opzioni per iniziare con il vostro account aziendale.
È possibile fare clic sull’icona della “croce” nell’angolo in alto a destra per saltare questa parte.
Fase 2: rivendicare il proprio sito web su Pinterest
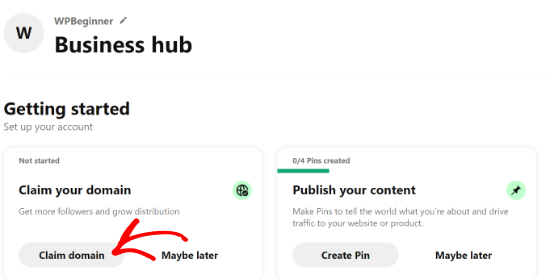
Il passo successivo consiste nel rivendicare il proprio sito web su Pinterest.
Per farlo, potete cliccare sul pulsante “Claim domain” (Rivendica dominio) dalla vostra pagina Pinterest Business hub, che vi porterà direttamente alla pagina delle impostazioni di rivendicazione.
Un altro modo per rivendicare il proprio sito web è fare clic sulla freccia rivolta verso il basso nell’angolo in alto a destra e selezionare l’opzione “Impostazioni”. Quindi, andate alla sezione “Rivendicazione” nel menu di sinistra.
Per ottenere il credito per i vostri contenuti su Pinterest, cliccate sul pulsante “Claim” per i siti web.
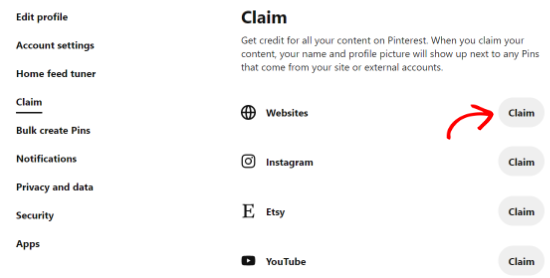
Una volta fatto clic sul pulsante, apparirà una finestra popup con tre opzioni per rivendicare il vostro sito web WordPress.
Scegliamo l’opzione “Aggiungi tag HTML” perché è la più semplice.
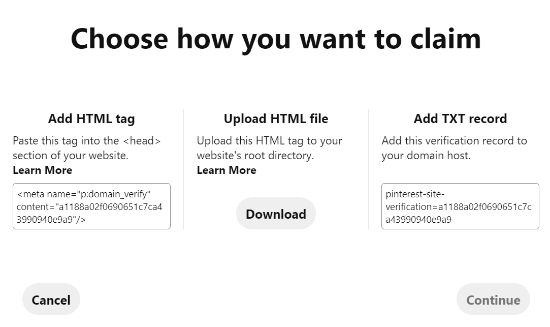
Tuttavia, se preferite, potete scegliere l’altra opzione, in cui scaricate il file HTML e lo caricate nella directory principale del vostro sito web utilizzando un client FTP o il file manager del vostro hosting WordPress.
È anche possibile aggiungere un record TXT di verifica alle impostazioni del dominio utilizzando il proprio registrar di dominio.
Passo 3: Aggiungere il tag HTML al sito web WordPress
Esistono diversi modi per aggiungere un tag HTML all’intestazione del vostro sito web, ma in questa sede ci occuperemo solo dei due metodi più semplici.
Aggiungere il tag HTML di Pinterest con un plugin SEO
Innanzitutto, è possibile utilizzare il plugin All in One SEO (AIOSEO) per WordPress e inserire il tag HTML nel proprio sito web. Per maggiori dettagli, seguite la nostra guida su come installare un plugin di WordPress.
AIOSEO è il miglior plugin SEO per WordPress e rende molto semplice l’ottimizzazione del sito per i motori di ricerca senza dover assumere un esperto.
Pur consigliando la versione Pro, è possibile utilizzare anche la versione gratuita di AIOSEO per aggiungere la verifica di Pinterest.
Per aggiungere il tag HTML, accedere a All in One SEO ” Impostazioni generali e quindi fare clic sulla scheda “Strumenti per i Webmaster” dal menu in alto.
Dopodiché, fate clic sul blocco “Verifica del sito Pinterest”.
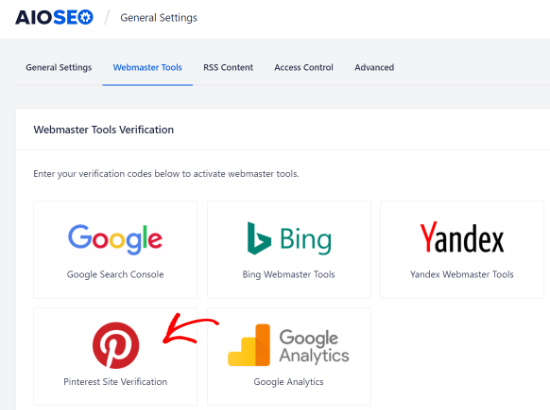
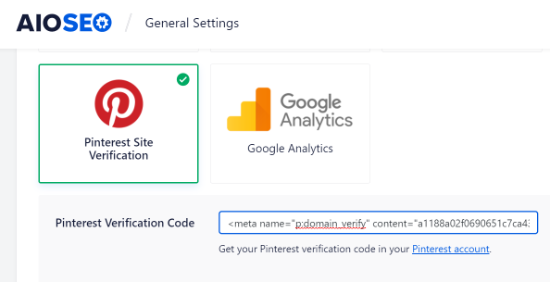
A questo punto, inserite il tag HTML copiato nel passaggio precedente nel campo Pinterest Site Verification.
Quindi, è necessario fare clic sul pulsante “Salva modifiche”.
Aggiungere un tag HTML di Pinterest con un plugin Code Snippets
Oltre a usare AIOSEO, un altro modo per aggiungere il tag HTML è installare e attivare il plugin WPCode.
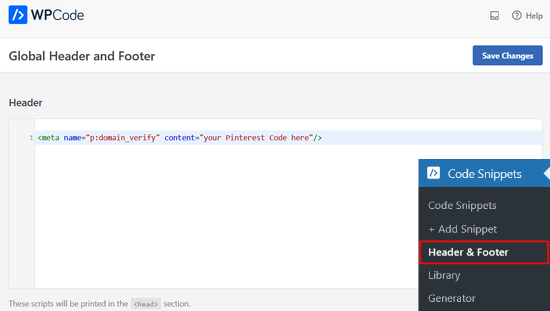
Dopo l’attivazione, è necessario visitare la pagina Code Snippets ” Header & Footer nella propria dashboard di WordPress. Nella sezione ‘Header’, è necessario incollare il tag HTML. Quindi, fare clic sul pulsante “Salva modifiche”.
Una volta aggiunto il codice HTML alla sezione header del sito web, è necessario tornare allo schermo di Pinterest e fare clic sul pulsante “Continua” nel popup.
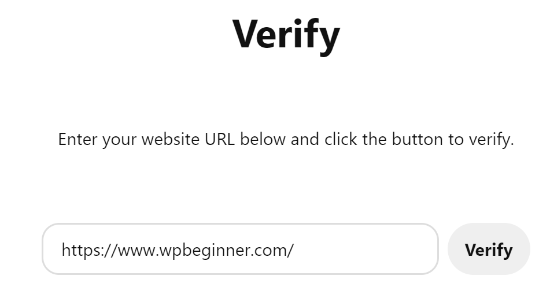
A questo punto vi chiederà di inserire l’URL del vostro sito web e di fare clic sul pulsante “Verifica”.
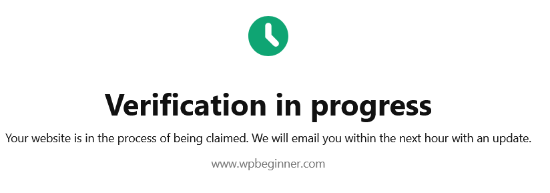
Una volta fatto ciò, verrà visualizzato un messaggio che dice: “Verifica in corso”.
Di norma, il processo richiede 24 ore e si riceve un’e-mail di verifica del sito web.
Ecco fatto! Avete verificato con successo il vostro sito WordPress su Pinterest.
Suggerimento: se Pinterest non riesce a verificare dopo aver aggiunto il codice di verifica, significa che è necessario cancellare la cache di WordPress.
Guide esperte sull’utilizzo di Pinterest in WordPress
Ora che sapete come verificare il vostro sito WordPress su Pinterest, potreste voler vedere altre guide relative all’utilizzo di Pinterest in WordPress:
- Come mostrare gli ultimi pin di Pinterest nei widget della barra laterale di WordPress
- Come nascondere le immagini di Pinterest nei post del blog WordPress
- Come aggiungere il pulsante “Pin It” di Pinterest nel vostro blog WordPress
- L’elenco completo dei social media per WordPress (aggiornato)
- I migliori plugin per i social media per WordPress
Speriamo che questo articolo vi abbia aiutato a capire come verificare il vostro sito WordPress su Pinterest. Potreste anche voler consultare la nostra guida su come creare un modulo di contatto in WordPress o le nostre scelte di esperti sui plugin WordPress indispensabili per il vostro sito web.
Se questo articolo vi è piaciuto, iscrivetevi al nostro canale YouTube per le esercitazioni video su WordPress. Potete trovarci anche su Twitter e Facebook.


Syed Balkhi says
Hey WPBeginner readers,
Did you know you can win exciting prizes by commenting on WPBeginner?
Every month, our top blog commenters will win HUGE rewards, including premium WordPress plugin licenses and cash prizes.
You can get more details about the contest from here.
Start sharing your thoughts below to stand a chance to win!
Marian says
I did as the article mentioned, and it has not worked. Not even after I cleared my cache.
WPBeginner Support says
It would depend on the specific issue you are running into, is it not verifying or are you seeing a different error?
Admin
aga says
Thank you so much!! I’ve been trying to do it for weeks and you made it so simple!
WPBeginner Support says
Glad our guide could help
Admin
Iruoma says
Hey,
Thanks for this info!
I used the AIOSEO and tried going back to my interest to confirm and it says no relevant meta tag was found. Do I have to wait some more to allow for verification?
Thank you.
WPBeginner Support says
You would want to check that you’ve cleared any caching on your site as that is the most common reason for that message after adding the verification to your site.
Admin
Kelly Grace says
I have Wordfence on my WP.org website and it gives me a warning when I try to add the HTML tag I copied from Pinterest. Is it safe to ignore that and proceed?
Taufiq Azad Siam says
Can you please tell me why should I verify my WordPress website on Pinterest?
Please don’t get me wrong. I am a huge fan of this website. I just want to know the benefits.
WPBeginner Support says
We would recommend taking a look at the beginning of our article where we cover what is gained from verifying your site
Admin
Eddie Morgan says
Can I uninstall AIOSEO verifying pininterest
WPBeginner Support says
Once the site is verified you can remove it from your site but AIOSEO is used for much more than only verifying your site on Pinterest.
Admin
Eddie Morgan says
Thank you so much, I followed the steps and got the notification verification in progress. How will I know when the website has been successfully claimed? Is it the email they will send? or what changes will I see on Pinterest to know its been successfully claimed.
WPBeginner Support says
It is normally an email, as we say in the article above
Salma says
Hello!
Thank you for such helpful guides. Your guides are very thorough and helped me through a lot of complications I didn’t think I’d run through while making a blog. So, I just thought I’d thank you for putting in so much work.
WPBeginner Support says
Glad our guides have been helpful
Admin
Laura says
this was SO helpful. thank you for posting!!
WPBeginner Support says
Glad our guide was helpful
Admin
Nesha says
This video was so helpful thank you. I have been trying to do this in multiple ways for a while now and never succeeding. Working with your video I managed it in less than 5 minutes. Thank you for sharing!!
WPBeginner Support says
Glad our guide was helpful
Admin
Chay says
This was a lifesaver!!!! I’ve have been struggling with claiming my website foreverrr. Yoast really is the easiest way and I already had it. Thanks
WPBeginner Support says
Glad our guide was helpful
Admin
Miles says
I’m great at adventures, not so great at websites… You rock thank you would have never gotten this alone
WPBeginner Support says
Glad our guide was helpful
Admin
Ashish Kumar Banchhor says
Thankyou dear,
I was looking for this. thanks a lot
WPBeginner Support says
Glad our guide was helpful
Admin
John says
I was going to add your plugin but it’s saying it’s untested with my version of WordPress 5.5.1. (which is saying I’m running the latest version).
WPBeginner Support says
For that warning, you would want to take a look at our article below:
https://www.wpbeginner.com/opinion/should-you-install-plugins-not-tested-with-your-wordpress-version/
The plugin should still be working and we’ll look into updating the tested number
Admin
John says
Great thanks so much, appreciate your response. Thanks for all your guidance and content, it’s been so helpful as I continue to learn WordPress.
Bryce says
Thanks !!
I have tried to do that many times but never succeeded.
WPBeginner Support says
You’re welcome, glad our guide can help change that
Admin
Tasia says
Your site is super helpful. I’ve come across it many times for answers to questions I’ve googled. Great work!
WPBeginner Support says
Thank you, glad our content is helpful
Admin
Lydia says
I have been trying to figure this out for a week! I should have come to WPBeginners in the first place, duh. The way you showed it in connection with Yoast was so easy, thanks.
WPBeginner Support says
Glad our guide could make it easier for you
Admin
ajumohit says
tq for the guidance. my website claimed within 15 minutes
WPBeginner Support says
Glad our guide was helpful
Admin
Sanaz says
I keep getting “Authorization Failed” after entering my website URL, does anyone know why this is happening?
WPBeginner Support says
It would depend on where you are getting the error but the most likely reason would be if you hadn’t cleared all your caching we would recommend doing that to ensure Pinterest can see the tag properly
Admin
Marlene says
I have claimed my website already and I accidentally deleted my header and footer plugin and now I’ve lost my meta tag for my claimed Pinterest account. I’m using SEO Yeost now. How do I find that meta tag again so I can input that into my SEO Pinterest section?
WPBeginner Support says
Unless you edit the website claim on Pinterest, your site will remain claimed without you needing to include the tag
Admin
Lynn says
I have followed the instructions but it never claims my website and after a couple of days I try again! Could there be another reason?
WPBeginner Support says
You would want to ensure you’ve cleared all of your caching and that you don’t have a coming soon page up preventing Pinterest from seeing your code.
Admin
Emma says
I came across this article when needing more information on getting my Pinterest business account up and running, this was really helpful and easy to follow, thank you very much.
I will be bookmarking your website to return to in the near future as I continue my learning
WPBeginner Support says
Glad our article was helpful
Admin
Lungi says
Thanks you, this was super easy to follow!
WPBeginner Support says
You’re welcome, glad our guide was helpful
Admin