WordPress’te kategori sayfaları için benzersiz şablonlar oluşturmak, içeriği düzenlemenin ve kullanıcı deneyimini iyileştirmenin harika bir yoludur. Bu, özellikle WPBeginner’da yaptığımız gibi çeşitli yazı kategorileriniz varsa yararlıdır.
Özel kategori şablonları, her kategori için içeriğin nasıl görüntüleneceğini uyarlamanıza olanak tanır.
Belirli gönderileri vurgulayabilir, farklı düzenler kullanabilir veya her kategorinin içeriğine uygun benzersiz öğeler ekleyebilirsiniz. Bu, ziyaretçilerin aradıklarını daha kolay bulmalarına yardımcı olur ve daha uzun süre etkileşimde kalmalarını sağlar.
Bu makalede, WordPress’te kategori şablonlarının nasıl oluşturulacağını adım adım göstereceğiz.
Kategori Şablonları Nedir ve WordPress’te Neden Oluşturulur?
WordPress web sitelerinde kategoriler, etiketler, özel yazı türleri ve taksonomiler için farklı şablonlar kullanmak yaygındır.
Kategoriler söz konusu olduğunda, WordPress hepsi için ayrı sayfalar oluşturur. Bunları aşağıdaki gibi bir URL’yi ziyaret ederek görüntüleyebilirsiniz:
https://example.com/category/news/
Artık çoğu popüler WordPress teması, kategori sayfalarını güzel bir şekilde sergilemek için yerleşik şablonlarla birlikte geliyor. Bu şablonlar kategori başlığını vurgular ve altında kategori açıklamasını gösterir.

Bununla birlikte, bazı temalar bunu bu kadar güzel bir şekilde ele almayabilir veya kategori sayfalarınızı özelleştirmek isteyebilirsiniz.
Kategoriler için şablonlar oluşturarak kategori sayfalarına belirli özellikler ekleyebilirsiniz.
Örneğin, kullanıcıların kategorilere abone olmalarına, kategori açıklamalarını göstermelerine, her kategori için farklı bir düzen seçmelerine ve kategori resimleri eklemelerine izin verebilirsiniz.
Kategori Sayfaları için WordPress Şablon Hiyerarşisini Anlama
WordPress, web sitenizin farklı bölümleri için farklı şablonlar oluşturmanıza olanak tanıyan güçlü bir şablonlama sistemine sahiptir.
Herhangi bir sayfayı görüntülerken, WordPress önceden tanımlanmış bir hiyerarşik düzende bir şablon arar.
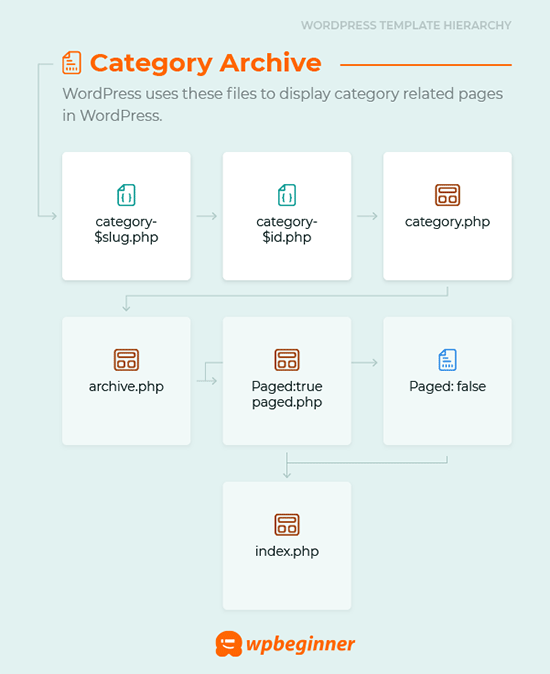
Bir kategori sayfasını görüntülemek için şablonları şu sırayla arar: category-slug.php → category-id.php → category .php → archive .php → index .php.
İlk olarak, WordPress kategori slug’ını kullanarak söz konusu kategoriye özel bir şablon arayacaktır. Örneğin, category-design.php şablonu ‘Tasarım’ kategorisini görüntülemek için kullanılacaktır.
Eğer bir category-slug şablonu bulamazsa, WordPress category-6.php gibi kategori kimliğine sahip bir şablon arayacaktır. Bundan sonra, genellikle category.php olan genel kategori şablonunu arayacaktır.
Eğer genel bir kategori şablonu yoksa, WordPress archive.php gibi genel bir arşiv şablonu arayacaktır. Son olarak, kategoriyi görüntülemek için index.php şablonunu kullanacaktır.
İşte WordPress şablon hiyerarşileri kılavuzumuz.
Bunu akılda tutarak, WordPress’te kategori şablonlarının nasıl oluşturulacağına ilişkin adımları paylaşacağız. Tercih ettiğiniz yönteme geçmek için aşağıdaki hızlı bağlantıları kullanabilirsiniz:
- Creating a Category Template Using Full-Site Editing (No Plugin)
- Creating a Category Template Using Thrive Themes (Recommended)
- Creating a Category Template Using Beaver Themer (Easy)
- Creating a Category Template for Your Theme in WordPress (Advanced)
- Bonus Tip: Building a Membership Site to Restrict Content Based on Categories
Hazır mısınız? Hadi başlayalım.
Yöntem 1: Tam Site Düzenlemesini Kullanarak Kategori Şablonu Oluşturma
Bir kategori şablonu oluşturmanın en basit yolu Tam Site Düzenleme (FSE) aracını kullanmaktır. Bu yöntemle herhangi bir eklenti yüklemeniz gerekmez. Ancak, FSE işlevselliğinin yalnızca WordPress blok temaları için kullanılabilir olduğunu unutmayın.
Bu eğitim için Twenty Twenty-Three temasını kullanacağız.
Öyleyse, web sitenize yükleyelim ve etkinleştirelim. Yardıma ihtiyacınız varsa, WordPress temasının nasıl kurulacağına ilişkin kılavuzumuza bakabilirsiniz.
Etkinleştirmenin ardından Görünüm ” Düzenleyici bölümüne gitmeniz gerekir.
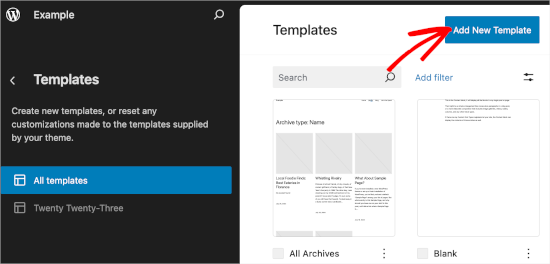
Bir kategori şablonu oluşturmak için ‘Şablonlar’ menü öğesine ve ardından ‘Yeni Şablon Ekle’ düğmesine tıklayalım.
Bir sonraki ekranda, şablon oluşturmak için farklı seçenekler göreceksiniz.
Bir kategori şablonu oluşturacağımız için ‘Kategori Arşivleri’ni seçelim. Üzerine tıkladığınızda başka bir bilgi istemi penceresi göreceksiniz.
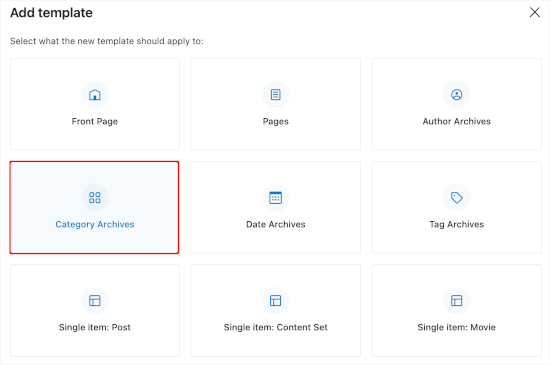
Burada, özel şablonu tüm kategoriler için mi yoksa belirli bir kategori için mi kullanmak istediğinize karar vermeniz gerekir.
Bu eğitim için ‘Kategori’ seçeneğini kullanacağız.

Bir sonraki adım, WordPress web sitenizden mevcut bir kategori seçmektir.
Listeden istediğiniz kategoriye tıklamanız yeterlidir.

Bu işlem tamamlandığında, yeni kategori şablonunuz için bir desen seçmeye yönlendirileceksiniz.
Üzerine tıkladığınızda blok düzenleyici açılacaktır.
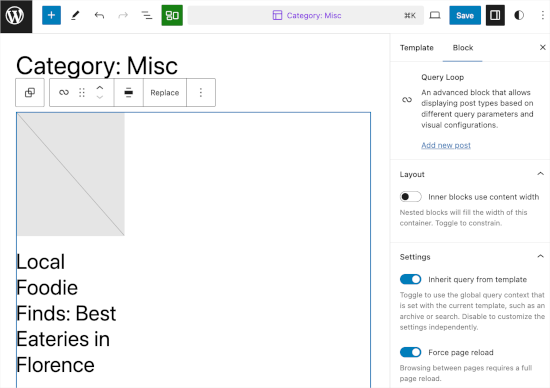
Buradan kategori şablonunuzu özelleştirebilirsiniz. Nasıl göründüğünden memnun olduğunuzda, değişikliklerinizi canlı hale getirmek için ‘Kaydet’e tıklamanız yeterlidir.
Yöntem 2: Thrive Theme Builder Kullanarak Kategori Şablonu Oluşturma
Daha fazla özelleştirme seçeneğine sahip olmak istiyorsanız, bu yöntem tam size göre.
Thrive Theme Builder, Thrive Themes markasının bir parçasıdır. WordPress kategorileriniz için özel şablonlar oluşturmak için en iyi araçlardan biridir.

Bu aracı kullanmak için önce bir Thrive hesabı oluşturmanız gerekir. Web sitesine gidin ve ‘Thrive Suite Al’ düğmesine tıklayın.
Aracı satın aldıktan sonra devam edin ve Thrive Product Manager’ı indirin. Tüm Thrive ürünleri kontrol panelinde mevcut olacaktır.
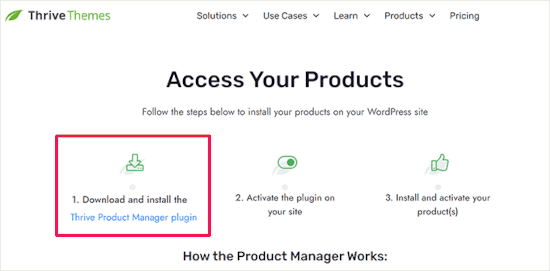
Ardından WordPress yönetici alanınıza geri dönebilir ve Eklentiler ” Yeni Eklenti Ekle’ye gidebilirsiniz. Burada Thrive Product Manager eklentisinin .zip dosyasını yükleyeceksiniz.
Yardıma ihtiyacınız varsa, bir WordPress eklentisinin nasıl kurulacağına ilişkin kılavuzumuza bakabilirsiniz.
Bundan sonra, ‘Ürün Yöneticisi’ne gitmek isteyeceksiniz. Buradan, Thrive Theme Builder’ı bulmak için sayfayı aşağı kaydırabilirsiniz.
‘Temayı Yükle’ seçeneğinin yanındaki kutuyu işaretlemek ve ardından ‘Seçili Ürünü Yükle’ düğmesine tıklamak isteyeceksiniz.
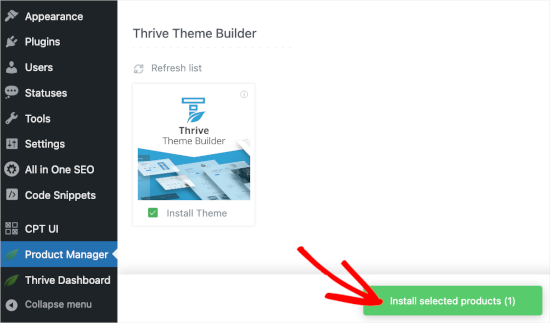
Ürün Yöneticisi kurulumu tamamladığında, devam edin ve ‘Seçili ürünü etkinleştir’e tıklayın. Ardından, bir kategori şablonu oluşturmaya başlamak için ‘Tema Oluşturucu Panosuna Git’ seçeneğine tıklayabilirsiniz.
Oluşturucuda yapmanız gereken ilk şey bir tema seçmektir. Bir temanın üzerine gelin ve kullanmak için ‘Seç’e tıklayın.
Bu eğitim için ‘Shapeshift’ kullanacağız.
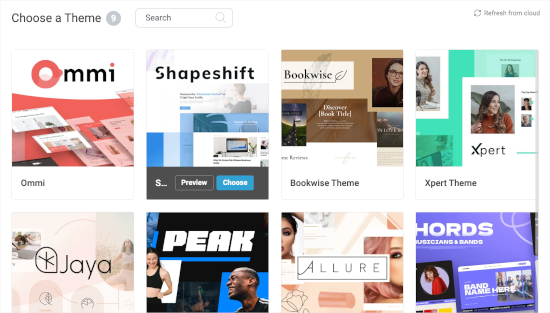
Daha sonra tema oluşturucuya yönlendirileceksiniz.
Buradan ‘Şablonlar’ menüsüne gidelim. Ardından ‘Yeni Ekle’ butonuna tıklayabilirsiniz.
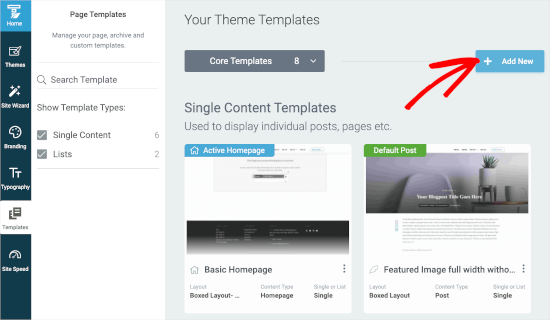
Bu bir açılır pencere açacaktır.
Buradan yeni bir liste şablonu oluşturacaksınız. Şablonu adlandırarak başlayabilirsiniz, örneğin ‘Kategori Şablonu’.
Ardından, “Tek mi Liste mi?” alanında “Liste “yi seçebilirsiniz. Bu, aşağıdaki alanlarda sırasıyla ‘Arşiv’ ve ‘Kategoriler’i seçmenizi sağlayacaktır.
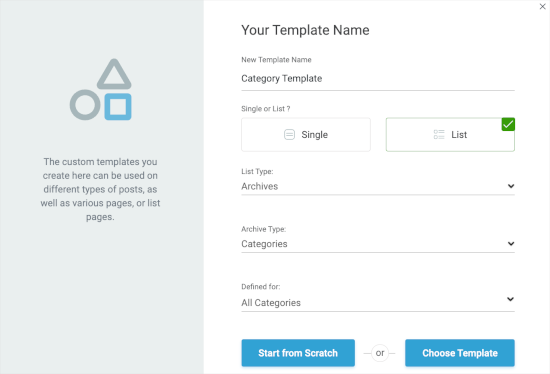
Bundan sonra, ‘Defined for’ alanında ‘All Categories’ seçeneğini seçelim. Ardından, hızlı bir şekilde kategori şablonu oluşturmak için ‘Şablon Seç’e tıklayabilirsiniz.
Yeni açılır pencerede bir şablon seçmeniz gerekecektir. Seçmek için tıklamanız ve ardından belirdiğinde ‘Şablon Oluştur’ düğmesine tıklamanız yeterlidir.
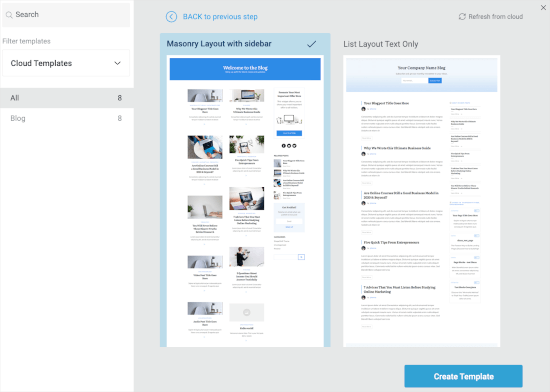
Bir sonraki ekranda yeni kategori listesini oluşturduğunuzu göreceksiniz.
Özelleştirmeye başlamak için üzerine gelin ve ‘Düzenle’ düğmesine tıklayın.
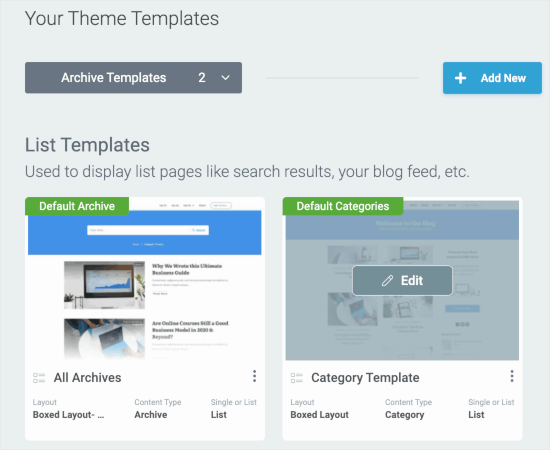
Bu, oluşturucuyu yeni bir sekmede açacaktır.
Buradan, kategori şablonunu vizyonunuza uyacak şekilde özelleştirmekten çekinmeyin. İşiniz bittiğinde, sol alt köşedeki ‘Çalışmayı Kaydet’ düğmesine tıklayabilirsiniz.
Yöntem 3: Beaver Themer Kullanarak Kategori Şablonu Oluşturma
Bir başka yeni başlayan dostu çözüm için Beaver Themer, temanız için düzenler oluşturmanıza olanak tanır. Şablonu kullanmak istediğiniz kategorileri tek tek seçebilir ve ardından sürükle-bırak aracını kullanarak düzenleyebilirsiniz.
Öncelikle Beaver Builder‘ı yüklemeniz ve etkinleştirmeniz gerekir. Yardıma ihtiyacınız varsa, bir WordPress web sitesinin nasıl kurulacağına ilişkin kılavuzumuza bakın.
Etkinleştirdikten sonra lisans anahtarınızı doğrulamanız gerekecektir.
Basitçe Ayarlar ” Beaver Builder “ Lisans bölümüne gidin. Ardından, metin kutusuna lisans anahtarınızı girin ve ‘Lisans Anahtarını Kaydet’e tıklayın.
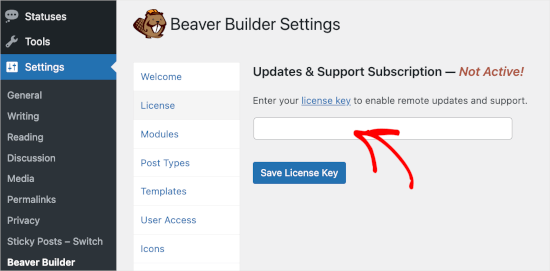
Anahtarı Beaver Builder hesabınızda bulabilirsiniz.
Bunu yaptıktan sonra, Beaver Builder ” Themer Layouts ” Add New bölümüne gitmek isteyeceksiniz.
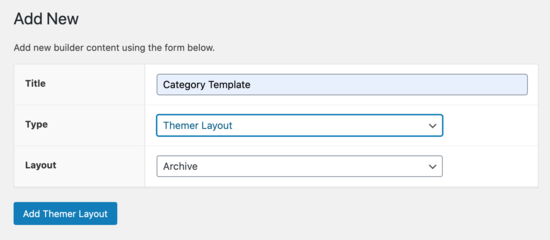
Buradan itibaren, bir başlık vermeniz gerekecektir.
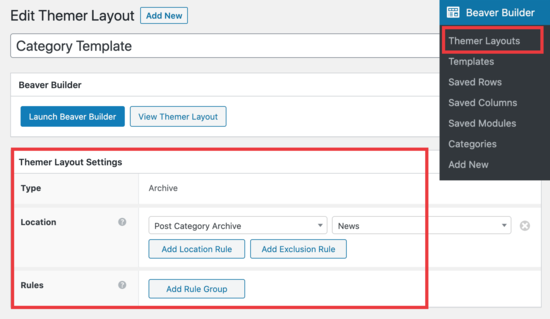
Ardından, ‘Konum’ seçeneği altından kategorinizi seçmeniz yeterlidir.
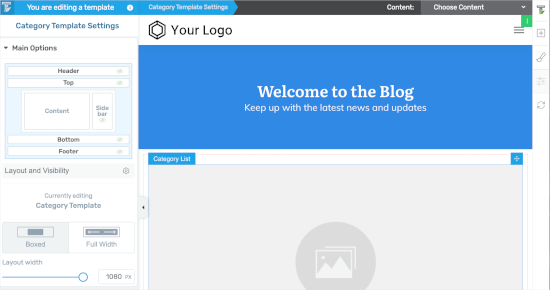
Daha sonra kategori düzeni sayfanızı istediğiniz gibi özelleştirmek için Beaver Builder’ın sürükle ve bırak düzenleyicisini kullanabileceksiniz.
Beaver Themer, kategori düzeni sayfanızı tasarlamak için kullanabileceğiniz ve hareket ettirebileceğiniz çok sayıda modül sağlar.
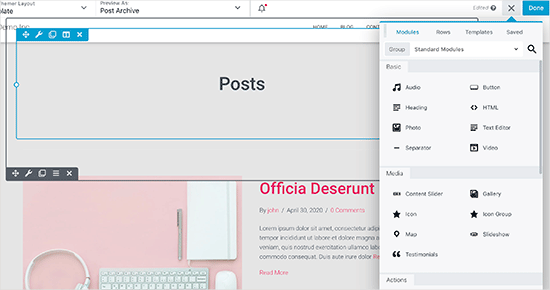
İşiniz bittiğinde, ‘Bitti’ düğmesine tıklayın ve ardından kategori şablonunuzu uygulamak için ‘Yayınla’yı seçin.
Artık kategori şablonunu çalışırken görmek için WordPress web sitenizi ziyaret edebilirsiniz.
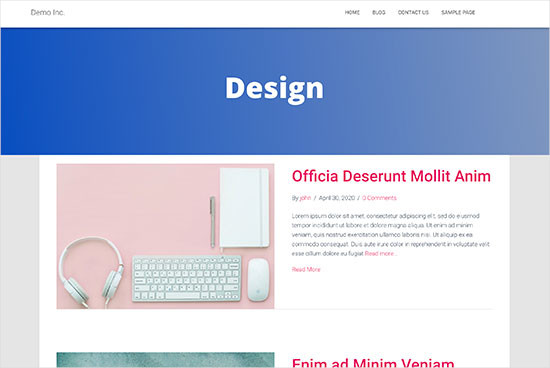
Yöntem 4: WordPress’te Temanız için Kategori Şablonu Oluşturma
Başlamadan önce tipik bir category.php şablonuna göz atalım:
<?php
/**
* A Simple Category Template
*/

get_header(); ?>

<section id="primary" class="site-content">
<div id="content" role="main">

<?php
// Check if there are any posts to display
if ( have_posts() ) : ?>

<header class="archive-header">
<h1 class="archive-title">Category: <?php single_cat_title( '', false ); ?></h1>

<?php
// Display optional category description
 if ( category_description() ) : ?>
<div class="archive-meta"><?php echo category_description(); ?></div>
<?php endif; ?>
</header>

<?php

// The Loop
while ( have_posts() ) : the_post(); ?>
<h2><a href="<?php the_permalink() ?>" rel="bookmark" title="Permanent Link to <?php the_title_attribute(); ?>"><?php the_title(); ?></a></h2>
<small><?php the_time('F jS, Y') ?> by <?php the_author_posts_link() ?></small>

<div class="entry">
<?php the_content(); ?>

 <p class="postmetadata"><?php
  comments_popup_link( 'No comments yet', '1 comment', '% comments', 'comments-link', 'Comments closed');
?></p>
</div>

<?php endwhile;

else: ?>
<p>Sorry, no posts matched your criteria.</p>

<?php endif; ?>
</div>
</section>

<?php get_sidebar(); ?>
<?php get_footer(); ?>
Şimdi ‘Tasarım’ adında bir kategoriniz olduğunu ve bu kategoriyi diğerlerinden farklı bir şekilde görüntülemek istediğinizi varsayalım.
Bunu yapmak için, söz konusu kategori için bir şablon oluşturmanız gerekir. Görünüm ” Tema Düzenleyici‘ye gidin.
Sağ tarafınızdaki tema dosyaları listesinden category.phpdosyasına tıklayın. category.php dosyanız yoksa archive.php dosyasına bakın.
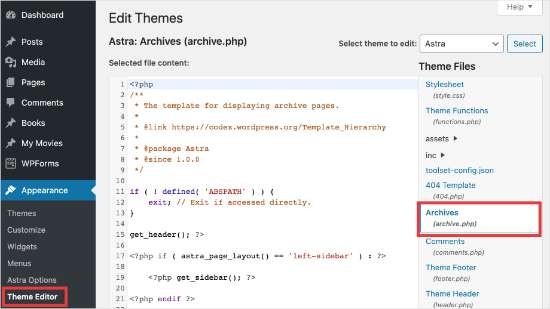
Bu şablonlardan herhangi birini bulamıyorsanız, bir WordPress Tema Çerçevesi kullanıyor olma ihtimaliniz yüksektir ve bu eğitim sizin için yararlı olmayabilir. Kullandığınız özel çerçeveye başvurmanızı öneririz.
Yukarıdaki dosyaları bulursanız, category.php ‘nin tüm içeriğini kopyalayın ve Not Defteri gibi bir metin düzenleyicisine yapıştırın. Bu dosyayı category-design.php olarak kaydedin.
Daha sonra bir FTP istemcisi kullanarak WordPress hostinginize bağlanmanız ve ardından /wp-content/themes/your-current-theme/ adresine gidip category-design.php dosyanızı tema dizininize yüklemeniz gerekir.
Artık bu şablonda yaptığınız tüm değişiklikler yalnızca bu kategorinin arşiv sayfasında görünecektir.
Bu tekniği kullanarak istediğiniz kadar kategori için şablon oluşturabilirsiniz. Dosya adı olarak category-{category-slug}.php kullanmanız yeterlidir. WordPress yönetici alanındaki kategoriler bölümünü ziyaret ederek kategori slug’larını bulabilirsiniz.
Aşağıda bir category-slug.php şablonu örneği bulunmaktadır. Lütfen category.php ile aynı şablonu birkaç değişiklikle kullandığımıza dikkat edin.
Kullanılacağı kategoriyi zaten bildiğimiz için, başlığı, açıklamayı veya diğer ayrıntıları manuel olarak ekleyebiliriz. Ayrıca, < ?php the_content(); ?> yerine <?php the _excerpt (); ?> kullandığımıza dikkat edin .
<?php
/**
* A Simple Category Template
*/

get_header(); ?>

<section id="primary" class="site-content">
<div id="content" role="main">
<?php
// Check if there are any posts to display
if ( have_posts() ) : ?>

<header class="archive-header">
<?php
// Since this template will only be used for Design category
// we can add category title and description manually.
// or even add images or change the layout
?>

<h1 class="archive-title">Design Articles</h1>
<div class="archive-meta">
Articles and tutorials about design and the web.
</div>
</header>

<?php

// The Loop
while ( have_posts() ) : the_post();
<h2><a href="<?php the_permalink() ?>" rel="bookmark" title="Permanent Link to <?php the_title_attribute(); ?>"><?php the_title(); ?></a></h2>
<small><?php the_time('F jS, Y') ?> by <?php the_author_posts_link() ?></small>

<div class="entry">
<?php the_excerpt(); ?>

 <p class="postmetadata"><?php
  comments_popup_link( 'No comments yet', '1 comment', '% comments', 'comments-link', 'Comments closed');
?></p>
</div>

<?php endwhile; // End Loop

else: ?>
<p>Sorry, no posts matched your criteria.</p>
<?php endif; ?>
</div>
</section>

<?php get_sidebar(); ?>
<?php get_footer(); ?>
category-slug şablonunu kullanmak istemiyorsanız, belirli bir kategori kimliğine yönelik bir şablon oluşturmak için category-id şablonunu kullanabilirsiniz. WordPress’te bir kategori kimliğini nasıl bulacağınız aşağıda açıklanmıştır.
Kategori için Koşullu Etiketleri Kullanma
Temanız için şablon oluştururken, yapmak istediğiniz şeyi yapmak için gerçekten ayrı bir şablona ihtiyacınız olup olmadığını belirlemeniz gerekir.
Bazı durumlarda, yapmak istediğiniz değişiklikler çok karmaşık değildir ve category.php veya hatta archive.php gibi genel bir şablon içindeki koşullu etiketler kullanılarak gerçekleştirilebilir.
WordPress, tema yazarlarının şablonlarında kullanabileceği birçok koşullu etiket desteği ile birlikte gelir.
Koşullu etiketlere bir örnek is_category()‘dir. Bu koşullu etiketi kullanarak, koşul eşleştiğinde farklı çıktı görüntülemek için şablonlarınızı değiştirebilirsiniz.
Örneğin, öne çıkan gönderiler için ‘Öne Çıkanlar’ adında bir kategoriniz olduğunu varsayalım.
Şimdi, bu belirli kategori için kategori arşivi sayfasında bazı ekstra bilgiler göstermek isteyeceksiniz. Bunu yapmak için, bu kodu category.php dosyasına <?php if ( have_posts() ) : ?>'dan hemen sonra ekleyin .
<header class="archive-header">

<?php if(is_category( 'Featured' )) : ?>
	<h1 class="archive-title">Featured Articles:</h1>
<?php  else: ?>
	<h1 class="archive-title">Category Archive: <?php single_cat_title(); ?> </h1>
<?php endif; ?>

</header>
Bonus İpucu: Kategorilere Göre İçeriği Kısıtlamak için Üyelik Sitesi Oluşturma
Üyelik sitesi, yalnızca üyelerin özel içerik, ürün veya hizmetleri görebildiği bir web sitesidir.
Üyeler genellikle premium kaynaklara erişmek için aylık, yıllık veya başka bir ücret öderler. Bunlar kurslar, makaleler, videolar veya üye olmayanların göremeyeceği diğer değerli kaynaklar gibi şeyler olabilir.
Elbette, bir üyelik sitesinin amacı, hedef kitlenize harika, özel içerikler sunarken düzenli bir gelir elde etmektir.
Artık, farklı üyelik planlarında hangi içeriğin kullanılabileceğini yönetmek için MemberPress ‘teki ‘Kurallar’ özelliğini kullanabilirsiniz. İçeriği kategorilere göre kısıtlamak da dahil olmak üzere çeşitli koşullar seçebilir ve bunları üyelik planlarına bağlayabilirsiniz.
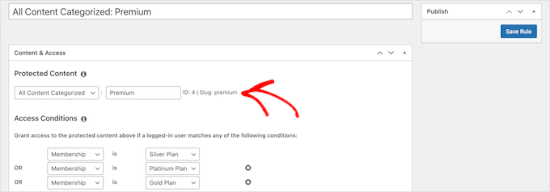
Daha fazla ayrıntı için, kategorilere göre içeriği kısıtlayabilmeniz için bir üyelik sitesinin nasıl oluşturulacağına ilişkin kılavuzumuza bakabilirsiniz.
Umarız bu makale WordPress’te kategori şablonlarının nasıl oluşturulacağını öğrenmenize yardımcı olmuştur. Daha sonra, kategori tabanı önekinin nasıl değiştirileceği ve WordPress yazı döngüsünde yalnızca üst kategorinin nasıl görüntüleneceği hakkındaki kılavuzlarımızı da görmek isteyebilirsiniz.
If you liked this article, then please subscribe to our YouTube Channel for WordPress video tutorials. You can also find us on Twitter and Facebook.


Gwyneth Llewelyn
I just wanted to thank you — not only for the clarity of the explanations, but, most importantly, for restricting your code to the essential, while keeping all typical WordPress conventions (in terms of styling) as they were originally coded (even if they have, today, a ‘retro’ style of coding!).
This simplifies, for beginners and forgetful experienced programmers alike, to fully integrate a category page on a theme that doesn’t support them; because even though every theme does it slightly differently, there is enough common ground for a simple template to do its job while delegating more complex functionalities to theme-specific functions. That is, at least, the case with well-written themes, of course.
Thanks again!
WPBeginner Support
You’re welcome, glad you found our guide and writing style helpful!
Admin
Ashlesha Shirsath
Very useful, Nice Tutorial !!
Thank You
WPBeginner Support
Glad our guide was helpful!
Admin
Muhammad Zeeshan
I want to create the same custom page for all categories but I don’t want to create it one by one. If I add a new category in the future, I want the same template for the new category as for the old one. How can I get this?
Alexandro Giles
You only need to create 1 category.php template, this category template will be used in any category archive that you create.
Daniel
Hi – Its a very helpful tutorial but I am trying to show a specific category and its sub categories on a page – How do i do that ?
WPBeginner Support
You would want to take a look at our guide below on this:
https://www.wpbeginner.com/wp-tutorials/display-subcategories-on-category-pages-in-wordpress/
Admin
Mike Clegg
This is incredibly helpful! Thanks so much!
WPBeginner Support
You’re welcome
Admin
shilpi pandey
Thanks a lot, You saved my time.
Barbara
I’m putting my question here because it’s the closest topic to what I am looking for. My church is going to put out a newsletter using Constant Contact. Our current newsletter has both short items and longer articles. I want to use short excerpts of the longer articles in the newsletter with a link to the article online. To that end, I have created a category-newsletter and using a plugin Unique Headers have changed the header image. I want now to suppress the H1 in the header, but since the header is called from the post page, the only way I can think of to obtain the result that I want is to do a custom page/post in which I don’t call header.php but include the contents of header.php in my custom post page. I might even want to do a custom footer.
How do I do that without causing an error?
Steven Denger
This is a knowledgable tutorial for making templates – if you are an advanced user of code. This is what I see too much here- an explanation for the advanced users or developers but is of little to no value to beginners. I thought that this was WP BEGINNER – this is hardly a beginners tutorial and was of no help to me what-so-ever.
Daniel
Hello, great tutorial. I really want to add a limit of 5 posts per page and have page numbering. Can someone help me with the code?
Chris Smith
Thank you so much for writing this article – I was trying so hard to find where the categories were stored for my personal blog site. I had been through every php I could find and searched relentlessly for categories in my FTP/ control panel. Although the advice given here basically said it couldn’t help and i wouldn’t find it useful, it did encourage me to look at the content.php which was in the ‘framework’ directory of the theme. If anyone else is using the free version of the plum theme and wants to know how to do this in ftp, I hope this comment is useful!
Richard Lowe
My theme came without a template for categories, tags, etc. So this article is perfect since I want them.
Question: Would it be best to do this in a child theme so custom changes are not lost if and when the theme is updated?
Borislav
For Custom Single Post page templates by category one could make a separated folder called “single” and then put inside all single templates like single-category-slug.php. + the general single.php. There was also necessary to add some code in functions.php. Can you do the same technique for Category page templates, like put all category-slug.php + the general category.php in a map called “category” ? I wonder that just to have a better file oragization istead of having all category-slug.php among all other theme php files like header.php footer.php index.php etc.
rami mike
Thanks… that’s very useful. What if i want an archive page that display all the posts from 3 of my 5 categories….
How can i do that ?
WPBeginner Support
Hi Rami,
You can create a custom archive page and then write a custom WP Query or use Display Posts Shortcode plugin.
Admin
Bruno Silva
Very useful, saved my day!
Amit Moral
how to develop many category template with different-different layout
Mark
Nice tutorial, I really appreciate the huge investment in wordpress tutorial and also in OptinMonster. But I will like to point out something in the tutorial: In the category template, you forget to echo the single_cat_title( ”, false );
It should be:
Category:
Thanks
Dan
When I use this template, I get the max set number of posts in the Dashboard, which is 10 posts only. When I select a category I want all of the posts for that category, not only the most recent 10. I tried adding query_posts(‘posts_per_page=50’); at the beginning of the Loop, but when I do that then posts from a different category are appearing in my selection. Any ideas?
Dnil
Hi, I have category.php file on my theme. But whenever I view it, it shows only the title and a brief summary of the post. I want to have image of the post instead of text appear below the blog title. Please help me sir. I can’t find a better solution. I’m a newbie at wordpress Thank you
Dnil
Hi,
I’m getting real problem on how can I add “Image” in the category page instead of “text”? Please is anyone can help me here?
Here’s my category.php
Thanks in advance. Please email me on how to fix this stuff.
WPBeginner Support
Add this code where you want to display featured image.
1-click Use in WordPress
You may also want to checkout our guide on how to add featured image or post thumbnail in WordPress.
Admin
SevenT
Thank you for this helpful post. But when i try a first one code. It make error.
Parse error: syntax error, unexpected ‘<' in \category.php on line 22
And the second one is same error on line 31
What happen? I have checked it.
DJ
I realize I’m a little late but hopefully it’ll help someone. Line 21 and 29 are missing closing tags ?> which causes an error on the following line:
21 if ( category_description() ) : ?>
29 while ( have_posts() ) : the_post(); ?>
WPBeginner Support
Thank you for notifying us. We have fixed the code.
Admin
Kasper
Hi,
just add ?> after while ( have_posts() ) : the_post(); on line 30
Lisa
I am using Divi 2.1.4. I do not see any archive or category php. Can I use the index.php as the base and modify from there for a custom category page?
JAspen
How would I have all my category page templates display on one page? I have 3 different category templates and look great on each single category page, but need them to display all together on one page.
WPBeginner Staff
Thank you for notifying us. We fixed the code.
Desiana Miranti
Thank you so much, this blog is extremely useful!
Bruce Bates
I solved my problem with your example code. You didn’t close the while loop on line 29 ?>
29 while ( have_posts() ) : the_post();
Muddasir
kindly have a look on line 41 you will see while loop closed.
Brian Bambl
No, it’s not closed on line 40.
Bruce Bates
I am trying to create a theme (first time) and I am stuck on the category template. Have things changed as of wordpress 3.9? I literally copied and pasted the code you have here (removing the line numbers), saved the file, and tested it out and I get a fully blank page. Not even an opening html tag is happening when viewing outputted source.
Andy
Yes man same problem – copy and paste – blank page – no hidden html whatsoever
Deepa Govind
Hi,
I am developing a child theme, and want to show a specific image alongside the category description — @ Category Archives page.
ie, If category = Poetry, SHOW + description + post list
if category = cooking, SHOW + description + post list
if category = tutrial, SHOW + description + post list
I know that we can put the IF-Condition in the category.php’s >> Archive header
But, my list is pretty long — almost 20 categories
and I donot want to clutter the actual category.php file
Is it possible to write a custom function (in myfunc.php)
and make a call at the category.php??
Thank you
Deepa Govind
This is wierd, some of my text in the comment is missing
so here it is again
ie, If category = Poetry, SHOW QUILL IMAGE+ description + post list
if category = cooking, SHOW CHEF IMAGE+ description + post list
if category = tutrial, SHOW TEACHER IMAGE+ description + post list
WPBeginner Support
Deepa, yes you can create a function that checks for all categories in functions.php and then call it in your category.php file.
Admin
Lars
Hey! I have trouble with the theme I am developing. I want to show only one category pr. page, but when all posts for all categories shows up on all the pages. How can I show just one category pr. page without having to make a specific page for each page specifying the name of the category?
WPBeginner Support
You can use conditional tags in WordPress, or simply add your categories in the navigation menu.
Admin
Muhammed Ashique Kuthini
Can i get a function like showposts in this loop ? I am designer and recently came with development. I need to show the most recent post of the selected category in a different style.
WPBeginner Support
Here is how to display recent posts from a category in WordPress.
Admin
Cath
This seems straightforward but I’m having problems. I’m creating a child theme from a parent theme. The parent theme has an archive.php file only. In my child folder I want the archive.php for my Archives widget and for my Category widget, I want a category.php file. I’ve copied the archive.php code into a blank php file and saved it as category.php. The archive.php still defaults for both. Am I missing something? Thank you.
WPBeginner Support
Nope you are not missing anything. category.php should take over when ever a user is browsing a category page. This could happen for a number of reasons. For example WordPress may not be able to identify category.php file. Can you open category.php file in Appearance » Editor. Double check that you have not accidentally saved category.php as category.php.txt. Also check out our guide on creating child themes to make sure that you have created a child theme correctly.
Admin
Cath
Hi. I am able to open category.php with the Appearance>Editor. Does the category.php file need to be added somewhere? Thank you.
WPBeginner Support
It should be in your theme or child theme.
Cath
Hi. I am able to open category.php with the Appearance>Editor. The file is saved in my child theme with the rest of my files that are working on my site. Do I need to add it to the functions.php file in order for WordPress to use category.php instead of archive.php?
Saravana
Thanks a lot, You saved my time.
Lex
Thanks for your great article. Very helpful.
I have a custom post type – ”video”, and a custom taxonomy – “video_categories” What would be the best way display them? I need a “home” for all videos, and a page that lists videos from a category.
archive-videos.php – “home” listing page for all videos of all categories
taxonomy-video_categories.php – a category listing page
This is what I am thinking about. I feel there should be a better way. At the moment these two files have exactly the same code which is duplication.
Thanks in advance for sharing your experience
Ryan
Nice tutorial.
Amit Kumar
I liked the Idea of creating different designs for each category page. Can you please tell me how can I achieve a particular design for post under one specific category?
For eg. All the post under category “Design” will have a particular design format and background etc.
I would be glad to have any link which can provide any hint related to this.
Editorial Staff
You would have to use conditional statement in your single.php file.
Admin
Mark Roth
I’ve been wanting to do this for quite a while. It’s not that I don’t know how to do it, it’s that I keep forgetting…and being distracted by more important projects. Your post is a great reminder…and will be a handy reference point. I’ve added it to my bookmarks. Thanks!