Volete installare e configurare W3 Total Cache sul vostro sito WordPress?
W3 Total Cache è un popolare plugin di caching per WordPress che aiuta a migliorare la velocità e le prestazioni del sito web. I plugin di caching possono aiutare a fidelizzare gli utenti e a ridurre la frequenza di rimbalzo, favorendo la SEO e aumentando le conversioni.
In questa guida per principianti, vi mostreremo come installare e configurare facilmente W3 Total Cache sul vostro sito web WordPress.
Nota dell’editore: non utilizziamo più W3 Total Cache sul nostro sito web e siamo passati a WP Rocket, un plugin premium per la cache. W3 Total Cache è comunque una buona soluzione che funziona bene.
Che cos’è W3 Total Cache?
W3 Total Cache è uno dei migliori plugin per la cache di WordPress che consente di migliorare facilmente le prestazioni e la velocità di WordPress.
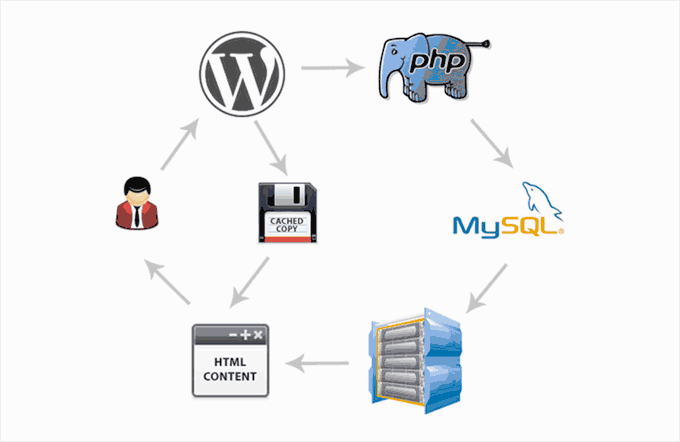
Per impostazione predefinita, WordPress utilizza PHP per generare dinamicamente ogni pagina del sito web quando viene richiesta da un utente.
PHP è un linguaggio di programmazione lato server. Ciò significa che ogni richiesta dell’utente aumenta il carico sul server. Ciò influisce sulle prestazioni del sito web, sull’esperienza dell’utente e sulla SEO.
I plugin di caching di WordPress aiutano a ridurre questo problema saltando il PHP e servendo una copia in cache della pagina web.
Inoltre, consente di collegare facilmente il sito web a una CDN (content delivery network) per migliorare ulteriormente le prestazioni del sito.
Installazione di W3 Total Cache in WordPress
Prima di installare il plugin W3 Total Cache in WordPress, è necessario assicurarsi di aver disattivato qualsiasi altro plugin di caching sul proprio sito web. Questo vi aiuterà a risparmiare risorse del server e a prevenire eventuali conflitti tra i plugin.
Dopodiché, si può procedere all’installazione e all’attivazione del plugin W3 Total Cache. Per maggiori dettagli, consultate la nostra guida passo-passo su come installare un plugin di WordPress.
Dopo l’attivazione, W3 Total Cache aggiungerà alla barra laterale dell’amministrazione di WordPress una nuova voce di menu denominata Performance. Facendo clic su di essa si avvierà la procedura guidata di configurazione del plugin.
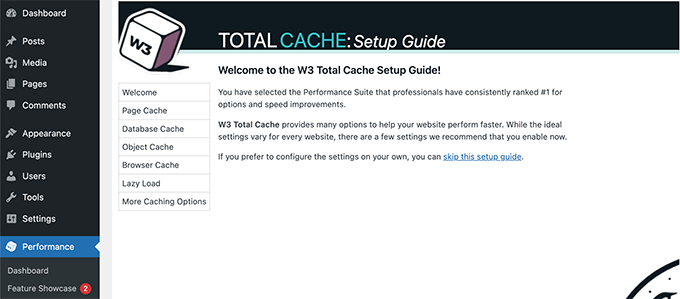
È sufficiente fare clic sul pulsante Avanti per continuare.
Per prima cosa, vi verrà chiesto di attivare la Cache di pagina. Fare clic sul pulsante Test Page Cache per continuare.
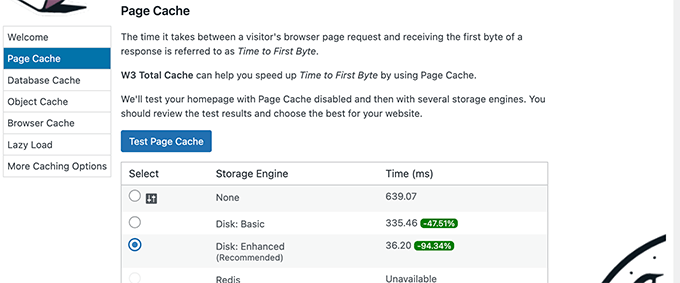
W3 Total Cache mostra diverse opzioni di motore di memorizzazione. È necessario scegliere quella che consente di risparmiare più tempo. Di solito, si tratta dell’opzione “Disk: Enhanced” per la maggior parte delle piattaforme di hosting condiviso.
Fare clic sul pulsante Avanti per continuare.
A questo punto, si potrà scegliere di testare la cache del database. Si consiglia di scegliere Nessuno. Per la maggior parte dei siti web di piccole e medie dimensioni, il server MySQL sarà in grado di recuperare i dati più rapidamente della cache del database.
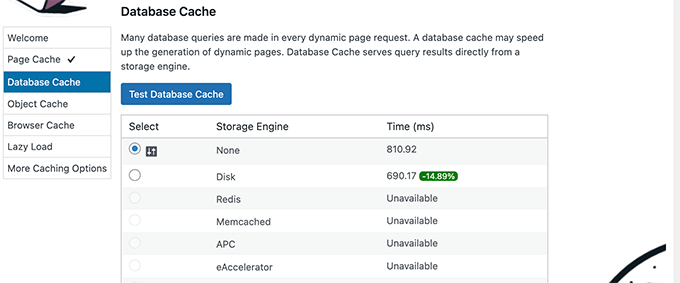
Fare clic sul pulsante Avanti per passare alla fase successiva.
Si accede così alla sezione Object Cache. La cache a oggetti consente a W3 Total Cache di memorizzare le query del database per le pagine dinamiche e di riutilizzarle per migliorare le prestazioni.
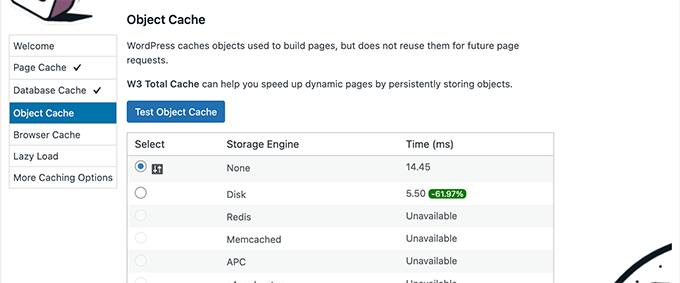
Se il risultato del test mostra una differenza di pochi millisecondi, si può scegliere Nessuno.
Fare clic sul pulsante successivo per continuare.
Quindi, fare clic sul pulsante Test della cache del browser e selezionare l’opzione “Abilitato” sotto i risultati del test.
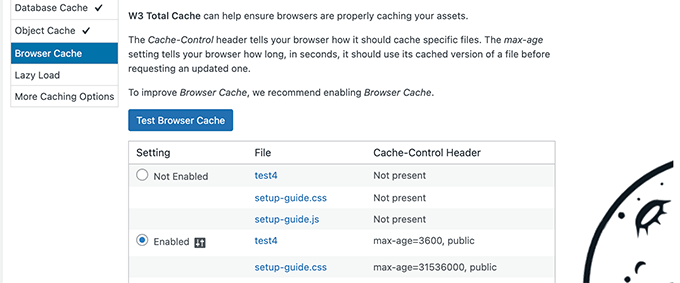
Questa opzione richiede al browser dell’utente di memorizzare una copia della pagina web per un periodo di tempo limitato. Il caricamento di una pagina dalla cache del browser è molto più veloce rispetto al caricamento dalla cache del server web.
Fare clic sul pulsante successivo per passare alla fase successiva.
Infine, la procedura guidata vi chiederà di abilitare il caricamento pigro delle immagini.
Ora, WordPress è dotato di un caricamento pigro incorporato per le immagini. Tuttavia, alcuni vecchi browser potrebbero non supportare questa funzione.
W3 Total Cache utilizza JavaScript per aggiungere il caricamento pigro delle immagini, che può essere ancora più veloce ed efficiente.
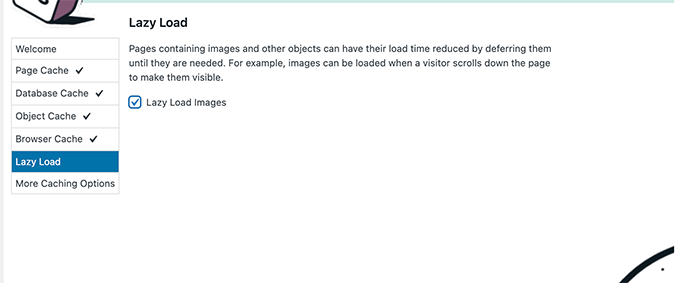
Dopodiché, fare clic sul pulsante Avanti per terminare l’installazione guidata e visualizzare la dashboard di W3 Total Cache.
Opzioni avanzate di caching in W3 Total Cache
Le impostazioni di base sono adatte alla maggior parte dei siti web. Tuttavia, ci sono molte opzioni avanzate che si possono configurare per migliorare ulteriormente le prestazioni.
Vediamo i più importanti.
Minimizzazione di JavaScript e CSS in W3 Total Cache
Il termine “minificare” è usato per descrivere un metodo che riduce le dimensioni dei file del sito web. Ciò avviene rimuovendo gli spazi bianchi, le linee e i caratteri non necessari dal codice sorgente.
Nota: la minimizzazione dei file JS e CSS può potenzialmente danneggiare il sito web. Se la attivate e il vostro sito non ha un aspetto corretto, disabilitate semplicemente queste opzioni.
W3 Total Cache consente di minificare facilmente anche il codice sorgente JavaScript, CSS e HTML. Tuttavia, si consiglia di minificare solo i file JavaScript e CSS.
Basta andare alla pagina Performance ” Minify e scorrere fino alla sezione JS.
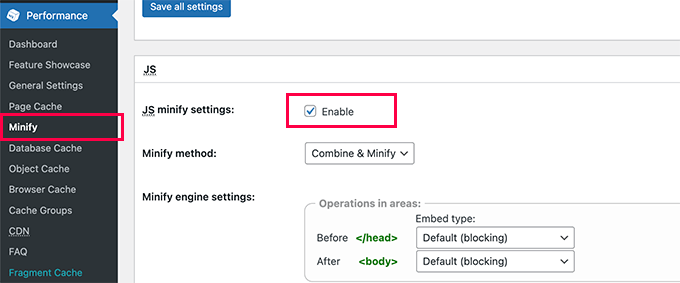
Selezionare la casella accanto a “Impostazioni di minificazione JS” per attivarla.
Ora, scorrere fino alla sezione CSS e abilitare le impostazioni di minificazione CSS nello stesso modo.
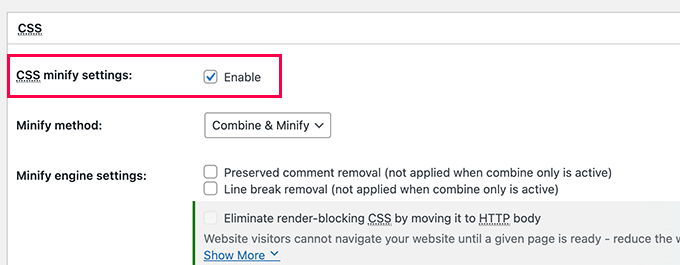
Non dimenticate di fare clic sul pulsante Salva tutte le impostazioni per memorizzare le impostazioni.
Per metodi alternativi, consultate la nostra guida su come minificare i file JavaScript e CSS in WordPress.
Abilitare il supporto CDN in W3 Total Cache
Le CDN o reti di distribuzione dei contenuti aiutano a migliorare ulteriormente le prestazioni del sito web servendo file statici come immagini, CSS e JavaScript da una rete globale di server.
Questo riduce il carico sul server di hosting WordPress e migliora la velocità di caricamento delle pagine.
W3 Total Cache è dotato di un supporto integrato per diverse piattaforme CDN.
Consigliamo di utilizzare Bunny.net, la migliore soluzione CDN sul mercato. Questa è la soluzione che utilizziamo per il nostro sito web OptinMonster.
Innanzitutto, è necessario registrarsi per ottenere un account Bunny.net. Dopo la registrazione, è necessario creare una Pull Zone per il proprio sito web.
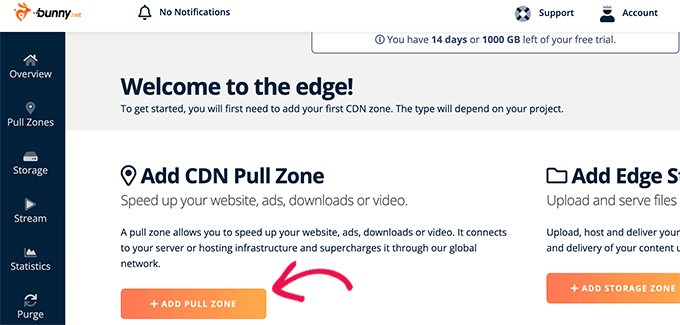
Una zona pull aggiunge un nome host al CDN Bunny.net. Questo nome host viene quindi utilizzato per servire i file statici del vostro sito web.
Aggiungete un nome per la vostra zona pull e poi fornite il nome di dominio del vostro sito web.
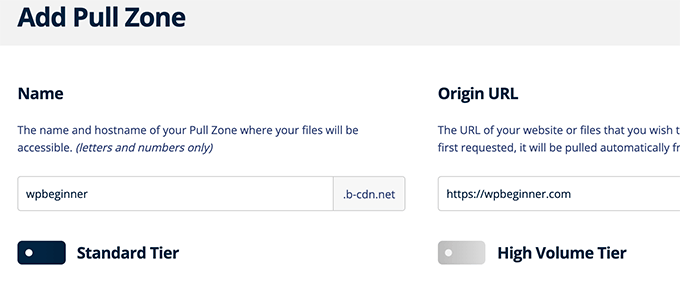
Dopo aver aggiunto la pullzone, è necessario visitare la pagina Performance ” Impostazioni generali.
Quindi, scorrere verso il basso fino alla sezione CDN.
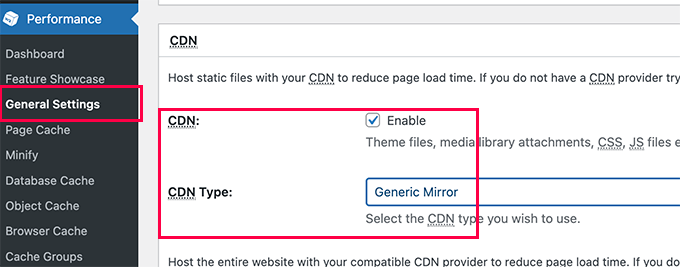
Selezionare la casella Abilita accanto all’opzione CDN e scegliere Generic Mirror accanto all’opzione Tipo di CDN.
Non dimenticate di fare clic sul pulsante Salva tutte le modifiche per memorizzare le impostazioni.
Successivamente, è necessario visitare la pagina Performance ” CDN e scorrere fino alla sezione Configurazione: Oggetti.
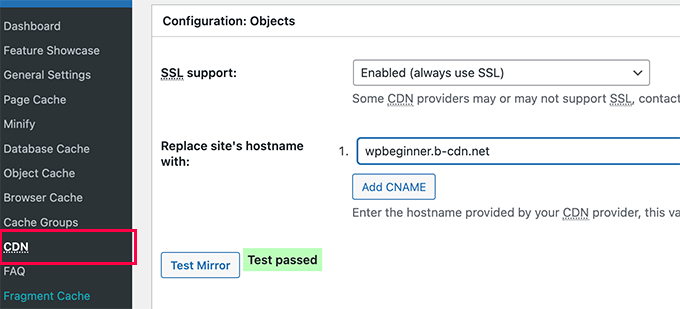
Da qui, è necessario aggiungere l’hostname creato in precedenza per la pullzone e fare clic sul pulsante Test mirror.
W3 Total Cache verificherà la disponibilità del vostro hostname e mostrerà il messaggio Test Passed (Test superato) in caso di esito positivo.
A questo punto è possibile fare clic sul pulsante Salva tutte le modifiche per memorizzare le impostazioni.
W3 Total Cache inizierà a servire le risorse statiche dal server CDN.
W3 Total Cache funziona bene anche con il CDN gratuito di Cloudflare. In alternativa, è possibile utilizzarlo anche con Sucuri, il miglior servizio di firewall per siti web con servizio CDN integrato.
Risoluzione dei problemi di W3 Total Cache
Una volta configurato correttamente W3 Total Cache, dovrebbe funzionare perfettamente in background per migliorare la velocità di WordPress e incrementare le prestazioni.
A volte può capitare che non si vedano subito le modifiche apportate al sito web o che un plugin non funzioni correttamente.
La ragione più comune di questi problemi è che probabilmente state vedendo una vecchia versione in cache del vostro sito web.
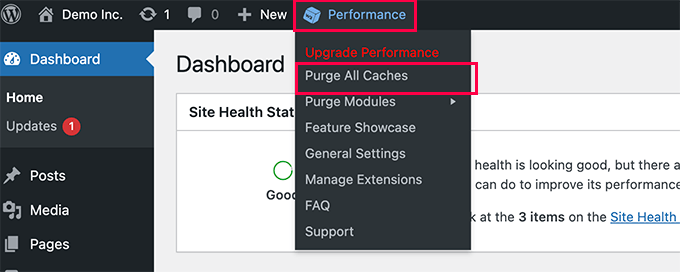
Questo problema può essere facilmente risolto cancellando la cache di WordPress.
È sufficiente fare clic sul menu Prestazioni in alto e selezionare l’opzione Elimina tutte le cache. W3 Total Cache cancellerà tutti i contenuti in cache del vostro sito web.
Se si vede ancora la vecchia versione del sito web, provare a svuotare anche la cache del browser.
Speriamo che questo articolo vi abbia aiutato a installare e configurare W3 Total Cache in WordPress. Potreste anche voler consultare la nostra guida completa alla sicurezza di WordPress per i principianti per rafforzare la sicurezza del vostro sito web, oppure la nostra selezione dei migliori servizi di hosting per WordPress per velocizzare ulteriormente il vostro sito web.
Se questo articolo vi è piaciuto, iscrivetevi al nostro canale YouTube per le esercitazioni video su WordPress. Potete trovarci anche su Twitter e Facebook.


Syed Balkhi says
Hey WPBeginner readers,
Did you know you can win exciting prizes by commenting on WPBeginner?
Every month, our top blog commenters will win HUGE rewards, including premium WordPress plugin licenses and cash prizes.
You can get more details about the contest from here.
Start sharing your thoughts below to stand a chance to win!
Rabia says
Thanks valuable information.
WPBeginner Support says
You’re welcome
Admin
Jiří Vaněk says
I would recommend everyone to make a note of the changes you have made, especially. Issues on the website may not manifest immediately. For instance, it happened to me that after a week, WordPress started behaving strangely, and it was happening randomly. It took me quite a while to find the problem in the cache plugin and incorrect settings. If I had documented the changes I made, I would have found the problem more easily. It’s a recommendation for everyone.
Roin says
Hello,
I’ve a question:
Does a free version slow the website ? My opinion is that a free version of this plugin makes website slow.. how do you think?
WPBeginner Support says
The free version of plugins will not slow down your site, poorly coded plugins can slow down your site.
Admin
Abu Allaah says
Thanks for the valuable tips,
I would like to ask if it’s possible to update the article with the latest version of the plugin.
Thanks in advance
WPBeginner Support says
We will look into updating the article as soon as we are able
Admin
Balu says
I enabled Minify settings in W3 Total cache plugin and also installed cloudflare extension in w3 total cache plugin.
Should I enable minify settings in Cloudflare extension also?
WPBeginner Support says
You would want to only use one or the other, if your W3 Total cache minification is working well then stay with that for the moment
Admin
Prajyot Kumbharjuvekar says
Do I still need to install a caching plugin if I use CLOUDFLARE CDN
WPBeginner Support says
It is not required but it is recommended to use a caching plugin with your CDN
Admin
Duryab says
This post is much outdated now, please update this post to the latest W3 total cache plugin.
Thanks.
WPBeginner Support says
Thank you for letting us know about this post being outdated, we will update this article as we are able
Admin
Tom Lloyd says
Thanks for the great article! I really benefitted from it and have a better performance now 1/4 load time. One thing you should mention is in the Browser Page under Performance tab there is a box at the bottom that says Rewrite URL. Don’t check that it ruined my pages. All links were alterred but I took it off and it’s ok.
Gavin says
Thanks for your very easy to follow tutorial (with screenshots) on W3 Total Cache. I noticed an immediate difference in load time of the site.
Bikramjit says
Hi, As per your recommendation, I have decided to go for MaxCDN, Is there any new update about CDN? Going to the MaxCDN site, there are different service including Content Delivery Network, Edge Delivery and other. Can your recommend me which service I have to select initially? I have new blog with no affiliate link till now and not planning for the next six month. And I am planning to apply Google adsense in the near future.Presently I installed WP Super Cache.
Do I need to switch W3 Total Cache to configure with MaxCDN? if I can configure MaxCDN with WP Super Cache, do you have any guideline?
HumbleHuman says
Hey:)
Thanks for those detailed instructions and I must say that you helped me much in setting up W3TC for my website..
I have a small issue with W3TC.. It is not purging my feed cache even though I have enabled this in the Purge Policy..
Will you help me how to solve this issue?
Thanks in Advance
Brandon says
After following this guide, I get the error: “Error: Empty hostname / CNAME list.” I have filled the “Replace site’s hostname with:” with all my cdn.* fields. Has anyone ran into this issue?
Vijay Prajapati says
I am Using W3 Total cache plugin for WordPress. My post has one table which updates every minute/hour. But as I do caching, the server does not serves latest version, instead it displays cached copy to the visitor. How can I purge cache every 30 minutes automatically so that it shows latest version of the post at after every 30 minutes?
I have already tried inserting this code in functions.php file but its not purging cache every 1h, instead it dies 2-3h later.
function w3_flush_cache( ) {
$w3_plugin_totalcache->flush_all();
}
// Schedule Cron Job Event
function w3tc_cache_flush() {
if ( ! wp_next_scheduled( ‘w3_flush_cache’ ) ) {
wp_schedule_event( current_time( ‘timestamp’ ), ‘hourly’, ‘w3_flush_cache’ );
}
}
Anna says
Thanks for such an easy to follow article. I broke my website yesterday using instructions from another blog. I should have come here first!!
I am a bit surprised by my results though. I did a Pingdom and GT Metrics test before I made all these changes and my page load time was:
Pingdom: 8.91 secs and GT Metrix: 5.3 secs
After I made all the changes I re-ran the tests:
Pingdom: 9.51 secs and GT Metrix: 9.9 secs
I thought my load times were meant to get much better – not worse!!?? What have I done wrong?
WPBeginner Support says
Hi Anna,
Allow the plugin to generate cache and recheck your scores. If that doesn’t help try to review your cache settings to make sure everything is setup properly. Alternately, you can try WP Super Cache and see if it helps.
Admin
Roman says
Thank you for so great content.
Should I enable “Page cache” option in the process of development of site or only at when I launch it?
For me it is convenient to do this right now, but I think maybe during development it is not good as I visiting thousand times to check the progress.
WPBeginner Support says
Hi Roman,
Yes, you are right. You can set up the plugin later once your website is live.
Admin
Jessica Braboy says
Hi! Trying to install the W3 Total Cache Plug In, and while it says it is compatible with my version of WordPress, it says that the plug in is unavailable and says “Not allowed on our system due to performance, security or compatibility concerns. Please contact support with any questions.”
First of all… do you know why this is no longer working? And, do you have an alternative cache plug in that you recommend? Thank you!
WPBeginner Support says
Hi Jessica,
This means that your WordPress hosting company doesn’t allow the plugin. Most probably because they have their own caching solution integrated into your hosting account which doesn’t work well with W3 total Cache. Please contact your hosting provider for more details.
Admin
Andy Sellers says
Hi, I need some help please.
I’ve followed the instructions to serve my static files through CDN (and they’re very clear, thank you) and have found the process straightforward so far- but when I log in to my site the URL still starts with ‘www.’ and not ‘cdn’ so I guess cdn is not operational yet.
One thing I notice is that in the MAXcdn account page there is no option to ‘Update’ the Custom Domain settings as mentioned in the instructions – is this OK? I assume it now updates automatically?
But my main problem is that, assuming I now have to do this, I don’t know how to specify the static files in the custom files list in the custom setting of W3Total Cache. Help please. How should I fill in this Advanced panel – it’s now getting a bit too techie for me? Thank you.
WPBeginner Support says
Hi Andy,
You will login to your WordPress site using the normal URL. CDN only serves static files via their network not the whole website.
MaxCDN settings may have changed, but you would still need to setup your domain. Please contact their support and they will be able to guide you.
Admin
sazia kazia says
Hi Very helpful and useful article. I set w3 total cache as per above instructions and could see it improved my website speed in good level. I ‘ll use MaxCDN instructions …Thank you so much
Amit Jain says
Hello Team! I am following your blog since long now and trust have learnt a lot. Thanks.
I need a little bit of help – Mine is a startup site, but have started with Cloud VPS Server with Data Centre located in Mumbai, India. 2.80*4 CPU and 8GB Ram is the part of Server Configuration. For better Site Security and Performance what should i use – Cloudflare (If cloudflare then free or paid plan) or Sucuri, W3Total Cache, WP Super Cache, Varnish Cache or Some other plugin/software.