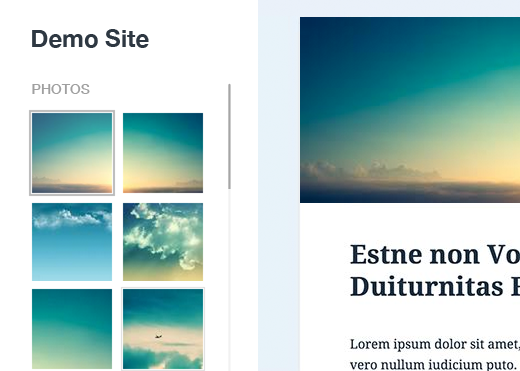
Avete una barra laterale lunga che interrompe il layout di WordPress in alcune pagine? Recentemente uno dei nostri utenti ci ha chiesto una soluzione. Poiché l’utente non voleva rimuovere nessuno dei widget, abbiamo suggerito di aggiungere una barra di scorrimento di altezza fissa a tutti i widget lunghi, risolvendo così il problema. In questo articolo vi mostreremo come aggiungere una barra di scorrimento personalizzata a qualsiasi elemento di WordPress.
Video tutorial
Se il video non vi piace o avete bisogno di ulteriori istruzioni, continuate a leggere.
La prima cosa da fare è installare e attivare il plugin Custom Scrollbar. Una volta attivato, basta andare su Aspetto ” Barre di scorrimento per configurare il plugin.
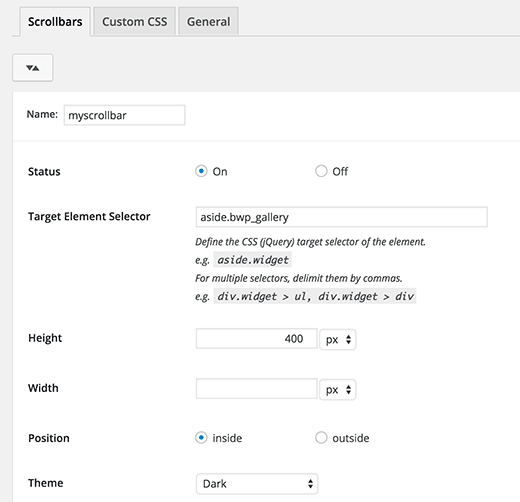
È necessario iniziare fornendo un nome alla barra di scorrimento. Il plugin consente di aggiungere più barre di scorrimento, quindi l’aggiunta di un nome aiuterà a trovare la barra di scorrimento personalizzata nell’area di amministrazione.
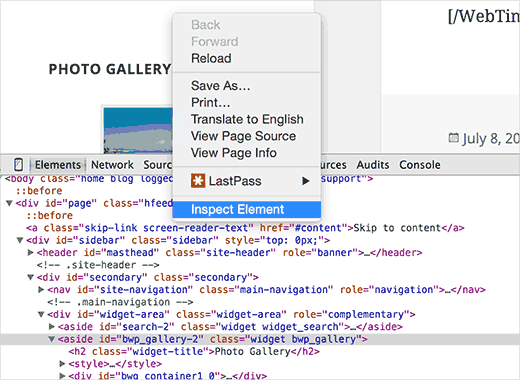
La voce successiva nelle impostazioni è Target Element Selector. Si tratta della classe o dell’ID dell’elemento web che si desidera indirizzare. È possibile trovare l’id o la classe di qualsiasi elemento facendo clic con il tasto destro del mouse sull’elemento nel browser Chrome e selezionando ispeziona elemento dal menu.
Come si può vedere nell’immagine, l’elemento che si vuole indirizzare è a parte con la classe CSS bwp_gallery.
Dopo aver inserito il selettore di destinazione, è possibile scegliere l’altezza e la larghezza dell’area della barra di scorrimento personalizzata. È anche possibile scegliere la posizione e il tema della barra di scorrimento.
Una volta terminato, è sufficiente cliccare sul pulsante Salva modifiche per memorizzare le impostazioni.
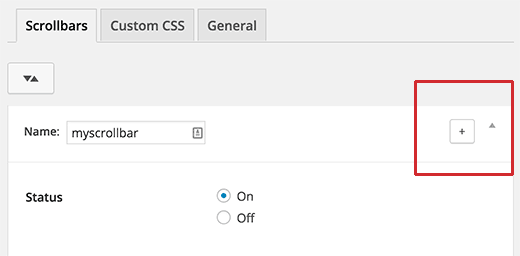
A questo punto è possibile visitare il sito web per vedere la barra di scorrimento personalizzata in azione. È possibile ripetere la procedura per creare un’altra barra di scorrimento personalizzata facendo clic sul pulsante Aggiungi.
Speriamo che questo articolo vi abbia aiutato ad aggiungere barre di scorrimento personalizzate a qualsiasi elemento del vostro sito WordPress. Potreste anche voler consultare il nostro elenco dei 25 widget WordPress più utili per il vostro sito.
Se questo articolo vi è piaciuto, iscrivetevi al nostro canale YouTube per i video tutorial di WordPress. Potete trovarci anche su Twitter e Facebook.


Syed Balkhi says
Hey WPBeginner readers,
Did you know you can win exciting prizes by commenting on WPBeginner?
Every month, our top blog commenters will win HUGE rewards, including premium WordPress plugin licenses and cash prizes.
You can get more details about the contest from here.
Start sharing your thoughts below to stand a chance to win!
Vaka says
Thank youuu!
WPBeginner Support says
You’re welcome
Admin
alex says
Hello I cannot seem to get my custom scroll bar to display vertically??? I have it set to a wordpress text widget with the height at 400 px and the width at 100 px and it comes up horizontal which is not what I need. thank you
WPBeginner Support says
Your content may not be tall enough, you may want to reach out to the plugin’s support and they should be able to assist.
Admin
irit says
hi
Thank you for sharing the plugin
i have a very long image that i would like to put a scroll bar on.
i know i have the right selector since the element does change, unfortunately it just “squishes” to whatever size i put into height (i used Elementor to create that page)
thank you
WPBeginner Support says
You would want to first reach out to Elementor as their page builder may be preventing the image from going beyond the size of the section you have set up.
Admin
Danny says
This is exactly my idea – to use it and make visitors spend more time on my site. My frontpage is such that I can combine several pages. So there is this particular page that is part of my front page, but it is long, so i want to use the scrolling to keep it short yet visitors can scroll just within it.
My problem is that I dont know the Target Element ID.
Can you assist?
WPBeginner Support says
If you reach out to your theme’s support for the specific section you want they should be able to let you know the element they’re using.
Admin
Danny says
I want to add scrolling on a particular page – the page itself, not the sidebar or any widget.
What will the Target ELement ID be?
I right-clicked on the page body, but I dont know what to look out for. Can anybody advice?
WPBeginner Support says
It would depend on the specific theme but normally for what you’re wanting it would be the content area.
Admin
Danny says
I am using the free version of raratheme’s lawyer landing page and I dount the developer can offer me such info as a free user.
Sure, its the content area, and I wonder what the Element ID is called. Any ideas?
WPBeginner Support says
It would be called something similar to content area normally, where you right click should have brought up a specific area of the html that when you hover over it should highlight the section to show you what it is targeting. You may want to take a look at our guide on how to use inspect element here: https://www.wpbeginner.com/wp-tutorials/basics-of-inspect-element-with-your-wordpress-site/
Alexandre says
Very nice and easy to custom widget. However, it took me a couple of hours to find what to enter in the Target Element Sector section while using Elementor. It finally worked with the following line: “.elementor-element-6daf57c”. The dot (“.”) at the beginning is important.
Thank you!
WPBeginner Support says
Thanks for sharing this specification to help other users
Admin
Rushikesh says
This is working for desktop view, but I don’t want this scrollbar work on mobile devices. Because it’s ruin responsiveness. How can I do it to stop working on mobile devices?
Rosie Malik says
This tool is such a tremendous help to website appearance and functionality! You can select your featured items (pictures, posts, etc.) and put them almost anywhere … and several times, too! Your site visitor will spend more time on your site and interract with more content, etc. This is a total win/win!
igor Griffiths says
Thanks for sharing this plugin and more importantly how to set it up, I would never have thought to use the Chrome inspect element to find the target id without many hours of experimentation.
Looks like a very flexible plugin that with a little imagination could be put to many powerful and engaging uses
igor