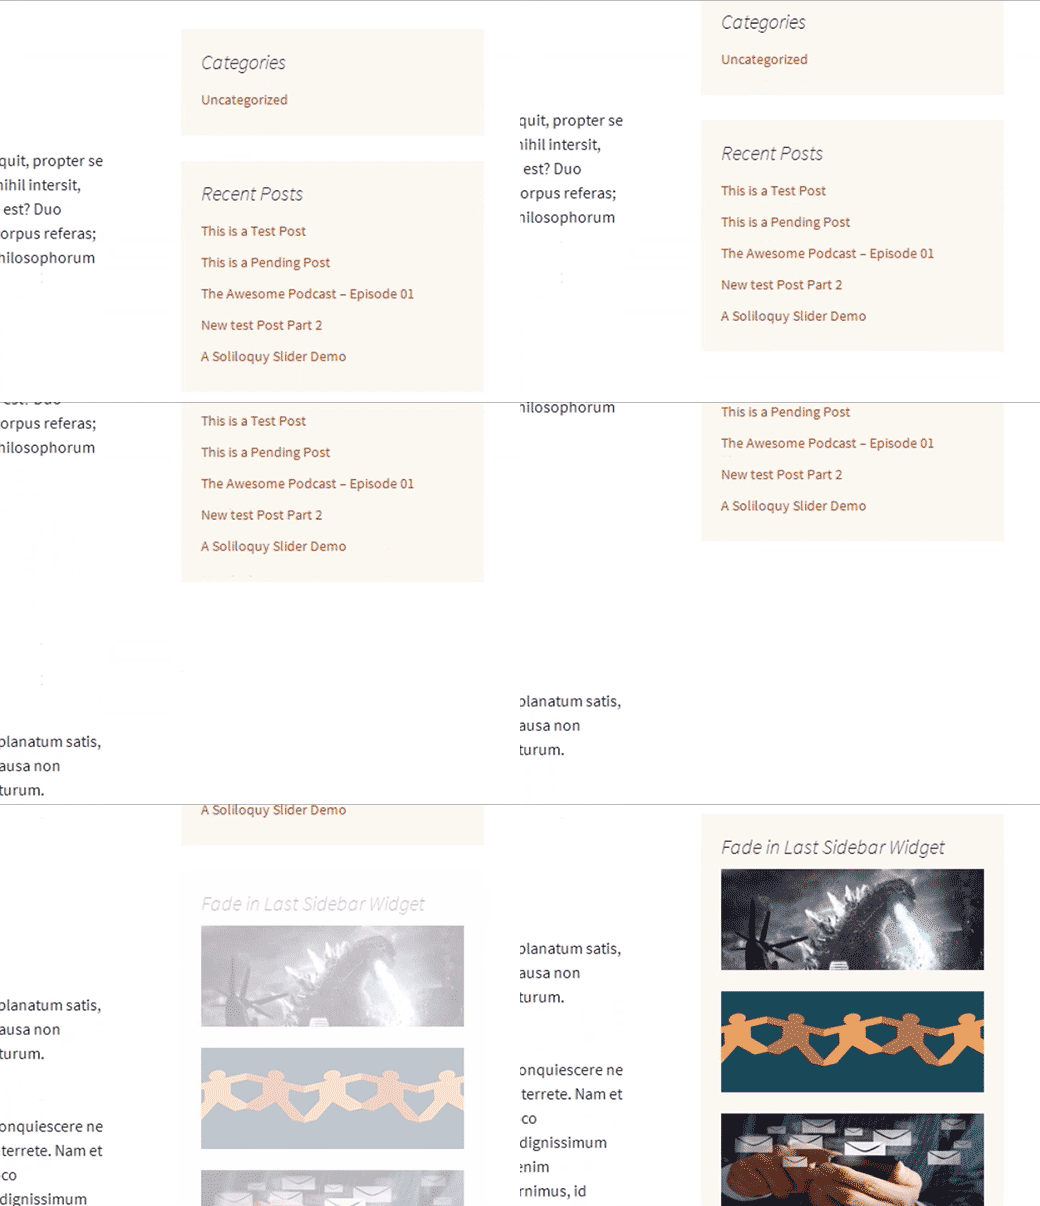
Recentemente uno dei nostri utenti ci ha chiesto come aggiungere un effetto di dissolvenza per l’ultimo widget della barra laterale. Questo popolare effetto jQuery è utilizzato in molti siti web e blog famosi. Quando l’utente scorre la pagina verso il basso, l’ultimo widget della barra laterale entra in dissolvenza e diventa visibile. L’animazione rende il widget accattivante e visibile, aumentando notevolmente il tasso di clic. In questo articolo vi mostreremo come sfumare l’ultimo widget della barra laterale in WordPress utilizzando jQuery.
Di seguito è riportata una dimostrazione di come apparirebbe:
In questa esercitazione si modificheranno i file del tema. Si consiglia di eseguire un backup del tema prima di procedere oltre.
Passo 1: Aggiunta di JavaScript per l’effetto dissolvenza
Per prima cosa è necessario aggiungere il codice jQuery al tema WordPress come file JavaScript separato. Iniziate aprendo un file vuoto in un editor di testo come Notepad. Quindi salvate questo file vuoto come wpb_fadein_widget.js sul desktop e incollate il seguente codice al suo interno.
jQuery(document).ready(function($) {
/**
* Configurazione
* Il contenitore per la sidebar, ad esempio aside, #sidebar ecc.
*/

var sidebarElement = $('div#secondary');


// Controllare se la barra laterale esiste
se ($(sidebarElement).length > 0) {

// Ottenere l'ultimo widget della barra laterale e la sua posizione sullo schermo

var widgetDisplayed = false;
var lastWidget = $('.widget:last-child', $(sidebarElement));
var lastWidgetOffset = $(lastWidget).offset().top -100;

// Nascondere l'ultimo widget
$(lastWidget).hide();

// Controlla se lo scroll dell'utente ha raggiunto la parte superiore dell'ultimo widget e lo visualizza
$(document).scroll(function() {

// Se il widget è stato visualizzato, non è necessario continuare a controllare.

if (!widgetDisplayed) {
if($(this).scrollTop() > lastWidgetOffset) {
$(lastWidget).fadeIn('slow').addClass('wpbstickywidget');
widgetDisplayed = true;
}
}
});
}
});
La riga più importante di questo codice è var sidebarElement = $('div#secondary');.
Si tratta dell’id del div che contiene la barra laterale. Poiché ogni tema può utilizzare div contenitori diversi per la barra laterale, è necessario scoprire l’id del contenitore che il tema utilizza per la barra laterale.
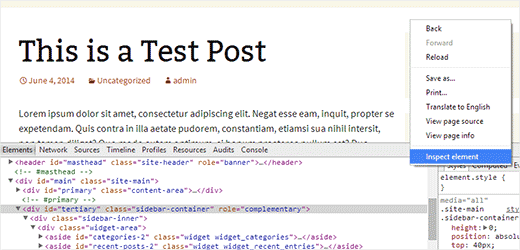
È possibile scoprirlo utilizzando lo strumento Ispeziona elemento di Google Chrome. È sufficiente fare clic con il pulsante destro del mouse sulla barra laterale in Google Chrome e selezionare Ispeziona elemento.
Nel codice sorgente sarà possibile vedere il div contenitore della sidebar. Ad esempio, il tema predefinito Twenty Twelve utilizza secondary e Twenty Thirteen utilizza teritary come ID per il contenitore della barra laterale. È necessario sostituire secondary con l’ID del div contenitore della barra laterale.
Successivamente, è necessario utilizzare un client FTP per caricare questo file nella cartella js all’interno della directory del tema di WordPress. Se la cartella del tema non ha una cartella js, è necessario crearla facendo clic con il pulsante destro del mouse e selezionando “Crea nuova cartella” nel client FTP.
Fase 2: inserimento di JavaScript nel tema di WordPress
Ora che il vostro script jQuery è pronto, è il momento di aggiungerlo al vostro tema. Utilizzeremo il metodo corretto per aggiungere il JavaScript nel tema, quindi basterà incollare il seguente codice nel file functions.php del vostro tema.
wp_enqueue_script( 'stickywidget', get_template_directory_uri() . '/js/wpb-fadein-widget.js', array('jquery'), '1.0.0', true );
Questo è tutto, ora potete aggiungere un widget nella vostra barra laterale che volete far apparire con l’effetto fadein e poi visitare il vostro sito web per vederlo in azione.
Fase 3: Rendere l’ultimo widget fisso dopo l’effetto dissolvenza
Una funzione spesso desiderata con l’effetto dissolvenza è quella di far scorrere l’ultimo widget della barra laterale mentre l’utente scorre. Si tratta del cosiddetto widget fluttuante o sticky widget.
Se si osserva il codice jQuery qui sopra, si noterà che abbiamo aggiunto una classe CSS wpbstickywidget al widget dopo l’effetto dissolvenza. Potete usare questa classe CSS per rendere il vostro ultimo widget appiccicoso dopo la dissolvenza. Tutto quello che dovete fare è incollare questo CSS nel foglio di stile del vostro tema.
.wpbstickywidget {
position:fixed;
top:0px;
}
Sentitevi liberi di modificare il CSS per soddisfare le vostre esigenze. Potete cambiare il colore dello sfondo o i caratteri per rendere il widget ancora più evidente. Se volete, potete anche aggiungere un effetto di scorrimento graduale verso l’alto accanto all’ultimo widget, per consentire agli utenti di tornare indietro rapidamente.
Speriamo che questo articolo vi abbia aiutato ad aggiungere un effetto di dissolvenza all’ultimo widget della vostra barra laterale di WordPress. Per ulteriori informazioni su jQuery, date un’occhiata ai migliori tutorial su jQuery per WordPress.
Se questo articolo vi è piaciuto, iscrivetevi al nostro canale YouTube per i video tutorial su WordPress. Potete trovarci anche su Twitter e Google+.


Syed Balkhi says
Hey WPBeginner readers,
Did you know you can win exciting prizes by commenting on WPBeginner?
Every month, our top blog commenters will win HUGE rewards, including premium WordPress plugin licenses and cash prizes.
You can get more details about the contest from here.
Start sharing your thoughts below to stand a chance to win!
Roger Perkin says
I am trying to implement this on my site but it’s not working
2 Questions
are you able to check my site and verify the sidebar div id?
Also should the enqueue script be get_stylesheet_directory_uri() . and not get_template_directory
Thanks – would love to get this working
Roger
Jonathan says
I was wondering can this be done instead off fade in to fade out an sticky widget??
WPBeginner Support says
Try replacing fadeIn with fadeOut in the JavaScript.
Admin
Johnny says
Hi I’m trying to implement this on my page and can’t seem to get it working. Added the .js file to my theme directory’s js folder and added it to my functions.php and no fade is showing. Where exactly should I be adding it in my functions.php as it’s a big file.
I’m using twenty fourteen, and my sidebar ID is “content-sidebar” which I have changed in the .js file. I have a few other widgets in the sidebar so perhaps something is conflicting?
Any help is appreciated! Thanks.
Johnny says
Here is my .JS Code
jQuery(document).ready(function($) {
/**
* Configuration
* The container for your sidebar e.g. aside, #sidebar etc.
*/
var sidebarElement = $(‘div#content-sidebar’);
// Check if the sidebar exists
if ($(sidebarElement).length > 0) {
// Get the last widget in the sidebar, and its position on screen
var widgetDisplayed = false;
var lastWidget = $(‘.widget:last-child’, $(sidebarElement));
var lastWidgetOffset = $(lastWidget).offset().top -100;
// Hide the last widget
$(lastWidget).hide();
// Check if user scroll have reached the top of the last widget and display it
$(document).scroll(function() {
// If the widget has been displayed, we don’t need to keep doing a check.
if (!widgetDisplayed) {
if($(this).scrollTop() > lastWidgetOffset) {
$(lastWidget).fadeIn(‘slow’).addClass(‘wpbstickywidget’);
widgetDisplayed = true;
}
}
});
}
});
WPBeginner Support says
Try deactivating all your plugins and see if it works. You can also use inspect element to see if there are any errors.
Admin
bb says
Hi wpbeginner, I love this tweak and the solution you’ve been giving to the community, thanks a million! I have a question, please, how can I integrate or if there’s a plugin/solution that can be use to query application forms submitted by applicants and the result show come up in the admin dashboard, for instance; how many applicant are below 25yrs? and the plugin should fetch the result from the database and show the relevant details in a nice table format that can be exported to excel. Possible? Please advise. Thanks
Jean Gérard Bousiquot says
You can check Gravity forms for that, but you’ll need to know some PHP. Otherwise you’ll have to pay a developer to help you achieve what you need.
Derek Price says
Isn’t this a bit off topic? Did you do this on purpose? If you have a question for WP staff, why not use the contact feature so you don’t take the blog post off topic?