Microsoft Outlook, her büyüklükteki işletme için mükemmel bir seçimdir. Ancak, ücretsiz bir plan kullanıyorsanız, varsayılan e-posta etki alanına takılıp kalırsınız. Bu, e-posta adresinizin sonunda ‘@outlook.com’ ifadesini göreceğiniz anlamına gelir.
Varsayılan e-posta alan adını korumak, hedef kitleniz üzerinde çok iyi bir izlenim bırakmayacağından ideal değildir. Bunun nedeni, genel bir e-posta adresinin güçlü bir marka kimliğini desteklememesi veya çok profesyonel görünmemesidir.
Neyse ki Microsoft 365 İş Ekstra planı, Outlook kullanarak bir iş e-posta adresi oluşturmak için alan adınızı kullanmanıza olanak tanır. Bu, e-posta gönderirken daha profesyonel bir görünüm yaratır. Ayrıca, premium plan size spam koruması ve daha iyi güvenlik gibi güçlü özellikler de sunar.
Bu makalede, Outlook ile özel markalı bir e-posta adresini nasıl ayarlayacağınızı göstereceğiz.

Profesyonel Markalı E-posta Adresi Nedir?
Profesyonel bir e-postada işletmenizin adı yer alır. Örneğin, ‘support@yourdomain.com’ profesyonel bir e-posta adresidir. Buna karşın, ‘yourdomain@yahoo.com’ profesyonel bir e-posta adresi değildir.
Profesyonel bir e-posta adresi oluşturmanın birçok yolu vardır. Çoğu WordPress barındırma şirketiyle birlikte gelen yerleşik posta sunucusunu kullanabilirsiniz.
Bu, dar bütçeli çoğu başlangıç web sitesi için işe yarayacaktır. Ancak, daha iyi spam ve antivirüs koruması, gelişmiş güvenlik, kolay hesap yönetimi ve daha fazlası gibi bazı kritik özelliklerden yoksundur.
Yukarıda belirtilen güçlü özellikleri istiyorsanız, mevcut işletme adınız veya alan adınızla çalışan profesyonel bir işletme e-posta hizmetine ihtiyacınız olacaktır.
Outlook.com Nedir?
Outlook, Microsoft tarafından sunulan bir e-posta hizmetidir. Hizmeti kullanmak için ücretsiz bir ‘yourname@outlook.com’ hesabı oluşturabilirsiniz.
Ancak Outlook.com ile profesyonel markalı bir e-posta adresi oluşturmak istiyorsanız Microsoft 365 İş Ek stra hesabına kaydolmanız gerekir.
Kullanıcı başına aylık 6,00 ABD dolarından başlayan ücretli bir hizmettir. PC veya Mac’iniz için 1 TB OneDrive depolama alanı ve Outlook, Word, Excel ve PowerPoint’in en son sürümlerini içerir.
WPBeginner’da, daha uygun maliyetli oldukları için iş e-posta adresleri için Workspace veya G Suite by Google kullanıyor ve öneriyoruz. Ayrıca ekibimiz Gmail ve diğer Google Uygulamalarına aşina olduğu için Google Cloud’u tercih ediyoruz.
Daha fazla ayrıntı için G Suite ve Office 365 karşılaştırmamıza bakarak Outlook.com’a karşı nasıl durduğunu öğrenebilirsiniz.
Bununla birlikte, Outlook.com ile özel markalı bir e-posta adresinin nasıl oluşturulacağına bir göz atalım.
Microsoft 365 ile Outlook Premium’a Kaydolma
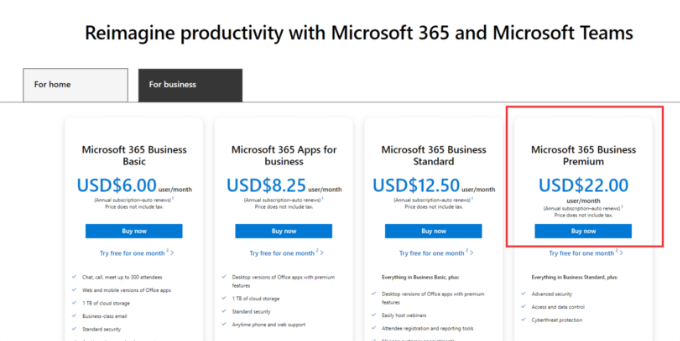
Öncelikle, Microsoft 365 web sitesini ziyaret etmeniz ve ‘Microsoft 365 İş Ekstra’ aboneliğine kaydolmanız gerekir.
Özel alan adları için destek içeren tek aboneliktir. Başlamak için ‘Şimdi Satın Al’ düğmesine tıklamanız yeterlidir.
Bir sonraki adımda e-posta adresinizi girmeniz gerekecektir. Bu, mevcut iş veya okul e-postanız olabilir.
E-postayı girdikten sonra ‘İleri’ düğmesine tıklayın.
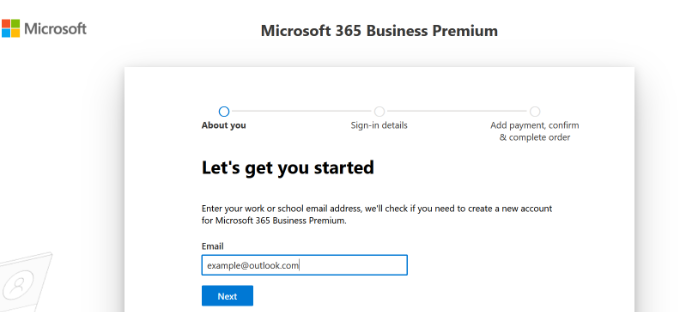
Ardından, adresin zaten bir Microsoft hesabıyla ilişkili olup olmadığını veya yeni bir hesap oluşturmanız gerekip gerekmediğini kontrol eder.
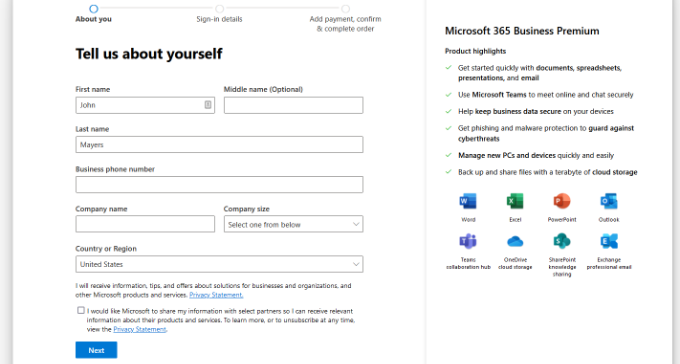
Ardından, adınız, iş telefon numaranız, şirket adınız, şirket büyüklüğünüz ve ülkeniz gibi kişisel bilgilerinizi vermeniz istenecektir.
Bu ayrıntıları girdikten sonra, devam edin ve ‘İleri’ düğmesine tıklayın.
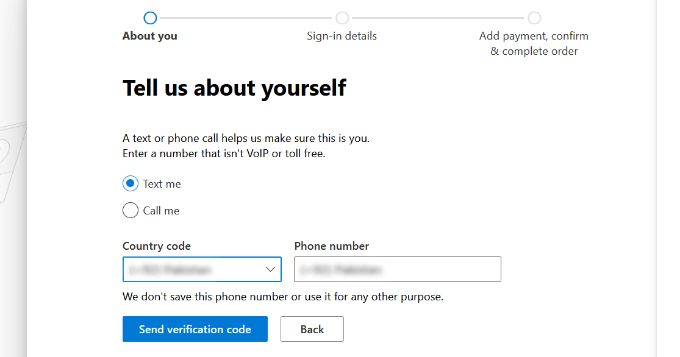
Bir sonraki ekranda, iş telefon numaranızı doğrulamanız gerekecektir.
Doğrulama kodunu almak için bir kısa mesaj almayı veya bir telefon araması almayı seçebilirsiniz.
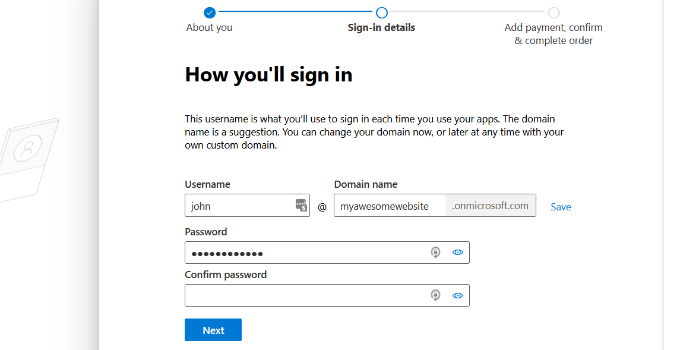
Doğrulamadan sonra, bir şifre ve alan adı girmeniz istenecektir.
İşiniz bittiğinde ‘İleri’ düğmesine tıklayabilirsiniz.
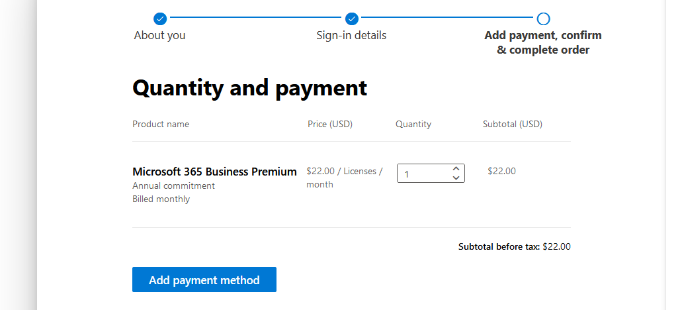
Buradan, istediğiniz Microsoft 365 İş Ekstra hesaplarının sayısını seçmeniz gerekir.
Bundan sonra, devam etmek için ‘Ödeme yöntemi ekle’ye tıklayın.
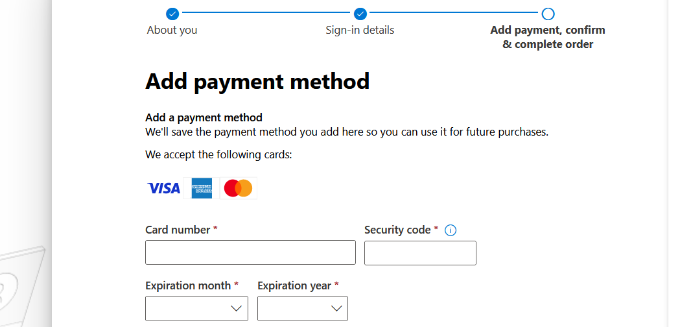
Microsoft şimdi sizden kredi kartı gibi bir ödeme yöntemi seçmenizi isteyecektir.
Devam edin ve kayıt işlemini tamamlamak için ödeme ayrıntılarını girin.
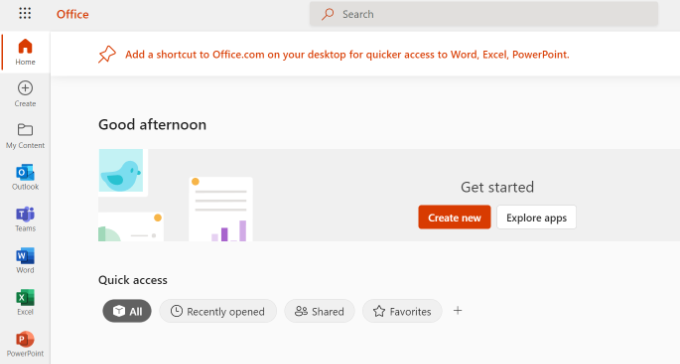
Bundan sonra Office 365 panosuna ulaşacaksınız.
Outlook E-postasını Özel Etki Alanı ile Kurma
Kontrol panelinde, Microsoft tarafından Office 365 paketi altında sunulan farklı araçları ve uygulamaları göreceksiniz.
Sol taraftaki kenar çubuğu, aboneliğinizle birlikte erişebileceğiniz çeşitli hizmet ve uygulamaların kısayollarıyla doludur.
Ardından, kenar çubuğu menüsünden ‘Uygulamalar’ seçeneğine tıklayabilirsiniz.
Şimdi Uygulamalar altında daha fazla araç görünecektir. Devam edin ve ‘Yönetici’ seçeneğini seçin.
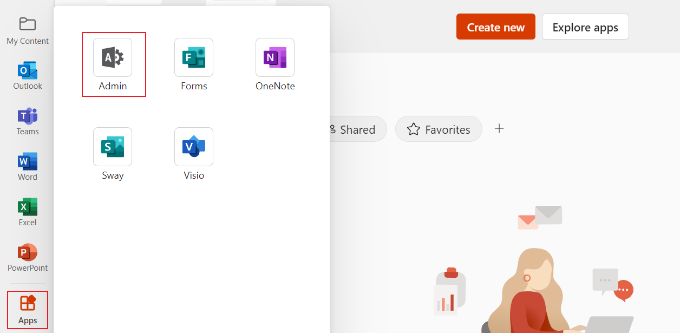
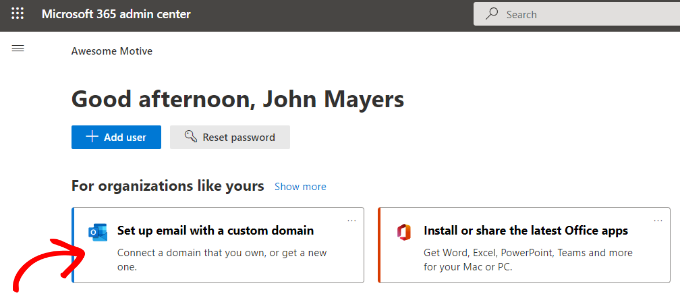
Ardından, sayfanın üst kısmında ‘Microsoft 365 yönetim merkezi’ni göreceksiniz.
Buradan, ‘Özel bir alan adıyla e-posta kur’ seçeneğini seçebilirsiniz.
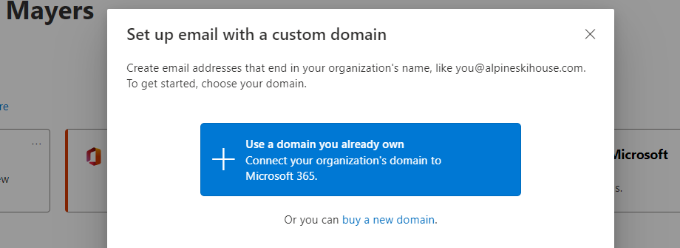
Bundan sonra, mevcut bir alan adını kullanmanızın veya yeni bir alan adı satın almanızın isteneceği bir açılır pencere açılacaktır.
‘Zaten sahip olduğunuz bir alan adını kullanın’ düğmesine tıklamanız yeterlidir.
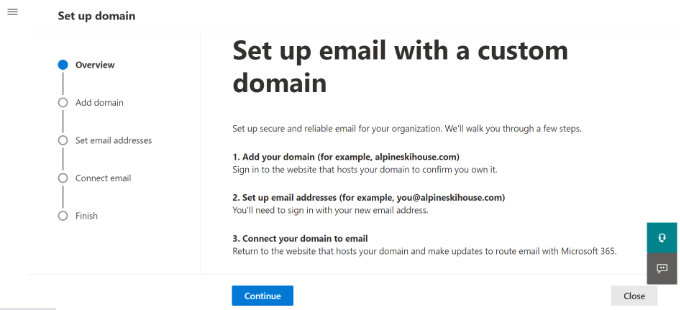
Bundan sonra, Outlook ile özel bir etki alanı yapılandırmanıza yardımcı olmak için bir kurulum sihirbazı açılacaktır.
İlk adım size izlemeniz gereken adımlar hakkında genel bir bilgi verecektir. Devam edin ve en alttaki ‘Devam Et’ düğmesine tıklayın.
Bir sonraki ekranda, kurmak istediğiniz alan adını girmeniz istenecektir.
Alan adını girdikten sonra ‘Devam Et’ düğmesine tıklayın.
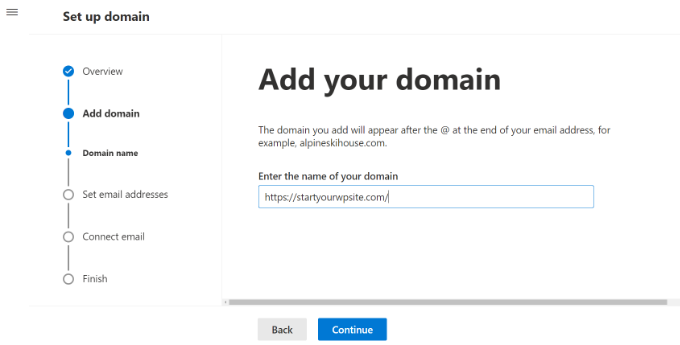
Microsoft şimdi alan adınızı arayacaktır.
Bundan sonra, alan adınızın DNS ayarlarına bilgi ekleyerek sahipliğini doğrulamanızı isteyecektir.
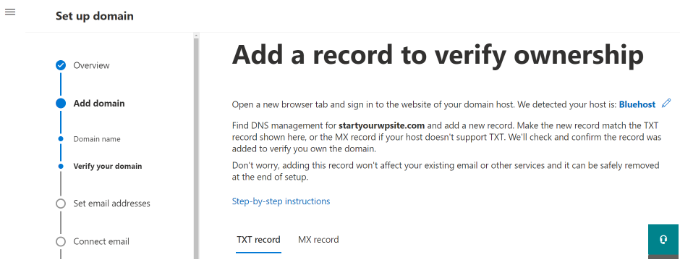
Bunu yapmak için tarayıcıda yeni bir sekme veya pencere açmanız ve alan adınızın ayarlar sayfasına gitmeniz gerekir. Alan adı kayıt kuruluşunuza bağlı olarak, bu sayfa hesabınızda yer alacaktır. DNS ayarları seçeneğini bulmanız gerekir.
Alan adınız WordPress hosting şirketiniz tarafından kaydedilmişse, cPanel panonuzda ‘Bölge Düzenleyici’ veya ‘DNS Bölge Düzenleyici’ olarak etiketlenmiş alan adı ayarını bulacaksınız.
Not: Eğer bir SiteGround kullanıcısıysanız, cPanel’e sahip olmayacaksınız. Bunu Site Araçları kontrol panelinizin Etki Alanı bölümünde bulacaksınız.
Bu eğitim için Bluehost kontrol panelini kullanacağız. Başlamak için, sol taraftaki menüden Alan Adları ‘na gidebilirsiniz. Ardından, web sitenizi bulun ve ‘Ayarlar’ düğmesine tıklayın.
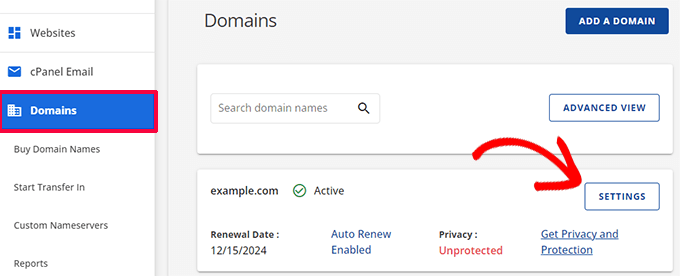
Buradan, alan adı ayarlarında aşağı kaydırabilirsiniz.
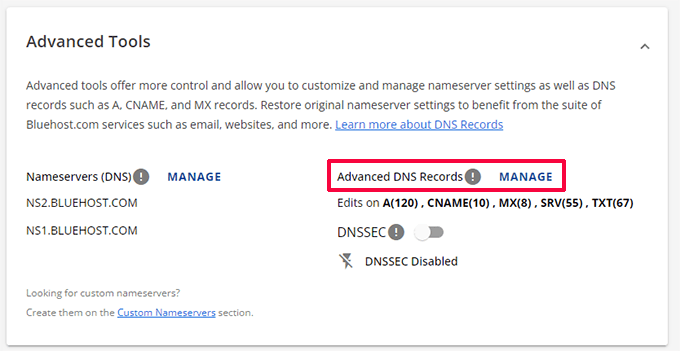
Devam edin ve ‘Gelişmiş Araçlar’ seçeneğine tıklayın.
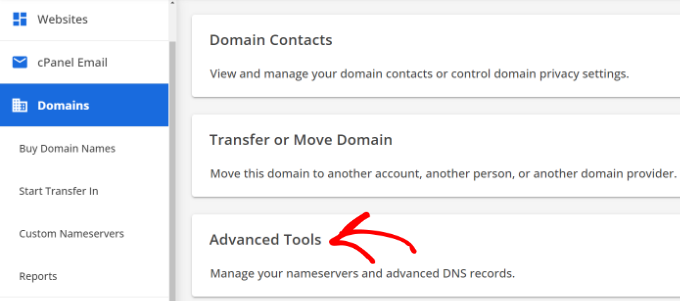
Burada Bluehost, alan adınız ve diğer kayıtlarınız için ad sunucularını gösterecektir.
DNS kayıtlarını yönetmek için ‘Gelişmiş DNS Kayıtları’nın yanındaki ‘Yönet’ düğmesine tıklayabilirsiniz.
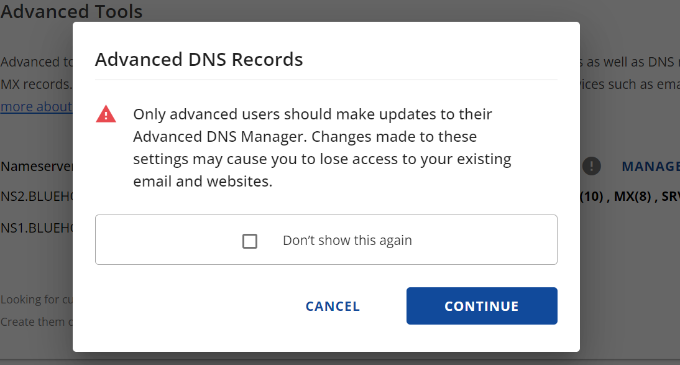
Bluehost daha sonra bir uyarı mesajı gösterecektir.
İlerlemek için ‘Devam Et’ düğmesine tıklayabilirsiniz.
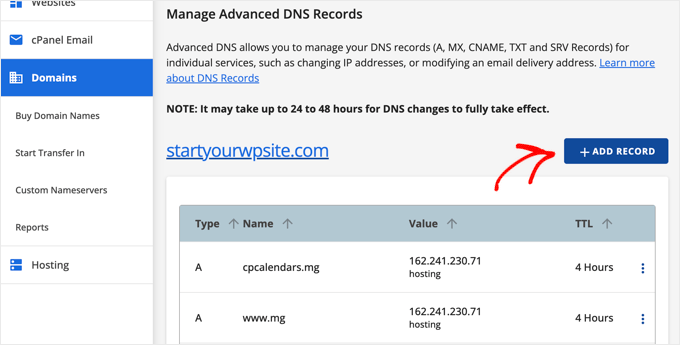
Ardından, farklı türde DNS kayıtları göreceksiniz.
‘+ Kayıt Ekle’ düğmesine tıklamanız yeterlidir.
Şimdi kaydı eklemek için yeni bir açılır pencere görünecektir.
Ardından, açılır menüye tıklayın ve tür olarak ‘TXT’yi seçin.
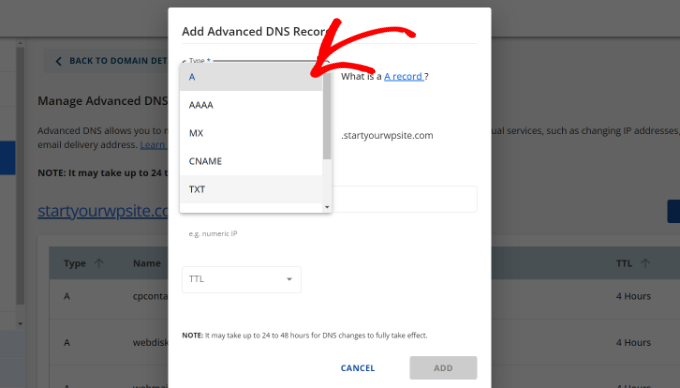
Buradan, TXT ayrıntılarını girmeniz gerekecektir. Bunlar ana bilgisayar kaydını, TXT değerini ve TTL süresini içerir.
Bu bilgileri Microsoft Office 365 sekmesinde kolayca bulabilirsiniz.
Ayrıntıları ekledikten sonra ‘Ekle’ düğmesine tıklayın.
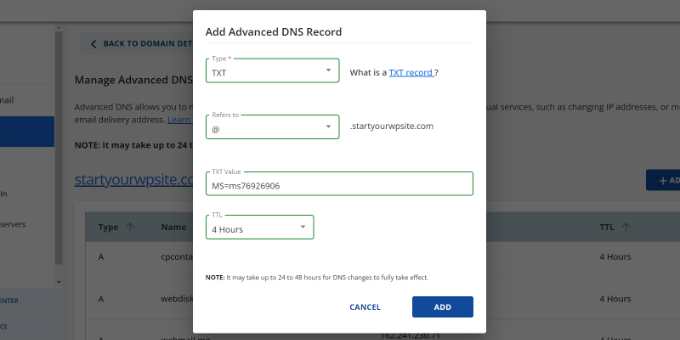
Bir DNS kaydı eklerken, girdiğiniz bilgilerin Office 365 tarafından görüntülenen bilgilerle eşleştiğinden emin olun.
Ardından, Microsoft Office 365 yönetici portalına geri dönmeniz ve doğrula düğmesine tıklamanız gerekir.
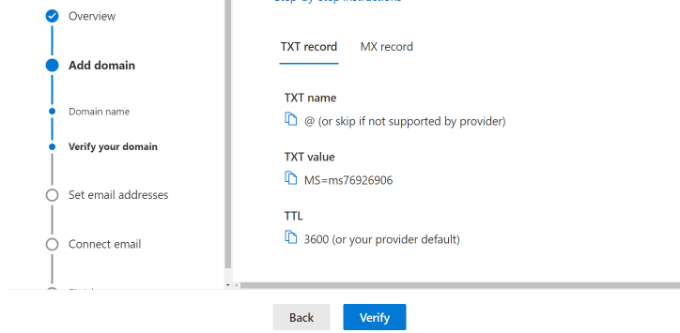
Office 365 şimdi alan adının size ait olduğunu doğrulamak için DNS kayıtlarını kontrol edecektir. DNS doğrulaması 5 – 10 dakika sürebilir, çünkü bazen DNS ayarlarınız hemen güncellenmeyebilir.
Doğrulamadan sonra, yeni markalı e-posta adresinizi ayarlamanız istenecektir. Bu işlem tamamlandıktan sonra ‘Güncelle ve çıkış yap’ düğmesine tıklamanız yeterlidir.
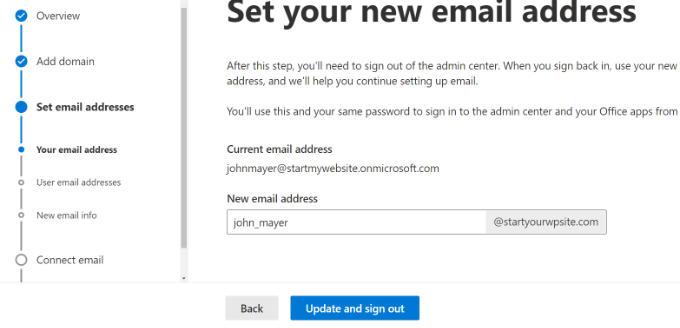
Ardından, yeni eklediğiniz markalı e-posta adresini kullanarak tekrar oturum açmanız gerekecektir.
Giriş yaptıktan sonra, alan adınıza eklemek ve Outlook e-postasına bağlanmak için daha fazla kayıt göreceksiniz.
E-posta alışverişinin çalışması için bir MX kaydı, bir CNAME kaydı ve bir TXT kaydı olmak üzere üç DNS kaydına ihtiyacı vardır.
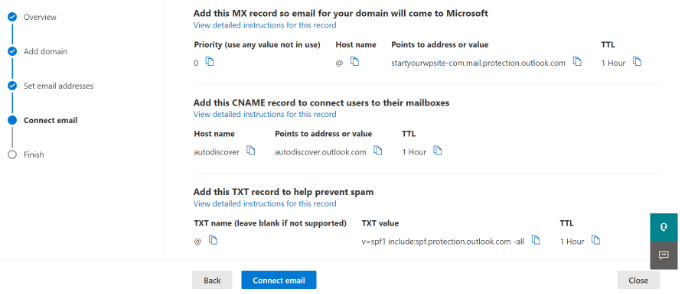
Bir kez daha, alan adınızın DNS ayarları sayfasına gitmeniz ve bu kayıtları tek tek eklemeniz gerekecektir.
İlk olarak, e-posta mesajlarının nereye teslim edileceğine ilişkin talimatları sağlayan bir MX kaydınız vardır.
Bluehost’ta, web sitenizin DNS ayarlarına gidin ve yeni bir MX kaydı eklemek için ‘+ Kayıt Ekle’ düğmesine tıklayın.

Ardından, kayıt ayarlarını içeren bir açılır pencere göreceksiniz.
İlk olarak, üstteki açılır menüye tıklayın ve ‘MX’ seçeneğini seçin.

Web sitenizin zaten bir MX kaydı varsa, bu kayıt bununla değiştirilecektir. Bu, özel alan e-posta adresinizden e-posta göndermek ve almak için Outlook’un posta sunucularını kullanabilmenizi sağlar.
Bundan sonra, birisinin spam göndermek için e-postanızı taklit etmesini önlemeye yardımcı olan bir TXT kaydınız olur.

Son olarak, Outlook gibi yazılımların e-posta hizmetini bulmasını ve bağlanmasını sağlayan bir CNAME kaydınız vardır.
Bluehost’ta yeni bir CNAME kaydı eklemeniz ve Microsoft panosundan ayrıntıları girmeniz yeterlidir.
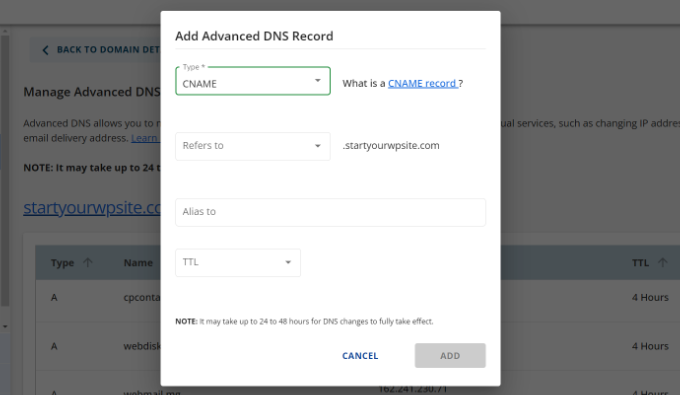
Tüm DNS kayıtlarını girdikten sonra, Microsoft Office 365 sekmesine geri dönebilir ve ‘E-postayı bağla’ düğmesine tıklayabilirsiniz.
Office 365 şimdi etki alanı DNS ayarlarınızı kontrol edecektir. TXT kayıtlarının doğrulanmasının 24 – 48 saat sürebileceğini unutmayın.

Her şey kontrol edildiğinde, kurulumun sonuna ulaşacaksınız.
Son adımda, yapılandırmanızın bir özetini göreceksiniz. Devam edin ve kurulum sihirbazını kapatın.
İşte bu kadar! Alan adınızı Outlook ile çalışacak şekilde başarıyla ayarladınız.
Outlook’ta Özel Markalı E-posta Adresi Ekleme
Artık Outlook kullanarak özel alan e-posta adresleri oluşturmaya hazırsınız.
Office 365 panonuzdan Kullanıcılar ” Etkin Kullanıcılar’a gidin.
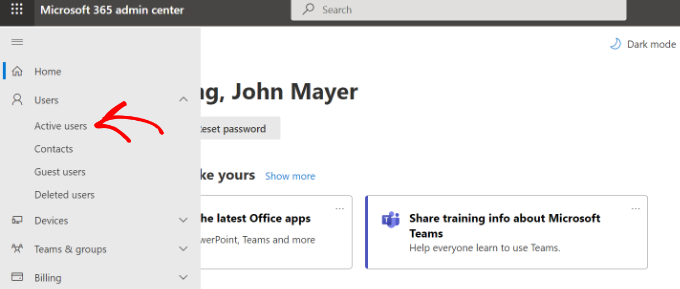
Ardından, aktif kullanıcılarınızın bir listesini göreceksiniz.
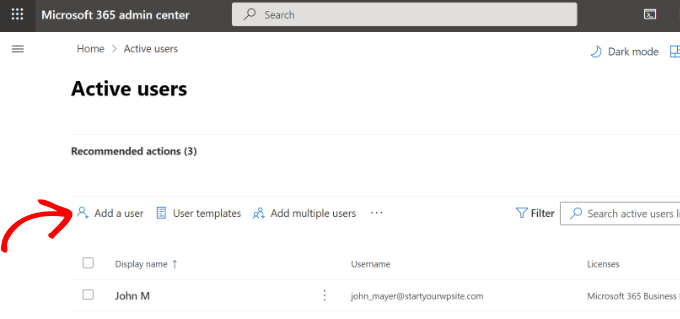
Devam edin ve ‘Kullanıcı ekle’ seçeneğine tıklayın.
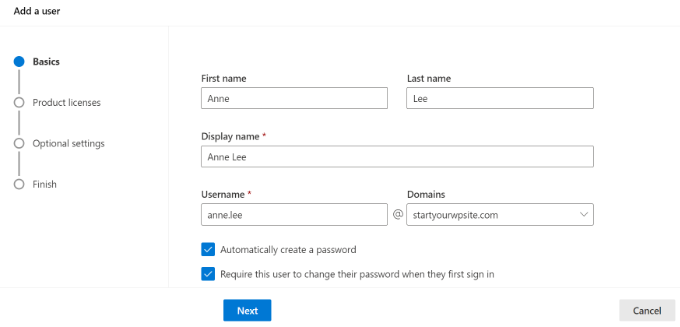
Bir sonraki ekranda, kullanıcının kişisel bilgilerini vermeniz ve ardından bir e-posta adresi seçmeniz gerekir.
Ayrıntıları girdikten sonra ‘İleri’ düğmesine tıklamanız yeterlidir.
Ardından, kullanıcınız için bir coğrafi konum seçmeniz ve bir ürün lisansı atamanız gerekir.
Microsoft 365 İş Ekstra planında 25 adede kadar lisans atayabilirsiniz. İşiniz bittiğinde, ‘İleri’ düğmesine tıklamanız yeterlidir.
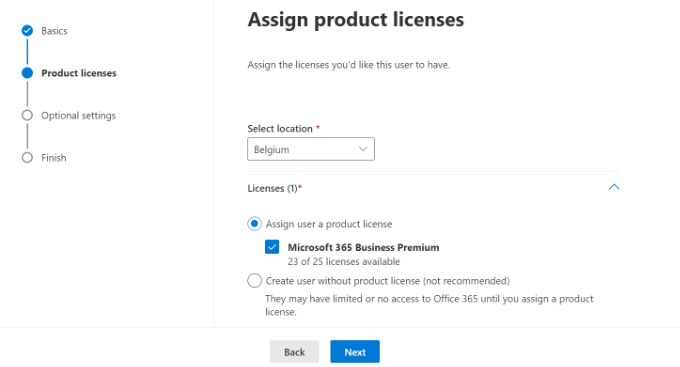
Microsoft ayrıca yeni kullanıcı profilleri için ek ayarlar da sunuyor.
Örneğin, bir kullanıcı rolü seçebilir ve Yönetim Merkezi’ne erişim izni verebilirsiniz. Ayrıca iş unvanı, departman, ofis ve daha fazlası gibi profil bilgileri ekleme seçeneği de vardır.
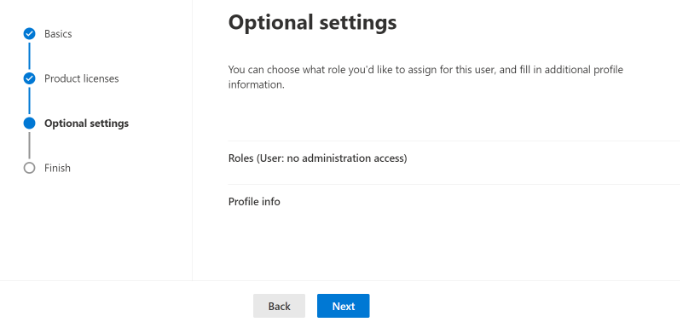
Bunlar isteğe bağlı ayarlardır ve boş da bırakabilirsiniz. İşiniz bittiğinde, ‘İleri’ düğmesine tıklamanız yeterlidir.
Son olarak, yeni eklediğiniz kullanıcının bir özetini göreceksiniz. Ayrıntıları gözden geçirebilir, gerekli değişiklikleri yapabilir ve ardından ‘Eklemeyi bitir’ düğmesine tıklayabilirsiniz.
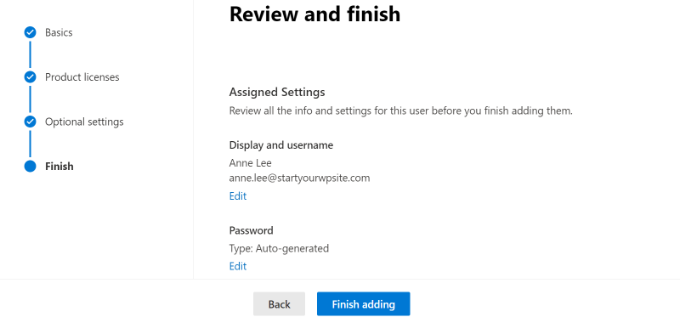
Bu noktada, başarıyla yeni bir kullanıcı eklediniz ve Outlook’ta markalı bir e-posta adresi oluşturdunuz.
Artık Outlook ile yeni profesyonel markalı e-postanızı kullanmak için önceki adımda oluşturduğunuz e-posta adresini ve parolayı kullanarak oturum açabilirsiniz.
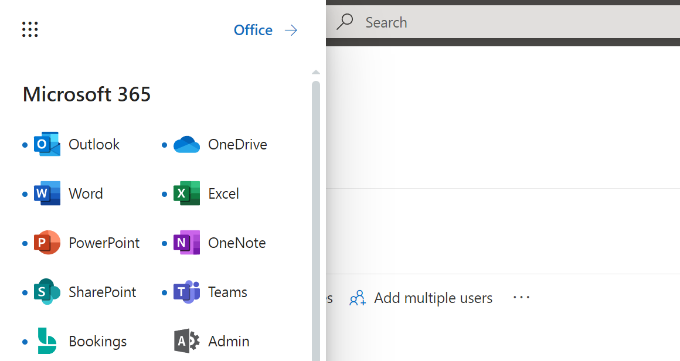
Outlook dahil olmak üzere Office 365 uygulamalarını Mac’inize ve PC’nize de yükleyebilirsiniz. Bu, markalı Microsoft Outlook iş e-posta adresinizi Outlook uygulaması aracılığıyla çevrimdışı erişimle kullanmanıza olanak tanır.
Bu makalenin Outlook ile profesyonel markalı bir e-posta adresinin nasıl kurulacağını öğrenmenize yardımcı olduğunu umuyoruz. Ayrıca yüksek e-posta teslim edilebilirliğine sahip en iyi SMTP sağlayıcıları hakkındaki makalemizi ve WordPress e-posta otomasyonuna yeni başlayanlar için kılavuzumuzu da görmek isteyebilirsiniz.
If you liked this article, then please subscribe to our YouTube Channel for WordPress video tutorials. You can also find us on Twitter and Facebook.


shayne
i notice that some of the email i received came from contact@domainname .com or support@domainname . com , how can i create, use and send just like that? or they just put contact or support as the name of there email, like myname@mydomainname .com, did they just put contact or support on “myname” ?
WPBeginner Support
You can put the username as what you want the email to be as we show under the ‘Adding Custom Branded Email Address in Outlook.com’ section or there are tools for allowing multiple users to answer emails from the same email address.
Admin
Andrew
I have a Professional Branded Email Address hosted by gmail. I’d like to switch it over to be hosted by outlook. is this possible?
I don’t want my emails interrupted for any length of time, and I’d like to keep my history if possible.
Any advice?
WPBeginner Support
Once you change the DNS settings for your domain it would swap from Gmail to Outlook for you with the main possible downtime being any caching active which you should be able to clear.
Admin
Jack
Thank you for the guidance.. It does work.
WPBeginner Support
You’re welcome, glad our guide was helpful
Admin
Olivia
Gsuite actually charges $12 per month for business accounts and is unlimited storage space. I have it. So, just to clarify price on that if you are looking for budget purposes.
WPBeginner Support
Thanks for letting us know about that section needing to be updated
Admin
kelli stark
I need a catch-all alias to be sure to receive all the email addresses How do I set up with a live domains
Refentse
hi i already purchased a domain with is it possible to use that domain to setup an email with Outlook or do i need to purchase another one?
Esther
To add to my earlier query, I would like to have my own domain name. Can help to create it and have it linked to my website?
Esther
Esther
Hi, I like to create a business email address. Can you please advise?
Thereafter, I would like to create a webpage/website for the business..
Please advise. Thank you.
Esther
WPBeginner Support
Hi Esther,
Please take a look at our guide on how to set up professional email address with Google Apps and Gmail.
Admin
Atira Laila
how much does it cost?
sumit
i want to create bussiness mail id plz help me
Jan Oniszczuk
For bussiness e mail address I have to pay?
I do not work for over year . It’s hart for me to generate any money at all ..
I’m over sixty eight I have chance to get a contract only if I will have my company e-mail address.
I have no extra money to pay for e-mail .
I have only money for the rent not even for the food..
please to understand me.
Jan.
WPBeginner Support
You can also get a business email address with Gmail. They are offering one month free trial that you can use.
Admin
Kasun Wijekantha
What is the maximum email capacity which we can send through this service?
John
Hi, is this for free?
Abhijeet Waibhaw
I have already my own domain name and want to create email id for my organization, needs technical support
WPBeginner Staff
Yes you can but both outlook and gmail now require a small fee to use your own domain name.
judy
office 365 ain’t free?
pze100@gmail.com
i own a domain name but have not built a website yet. Can I still create a business email address using my domain name? Can I use OUTLOOK or GMAIL for this ?
Janarthanan
Hi Syed,
Me too want to know the details about the below screenshot. Is this will be problem to us with the existing emails and email IDs.
Pls help us, as we are newbies and can’t understand Microsoft’s technical explanations.
Thanks
Janarthanan
sherilyn
it doesn’t offer the free service anymore ☹
Hasnain
UPDATE: Microsoft is no more offering this service.
Andre Imbayago
Microsoft has pulled the plug on this.
I’ve setup a petition to Microsoft to allow us to keep our accounts as is without migrating them to Office 365.
https://www.change.org/en-AU/petitions/microsoft-keep-current-outlook-com-custom-domains-as-is-without-forced-migration-to-premium-office-365-subscription
Katie Metz
Thank you for this information. It was very helpful!
Katie
Thank you so much!! This is such a great guide to setting up a custom email. You helped me and my family’s Company to add a professional touch to our email services! I only have one problem and that is when I entered the new MX Record I was not aware that you would have to delete any existing Records in that area otherwise it will interfere with the activation of the account. Other than that I’m totally happy!
Nagulan Shan
I need to know the screen shot. it will help us more.
Jagath Singh
How can I increase the mail ids limit from 50 to 500 for free?
Nishant Thakur
Was looking for this! Perfect!
Peter
Hello, thanks for this tutorial, please where do I need to add this
v=spf1 include:hotmail.com ~all
Jay
its more than 72 hrs of changing my dns. but now also it is showing “You need to prove ownership of this domain by creating a DNS record. Use the settings below.”
WPBeginner Support
This probably means your DNS records are not correctly set.
Admin
Abhay
hey! nice article…thank you
Rani
Hi,
I set up the account following your instructions.Thanks
But I have this problem , i am not receiving any mails in my inbox. when i send mails from other accounts to this mail it is bounced.
i checked the microsoft support. looks like it is some internal problem and not a settings problem. people are reporting other issues with accounts.Microsoft says they resolved the issue. But doesnt look like so.
http://answers.microsoft.com/en-us/outlook_com/forum/oemail-osend/my-outlookcom-email-account-is-not-receiving-any/02581144-c02b-4cdc-9132-98a8e0531ab1?msgId=2fd9d76f-6dfa-45bc-9a46-81e11265a7a1&page=1
R
Ankush
Hi,
I am trying to setup emails for my domain. This tutorial is really helping me since I am a non technical person. I have set up my live account and I am getting a message ‘You need to prove ownership of this domain by creating a DNS record. Use the settings below’.
When contacted a person where I have hosted my site, he is saying that the settings displayed here are for CPANEL and my sited is on DreamHost. DreamHost has its own CPANEL and that doesn’t support entries like ‘Priority: 10 (or High priority)’ etc.
Can you please guide us to take this forward.
Thanks,
Ankush
WPBeginner Support
Ankush dreamhost does support A records and Max records. For records ask the person managing your account to go to Mail » Custom MX in Dreamhost Panel. As for A or TXT records go to Domains and then click on DNS.
Admin
Ria Parish
I don’t suppose you’d still be able to use this email for Google+ and YouTube account though, eh…. Better than nothing, I guess.
Thanks for the alternative!
princess
Hi I set up my domain via Godaddy.com..and I already have my live mail set up. My question is: When I tried replying to the email my replies bounces back. what could be the problem?
WPBeginner Support
seems like you have not correctly configured your site to use Outlook’s mail servers.
Admin
Verma
Hi- I did a setup of outlook.com with my domain. All seems to be working fine except i am not able to get emails from MS Outlook. If it is possible to access email via MS Outlook app please let me know.
Paul Jones
Great article thanks.
We run a mail server and batch import mail into a sql server database. Would it be viable/possible to switch our mx to outlook.com and forward all inbound and outbound email to our mail server so that we can still import mail into sql?
WPBeginner Support
Sounds doable. But make sure before you implement it.
Admin
Chris
Hi, I just created an outlook email admin account with my own domain name. i create 2 users. Will I be able to see the emails sent to the users I created? If so, how do I enable that feature? Thank you Great article by the way. Thanks.
sivakumar
Now showing it
You can create up to 50 accounts in your domain.
How to create 500 accounts
WPBeginner Support
Contact outlook support for more accounts.
Admin
david
If you want users to use mail.yourdomain.com to sign in for email address, then you can create a CNAME record in your domain’s custom DNS settings or in cpanel’s Simple DNS Editor. Enter Mail in the Name field, and enter subdomain in CNAME field, e.g. mail.example.com.
this is not well explained. Could you please…
WPBeginner Support
Using a subdomain will allow users to sign in to their accounts by typing in your domain name instead of outlook.com.
Admin
kaycee
please how can i create the sub domain
kaycee
If you want users to use mail.yourdomain.com to sign in for email address, then you can create a CNAME record in your domain’s custom DNS settings or in cpanel’s Simple DNS Editor. Enter Mail in the Name field, and enter subdomain in CNAME field, e.g. mail.example.com
…..Please can you provide a guide on how to create this? cos am using ipage and they said its not possible for me to have mail.businessname.com
thank you
Kelly
Hi, thanks for your tutorial.
So after a week of waiting for the service to become active it is now saying that “Your service is suspended. Please make the required DNS changes.” Can somebody please help?
Letitia
I’m having the same problem
Asad
Currently outlook allows 50 free Email addresses. If I need more Account then what is the procedure ?
WPBeginner Support
Contact outlook support and they will extend your user account limit.
Admin
Tihomir Valkanov
Very good article!!! It save me a lot of time Thank you!
phil
Hi I have a question, I bought my domain name off Godaddy, but I built the site and its being hosted by wix.com, I want to use my own domain with outlook so who do I update my mx and txt with godaddy or wix?
Hope to hear from you soon
Phil
WPBeginner Support
Go Daddy if your domain is controlled by GoDaddy.
Admin
Murali
Thank you. I also got good email service.
Lynn Jackson
Awesome post! Very user-friendly. This was almost effortless. I was up and running after about 10 minutes! Thanks.
JANARTHANAN
Hi Syed, as said earlier I’ve done setting of my domains mails on outlook.com. Let me know how to configure this on blackberry and iPhone devices.
Thanks – Janarthanan
tilak
I want to view my old mails from my previous employers where we were using Outlook server. I have those .pst data files in my external hard disk. But don’t know how to configure them in Outlook 2013. Could any one please help me on the step by step guide. thanks.
Haseeb Ahmad Ayazi
Guys the New UI of outlook is tooooo slow. While loading it makes my PC also slow. Outllook can compete Gmail but will loss badly only due to his loading speed.
Jon Adams
Check your computer. Due to the new Gmail compose debacle, I have been testing Outlook.com for the past few months in case Google makes the change permanent and mandatory. The only reason I don’t make the switch now is six years of company emails in twenty accounts. Not to mention everything that lives in Google Drive.
The Outlook UI is vastly superior to Gmail even without consideration of the new compose.
Kunal
I already have an email account on Google Apps, if I were to move to Outlook, what would happen to emails that I already have in my existing accounts on changing the MX record ? Do I have to transfer my emails from google apps to outlook?
quocnt
Thank you. I have successfully setup my professional email.
But can I go to mail.mydomain.com to check mail or must I go to outlook.com every time?
Ana
Hi,
I followed the steps and everything went fine. But when I started using the email, I can send emails, but not receive them. Any idea what can be the issues?
Thanks!
hunter
I have the exact same problem. help
JANARTHANAN
Hi Ana,
Have you got the solution, did your mail work fine on both send & receive ways!
If you got the solution pls let me know.
Thanks
Ankush
Hi Ana,
Did you get solution to your problem? Are you able to send/receive from your new email account. Please guide us as well.
Thanks,
Ankush
Leon
Hi! I finally finally got to the last part.. I had to login using my old @live.com account, I never saw the DNS options when trying to signup using just my domain name http://hempconnection.net
Anyways I was able to create an info@ email for my domain, but now where do I go to login? I tried mail.mydomain.net and I just see the last page I was on showing the emails I created, but not able to actually access my new email
Leon
Screw this, Outlook and Microsoft sucks… I’ve been trying for 3 hours.. this is freaking ridiculous
marco
Me too, I’ve been trying for 3 days using chrome, maybe I should try using I.E.
JANARTHANAN
Hi Syed,
I have my website already set up at windows live admin center and the emails are already in use by users.
But now i planned to migrating my domain from godaddy to a Blue Host (i came to know about the cheapest and best service of this host by reading your site), what should i do so the emails will not be deleted and users can continue using the same mails.
Pls give me clarification thru email or on you blog. It will be very helpful for me and all others.
Thanks in advance
Janarthanan
Editorial Staff
In your bluehost account setup the MX records. Then do the transfer, and it will work.
Admin
JANARTHANAN
Hi Buddy, Thanks for the info. But i’ve a doubt, before transfering a domain from Godaddy how can i setup MX records in Bluehost for the same domain. PLs explain as i was a newbie on this field.
Thanks
Editorial Staff
In the DNS settings in your Bluehost cPanel, you can specify MX records. Bluehost support will be able to help you with this.
JANARTHANAN
Hi Syed,
Thanks for your info, i followed your tuts, also as per your comment i get details from Blue Host too. Now i successfully transferred my domain. And all my emails associated to it (functions on outlook.com) work fine.
Thanks once again for your great tuts.
Janarthanan
Tuyen
Hi I set up my professional mail on outlook.com, it’s work fine for about a month but now when I send email to client it alway have hotmail_77425feceaf13aa1@live.com on behalf of my email, pls advise how to remove (hotmail_77425feceaf13aa1@live.com on behalf of my email)
hope to hear soon
all the best
WPBeginner Support
Please contact outlook support, they would be able to help you better.