Tittar du på retargeting-annonser på Facebook? Vill du installera Facebook-pixeln i WordPress?
Att sätta upp kampanjer med Inga annonser på Facebook som riktar sig till personer som tidigare har viewat ditt content är ett bra sätt att driva mer trafik tillbaka till din site.
I den här artikeln visar vi dig hur du steg för steg add to Facebook-pixeln i WordPress för att skapa retargeting-annonser.
Varför använda Facebook Retargeting Pixel för att öka din sociala räckvidd
Syed Balkhi, vår grundare och VD, publicerade en fallstudie om hur vi ökade WPBeginners trafik på Facebook med 332% under 2015. Detta väckte ett överväldigande intresse hos våra läsare, som ville veta hur de kunde göra samma sak för sina websites.
När du boostar Facebook page posts med hjälp av Facebook-annonser kan du välja ett brett utbud av målgrupper. Retargeting allow you to narrow your audience and get better results with less spending.
Du kan visa dina annonser för personer som redan är intresserade av din website. Dessa människor är mycket mer benägna att svara på dina förstärkta inlägg och annonser på Facebook.
Vad är en Facebook Retargeting Pixel?
Har du lagt märke till att när du besöker en website så börjar du se dess annonser på Facebook? Detta anropas retargeting eller remarketing.
Dessa websites använder Facebooks retargeting-teknik, allmänt känd som Facebook Pixel eller Meta Pixel.
Retargeting-pixeln addar ej något synligt till din website. Den skickar helt enkelt en cookie från webbläsaren till dina besökare.
This allows Facebook to retarget users visiting your website on Facebook.
Låt oss ta en titt på hur du kan add to en Facebook retargeting pixel till din WordPress site.
Step-by-Step 1. Skapa en Facebook Retargeting Pixel (Meta Pixel)
För att göra det enkelt har vi skapat en video tutorial om hur man installerar en WordPress plugin som du kan titta på under.
Men om du bara vill följa textinstruktioner kan du följa vår steg-för-steg tutorial om hur du installerar Facebooks retargeting-pixel i WordPress.
Först måste du logga in på ditt Facebook-konto och besöka Meta Business Suite. Klicka sedan på All Tools ” Händelser Manager.
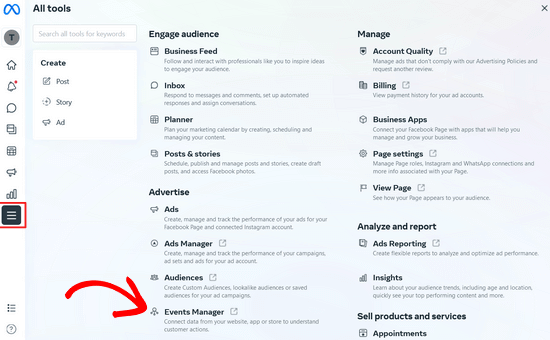
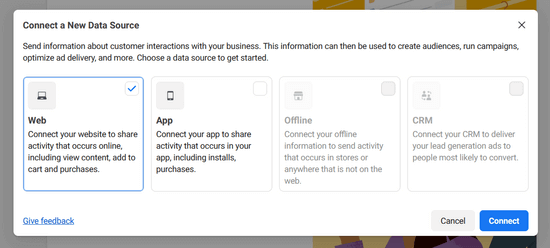
Klicka sedan på knappen ”+ Connect to Data Sources” i menyn till vänster och välj alternativet ”Web”.
Därefter klickar du på knappen ”Anslut”.
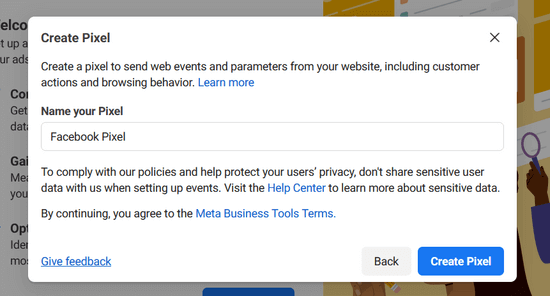
I nästa popup-fönster måste du enter ett namn för din pixel, som kan vara namnet på ditt företag eller din produkt.
Klicka sedan på knappen ”Create Pixel” för att fortsätta.
Därefter enter du bara URL:en till din website och klickar på knappen ”Check” för att se om din site är berättigad till integration med partners som gillar WordPress och Shopify.
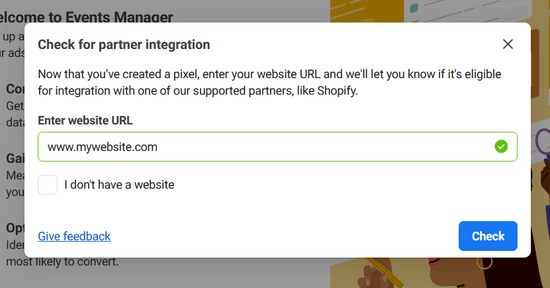
Om din site ska vara berättigad till integration kommer du att se en grön bock och du kan klicka på knappen ”Next” för att fortsätta.
Därefter måste du välja hur du ska ansluta din website och skicka aktivitet till Facebook.
För den här tutorialen väljer vi alternativet ”Endast Meta Pixel”. You can always set up the Conversion API in addition to your pixel later.
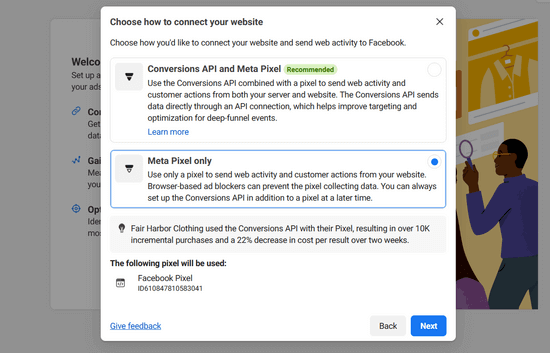
Klicka på ”Next” för att fortsätta.
Nu måste du välja en metod för att lägga till pixelkoden på din website.
Om någon annan hanterar det tekniska på din website kan du emaila pixelkoden till dem. Annars klickar du på knappen ”Installera koden manuellt” för att installera den själv.

Facebook kommer nu att visa dig pixelkoden som du måste installera på din WordPress site.
Klicka bara på knappen ”Copy Code” för att kopiera pixelkoden, så visar vi dig hur du installerar den i WordPress.

Step-by-Step 2. Installera Facebook Pixel i WordPress (+ eCommerce Tracking)
You need to add the Facebook pixel code just before the </head> in your WordPress theme.
Det enklaste sättet att göra detta är att använda det gratis WPCode plugin.
WPCode är det bästa code snippets pluginet för WordPress. Det gör det enkelt att inserta kod i din WordPress sites headers och footers utan att behöva edit dina theme filer.
För att komma igång måste du installera och aktivera tillägget WPCode. För steg-för-steg-instruktioner, se vår przewodnik om hur du installerar ett tillägg till WordPress.
När du har installerat och aktiverat pluginet måste du gå till Code Snippets ” Header & Footer page.
Sedan klistrar du bara in koden för Facebook-pixeln i rutan Header.

När du är slutförd, glöm inte att trycka på knappen ”Save Changes”.
Se vår guide om hur du lägger till header- och footer-kod i WordPress för detaljerade instruktioner.
Därmed har du utan problem installerat Facebook-pixeln på din WordPress website.
Alternativ: Lägga till Facebook Pixel för WooCommerce med eCommerce Tracking
Om du har en online-butik kan du uppgradera till premiumversionen av WPCode för att add to eCommerce tracking pixels och förbättra dina annonsers prestanda.
WPCodes tillägg Conversion Pix els tillåter dig att enkelt lägga till spårningspixlar för e-handel för populära plattformar som Facebook, Inga annonser, Snapchat, Pinterest och TikTok med 1 klick.
Det integreras sömlöst med WooCommerce och Easy Digital Downloads, så ingen ytterligare installation är obligatorisk.
You can quickly choose which eCommerce events to track, such as product page view, add to cart, checkout, and purchase, so that you can better understand how your ads are utförd and improve your return-on-ad-spend (ROAS).
Först måste du installera och aktivera premium WPCode plugin. Du behöver Plus-planen eller högre för att få tillgång till Conversion Pixels addon. För steg-för-steg-instruktioner, se vår guide om hur du installerar ett WordPress plugin.
Följ därefter samma instruktioner i steg #1 för att skapa en Facebook-pixel för WooCommerce.
Därefter kopierar du pixel ID:n, som du hittar under ”Datakällor” i Facebook Events Manager i ditt Facebook Business account.
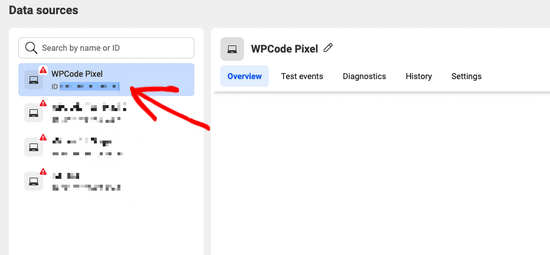
Gå sedan till Code Snippets ” Conversion Pixels från din WordPress dashboard och klistra in ditt pixel ID i fältet ”Facebook Pixel ID”.

Efter det måste du add to your Facebook Conversion API Token för att ställa in ecommerce tracking.
För att göra det går du tillbaka till vyn ”Datakällor” från Facebook Events Manager och klickar på din pixel. När din pixel är vald klickar du på tabben ”Settings” och sedan på länken ”Generate Access Token”.
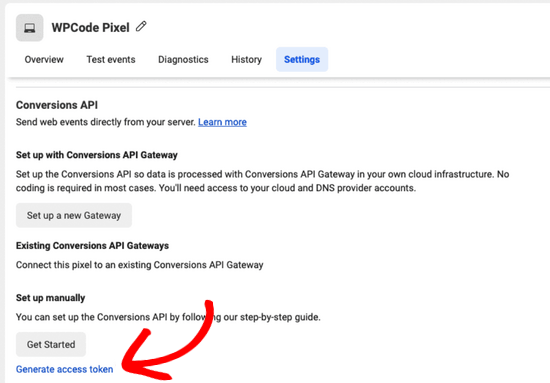
När du har clickat på linken kommer din access token att genereras automatiskt. Kopiera bara access token och klistra in den i fältet ”Conversions API Token” i WPCode.
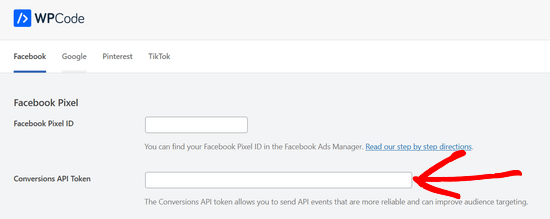
Nu kan du rulla ner på sidan för att välja vilken typ av ecommerce händelser som ska trackas.
Som standard är all tracking av händelser aktiverad. Men om du vill stänga av spårning av händelser för något av alternativen, toggle helt enkelt omkopplaren till ”Av”.
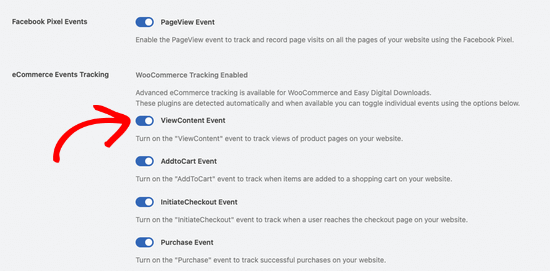
Glöm inte att klicka på knappen Save Changes längst ner på sidan.
Det är allt, du har utan problem addat Facebook-pixeln för WooCommerce och du är redo att spåra händelser inom ecommerce.
Step-by-Step 3. Skapa Customize-målgrupper med hjälp av Facebook Pixel
Nu när du utan problem har installerat Facebook Pixel på din WordPress site, är nästa steg att skapa custom målgrupper för dina retargeting-kampanjer på Facebook.
Custom Audiences allow you to target users you already know for your Facebook ads. Dessa användare kan vara besökare på din website, användare som gillar din page eller användare som har registrerat sig för din mailinglista.
Så här kan du skapa customize-målgrupper på Facebook.
Besök bara instrumentpanelen i Meta Business Suite och gå till All Tools ” Audiences section.
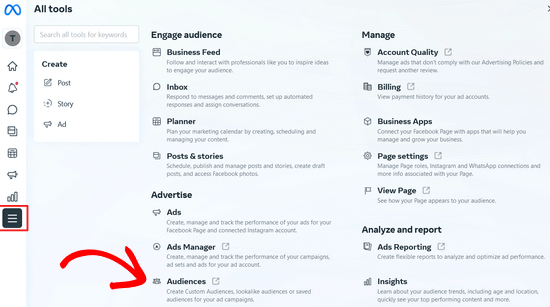
På nästa page klickar du på knappen ”Create a Custom Audience”.
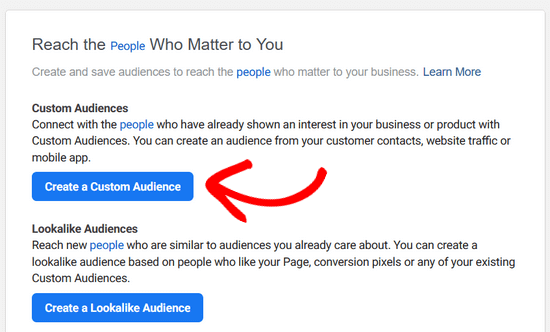
Detta kommer att visa en popup där du måste välja den målgruppskälla du vill rikta dig till på Facebook.
Du kan välja din website, kundlista, app-aktivitet och mer. För denna tutorial kommer vi att välja alternativet ”Website”.
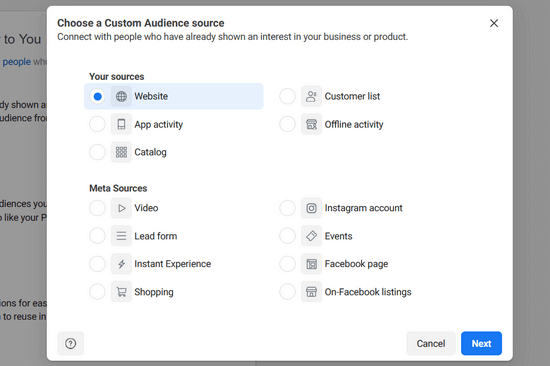
Därefter klickar du på knappen ”Next”.
Nu kommer Facebook att fråga dig vilken målgrupp på din website du vill rikta dig till. You can choose all website visitors, people who visit specific pages, or visitors by time spent.
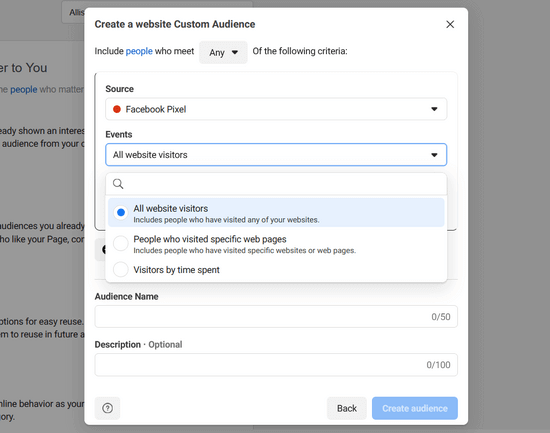
Därefter måste du välja en varaktighet på ett antal dagar. Slutligen måste du ange ett målgruppsnamn. Använd något som hjälper dig att enkelt identifiera den här målgruppen i dina insikter.
När du är klar klickar du på knappen ”Create Audience” för att slutföra skapandet av din första customize-publik.
Upprepa processen för att skapa fler customize-målgrupper genom Facebook-retargeting.
Steg 4. Visa dina annonser för Custom Audiences med hjälp av Facebook Retargeting Pixel
Det riktigt roliga börjar med att engagera dina customize-målgrupper genom att använda Facebook-annonser.
Börja med att skapa en new annons i Facebook. Du kan run olika typer av annonser för olika objekt. Gillar att öka dina pages posts, skicka trafik till din website, öka konverteringarna och så vidare.
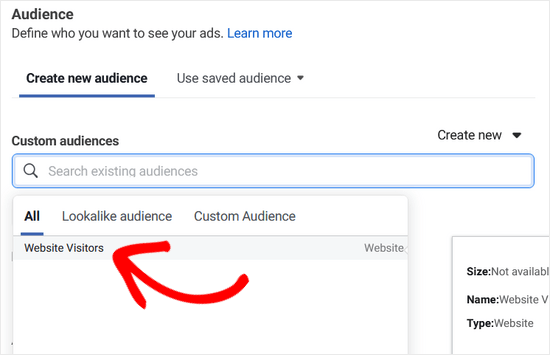
Beroende på vilket object du väljer kommer du att kunna selecta målgruppen någon gång under skapandet av annonsen.
I samma målgruppsval kommer Facebook att visa dig en anpassad målgrupp, och du kan välja att rikta in den med din annonskampanj.
Vi hoppas att den här artikeln hjälpte dig att installera Facebooks remarketing/retargeting-pixel i WordPress. Du kanske också vill se vår guide om hur du installerar och ställer in Facebook comments i WordPress och våra expertval för de bästa WordPress Facebook-tilläggen för att få din blogg att växa.
If you liked this article, then please subscribe to our YouTube Channel for WordPress video tutorials. You can also find us on Twitter and Facebook.


crystal
Can you make an updated version of this? Now FB has a partners integration option. I have tried this version of doing (downloading a plugin) and I’ve tried their partners way of doing it and neither way is working for me.
WPBeginner Support
We will be sure to take a look
Admin
Jeff Cope
Thank you for the post and even though it does need updating since Facebook has changed the links and process, I finally added the pixel to my website. Note with the improvement in the WordPress Customizer, a plugin is no longer needed to add the pixel code above the /head.
WPBeginner Support
Thank you for your feedback and we still recommend the plugin to ensure it is included on every page on the site
Admin
Joseph Abokhai
I was using the Facebook for woocommerce plugin that automatically sets up a Facebook pixel on a particular website.
I started a new hosting account and redirected my domain name servers to point to the new hosting account.
My question is, since I changed my hosting account and started building the site from scratch, will the pixel still be attatched to my domain?
WPBeginner Support
Sadly, for that plugin, you would need to check with the plugin’s support for how they handle a change like that
Admin
Andrew Wilkerson
Well I think it’s done right, thanks WpBeginner! Still not sure what I should be doing with the second bit of code from Facebook in order to track people who have gone to one particular page. I clicked around for over 2 hours on FB then my wp site, then gave up as usual.
I’m not even sure how this works, where does the headers and footers plugin put the code, in to every page? Do I just add the second bit of FB code beneath this? it needs to go after the . Does it go in the page template? Posts template? I’m lost as usual, until FB make this easier I’m not going to bother. Selecting your audiences, demographics, countries, Events? and all that, it’s just too overwhelming for most business owners. Those who have money will survive online, they can pay someone else to do it, one-man businesses like mine will eventually disappear. I can’t make any money wasting time on things like this so it just gets worse. Already slipped off the first page of Google after 14 years on there, all down hill from here I’m afraid, time to do something else.
Angie Sherbondy
Thank you! I followed the instructions. I already had headers and footers installed and there was already code in the header section so I put this above it. Is that OK?
Thanks,
Angie
Shivam Bhateja
Yes, it is okay. I used the analytics code and pixel code both in the headers section.
Shodkk
Ya, there is no Problem in doing So. It is Completely Fine this only a Code.
This Code load each time when your site page run. there is no problem in that OK. Both Code run and send the Respected data back to FB and Google by their Respective code.
Andre
Hi there. There is one question that I have on the FB pixel I just can’t seem to find an answer for anywhere. Shopify has an app called Trackify that allows you to segment the events, per product for example, and in doing so allows you to super target people who have purchased a particular product without setting up custom events. Is there a similar plugin for WordPress. Please if you could help that would be great! I am at my wits end with searching for a solution.
Maryann
I am so glad I came across your site. Very helpful and informative.
Thank you
vinton samms
Thank you most kindly for this tutorial. I really did not how how to use the FB pixel. Thanks again.
Vinton
Nathan
I’ve installed the pixel using the plugin.
Will the pixel automatically be place on every page?
Thanks
Claudio
It seems like Facebook has changed some of the details for doing this since this post was written. They now have a new pixel which also includes having to copy event code. How/where do we do this within the context of this article and plugin?
Matthew
How do you install the pixel to fire on page load given the plugin constraint?
I’ll clarify- Facebook states that if you want an event to fire on page load the code for that specific event has to be pasted BELOW the head tag.
The plugin in you recommend, as well as all the others I’ve seen available for WP, don’t address this issue.
Recommendations?
John Henry Gaspay
Is it also possible to add the code on the footer instead in the header portion? usually if it’s for tracking purposes better implementation would be on the footer part, your know for SEO purposes.
Pat
I went ahead and installed the pixel because i wanted more visits to my music site. I started filling in the remarketing stuff in FB, then I came to the part about paying! I didn’t realise I had to pay so I’ve uninstalled the remarketing pixel in WP and delete everything in FB that I’d filled out. I hope I don’t start getting demands for money. Maybe you could add a note to your article that there will be payment involved in FB marketing. I guess I should have realised.
Jim
You didn’t think you had to pay for marketing or advertising? Where have you been for the past one thousand years?
Michael
Is there any way to use a Facebook pixel if I am at wordpress.com?
WPBeginner Support
Please see our guide on the difference between self hosted WordPress.org vs free WordPress.com blog.
Admin
Alex
Great article! Thanks
I use wordpress on mys ite – I’ve managed to install the facebook pixel using the ”insert headers and footers app” and facebook says it is successfully installed
in wordpress, what’s the best way to install a standard event code? I have a ”thank you” page that I would like to use as my conversion referecence – the thank you page appears after the viewer has submitted a form
Thanks!
Karl
I have also successfully installed the facebook pixel code through insert headers and footers by wpbeginner, now I want to know how to add standard event codes. Can anyone teach us how to? Big thanks to WPBeginner for this
Terry Green
I added the FB retargeting pixel about a month or so ago to my WP site, and the Facebook Pixel Helper showed it was installed and working. Now I ”hear” there is a new Facebook Pixel, AND my Facebook Pixel Helper shows ”there are no Facebook pixels” on my site.
The article I read goes all over the world and back about everything I don’t want to know about. All I want to know is how to replace the pixel. You are a trusted source so I thought I would ask … is there a new pixel out? And can I add it (or replace the old one) as easily as it was to add it the first time (with a plugin), or will it require manually adding code to each page?
Nina
How do we add other rules, like these Search fbq(’track’, ’Search’);
Add to cart fbq(’track’, ’AddToCart’);
Add to wishlist fbq(’track’, ’AddToWishlist’);
do we simply add it to the code?
Yev
I need to re-copy the Facebook pixel if I add standard/custom events for Conversion Tracking, to paste the new one into the website.
Does that mean I only have PageView data up until I update the code on the website, or does any type of data backtrack and becomes available as long as I had the original/basic Pixel installed?
Darren
Hi,
I have done this and the Facebook pixel is tracking. However I am using the sign up form as well with the mailchimp API and I added the Lead and Complete registration aspects to the pixel in the header. They are firing as the chrome addon shows that however the sign up form isnt triggering as a sign up or registration complete. I am not sure if I am explain my problem well. So in business manage and the pixel I can see people visiting my site. But when they sign up the value for lead or complete registration is still 0. Any ideas why this occurs? I used the old FB conversion pixel and that was fine just this new one is so annoying!
Cheers
Ron Hudson
Wow! Thank you very much for writing this post and recording a video to help your audience implement this important tool.
WPBeginner Support
Glad you found it helpful.
Admin
Prakash Thakur
hi wp beginner
Great job by making this article..
one question only…
can i uninstall that plugin after uploading script in the header section???
Brendon Osborne
Great video, super simple and helpful!!
moon
Hi,
I need to add ” Facebook Pixel Code ” in my wordpress site.
May I know if this plugin suitable for it.
Thanks
Elle Van Buren
Dear author, I have a question on the ”Add conversion tracking” feature. Like you instructed, if we place the Facebook pixel into the header section of the plugin, that piece of code will be on every page. But if I have a conversion page, how do I single out that particular page and add in a custom event such as fbq(’track’, ’Lead’); to the middle of the Facebook pixel?
Usually with WordPress or other CMS, once something is in the header, it is on every page. How do we then put up something different for a particular page?
Thanks!
I Have The Same Exact Question!
I have the same question! How do you I single out a particular page (Thank You Page) and add in a custom event?
Marvin
I too have this question.
Stephen
Has anyone gotten a solution for this?
Adrien
Still have this question remaining… any solution ?
Cheers
Luke
THANK YOU!
So much easier to understand than the official FB instructions.
Hammad Afzal
Great article, Can I use this feature right away or first I have to buy facebook ad campaign. I means paid Facebook advertising.
Thanks alot syed balkhi for a cool post.
WPBeginner Support
You can see information about your visitors right away. You can run a paid campaign later on.
Admin
Hammad Afzal
Thank you so much
fajar siagian
hello
i want to ask about this
is this using facebook ads first. become subscriber user facebook ads
thank you,
Kingsley
Great, thanks for this tutorial
Angelica Costa
This is perfect. I am starting to experiment on Facebook Ads.
On other note, is there a way to tell where are facebook visitors coming from? Sometimes I get a load of new user and have no idea who shared a link to my website.