Genom att installera WordPress på din Mac kan du utforska dess funktioner utan att behöva ett webbhotell.
Du får lära dig hur WordPress fungerar och se om det är rätt för ditt projekt. Det är också perfekt för att testa teman och plugins innan du gör din webbplats live. Att experimentera lokalt ger dig dessutom friheten att göra misstag och lära dig.
Vi har lekt en hel del med lokala webbplatser, både på Mac- och Windows-datorer. I den här handledningen visar vi två enkla metoder för att installera WordPress på din Mac.
Obs: Använder du inte Mac? Vi har också en handledning om hur du installerar WordPress lokalt på Windows.
Varför installera WordPress lokalt på Mac?
Normalt sett behöver du ett webbhotellskonto och ett domännamn för att skapa en WordPress-webbplats.
WordPress-kärnprogramvaran är dock gratis att ladda ner och kan köras lokalt på din dator. Denna lokala WordPress-webbplats kommer inte att vara tillgänglig på internet, utan kan bara ses på din dator.
Fördelen med detta tillvägagångssätt är att du privat kan öva på att använda WordPress, prova det och se vilken typ av webbplatser du kan skapa .
Du kan också använda den här lokala installationen för att testa olika WordPress-teman och plugins innan du installerar dem på din live-webbplats.
Vad behöver du för att installera WordPress lokalt på Mac?
WordPress är huvudsakligen skrivet i PHP, ett programmeringsspråk för serversidan. För att köra PHP behöver du en webbserverprogramvara och ett MySQL-databashanteringssystem installerat.
Att installera alla dessa program oberoende av varandra och få dem att fungera med varandra låter som en skrämmande uppgift.
Lyckligtvis finns det gratis utvecklingsverktyg som gör det superenkelt att installera dem som ett paket, även för de mindre tekniskt kunniga användarna. Med detta i åtanke kommer här 2 metoder för att enkelt installera WordPress lokalt på en Mac utan några speciella serveradministrationsfärdigheter:
Är du redo? Nu kör vi igång WordPress på din dator.
1. Installera WordPress lokalt på Mac med hjälp av Local WP (rekommenderas)
Local WP är ett WordPress-utvecklingsverktyg som gör att du enkelt kan sätta upp en lokal server på din Mac-dator. Du kan också använda Local på Windows och Linux för att sätta upp WordPress.
Först måste du besöka den lokala webbplatsen och klicka på knappen “Download” längst upp till höger på skärmen.
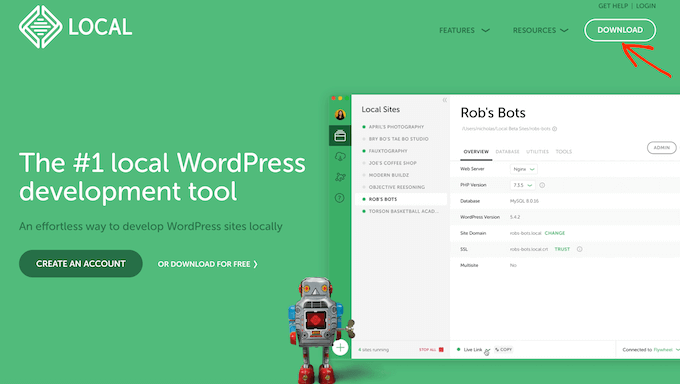
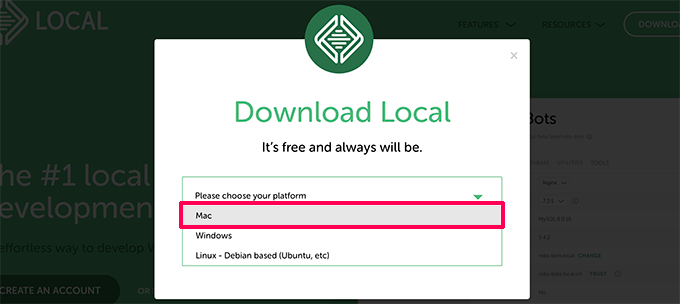
Detta öppnar ett popup-fönster för Download Local.
Här väljer vi Mac som din plattform.
Lokalavdelningen kommer sedan att be dig fylla i ett kort formulär.
När du har skrivit in ditt namn, din e-postadress och ditt telefonnummer kan du gå vidare och klicka på knappen “Get it Now”.
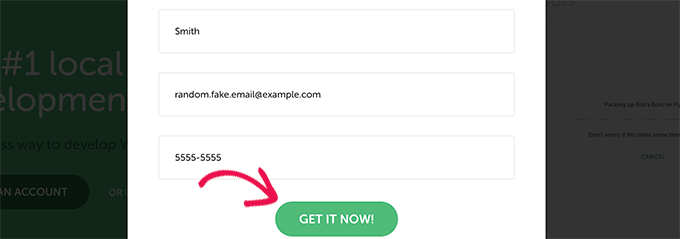
Detta kommer att ladda ner den lokala installationsfilen till din dator. Du kan dubbelklicka för att öppna den nedladdade filen så snart den har laddats ned.
Du kommer då att se en installationsguide som guidar dig genom processen att installera Local på din dator.
Mac-användare behöver bara dra Local-appen till sin “Applications”-mapp.
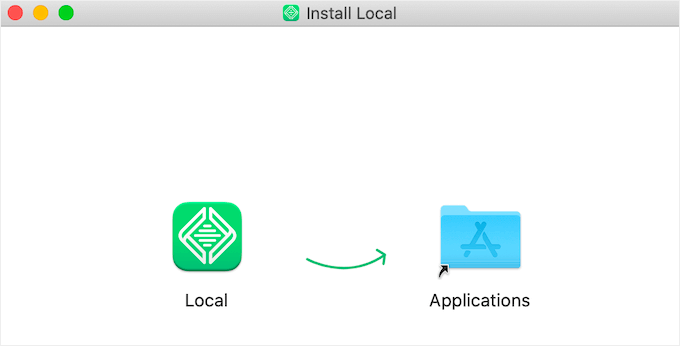
När installationen är klar kan du starta Local-appen från mappen Program.
När du startar första gången kan du få svara på några frågor och skapa ett kostnadsfritt konto för Local. Dessa steg är valfria och du kan hoppa över dem om du vill.
Skapa en website i WordPress i språkversion
Local gör det mycket enkelt att skapa en lokal webbplats och installera WordPress snabbt.
För att komma igång klickar du bara på knappen “Skapa en ny webbplats” för att fortsätta.
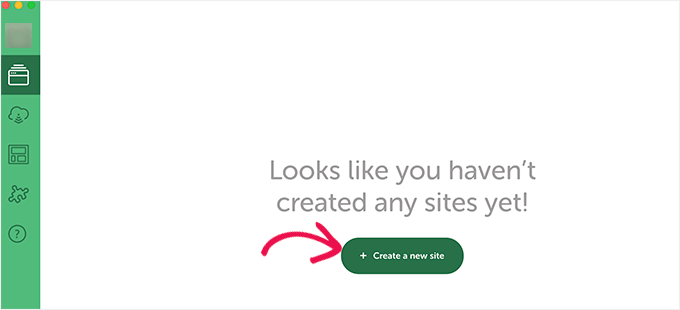
På nästa skärm måste du ange namnet på din webbplats.
Gå sedan vidare och klicka på knappen “Fortsätt”.

Därefter får du välja din plattform.
Local gör att du kan välja vilken version av PHP, Apache och MySQL du vill använda.
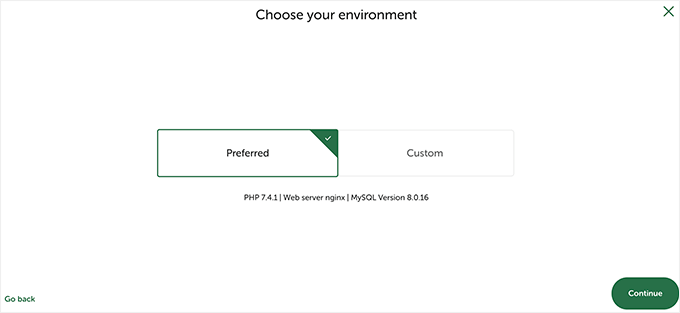
Om du är osäker väljer du inställningarna “Preferred” och klickar på knappen “Continue”.
Slutligen måste du ange ett användarnamn och lösenord för WordPress. Sedan kan du klicka på knappen “Add Site”.
Local kommer nu att ladda ner och installera WordPress för att skapa din webbplats. Du kan bli ombedd att ange ditt användarnamn och lösenord för Mac för att göra ändringar.
När du är klar kommer du att se information om din nyskapade webbplats med knappar för att besöka WordPress-adminområdet eller visa din lokala webbplats.
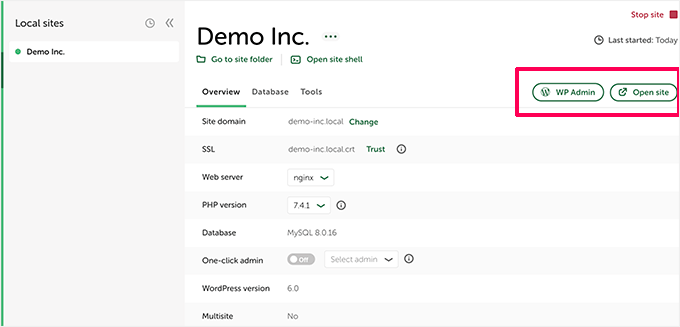
Du kan nu besöka din webbplats eller logga in på WordPress adminområde.
Härifrån kan du använda din lokalt hostade WordPress-webbplats precis som du skulle hantera en live-webbplats.
Du kan installera plugins och teman och utforma din webbplats som du vill.
2. Installera WordPress lokalt på Mac med hjälp av MAMP
MAMP är ett populärt program som gör det möjligt att köra WordPress på din Mac-dator.
Låt oss först besöka MAMP-webbplatsen. Här bör du se den senaste versionen av MAMP & MAMP Pro.
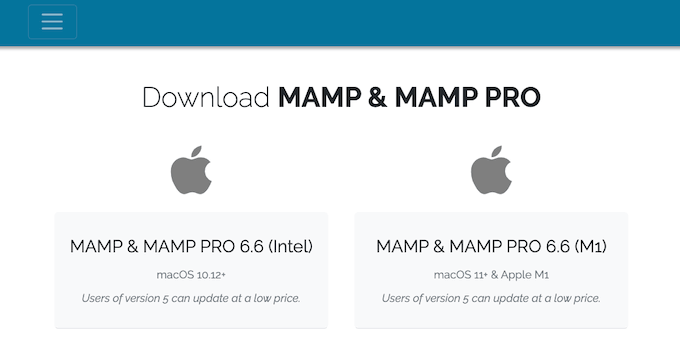
MAMP har separata nedladdningar för olika versioner av operativsystemet macOS.
Är du osäker på vilken version av macOS som är installerad på din dator? För att ta reda på det klickar du bara på Apple-ikonen i datorns verktygsfält.
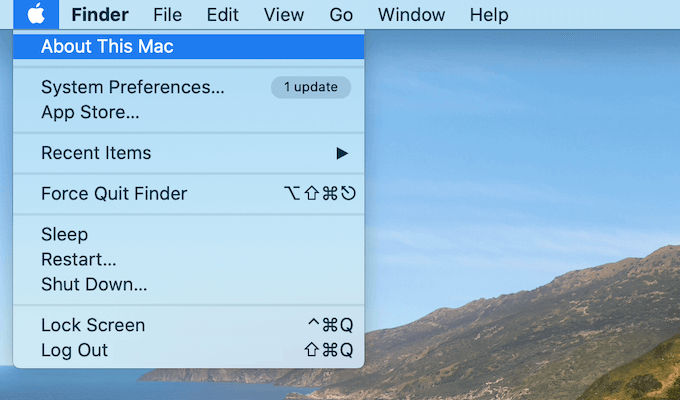
You can then click on the “About This Mac” alternative.
Då öppnas ett popup-fönster som visar massor av information om din dator, inklusive din version av macOS.
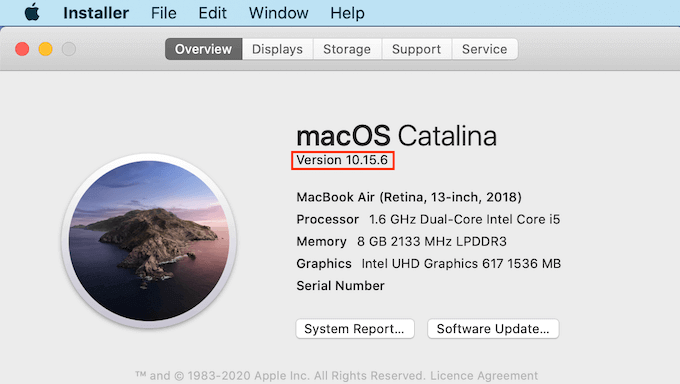
You can now download the correct version of MAMP for your operating system.
När din download är slutförd, dubbelklicka på MAMP .pkg-filen. Detta kommer att starta MAMP installer.

Nu är det bara att följa instruktionerna på skärmen för att installera MAMP.
När du har installerat programmet startar du MAMP genom att öppna mappen “Program” på din dator.
Här hittar du 2 versioner av MAMP. MAMP Pro är den betalda versionen, så se till att du väljer gratisversionen.
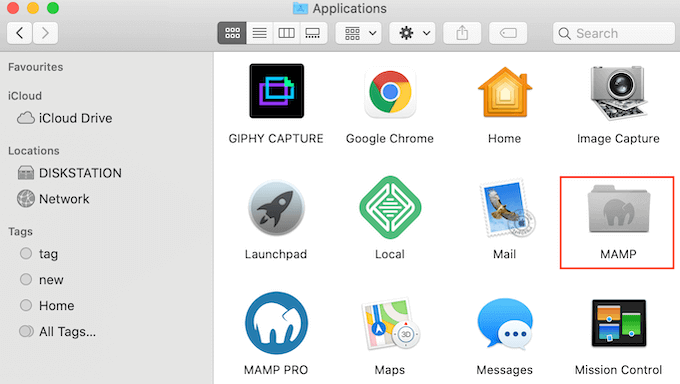
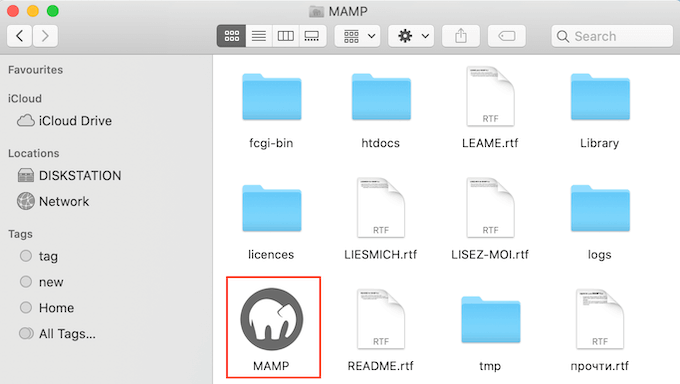
I den här MAMP-mappen hittar du olika filer och ett MAMP-program.
Det är bara att dubbelklicka för att starta MAMP-appen.
Innan du sätter igång rekommenderar vi att du konfigurerar några inställningar för att göra din MAMP-upplevelse bättre.
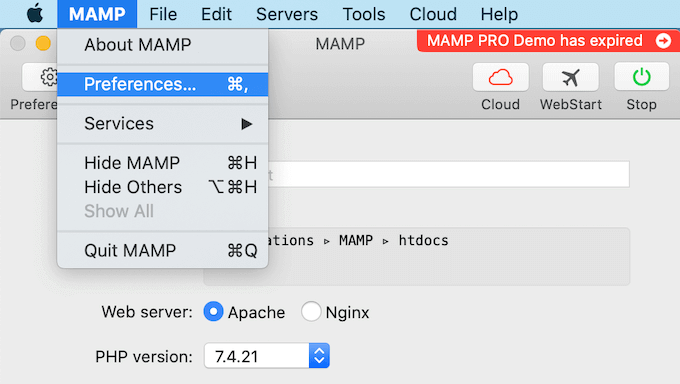
För att göra dessa ändringar måste du klicka på “MAMP” i verktygsfältet och sedan välja “Preferences….
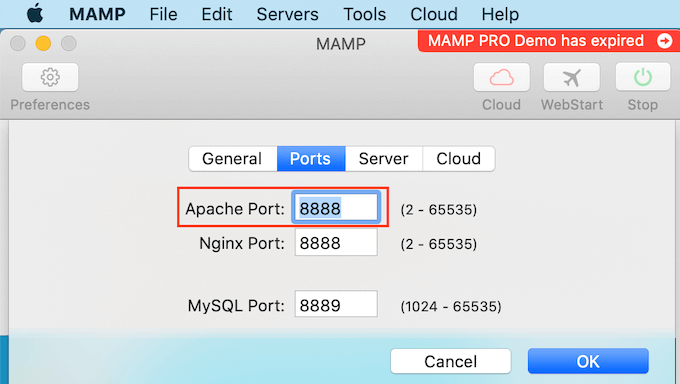
I popup-fönstret ska du växla till fliken “Ports”.
Du kan nu kontrollera vilken Apache-port som MAMP använder. Vi rekommenderar att du byter till Apache Port 8888 om MAMP inte redan använder den här porten.
Nästa steg är att konfigurera din dokumentrotmapp. Det är här du kommer att skapa och lagra alla dina lokala WordPress-webbplatser.
Som standard använder MAMP mappen /Applications/MAMP/htdocs/, men du kan ändra detta till någon annan plats.
I dialogrutan “Inställningar…” klickar vi på fliken “Server”. Din dokumentrot bör nu vara synlig.
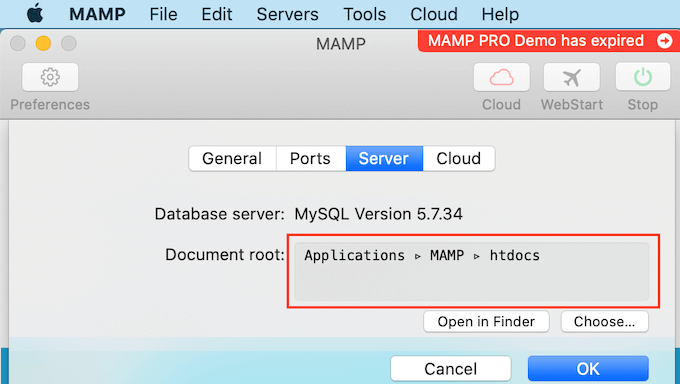
Om du vill lagra dina webbplatser i någon annan mapp klickar du på knappen “Välj…”.
Då öppnas en popup där du kan välja en ny plats. Du kanske också vill skapa en ny mapp för att lagra alla dina WordPress-webbplatser.
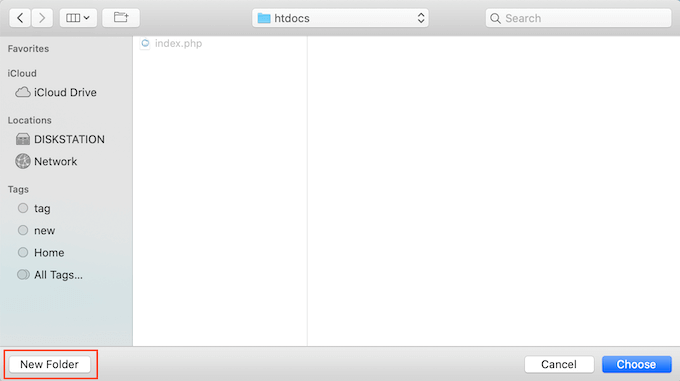
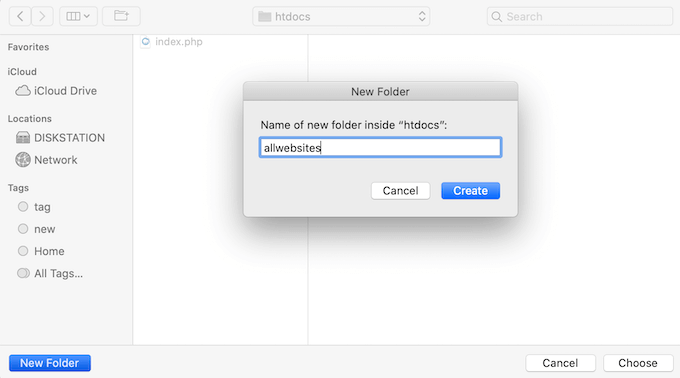
Du kan döpa den här mappen till vad du vill.
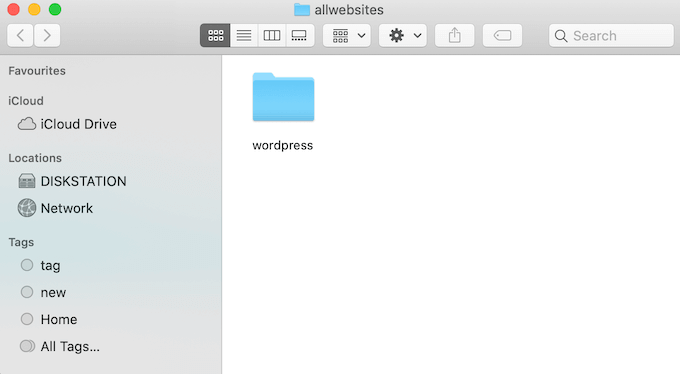
I den här artikeln kommer vi att lagra våra webbplatser i en mapp som heter “allwebsites”.
Installera WordPress på MAMP
Nu när du har konfigurerat MAMP är det dags att installera WordPress på din Mac-dator.
Först måste du besöka webbplatsen WordPress.org och ladda ner den senaste versionen av WordPress Core .
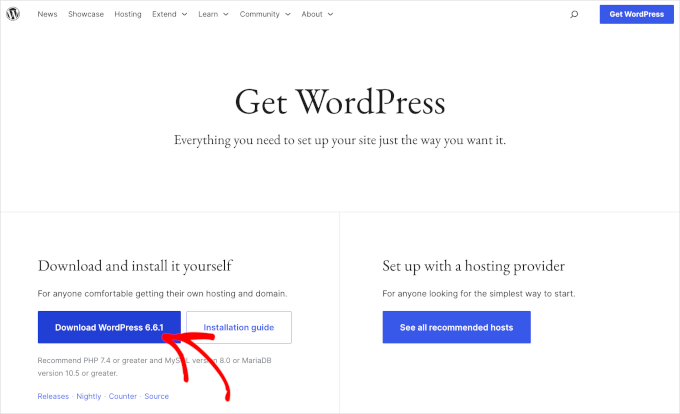
OBS: Det finns två versioner av WordPress. För mer information, se vår jämförelseartikel om WordPress.com vs. WordPress.org.
När du har downloadat filen från WordPress.org behöver du bara packa upp den. Detta kommer att skapa en unzippad “WordPress” folder.
Nu är det bara att kopiera den här mappen till rotmappen för ditt MAMP-dokument.
Eftersom vi ändrade dokumentets rotmapp måste vi kopiera “wordpress” till applications/MAMP/htdocs/allwebsites.
WordPress behöver en database för att kunna lagra all content och data. Du måste skapa denna database innan du kan skapa en språkversion av din website.
Oroa dig inte – det är inte så svårt som det låter.
I MAMP-fönstret “Preferences…” klickar du helt enkelt på “OK”-knappen. Detta bör starta MAMP-applikationen i en ny webbläsarflik.
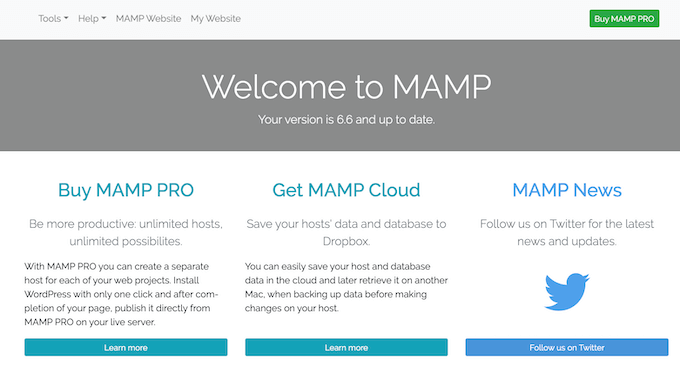
Din nästa uppgift är att starta phpMyAdmin. Det här är en webbaserad applikation för hantering av webbplatsens MySQL-databas.
I verktygsfältet navigerar vi till Verktyg ” phpMyAdmin.
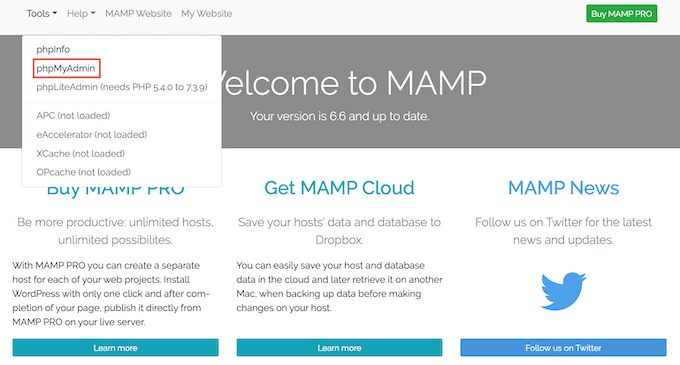
Detta öppnar phpMyAdmin i en ny flik.
I phpMyAdmins instrumentpanel ska du gå till fliken “Databaser”.
Du kan nu skriva in ett namn för din databas i fältet “Database name” med vad du vill. Se bara till att komma ihåg namnet, eftersom vi kommer att använda det i nästa steg.
I den här handledningen kallar vi vår databas för “test_db”.
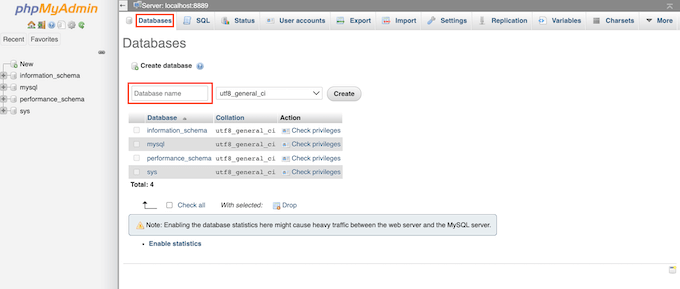
När du har skrivit in databasnamnet kan du klicka på knappen “Create”.
PhpMyAdmin kommer sedan att skapa din databas.
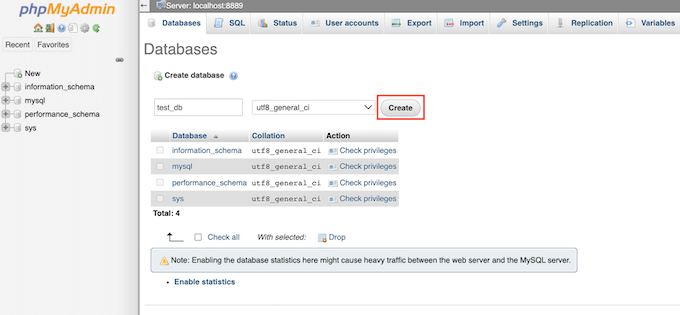
Nu är det dags att installera WordPress.
I en ny webbläsarflik går du till http://localhost:8888/. Om du använder någon annan port än 8888 ändrar du bara webbadressen så att den anger din port.
Du bör nu se en länk till mappen “wordpress” som du kopierade till din rotdokumentmapp. Gå vidare och klicka på den här länken. Då öppnas installationsguiden för WordPress.
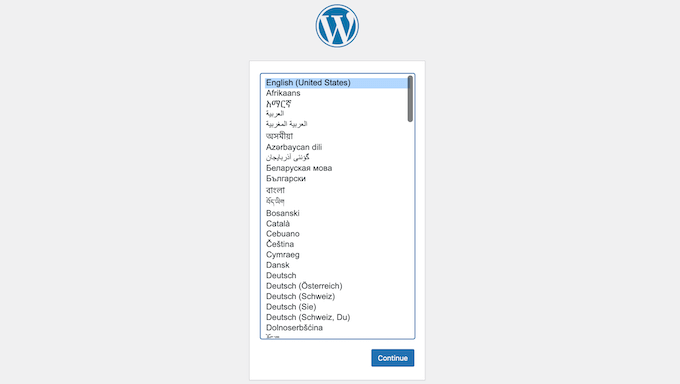
Installationsguiden för WordPress börjar med att be dig välja språk. När du har gjort ditt val kan du klicka på knappen “Fortsätt”.
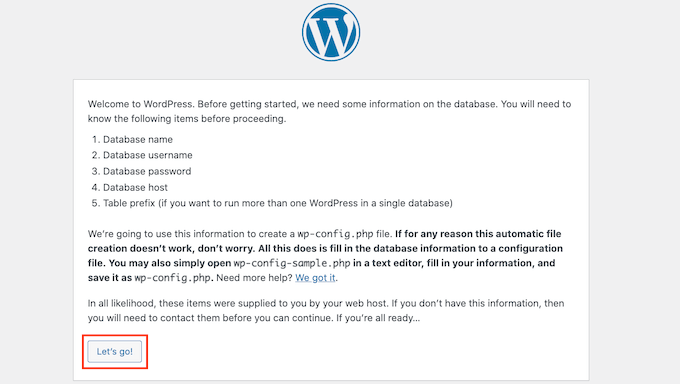
På nästa skärm visar WordPress en lista med all information som behövs för att slutföra installationen.
När du har läst den här skärmen kan du klicka på knappen “Let’s go” för att gå vidare.
Installationsguiden kommer nu att be om information om din WordPress-databas. För databasnamnet skriver du helt enkelt in det namn du skapade i föregående steg.
För “Användarnamn” och “Lösenord” skriver du helt enkelt “root”.
Du kan sedan skriva “localhost” i fältet “Database Host”. Localhost innebär att databasen och webbplatsen finns på samma server, vilket i det här fallet är din Mac-dator.
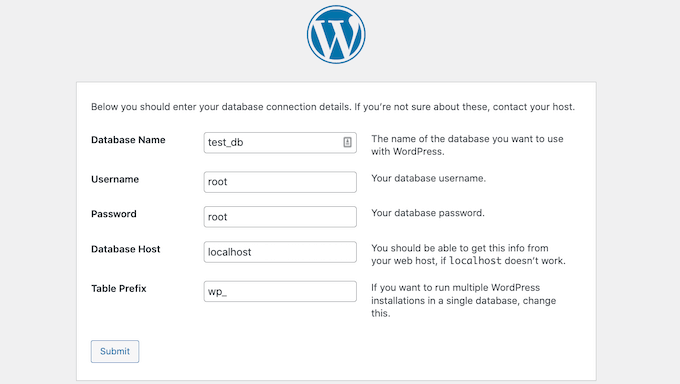
När du har skrivit in all information klickar du bara på knappen “Skicka”.
WordPress kommer nu att ansluta till din databas och skapa en konfigurationsfil åt dig. När det är klart kommer du att se ett framgångsmeddelande.
Om du vill gå vidare till nästa steg kan du klicka på knappen “Kör installationen”.
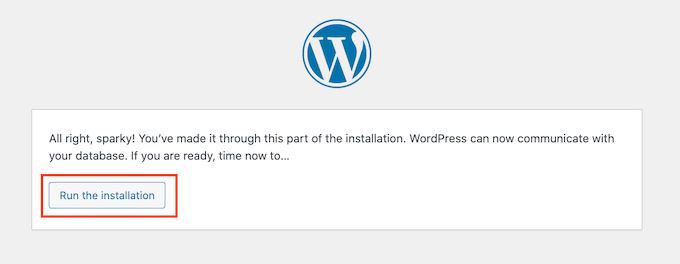
På nästa skärm kommer WordPress att be dig att lägga till en webbplatstitel. Du kan t.ex. använda ditt företagsnamn. De flesta WordPress-teman visar denna titel högst upp på din webbplats.
Om du är osäker på titeln på din webbplats behöver du inte få panik. Du kan när som helst ändra titeln i din WordPress instrumentpanel.
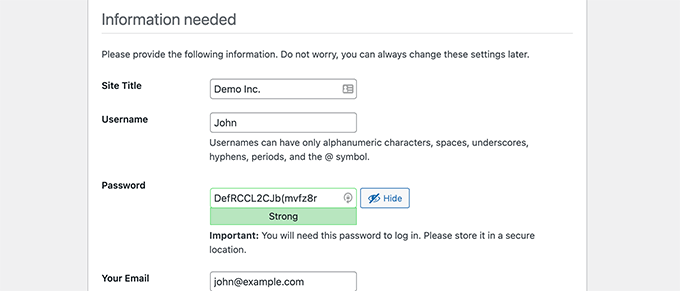
Därefter måste du skapa ett användarnamn och ett lösenord. Detta är de inloggningsuppgifter som du använder för att komma åt din WordPress-instrumentpanel.
Du kan också skriva in din e-postadress i fältet “Din e-postadress”. Det är till den adressen som WordPress kommer att skicka alla sina admin-e-postmeddelanden.
När du har fyllt i formuläret klickar du på knappen “Installera WordPress”.

WordPress kommer nu att runna installationen.
Efter några ögonblick bör du se ett meddelande med texten “Success!”.

Klicka på knappen “Logga in” om du vill gå direkt till inloggningsskärmen i WordPress.
Du kan också logga in på din lokala WordPress-webbplats med hjälp av följande URL: http://localhost:8888/wordpress/wp-login.php
Obs: Om du använder en annan Apache-port måste du ändra delen “8888” i den här URL:en.
Du kan nu gå vidare och logga in på din WordPress-webbplats genom att ange det användarnamn och lösenord som du skapade i föregående steg.
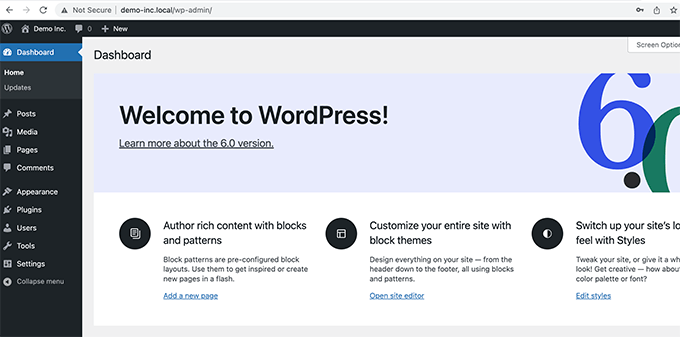
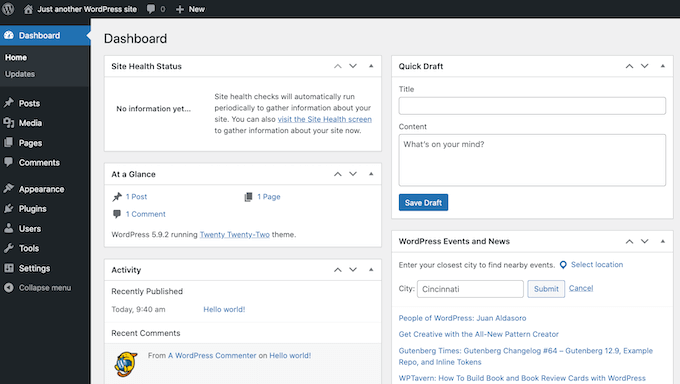
Du kommer då till WordPress instrumentpanel.
Prova WordPress språkversion på Mac
En lokal installation är perfekt för att testa WordPress eller utveckla webbplatser på din dator. Nu när WordPress körs lokalt på din Mac finns det några saker som du kanske vill prova:
- Experimentera med de bästa WordPress themes.
- Försök att hitta ditt perfekta WordPress theme.
- Testa viktiga tillägg till WordPress lokalt.
- Lär dig programmera WordPress genom att skapa dina egna tillägg och customizes themes.
Flytta din lokala installerade WordPress till Live website
När du har lekt med WordPress lokalt kanske du vill flytta din installerade WordPress till en live website. Det är det enda sättet som andra kan se din website.
För att göra det måste du köpa ett domännamn och ett webbhotell.
Ett domännamn är din hemsidas adress på internet och ett webbhotell är den plats där din hemsidas filer lagras. Du kan se webbhotellet som din hemsidas hem på internet.
För webbhotell rekommenderar vi Bluehost. De är ett av de största webbhotellen i världen och rekommenderas också officiellt av WordPress.org.
Lyckligtvis erbjuder Bluehost WPBeginners användare rabatt på hosting, ett gratis SSL-certifikat och ett gratis domännamn. I princip kan du förvandla din lokala WordPress-installation till en levande webbplats för 1,99 USD per månad.
När du har köpt ett webbhotell kan det vara bra att läsa vår artikel om hur du flyttar WordPress från en lokal server till en live-webbplats.
Vi hoppas att den här artikeln hjälpte dig att lära dig hur du installerar WordPress lokalt på Mac. Du kanske också vill kolla in vår guide på om hur du skapar en webbplats med WordPress eller se vår jämförelse av de bäst hanterade hostingföretagen för WordPress.
If you liked this article, then please subscribe to our YouTube Channel for WordPress video tutorials. You can also find us on Twitter and Facebook.


WPBeginner Staff
Since we don’t know what went wrong when you deleted the site earlier. We would recommend you to create a new site. Basically repeat the whole process all over again. Except this time create a new directory in your document root folder. Do the same with MySQL DB. Then install WordPress in the new directory using your new MySQL DB.
Steve
Great instructions! I was able to set up a site, but I needed to delete it and start over. I trashed the SQL database and the previous site folder. But when WordPress goes to install itself now, I get a huge error log in the browser saying that a ton of files, info “already exist.” Do I need to get rid of some other previously installed files and, if so, which ones?
Minyan
When I type in http://localhost/wordpress (I name the wordpress folder under the root folder of MAMP wordpress), it shows “404 not found. The requested URL /wordpress was not found on this server”. Can anyone tell me what I did wrong?
Schalk
Minyan,
Any luck with your “404 not found’ issue ??
ej
having the same problem. please help!
Ish
Instead of typing in ‘http://localhost/wordpress’,
just type in ‘localhost’ instead and it should bring you to the wordpress page.
Worked for me, hope it does for you!
ThankQ
Michelle Hamilton
These instructions are the best and easiest to follow out there. I actually used them to help my instructor set up WordPress on her new mac and I used them to set it up on the mac I use in my internship. Thanks so much!!!
Michelle Hamilton
These are the best and easiest to follow instructions out there. I actually used them to help my instructor install MAMP on her mac. I had already used them to do it for my internship that I am participating in. Great Job!!!
Julie Valin
Thank you very much for this great step-by-step tutorial! Very helpful for this first-time MAMP user, when at first I felt overwhelmed. Now I’m feeling informed and happy, and I always like to comment on those posts/tutorials that have really helped me. Kudos!
WPBeginner Staff
You can set up a staging environment for on a live server. Take a look at our guide on how to create staging environment for a WordPress site
Haley
Thanks for this tutorial – quick question for you: I’m designing a site for a client that I will have to build offline using MAMP, however I see the note about only being able to view it on my computer. Is there a way that my client (located in another state) can review the progress without making it live on their site?
Hannah
Oh god, thank you wpbeginner team so much. First time I’ve ever used MAMP and nothing seemed to say ‘Hey, for all you dummys, here’s how you install WordPress’- it just assumed we would know. *forever grateful*
Frank
Too easy guys, thanks a lot!
Alex Koch
Really appreciate your help. MAMP 3.0.3 comes with a slightly different interface and a different setup – you have to redirect Apache to /bin/phpMyAdmin/ in oder to setup your mysql database for wordpress and THEN redirect Apache to you actual root directory localhost/mysitewahtever/ where you put wordpress.
WordPress can access the db nevertheless.
Rich
Thank you for this easy to follow guide! I finally got the motivation up to move forward with a project I’ve almost completed and this guide really helped. Thanks again!
megan Dickson
This was AWESOME. SO EASY.
Thank you!
Tim Aldiss
Really useful, thanks
Tom Nguyen
Is it possible to receive emails from WordPress installed on a local server? I’m only asking because I had installed WordPress and forgot my administrator password. I click the Lost Your Password link to start the password reset process, but I never received an email.
I just ended up going to the local phpMyAdmin interface and reset the password that way.
Kate
I made an assumption when installing mamp/wordpress with my website name. The “website name” I used to set it up using your tutorial is not my website name my business currently owns and I am redoing. I thought if I used that one it would mess up the current site. So…..do I have to go back and put my “real” website name in the install files or can I just switch it over to my current domain name when I am done with the new wordpress site? Thanks!
Leigh
hey
followed steps ….up to setting up to part of .. new database – used test_db as per example
opening http://localhost/mysite in browser and getting 404 kicking out.
should be saying …
WordPress will notify you that it was unable to find wp-config.php file. !!!
…directory set cool , to mysite
///using default mamp ports
thanx for help in advance man !
smiles
Kate
I guess the issue was that I named my wp folder that contains all my wp files in hpdocs folder within MAMP using 2 words. Therefore I put a space in between and when I went to put the local host/mydomainname/wp-admin/ address to find my dashboard I apparently had to add a %20 due to the space. It seems to work now so I think I did it right! Thanks again for your sites guidance and prompt help. I really appreciate it and have added your site to my bookmarks and subscribed!
Kate
Well apparently it was so simple I was missing the part that I needed to put the _db after my new database I created Solved!
Kate
I am switching to wordpress from drupal and I appreciate and value your great resources and thorough steps coming from a newbie with no tech experience and knowledge!! I am having the same problem that Jen did above (12/12/2013). I’m using a Macbook Pro and got as far as trying to figure out whether the database that I set up in my wp-config file exists. I did the steps you recommended (it says all privileges are granted in my root user) , but maybe I’m doing it wrong cause I’m still getting the same error message as she did? Maybe I need another way of explaining the steps? I closed Skype and ensured websharing wasn’t on, but that didn’t change anything. Totally stumped!!
WPBeginner Support
Kate once you start MAMP, you need to go to http://localhost/phpmyadmin create a new database. Open your wp-config.php file and enter the database name on the line:
define('DB_NAME', 'YourDBNameHere');Let us know if this solved your problem.
Admin
Daniel
Thanks for the guide.
Now i have installed wordpress onto my mac, and have created a website. How do I go about starting a new website?
Thanks Dan
WPBeginner Support
Repeat the process by installing WordPress in a new directory (folder) and by creating a new database.
Admin
Syed
I am going through a nightmare. Thanks to your instructions, everything was running fine until today when I clicked on upgrade to the new MAMP version and went for an install, thinking that it will happen in the background.
It appears that the upgrade has either erased my data or has put it away. Incidentally, I had a full copy of the main drive on a different drive (the whole MAMP folder). I can see the folders and files in both places but when I try to start MAMP from the different drive where the old MAMP folders are placed, it still boots up with the new version and I can’t start my site.
I have no way to really know what to do next. Kindly help. Thanks
netyx
Thanks for the guide!
I have a problem though. I created a database and then MySQL server crashed. It’s not working anymore. Could you help me please anyone?
arzu
very helpful, thank you
Art
Yeah dude, this was very helpfull, thanks a lot!
Derek
Great tutorial. Thanks. It all worked fine for me until the very end. After I successfully installed wordpress I clicked on “View Site” and got a white splash screen that says “Your Website” followed by instructions on how to make it “live.” I don’t want to go live. I just want to work on building a theme locally. But for whatever reason, I’m just not able to view the site.
Help!
Thanks.
Ian
Perfect guide, much appreciated
Brandon
A breeze. Many thanks!
GH
Thank you so much. Very helpful explanation.
Jen
I just installed MAMP and my servers won’t start. Have you ever had this problem before? I tried restarting and re-reading the steps, thanks!
WPBeginner Support
check error logs in the directory where you installed MAMP
Admin
Jen
PLEASE HELP! I CANNOT FIND AN ANSWER AND IM ON A DEADLINE!
So everything was working until I clicked the ‘open start page’ button. Originally it just populated a web browser that only said:
It Works
Then, after refreshing it send me straight to the create config screen for wordpress and skipped the database start section. When I submitted the information your tutorial included it says :
“We were able to connect to the database server (which means your username and password is okay) but not able to select the (my database name) database.”
What do I do to fix this?? I was reading online and it says that there are some issues with Mac Mountain Lion, so I turned off the web sharing, which was the solution for this problem on all other sites. Please please please help!!
– Jen
WPBeginner Support
Jen, open your wp-config.php file which is located in your WordPress installation’s root directory. Look at the Database, database username and password sections. Go to phpmyadmin by typing
http://localhost/phpmyadminin the browser. Make sure that the database name in your wp-config file exists. Also check that the username used in wp-config file has all privileges by clicking on the Users tab in phpmyadmin.Admin
brad
i rescind my prior victory, when i finished working on my site, I stopped the servers and quit MAMP. When I restarted MAMP to work on a new project a few hours later I am unable to access any files in htdocs without a 404 error. MAMAP support forums have almost no responses to this issue, any one here have this issue? Any possible help? I’m not a tech person, just a designer so this is mostly greek to me.
Brad
Thanks for a simple and well explained tutorial! I got this up and running in under 15 mins!
Daniele
Thank you guys! Really helpful for a young Mac user like me!
jeroen faber
Great guide!
One thing: the following line in the guide:
“Open a new browser window and type http://localhost/mysite.”
didn’t take me to the WordPress installation screen, just typing “localhost” in the browser did.
Did i make some mistake in the configuration or….?
WPBeginner Support
seems like you have installed wordpress in your main www or htdocs or web directory under your Apache installation.
Admin
Dee
Thanks for this, it was really easy to follow and I had no problems at all!
Ton in 't Veld
I’ve made many sites already with Dreamweaver. Now I want to set up a WordPress blog for my wife. I installed MAMP. So far so good. In the preference I tried to start the servers. MySQL Server worked immediately, but the Apache server doesn’t go to green. I alreadyI switched off Skype (as advised before.
Many thanks for looking atmy problem.
WPBeginner Support
Sometimes skype is running in the background check in the activity monitor to make sure that skype is not running in the background.
Admin
George
Everything was going well until I got to, http://localhost:8888/wordpress. For some reason the Apache Server wouldn’t start with a port of 80. Please tell me what I’m not doing or doing wrong.
Thank you,
George
Editorial Staff
This is happening if you have Skype running. You need to change the port in Skype or quit skype while using Mamp.
Admin
Justin
That was exactly what I needed. One hang up I had was that “Web Sharing” was turned on in my Mac OSX “System Preferences.” It was causing a duplicate Apache server to run, which prevented phpmyadmin or the “Start Page” from running.
Editorial Staff
Thanks for sharing that with us Justin. Hopefully it will help others who read the comments
Admin
Jonas
Hi,
Followed your instructions an successfully installed WP. Many thanks
JaY Srivastava
Thanks for saving me real time, i knew how to do that on windows, but since i use my mac as my main work laptop it was getting difficult for me to test websites.
I have been always fan of wpbeginner but now i guess it has grown more.
Thanks Again !
RW
Been using my first install of mamp ever since I read this tutorial. The only thin that I’m struggling with is, porting it over to a live production site. I’m assuming I have to export my DB and then import it using phpmyadmin, but obviously, some things will have to change. Also have to manually upload all upload folders as well.
Does anyone have recommended workflow ideas?
Thanks,
Bob
Editorial Staff
If you have BackupBuddy, then you can easily create a full backup file and import that. To do it manually:
1. Install WordPress on new site and copy/paste the /wp-content/ directory from the old site.
2. Import all content using phpMyAdmin
3. Change the site_url and home_url options in wp_options to reflect the new site.
4. Login to the new site and go to Settings > General and click on the save button.
5. Go to Settings > Permalinks and click on the save button.
Admin
RW
perfect! thanks! never loved backupbuddy as it didn’t reliably work for me. the manual approach looks simple! thanks so much!
Bob
RW
I’ve been using MAMP for a week now and absolutely love it. Makes testing so much faster!
Thanks,
Bob
Gautam Doddamani
i have been using XAMPP from a long time and its serving me well…it has the same functionality as MAMP and perfectly runs on a mac
Raihan
this post is very useful to me. for this i saved this page
Gunstra
Great Tut, thank you.
Debbie
Finally, concise, step-by-step instructions on how to set-up WordPress. I have followed other instructions and still get lost on what to do. Thank you so much!!
Christopher Anderton
I’m using MAMP myself, however, there is a even simpler way to get up and running in notime using MAMP Stack (http://bitnami.com/stack/mamp) and the WordPress module (see the modules section at the page).
Luke
Definitely a useful process! I wish I had this article the first time I tried to set this up. It would have been a huge help!
What’s your opinion on modifying the hosts file to allow using a DNS name for the local site ( example.com instead of localhost )? Good practice? Bad practice?
I’ve personally found it helpful when transferring a site I’ve developed locally to a live server.
RW
That’s so helpful. I’ve read about doing this and I think it will save so much time working locally on sites. I guess it has to be configured (or reconfigured) for different sites?
Thanks,
Bob