


If you run a charity or nonprofit, you need a way to accept donations on your WordPress site that doesn’t send supporters away mid-gift.
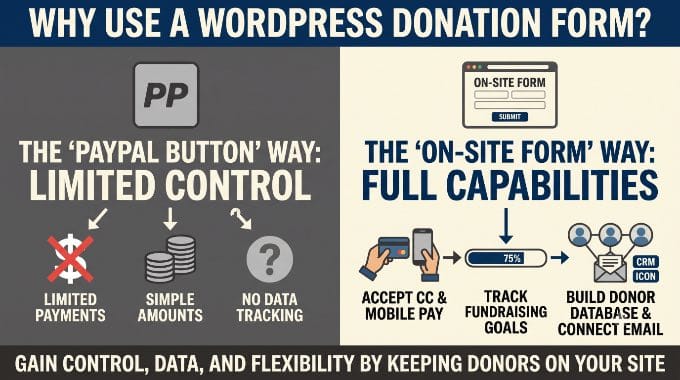
The quickest option, a PayPal donate button, sends donors off your site to finish paying, and many drop off along the way, especially on mobile.
On the other hand, a donation form on your own website keeps donors on the page, lets you build a supporter list, and can show a live fundraising goal that nudges bigger gifts.
In this guide, we’ll show you how to create a donation form in WordPress, turn on recurring donations, and pick the right setup whether you need full donor management or just a simple form.
Why Create a Donation Form in WordPress?
A dedicated donation form gives you capabilities that a simple PayPal button can’t match. Here’s what you gain by keeping donors on your site:
- Accept credit card payments via Stripe, including Apple Pay and Google Pay.
- Set suggested donation amounts to make giving easier and increase average gift size.
- Track fundraising goals with a visual progress bar.
- Collect donor contact details and build your own donor database.
- Ask donors to join your email newsletter in the same step.
- Integrate with your CRM or email marketing platform.
Let’s take a look at how to create a donation form in WordPress:
How to Create a Donation Form in WordPress (Full Donor Management System)
Charitable is the best WordPress donation plugin for nonprofits and charities.
Unlike general form builders, it’s built specifically for fundraising, with a drag-and-drop campaign builder, unlimited campaigns, a donor management dashboard, and Stripe and PayPal integration in the free version.
We use Charitable on the Balkhi Foundation website, and the setup is fast and clean. You can have your first donation form live in under 10 minutes.
Before You Start: This tutorial uses the free version of Charitable. You can download Charitable free from WordPress.org.
If you want to add recurring donations or annual donor receipts, you’ll need to upgrade to Charitable Plus ($99/year).
Step 1: Install and Activate Charitable
First, install and activate the free Charitable plugin. For step-by-step help, see our guide on how to install a WordPress plugin.
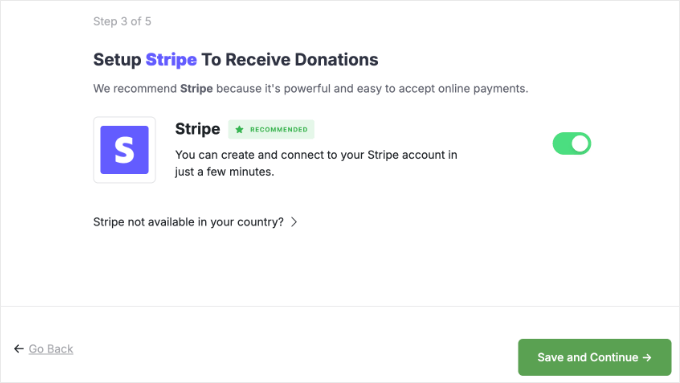
Charitable’s setup wizard launches automatically on your first activation. You can connect Stripe or PayPal through the wizard now, or skip that step and complete it in Step 2.
Step 2: Configure Your Charitable Settings
Before building your campaign, make sure your site is running on HTTPS. All payment processors require it, and it protects your donors’ payment data.
If you didn’t connect a payment gateway during the setup wizard, then go to Charitable » Settings » Payment Gateways and enable Stripe for on-site card payments. Stripe also includes Apple Pay and Google Pay automatically at no extra cost.
On the free version of the plugin, Charitable adds a 3% platform fee to every donation, on top of your payment gateway’s standard processing fees. Upgrading to any paid plan removes this Charitable fee entirely.
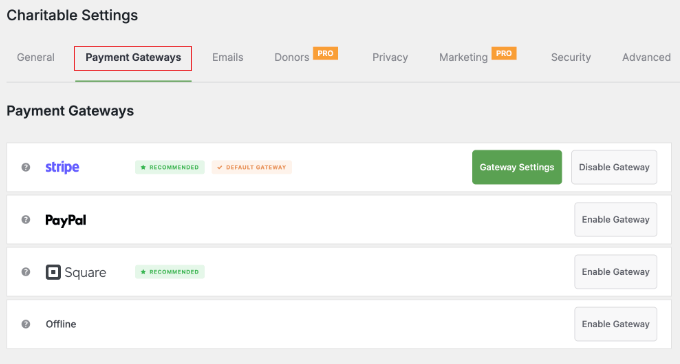
You can also enable PayPal, Square, or offline donations here.
If you’re not sure which gateway to turn on, here’s how they compare for a beginner nonprofit:
- Stripe: Donors complete their payment right on your site, and it supports Apple Pay and Google Pay. That keeps conversions high, so it’s the option we recommend for most nonprofits.
- PayPal: Many donors know and trust it, but it redirects them off your site to finish the payment. That extra step tends to lower conversions, especially on mobile.
- Square: A good fit if you already use Square to take donations in person and want to run everything through one system.
On the Stripe Gateway Settings page, click the ‘Connect with Stripe’ button to link your Stripe account. This opens a Stripe login flow rather than asking for API keys.
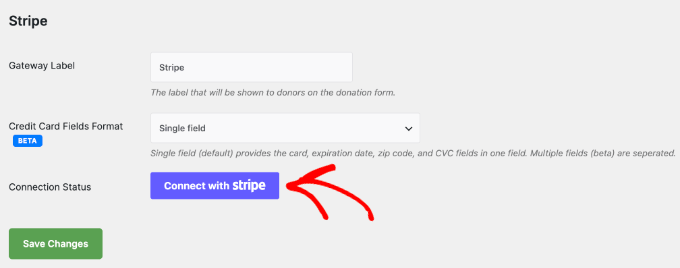
You’ll also see a Credit Card Fields Format option: single field combines card number, expiry, zip, and CVC into one input, while multiple fields separates them. The default single field works well for most sites.
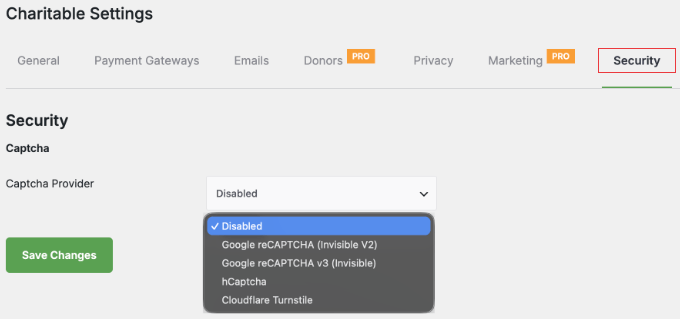
Charitable includes built-in honeypot spam protection automatically, with no setup required. For additional protection, go to Charitable » Settings » Security to enable Google reCAPTCHA or hCaptcha.
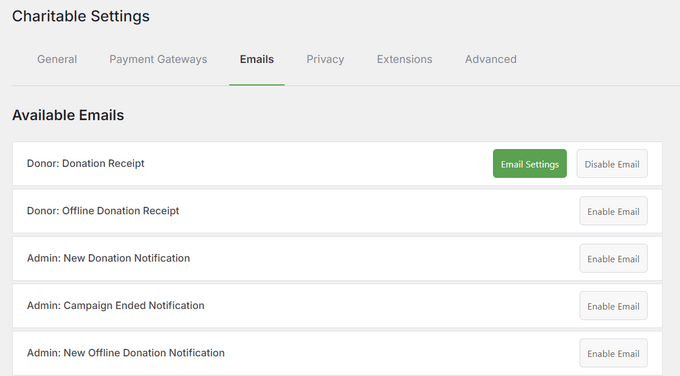
Charitable also automatically sends an email receipt to each donor after a successful donation.
This matters for nonprofits, since donors expect a receipt as written acknowledgment of a tax-deductible gift for their records.
To customize the receipt template, go to Charitable » Settings » Email.
Step 3: Create a New Fundraising Campaign
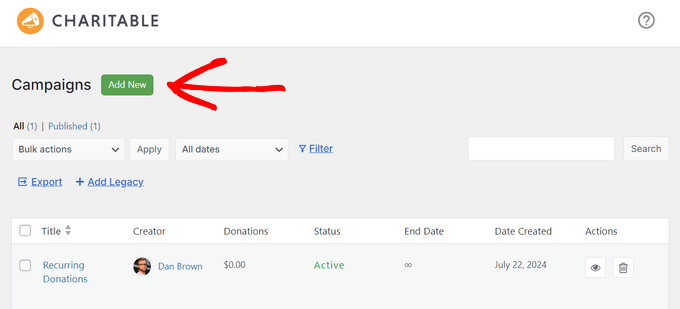
Now you can go to Charitable » Campaigns and click the ‘Add Campaign’ button.
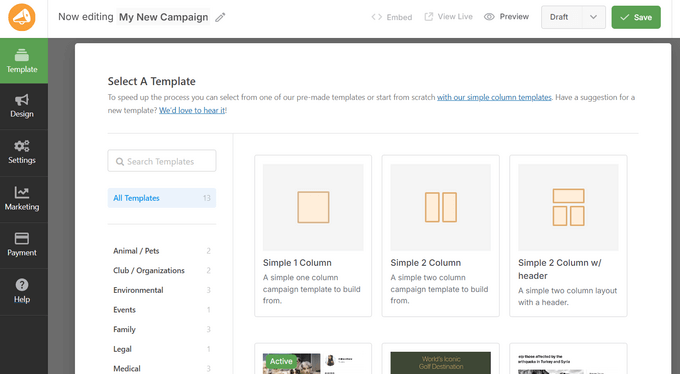
Next, choose a pre-built campaign template or start from a blank canvas.
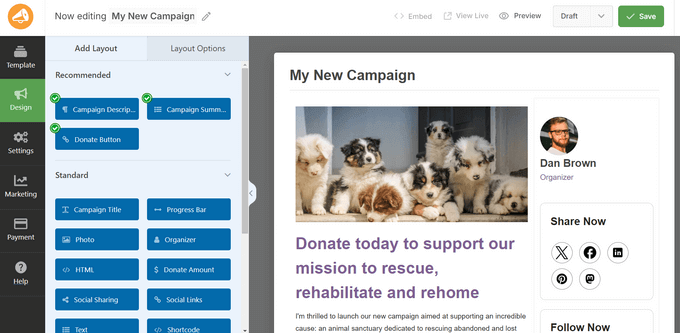
Enter your campaign title in the editor.
Use the drag-and-drop builder to add a description, a campaign image, and a fundraising goal with a progress bar.
Step 4: Configure Your Donation Form Options
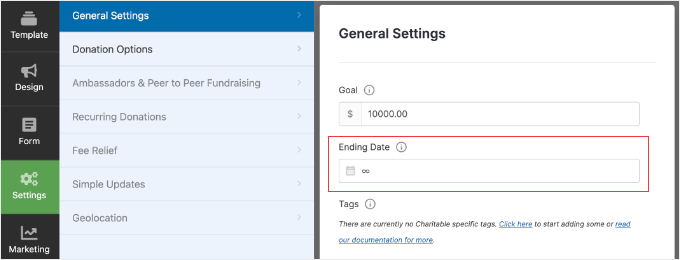
To set an optional campaign end date, click ‘Settings’ in the campaign editor sidebar and make sure ‘General Settings’ is selected.
Charitable generates your campaign page URL automatically when you publish.
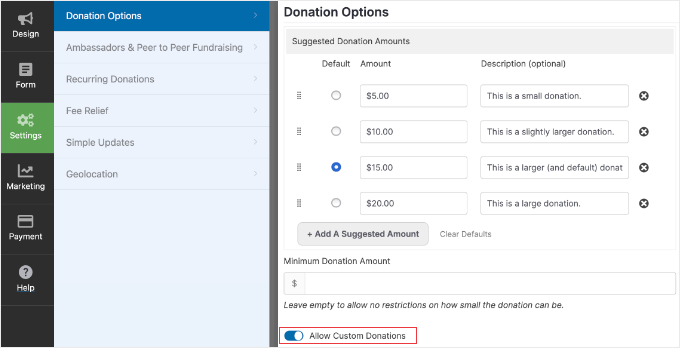
While you’re still on the Settings tab, select ‘Donation Options’. Set your suggested donation amounts, such as $10, $25, $50, and $100.
You can also enable the ‘Allow Custom Donations’ option so donors can enter their own figure.
Charitable collects each donor’s name and email address by default. If you need additional fields like phone number or address, you’ll need to upgrade to a paid plan for the Custom Fields feature.
Optional: Turn on Recurring Donations (Paid Plugin Only)
Recurring donations let supporters give automatically each month or year, which gives your nonprofit steady, predictable income instead of relying on one-time gifts. This is a Charitable Plus feature, and the free version doesn’t include it.
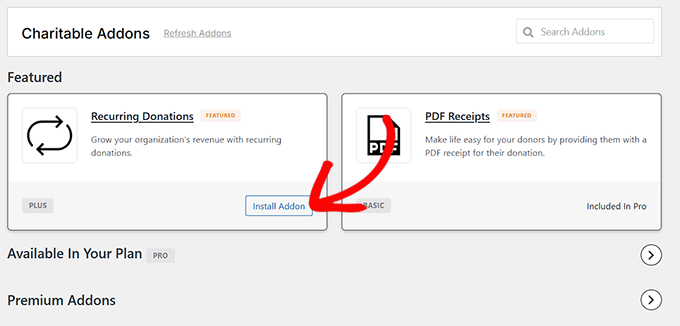
You will need to first install the Recurring Donations addon.
You can do this from the Charitable » Extensions page in your WordPress dashboard.
Then, inside your campaign, you need to open the ‘Recurring Donations’ tab in the general settings.
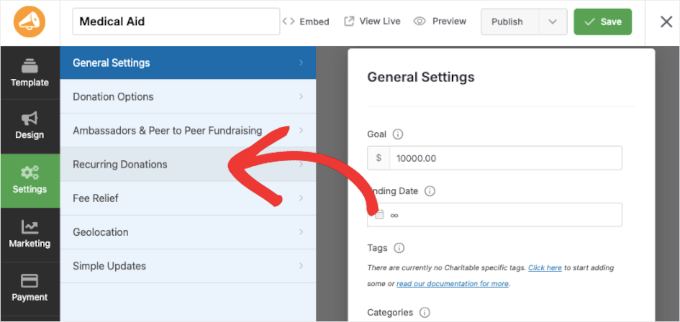
You can then choose between different modes:
- Simple: Provides a checkbox for users to make their donations recurring.
- Advanced: Donors can choose between one-time and recurring donations and choose when their contributions will end.
- Recurring only: All donations are recurring by default.
Make sure to click the ‘Save’ button at the top right of the builder.
Step 5: Publish and Embed Your Donation Form
When you’re ready to go live, click the dropdown arrow next to the ‘Draft’ button at the top of the campaign editor and select ‘Publish’.
After that, you need to click the ‘Save’ button.
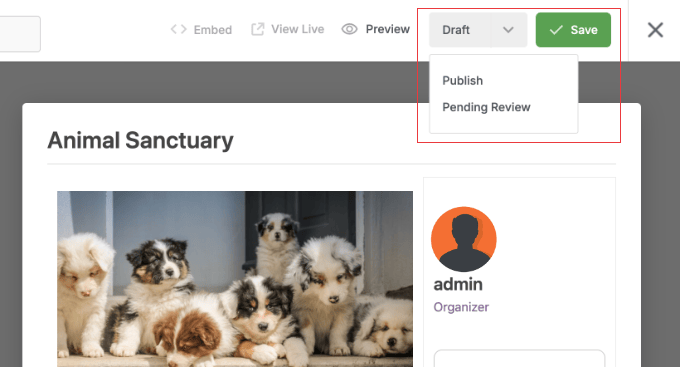
Charitable creates a standalone campaign page with its own URL automatically. You can share that URL directly with donors, or embed the form on any existing page.
To embed it, open the page in the WordPress block editor, click the + inserter, search for ‘Charitable Campaign’, and select your campaign from the dropdown.
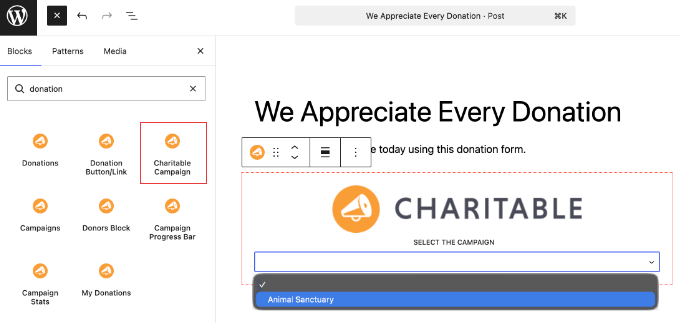
You can also embed the entire fundraiser anywhere using the shortcode [campaign id="123"], replacing “123” with your campaign ID.
After embedding, publish the page and send a test donation to confirm payments are processing correctly.
Using WPForms to Create a Simple Donation Form
If you don’t need a full donor management system, then WPForms is a great option for building a simple WordPress donation form.
It’s the most popular drag-and-drop form builder for WordPress and comes with pre-built donation form templates.
The free version of WPForms lets you accept donations through Stripe and PayPal with a 3% transaction fee. The Pro version of the plugin also supports recurring donations in WordPress with no additional transaction fees.
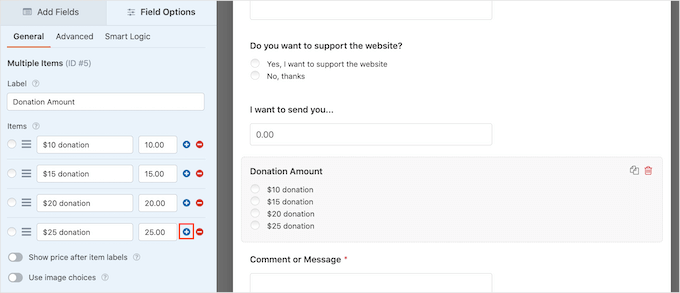
WPForms also offers special nonprofit pricing for qualifying organizations.
If you’re new to the plugin, our guide on how to create a contact form in WordPress covers the WPForms basics you’ll use to build any form.
Frequently Asked Questions About Donation Forms
What is the best free donation form plugin for WordPress?
Charitable is my top recommendation for a free WordPress donation plugin. The free version includes unlimited campaigns, Stripe and PayPal integration, a donor management dashboard, and donation goals with progress bars.
Can I add a recurring donation option to my WordPress donation form?
Yes. Charitable supports recurring donations on its Plus plan at $99 per year, with available frequencies including weekly, monthly, quarterly, and annual.
WPForms also supports recurring donations on its Pro plan.
Does Charitable charge a percentage of my donations?
Partly. Charitable’s paid plans charge zero platform fees. But on the free version only, Charitable adds a 3% platform fee to every donation, on top of your payment processor’s standard rates (for example, Stripe charges 2.9% + 30¢).
To remove the 3% fee, you can upgrade to any paid plan (Basic starts at $69/year).
Can I accept donations without a plugin in WordPress?
Yes, you can add a PayPal donate button to your site without a plugin, but it redirects donors off your site to complete the payment. That means lower conversion rates and no donor information collected on your end.
How do I add a donation form to my WordPress sidebar?
With Charitable, you can add a donation form to any sidebar or widget area by going to Appearance » Widgets, adding a Shortcode widget, and pasting in the shortcode [campaign id="123"]. Replace “123” with your campaign ID, which you’ll find in Charitable » Campaigns.
If your site uses a block theme with the Site Editor, go to Appearance » Editor instead and add the Charitable Campaign block directly to your template.
Additional Resources for Nonprofit Fundraising in WordPress
I hope this article helped you learn how to create a donation form in WordPress.
You may also want to read these guides about nonprofit fundraising and WordPress donations:
- 16 Best WordPress Plugins for Nonprofits. A roundup of the best tools for nonprofit WordPress sites.
- How to Create a Nonprofit Website in WordPress (Step by Step). Start here if you’re building your nonprofit website from scratch.
If you liked this article, then please subscribe to our YouTube Channel for WordPress video tutorials. You can also find us on Twitter and Facebook.



Mrteesurez
Thanks for the guide. Yes, I also see it beneficial to keep donors on site instead of just redirecting them especially to be able to customize the form to attract donors and sometimes subscribe them for follow-up email depending on the motive of the campaign.
The post is beneficial, thanks.
Karin Mainwaring
This was really helpful thank you.
WPBeginner Support
You’re welcome
Admin
Atiq Ur Rehman
Can you please publish article on gravity forms? I’ve their developer license also. I need it for my website
Zaoul Qamar
Can it be integrated with any payment gateway ? Will love your answer
Susan
Is it possible to add the option to make the donation repeat monthly on this form?
Emmanuel
Most nonprofits use a button on the header that leads to a donation form rather than creating a page for it, isn’t that better.
Jide
Can it integrate with any payment gateway?
Adrienne
ask donors if they want to subscribe to your email newsletter in the same form
—
You can now do this with the new PayPal process.