Are you planning to move your WordPress site to a new hosting company or a different server?
The biggest risk when switching web hosting or migrating a website to a new server is data loss and downtime.
In this step-by-step tutorial, we will show you how to safely migrate your WordPress site to a new host without any downtime. We will also answer commonly asked questions about moving a WordPress site to a new hosting provider.
Important: Before we start, we want you to know that a lot of WordPress hosting companies offer a free migration service. It might not be listed on their website, so all you have to do is ask. Usually, it’s free, but some may charge a small fee.
Having that said, let’s look at the steps we will cover to move WordPress to a new hosting server (without any downtime):
Ready? Let’s get started.
Step 1: Choose Your New WordPress Host
If you are stuck with a slow web host even after optimizing WordPress speed and performance, then it’s time to move your WordPress site to a new host that can handle your growing traffic.
When looking for a new WordPress hosting provider, it’s important to choose carefully so you don’t have to move again any time soon.
Here’s who we recommend:
- For reliable shared hosting, we recommend going with Bluehost. They are officially recommended by WordPress.org. Using our Bluehost coupon, WPBeginner users get up to 61% off and a free domain name.
- For faster shared hosting, we recommend Hostinger. They are among the top WordPress hosting companies and offer faster servers with outstanding customer support.
- If you are looking for cloud hosting or location-specific providers, then we recommend you check out SiteGround. They have data centers across three different continents.
- If you are looking for managed WordPress hosting, then we recommend you check out WP Engine. They are the best and most well-known provider in the industry.
After buying your new hosting, do NOT install WordPress. We will do that in a later step.
For now, your new web hosting account should be empty, with no files or folders in your main directory.
Step 2: Set Up Duplicator for Easy Migration
The first thing you need to do is install and activate the Duplicator plugin on the website that you want to move. For more details, see our step-by-step guide on how to install a WordPress plugin.
Duplicator is the best WordPress migration plugin on the market. It also comes with automated scheduled backups, cloud storage support, 1-click restore, and smart migrations.
Note: Duplicator also has a free version called Duplicator Lite. It can be used to move your website but has limited features compared to the pro version.
Once you have installed and activated Duplicator, go to the Duplicator » Packages page in your WordPress admin area.
Next, you need to click the ‘Create New’ button in the top right corner.
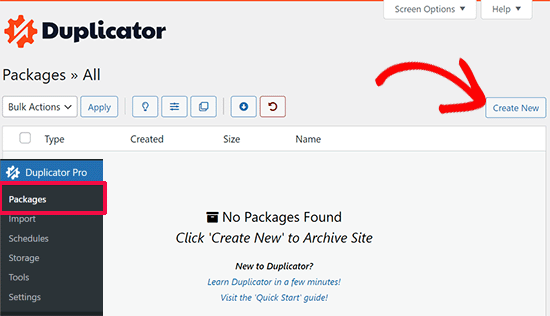
This will launch the Duplicator’s backup wizard.
On the next screen, you can optionally provide a name for your backup or simply click on the ‘Next’ button to continue.
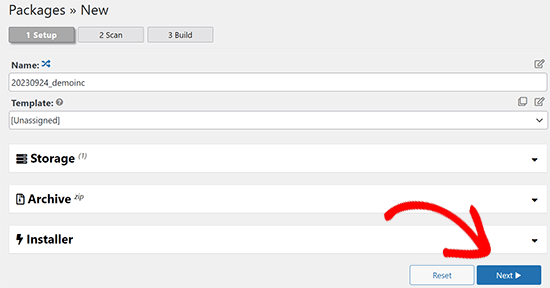
Next, Duplicator will scan your system to make sure that everything is in order to prepare the package.
Make sure that your scan results check out (everything should say “Good”), and then click the ‘Build’ button.
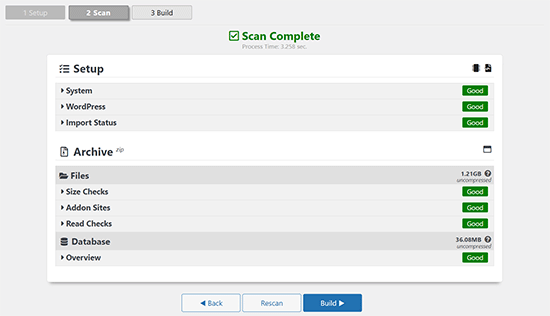
The process may take several minutes to complete, so leave the tab open as the plugin does its job.
Once the process is complete, you’ll see download options for Installer and the Archive package. You need to click on the ‘Download’ button and then select ‘Both Files’.
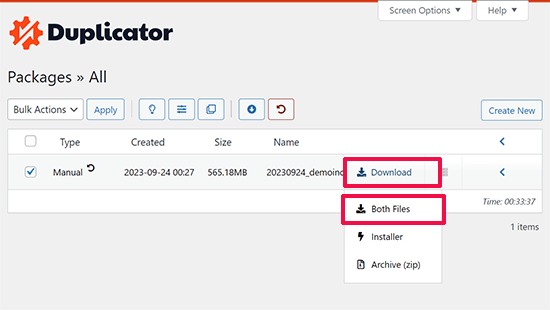
The archive file is a copy of your complete website, and the installer file will automate the installation process for you.
Step 3: Import Your WordPress Site to the New Host
Now that you have downloaded both the archive and installer files, the next step is to upload them to your new web host.
You can do this by connecting to your new web host using FTP.
If you’ve never done this before, check out our beginner’s guide to uploading files via FTP to WordPress.
Normally, you would enter your website’s domain name as host when connecting your FTP client.
However, since your domain name still points to your old host, you’ll need to connect by entering your server’s IP address or server hostname.
You can find this information in your new hosting account’s control panel dashboard.
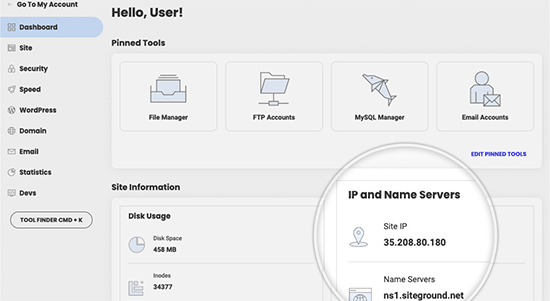
If you are unable to find this information, then you can ask for support from your new web hosting company, and they will help you out.
Using the FTP client, you need to upload both the installer.php file and your archive .zip file to the root directory of your website.
This is usually the /username/public_html/ folder.
Again, if you are not sure, then ask your web hosting company.
Make sure that your root directory is completely empty. Some web hosting companies automatically install WordPress when you sign up.
If you have WordPress installed in your root directory, then you need to delete WordPress first.
Once that’s done, you need to upload both the archive zip file and the installer.php file to your site’s root directory.
Step 4: Change the Hosts File to Prevent Downtime
Once you’ve uploaded both files to your new host, you need to access the installer.php file in a browser.
Normally, this file can be accessed using a URL like this:
http://www.example.com/installer.php
However, this URL will take you to your old web host, and you will get a 404 error. This is because your domain name still points to your old web host.
Normally, other tutorials might tell you to change your domain nameservers and point it to your new hosting company, but that’s wrong.
If you do this now, then your visitors will see a broken website as you migrate it.
We will show you how you can temporarily access your new site on your computer without affecting your old site.
This is done with the hosts file on your computer.
The hosts file can be used to map domain names to specific IP addresses. In other words, it lets you trick your computer into thinking that the website is moved even though it’s not.
Let’s take a look at how to add an entry for your domain name in the hosts file so that it points to your new hosting company.
Making these changes will allow you to access the files on your new host using your own domain name while the rest of the world will still be accessing your site from the old host. This ensures 100% uptime.
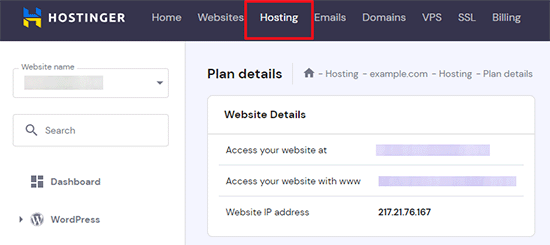
The first thing you need to do is find the IP address of your new web hosting server.
To find this, you need to log into your cPanel dashboard and click on the expand stats link in the left-hand sidebar. Your server’s address will be listed as ‘Shared IP Address’.
For instance, on Hostinger, you’ll find your server IP address under your hosting plan details.
If you are using a Windows PC, then you need to open the Notepad app with administrator privileges.
Simply click on the ‘Start; button and then look for the Notepad app. Right-click on the Notepad app icon and then select ‘Run as administrator’.
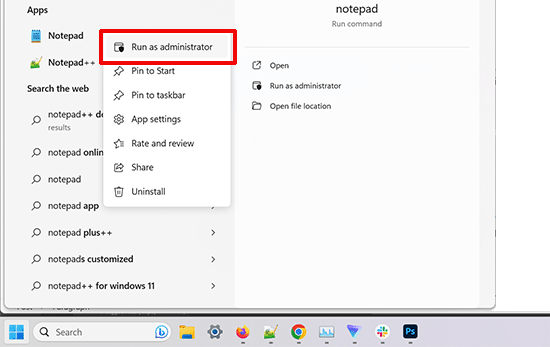
A Windows UAC prompt will appear, and you need to click on ‘Yes’ to launch Notepad with administrator privileges.
On the Notepad screen, go to File » Open and then navigate to the C:\Windows\System32\drivers\etc folder. From this folder, select the hosts file and open it.
If you are using a Mac, then you need to open the Terminal app and enter this command to edit hosts file:
sudo nano /private/etc/hosts
For both Windows and Mac users, at the bottom of the hosts file, you need to enter the IP address you copied and then enter your domain name. Like this:
192.168.1.22 www.example.com
Make sure that you replace the IP address with the one you copied from cPanel and example.com with your own domain name.
Once you are done, save your changes.
You can now access your files on the new host using your domain name on your computer.
Important: Don’t forget to undo the changes you made to the hosts file after you have finished the migration (step 6).
Step 5: Creating MySQL Database on Your New Host
Before we run the installer on the new host, you will need to create a MySQL database on your new hosting account. If you have already created a MySQL database, then you can jump to the next step.
Creating a Database in cPanel
Go to your new hosting account’s cPanel dashboard, scroll down to the Databases section, and click on the ‘MySQL Databases’ icon.
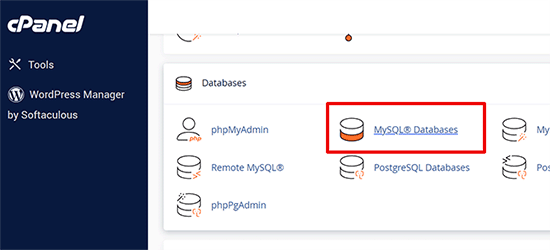
You will see a field for creating a new database.
Enter a name for your database, and click the ‘Create Database’ button.

After creating the MySQL database, you need to scroll down to the MySQL Users section.
Next, provide a username and password for your new user and click on the ‘Create User’ button.
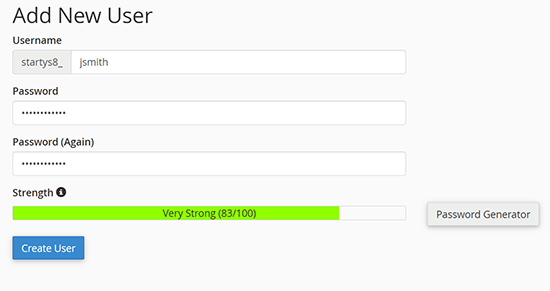
After that, you need to add this user to your database. This will give the username you just created all the permissions to work on that database.
You can do this by scrolling down to the ‘Add User to a Database’ section. Simply select the database user you created from the dropdown menu next to the user, then select the database and click on the ‘Add’ button.
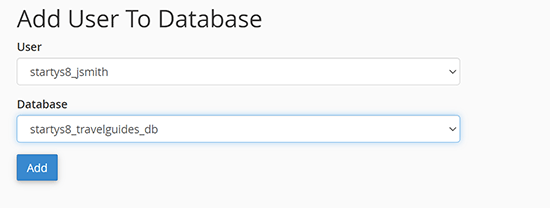
Your database is now ready to be used with WordPress. Be sure to make a note of the database name, username, and password. You’ll need that information in the next step.
Step 6: Begin the Duplicator Migration Process
Now, we are ready to run the installer. Navigate to the following address in your browser window, replacing example.com with your domain name:
http://www.example.com/installer.php
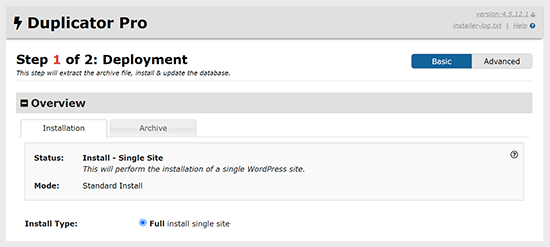
The installer will run a few tests and will show you ‘Pass’ next to the archive and validation tests.
You need to check the terms & conditions checkbox and continue by clicking on the ‘Next’ button.
Now, you will be asked to enter your MySQL host, database name, username, and password.
Your host will likely be localhost. After that, you will enter the details of the database you created in the previous step.
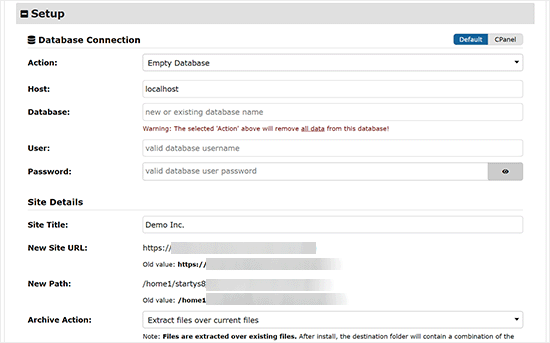
Next, the Duplicator needs to check that it can connect to the database and is able to run the installation.
Click on the ‘Validate’ button at the bottom to continue.

If Duplicator is able to connect, then you will see test results as Pass.
You can now check the terms and notices checkbox and click on the ‘Next’ button.
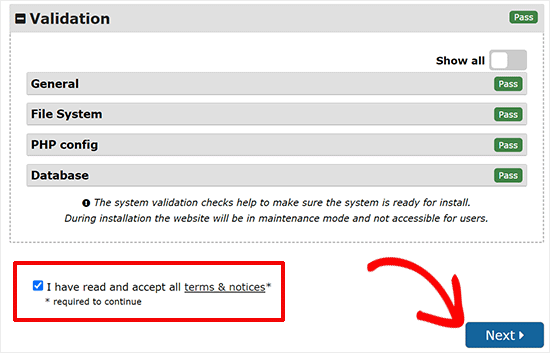
Click on the ‘Next’ button to continue.
Duplicator will now import your WordPress database from the archive zip into your new database.
Next, it will ask you to update the site URL or Path. Since you are not changing domain names, you DON’T need to change anything here.
Simply click on the ‘Next’ button to continue.
Duplicator will run the final steps and show you the login button.
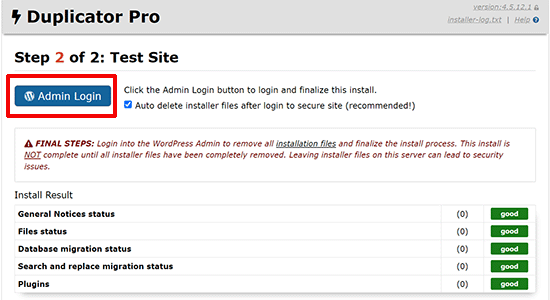
You can now log in to your WordPress site on the new host to make sure that everything is working as expected.
Step 7: Update Your Domain Name Servers (DNS)
At this point, you’ve created a complete copy of your WordPress database and files on your new hosting server, but your domain still points to your old web hosting account.
To update your domain, you need to switch your DNS nameservers. This ensures that your users are taken to the new location of your website when they type your domain into their browsers.
If you registered your domain with your hosting provider, then it’s best to transfer the domain to a new host.
On the other hand, if you use a domain registrar like Domain.com, GoDaddy, or Network Solutions, then you need to update your nameservers.
You will need the DNS nameserver information from your new web host. This is usually a couple of URLs that look like this:
ns1.hostname.comns2.hostname.com
For the sake of this guide, we will be showing you how to change DNS nameservers with GoDaddy.
For other hosting providers, take a look at our guide on changing domain nameservers.
Depending on your domain registrar or web host, the screenshots may look different. However, the basic concept is the same.
You need to look for the domain management area and then look for nameservers. If you need assistance updating your nameservers, you can ask your web hosting company.
For GoDaddy, you need to log in to your GoDaddy account and then click on ‘Domains’.
After that, you need to click on the ‘Manage’ button next to the domain name you want to change.

Go to the ‘Additional Settings’ section.
Then, you will need to click on ‘Manage DNS’ to continue.
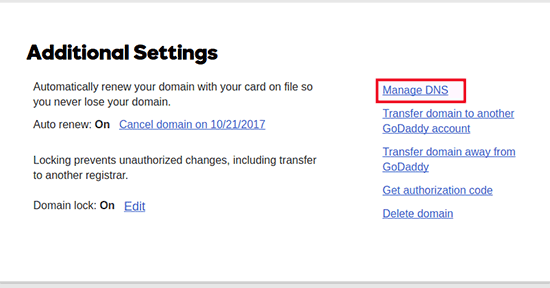
Next, you need to scroll down to the ‘Nameservers’ section.
Here, click on the ‘Change’ button.
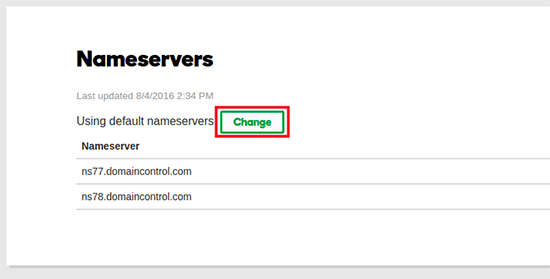
First, you will need to switch the nameserver type dropdown from ‘Default’ to ‘Custom’.
After that, you can fill in your new hosting provider’s information under Nameservers.
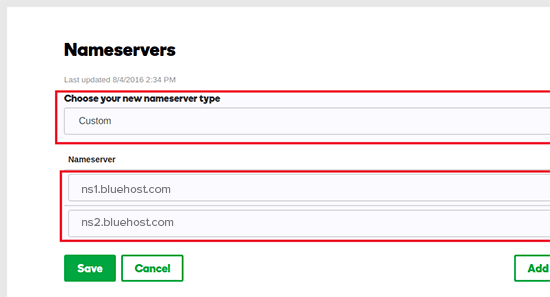
Don’t forget to click on the ‘Save’ button to store your changes.
You have successfully changed the nameservers on your domain. DNS changes can take 4 – 48 hours to propagate for all users.
Since you have the same content on your old host and the new host, your users wouldn’t see any difference. Your WordPress migration will be seamless with absolutely no downtime.
To be on the safe side, we recommend that you wait to cancel your old hosting account until 7 days after your migration.
Frequently Asked Questions
Here are a few questions many of our users ask while moving WordPress from one host to another.
1. How do I migrate my WordPress website to another host?
You can migrate your WordPress website by moving your WordPress files and database from your old host to the new hosting provider.
Some hosting companies offer free website transfer services as well, but you’ll need to ask them. Alternatively, you can do it yourself by transferring files using an FTP client and importing the database via phpMyAdmin.
2. Can I migrate my WordPress site to another hosting provider?
Yes, you are free to migrate your WordPress site to another hosting provider.
3. Can I sign up for the new hosting account without registering a domain name?
Yes, you can absolutely sign up for a hosting account without registering a domain name.
Domain name and hosting are two different services, and you don’t necessarily need to register a domain name when signing up for a new host. For more details, see our guide on the difference between domain name and web hosting.
Some hosting providers will ask you to select a domain name as the first step when purchasing hosting. They will also allow you to enter a domain name if you already have one.
4. Do I need to transfer my domain name to the new host?
No, you don’t need to transfer your domain name to the new host. However, transferring your domain name to your new hosting will make it easier to renew and manage under the same dashboard as your new hosting account.
For more on this topic, see our ultimate guide on domain names and how they work.
5. How do I fix the error establishing database connection error in Duplicator?
If you are seeing an error connecting to the database or the database connection error in Duplicator, then you likely entered incorrect information for your database connection.
Make sure that your database name, MySQL username, and password are correct. Some web hosting companies do not use localhost as the host for their MySQL servers. If this is the case, then you will need to ask your web host’s support staff to provide you with the correct information.
6. How do I check if my website is loading from the new host?
There are several online tools that allow you to see who is hosting a website. After you have transferred your website to the new host, you can use any of these tools, and they will show you the name of the web hosting company hosting your website.
If it hasn’t been long since you migrated your website and made changes to your domain name server (DNS), then chances are that your site may still load from your old host. Domain name changes can take up to 48 hours to fully propagate.
7. Do I need to delete any files or data from the old host?
When switching hosting companies, we recommend that you keep your old website for at least a week. After that, you can delete files from your old web host. If you are canceling your account, then your web hosting provider will delete all your data according to their policy.
8. How long should I keep my account active on the old host?
Once you have migrated your website to the new host, and if you don’t have any other websites hosted with your old web host, then you can cancel your old web hosting account.
However, in some cases, you may have already paid them for yearly hosting. You should check their refund policy to see if you are eligible for any refund upon cancellation.
9. How do I move a WordPress site with SSL/HTTPS?
You will need to install an SSL certificate on your new hosting provider. After that, you can follow the same steps mentioned above. Just make sure that you use HTTPS in the URLs, like https://example.com
10. Bonus: Free Site Migration by Your New Host
If you are looking to switch your web hosting, but the steps above sound too complicated, then you can choose the following providers, and they will migrate your website for you.
SiteGround, Hostinger, and WP Engine offer free website migration for WPBeginner users.
We hope that this step-by-step guide helped you move WordPress to your new host with no downtime whatsoever. If you come across any issues with your WordPress migration, then check out our guide on the most common WordPress errors and how to fix them.
If you liked this article, then please subscribe to our YouTube Channel for WordPress video tutorials. You can also find us on Twitter and Facebook.


Syed Balkhi says
Hey WPBeginner readers,
Did you know you can win exciting prizes by commenting on WPBeginner?
Every month, our top blog commenters will win HUGE rewards, including premium WordPress plugin licenses and cash prizes.
You can get more details about the contest from here.
Start sharing your thoughts below to stand a chance to win!
Shane says
In the next step, Windows users need to go to Programs » All Programs » Accessories, right click on Notepad and select Run as Administrator. A Windows UAC prompt will appear, and you need to click on Yes to launch Notepad with administrator privileges.
On the Notepad screen, go to File » Open and then go to C:\Windows\System32\drivers\etc. Select hosts file and open it.
I’m having trouble with this step. Can anyone shed any light?
WPBeginner Support says
Hi Shane,
You just need to open the Notepad app as an administrator so that you can edit the hosts file.
Admin
Shane says
Oh, just microfosft simple wordpad and then “run as administrator”?
Is that all I have to do?
Muhammed Shabeer says
Thanks for the wonderfull trick. Exactly the trick was intented to migrate WordPress to new host, but I used for migrating from root to subdomain/subfolder. It done successfully with the plugin. Thank for sharing the trick.
Kenneth Aycox says
Thank you for a wonderful product! worked perfect.
James Crow says
Briliiant! Thanks so much, I’ve just moved a few sites without any problem at all.
Max says
Sadly, this didn’t work for me either. I deleted all the website files as directed , uploaded to the installer.php file and package but when I went to website.com/installer.php I was served a 404 error: Not Found
The requested URL /installer.php was not found on this server.
I think it’s easier to just transfer the website the old fashioned way, as others have mentioned. No need for any scripts that might not work.
Max says
Please disregard my comment. I later noticed the root folder was set to httpdocs. So created a folder, named it httpdocs and put the package and installer.php in there. Then the website.com/installer.php worked no problem. All went very smoothly thereafter.
Nandan Jha says
Hello Max,
Actually it did work for me in the end. I am guessing that you moved the installer and archive to your new host , correct ?
Please look up the IP address from cpanel or equiv of the new host and try accessing via the IP address
http://IPAddress/installer.phpKB says
Seems like a good tutorial, but I had no luck with it. There are also a few steps/screens in the Duplicator sequence that were different from mine. The end result was, I got a 404 error upon clicking Site Login – Login to finalize the setup in Step 4 of 4 of the Test Site screen. This differs substantially from the above. Top right corner there’s a version number of 1.2.30. Fairly certain I have the most up to date version of the plugin. If I use File Manager to view the contents of public_html I don’t see the normal list of wp files that I think I should see aside from a wp-snapshots directory, a few web.config files, some installer files and the archive.zip…oh and database.sql. So something has clearly gone wrong, but I’m at a loss to understand what. So…there it is.
Stephen Duffield says
Let me guess, you tried to move from a WordPress.com site? Duplicator & Duplicator Pro wont work for wp.com sites. Nothing works unless you use one of two host sites that they recommend. Duplicator after lots of help, ended up giving me a refund.
Rob says
Hey, Just wanted to say thanks for this tutorial. Went perfectly smoothly and would use this duplicator again
Nandan Jha says
Great article.
Friends, How do I make it work for an Addon Domain. I took a new plan with GoDaddy and now need to move my sites there. What entry do I make in my hosts file to navigate to install.php ? Thank you,
Nandan Jha says
I tried it with my AddOn Domain. It worked for me over a couple of iterations. The thing to take care of is to supply the right ‘domain name’ at Step 3 (or Step 4). The default value which it picks is ‘primarydomain.com/addondomain’. Delete the default value and put addondomain.com
Thanks.
Sean says
I recently switched hosts and my original hosting plan has expired. I failed to create a back up before it expired. I do have a local copy of my site on my computer (I use Dreamweaver for FTP). Is there any way to recreate the site with the local files?
Thanks.
Dave Porter says
Hi Sean,
Try using WayBack Machine – it takes snapshots of websites over time…
You may be able to grab the source code, images etc… and recreate it from that. I’ve had to do that a few times for clients who have come to me after they have lost contact with their developer…
HTH, Dave
Miki says
Hi there,
I have used the Wayback machine and was able to make a copy of my site. Unfortunately I have found myself involved with an unsavory company that had other plans for my business (selling their services on my site) without full disclosure in the beginning. I am now tasked with finding a new programmer to finish the site although it is in wordpress. I do not have wordpress at this time as I was not developing the site; however my understanding from these posts is that if I move the site to another host, I should be able to access wordpress. Is that correct?
WPBeginner Support says
Hi Miki,
Yes you can move an existing WordPress website to any other host.
Michael says
update…
it works….
be careful with IP address information…. you should read the information carefully…
Thanks
Michael says
No luck..
After change the host file, my browser shows message:
This site can’t be reached
example.com took too long to respond.
Search Google for idea inspirations
ERR_CONNECTION_TIMED_OUT
I did flush dns, net stop, dan net start and restart my computer & modem, still not working…
Navajo says
I have another question:
In the text it says:
“At this point, you’ve created a complete copy of your WordPress database and files on your new hosting server. But your domain still points to your old web hosting account.
To update your domain, you need to switch your DNS nameservers. This ensures that your users are taken to the new location of your website when they type your domain into their browsers.
If you registered your domain with your hosting provider, then it’s best to transfer the domain to the new host.”
I thought that when i buy a new hosting space, i also and immediatly have to name a doman name. As in: buying a hosting space is always linken to buying a domain. So the new ip addres which i have uploaded my old site to, and which i have to link to my old doman name, already HAS a (newly bought) domain name.
Or can i buy a hosting space, ánd get an IP address which i can use in this tutorial, without it already having a domain name?
Regards, Navajo
WPBeginner Support says
Hi Navajo,
It is a common misconception. Hosting and domain name are two different services and you can buy them from two different companies. On the same page where hosting companies offer you to register domain name, they also show another option to indicate that you already have a domain name and you can continue without registering a new one.
For more details please see our detailed guide on What is a domain name and how do domains work?
Admin
Uldis says
this is really profound stuff. I was just scratching my head how to migrate client’s site without interruption while changing name servers. Eternally grateful!
Shadat says
Hello, I face the database connection failed problem.
can you plz help me? plz
see the screenshots
Dave Porter says
Shadat – this is quite an old article now – and you don’t give very much to go on – I would seek help from your hosting company, or get onto a WordPress discussion forum where there are active people who may be able to help you.
But if you are getting a database connection error message, it is generally because the database name/user or password is incorrect
I would try one of the backup tools like Duplicator and see if that works better for you.
Slade says
Did you set up a new database and user on your new host?
You must make sure the database name and user and password are all correct for the new host.
Usually a database connection error is a simple oversight like a mispelling or something simple like that.
Michael Goriany says
Thanks for this excellent tutorial
If I have well understood, the hosts file (Step 4) is providing for 100% uptime only for the Webmanager but not for the public
How can the DNS switchover time be shortened, or how can the downtime for the public be avoided ?
Slade says
Editing the host file allows you to see your site at your new host. Until you update your dns nameservers the public will go to the old host.
The time it takes for dns changes to updare (propagate) is not something that can be controlled. However this guide is correct in providing a no down time solution.
What is happening on the backend that the public does not see is that your website is being hosted at two hosts. The nameservers tell the public which host they are viewing the site on. During the dns update process the users will still view the site at the old host until the propogation is complete.
Once the dns change officially kicks in the public will then be viewing the site at your new host.
Again, to provide the no downtime transfer you would need to change your host file on your local machine (tells your computer you want to view the site at the new host).
This allows you to do the actual install of your website on the new host.
Hope that helps
Lydia says
i had to move a client’s site off our subdomain into their own hosting overnight and this REALLY REALLY saved my life! Especially as the domain needed to be repointed seamlessly! I only had trouble with the FTP, i dunno what was wrong with all the logins but i couldn’t get it working. Thankfully my hoster always has an awesome file manager on cpanel.
So yes, very nearly seamless, i’m just testing out the contact forms now which seems to need the DNS switchover time in order to function properly…
And one thing to add, Duplicator has changed the SQL database setup to Step 2 in their latest version, which really made me freak out a bit there.
Thanks very much for the detailed and extremely godsent tutorial!
Kurt says
I’m getting ready to follow this tutorial. One question: I am switching servers but also am switching domain names. Should I change my website address in the WP admin settings before running duplicator or after? (Does the order matter?) Thanks!
Johel Fernandez says
This tutorial worked out perfectly by April, 2017. ¡Thank you so much!
Ravijit says
Hey,
I used this plugin so many times. even, once i used it for too. I really like this plugin but, the problem is it do not extract the big package. We’ve to manually unzip it or need to upload unzipped data to the new hosting.
Any fix for that? Reply as soon as possible.
Archit says
Duplicator doesn’t work properly with GoDaddy’s cPanel Linux Hosting service. Script gets terminated even if the settings in php.ini are changed. Please suggest what to do to make Duplicator work there? If not possible, what would be the best alternative?
Hernan says
Hi Archit,
I’ve just migrated a site to godaddy and it worked just fine. Which part failed?
best
Hernán
Susan Taunton says
This GREAT tutorial successfully guided me through my very first migration of a WordPress site to a different host! Especially life saving was the instruction about changing “sudo nano /private/etc/hosts” in Terminal – worked like a charm. wpbeginner.com has the most succinct, articulate and smart tutorials, which I have come to depend on.
Thank you!!!!
Susan
Prinze says
hi, pls have been having issues uploading my site to s new server using FTP client, my hosting company tried to give tutorials on how to transfer with no result.
the tutorials am getting from your site is abt using a duplicate plugin. my site is down, i can’t access my wp-admin to install the plugin.
i use a backup plugin when my site is up so i have a backup file from the plugin i used n also i did a cpanel backup from my old server.
pls, i need a tutorial hoe to upload my backup files to my new server, which one is best to upload?
the plugin backup or the cpanel backup…
pls help!
Greg Draven says
What backup plugin did you use?
Ritadrik Chowdhury says
Hi Sir,
I am stuck up with 3rd part which is verification part. I have changed the permalinks and I can see the dashboard as usual but the site is not running. Whenever I am clicking on “TEST SITE” it returns error 404: File Not Found. I tried their help documents. Made changes as usual but no luck. Can you please help me out?
saurabh shelar says
Hello Sir. I am saurabh from India. I love your website. I have a blog about software review. And I saw your posts and observe that you edited image in microscope effect. This is really fantastic. Can you please tell me how you do this or please make tuts for this please.
Thank you.
WPBeginner Support says
Hi Saurabh,
Thanks for the kind words. There are actually tons of tutorials already. Try searching for how to add magnifying glass effect in Photoshop.
Admin
Brad says
Hello,
I have a situation where it would be ideal to have the database on separate hosting. Just because the host of the current site does not offer mysql. I cannot move the site (for a company)
Can I install wordpress on current hosting in a sub domain and have the database on another host? I have never used anything except “localhost” in the wp-config file? Thank you!
Sachin says
php not supported they are giving reason?? what to do??
Samuel says
Does it work on addon domain?
Because there is this step
“Make sure that your root directory is completely empty. If you have WordPress installed in your root directory, then you need to delete WordPress first”
While my primary domain is already up and running
Cory says
This is a well put together article, nice job guys!
Just as an FYI for users reading through the comments, any comment pre-dated 12-6-2016 does not pertain to the article above or the Duplicator plugin specifically.
This article was originally written using the Backup Buddy plugin and has since been updated and rewritten using the Duplicator plugin. This should help clear-up any confusion should some of the comments not really make sense or refer to topics not covered in the article.
Mark Rudder says
This is an excellent tutorial.
I also believe this is the easiest and fastest way to to migrate a site.
Migrating DB files and tables with phpMyAdmin is the long way around.
Using Duplicator or BackupBuddy is way less work and you are less prone to mistakes that way.
You need to change DNS no matter what method you choose, so that aspect can’t be counted as far as which method is best.
Changing TTL settings to 1 hour (3600 seconds) as Dave Porter pointed out is the only missing piece of the puzzle. (even though that is not essential to success)
Augusto says
Nice article, guys!
I feel that the most critical point migrating a site to another host is the email service. If the default email solution provided by host need to be replaced, a lot of work will came.
Anyone want to share your workflow to do this kind of thing?
Thanks!
Frans Kemper says
hello,
Would this procedure also work for sub domains?
I have an add on domain to transfer with about 10 related sub domains.
Thank you
Dave Porter says
A few days before I move a domain, I go into the DNS settings and change the TTL settings to 1 hour (3600 seconds), so that the site will move quickly (and do it overnight – so the new location will show for everyone in the morning)
(I was expecting this to be mentioned in the article when I saw the title!)
And to answer Dave’s question you can have as many entries in your Hosts file as you want – I have a reseller account with my hosting company and I’m often working on 2 or more sites I am working on that are located on a different server. You can’t specify a sub-directory in the entry – the one entry will point to all locations for that domain – to do what you want to do you are better using sub-domains – so for example example.com is the main location, then you can have play1.example.com as a sub domains that will have it’s own hosts entry.
Harindepreet singh says
I think you should make a video or attach screenshots
David in Mississippi says
Another article – directly related to this one, but sufficiently different to warrant its own separate article – would be “Replacing A Legacy Website with a Fully-Developed WordPress Website.”
This has happened to me several times already. I have clients with older, legacy-type (non-WordPress) websites, and they ask me to convert their site to WordPress.
I have two methods I use to do this, and one of them involves building the brand new WordPress site on a temporary development URL. When it is done, I then need to transfer it to the existing URL for the client.
In other words, I develop it at DevelopmentSite, and when it is done, I then move it to ExistingLegacySite
I should think it would be easier to do this than the procedure outlined in your article above, but it would still be helpful for you to do an article on this type of migration.
Thanks.
Dave says
Correct me if I’m missing something, but this ‘hosts file change’ will only work if you have a just one site on your plan at that new IP address. I have several low-usage sites I’m hosting on one plan. They are in subdirectories under phulic_html.
So doing this:
192.168.1.22 http://www.example.com
in the hosts file will not specify which of your 5 sites to point to. And it seems the only thing you can specify in the hosts file is an IP address and a URL.
You can’t do something like this:
192.168.1.22/sitea http://www.example.com
Am I wrong?
Felipe says
I think this is correct, it won’t work for shared domains.
It is better explained here: the voted answer says “If you have shared hosting, this will make your site inaccessible by direct IP. In a shared hosting environment, the host (GoDaddy) will have multiple websites living at the same IP address. When a browser requests a website, the server relies on the domain name to determine which of the many websites to serve. Without a domain name, the server has no way to tell what the browser actually wants so you don’t get your website. To avoid this situation, you will need a host to give you exclusive use of an IP address.”
I think this should be highlighted in the article.
WPBeginner Support says
Once you have added your domain name to your new host, your webserver knows that it is hosting domain name example.com and it’s root directory (Doesn’t matter if it is also hosting other domains as well). However, DNS servers take time to propagate so instead of sending your request to your new webserver, they will be sending users to old location for a while. The hosts file allows you to send your request directly to the new server. Hope this clears the confusion.
Admin
Matt Davis says
Correct me if I’m wrong, but I believe you can type in (directly in the browser’s address bar) the IP address followed by a slash (/) and then the sub-directory of whichever site you’re trying to access. I would avoid changing the hosts file altogether. Most hosting companies I’ve used will also usually assign temporary URLs to each new website as well, so if that’s the case you could use that instead of the IP or messing with the hosts file.
Niko says
That’s correct MATT. Temporary using the IP address instead of altering the hosts file seems like a better approach. However, both work fine.
Vyse says
hello. good article but what about wp multisite?
Tanisia says
I’ve tried for four hours to make these instructions work. The result? Now I can’t access my site at my old host. I tried following the directions on this 2-year-old article (will there be an update, since BackupBuddy has evolved?) and now everything is messed up.
I used FTP to upload the files, and edited the host file as instructed, but the ImportBuddy PHP script won’t run. It just shows me the code. I tried contacting Bluehost for assistance, and they were no help. So I tried setting all my other settings back to where they were before I started this odyssey, and now I can’t see my site at all. Not the Admin panel, nothing.
WPBeginner Support says
Tanisia, please refer to our guide on what to do when you are locked out of WordPress admin area.
Admin
Tanisia says
I’m back in at my old host – my servers needed to re-propagage from Bluehost, and it took longer than I had anticipated. I’m still left with BackupBuddy not working the way it’s supposed to. Again, do you have updated instructions from 2014, since there have been several updates to BackupBuddy since this was written? When I did the Notepad update in Windows 10, it looked different from what was described here, so I couldn’t be sure if that trick worked.
Thank you for answering back.
Fahim says
If it was a primary domain , can i follow this Process? I need to move and that domain is Main/primary domain, how can i move,will u plz help me?
Mark says
Just stuck i step 4, can i just simply addon domain and change dns in new host, ? Following that, C:\Windows\System32\drivers\etc. , there is nothing in my etc, nothing like hosts file, btw great tutorial easy to fallow, thanks
Jacob says
I was hoping there would be an easier way to do it with a third party service, but I’m not about to shell out 80 bucks just to do that.
Ash says
The backupbuddy steps in the new version have changed quite a bit. Nothing to be afraid of though. I was able successfully migrate from t1.micro on aws to t2.small instance. So far so good.
David says
A few questions for you:
1. Isn’t there a SIMPLE way to back up one site (themes, child themes, plugins, and post data), then restore it to another site?
It truly should be as simple as (a) Backup To (dropbox mysite.zip), then (b) Restore From (dropbox mysite.zip).
2. Is it possible, perhaps even EASY, to develop a client’s WP site on your development server, then use Backup Buddy (or some other backup/restore program) to migrate it to the client’s site?
3. Does Backup Buddy, or any other backup/restore program you know of, give you the ability to restore to an existing WP installation? In other words, can you set it to restore everything except the WP core files?
Thanks for this article.
David in Mississippi
WPBeginner Support says
Actually, in the article we have shown how BackupBuddy does exactly what you are asking for. You simply backup your site, download an archive file and an importer file. Upload these files to the new location and run the script. Hope this helps.
Admin
Ash says
@David, with backupbuddy you can choose which files to leave out while backing up. So you can leave out the core WP files.
Robert says
hi guys,
A friend just make me a new wordpress website and uploaded it to my hosting account. Now, I want to change the domain and hosting account and want to upload the website to the new hosting account.
My friend sent me the archive with all files of the website including database. How is possible to upload the website to my new host?
I appreciate your answer.
thank you
Ricardo Clarke says
I actually just went through this process yesterday and need to transfer another site today. This is hands down the most thorough walkthrough I’ve seen. The 4 to 48 timeframe really helped ’cause I thought something went wrong, but the transfer just needed time to propagate across the interwebs.
WPBeginner Staff says
As soon as you figure out that your new domain has regained the search positions for your old site. We hope that you have setup 301 redireccts on old domain otherwise search engines wouldn’t know that your old content has moved to the new domain permanently.
WPBeginner Staff says
What’s the shorter way of doing this?
Sebastien says
Hi there, thanks for your tutorial, here’s an other way of doing it… free.
1. Tools > export posts and pages from admin panel. If you also need the DB phpMyAdmin export tables from the db. Import them in the new db. Check for the extension of the tables to be the same (_wp for instance)
2. edit your virtual host config file, add what follows between your server {}
allow your_public_ip;
deny all;
3. Access the site by its ip. (make sure you set the ip of your new server instead of the url in phpmyadmin > wp_options > siteurl and home options)
4. Tools > import posts and pages
5. Change your DNS records at the old host.
6. Done. Use another plugin like UpdraftPlus to backup for free.
Ash says
Tried UpdraftPlus. Didn’t do anything at all.
Rachel Charles says
Clean and modern and Easy to modify!
Kate_H says
Great guide. I can confirm these steps work brilliantly as I recently moved a 5 year old WP site from one domain to another domain and swapped web hosts as well.
The only difference I did was redirect the old site to the new site via the .htaccess as I wasn’t migrating the old domain name over at the time.
Out of curiosity how long would you leave it before deleting all the old content from the old domain and setting up a permanent URL redirect via your registrar?
zimbrul says
I really hate Backup Buddy. In 80% of cases I got errors and their support is not that good. I’d rather move a site with Duplicator free WordPress plugin
WPBeginner Staff says
Zimbrul, Duplicator is a nice plugin too. However, we have moved many WordPress sites using BackupBuddy and it has always worked flawlessly for us. That’s why we recommend it.
Jim says
Fully agree. Duplicator has never let me down and I have backed up and installed to many websites to count. No need for a paid plugin.
Dennis Does Cricket says
That’s a ridiculously long winded way of doing it.
Jonathan says
I was looking for this. This already assumes knowledge of FTP etc. so why not just:
1. Copy over all files (download locally, upload to new server).
2. Export the DB (you can use Migrate DB free version if you can’t access the old hosts phpmyadmin or such). Also, if you’re moving from a different domain it replaces the urls etc.
3. Create a new DB on your new host, import the DB.
4. Transfer the domain.
Same result, no fiddling with installer scripts and such.
Matt Davis says
This is how I would do it.. In addition, you would also need to edit your wp-config.php file with the new DB info (Specifically the database host entry, as I believe importing the old database will create the same database name, user and password on the new one). Also, I would avoid editing your hosts file and instead either use the IP address directly in your browser’s address bar followed by your sub-directory name (if needed) or use the temporary URL most hosters provide when a new account is set up.
The steps in this article are good for someone that doesn’t want to touch configuration files in their WordPress folders, or who want an all-in-one solution that gets them their site and DB in one step.