Do you want to increase the maximum file upload size in WordPress?
Sometimes a low file upload size limit can stop you from uploading files with the media uploader or installing larger WordPress plugins and themes.
In this article, we will show you how to easily increase the maximum file upload size in WordPress to fix those issues.
Why Increase the Maximum File Upload Size in WordPress?
Your WordPress hosting provider will set a default maximum file upload size when you sign up and install WordPress. Your hosting provider defines this limit, and it usually ranges from 2MB to 500MB.
For most WordPress website owners, this limit will be more than enough.
However, there are times when you’ll need to raise this limit so you don’t run into upload errors.
For example:
- You run a photography website and need to upload large images.
- Your design or photography portfolio has large images.
- You want to install a larger WordPress theme or plugin.
- You want to sell digital products like eBooks, photos, videos, and more.
- You regularly update content and add audio, photos, and more that are beyond the current limit.
That being said, let’s show you how you can increase the maximum file upload size on your WordPress site.
Note: Keep in mind that displaying a lot of large files on your website can seriously slow down its speed and performance. That’s why we typically recommend never to upload videos to WordPress.
Since most users have different WordPress hosting setups, we will cover the following:
- How to Check Your Maximum File Upload Size Limit in WordPress
- Method 1: Contact Your WordPress Hosting Provider
- Method 2: Create or Edit an Existing php.ini file
- Method 3: Add Code to Your WordPress Theme functions.php File
- Method 4: Add Code to Your .htaccess File
- Method 5: Use a WordPress Plugin to Increase File Upload Size
Video Tutorial
If you’d prefer written instructions, then just keep reading.
How to Check Your Maximum File Upload Size Limit in WordPress
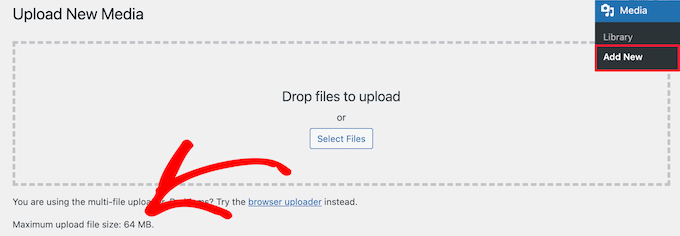
WordPress will automatically show the maximum file upload size limit when you are uploading images or other media.
To check this, simply go to Media » Add New in your WordPress admin panel, and you will see the maximum file upload size limit for your WordPress site.
Now that you know how to find the size limit, let’s show you how to increase the maximum upload size in WordPress.
Method 1: Contact Your WordPress Hosting Provider
One of the easiest ways to increase the maximum file upload size in WordPress is to reach out to your WordPress hosting provider.
This is a relatively simple task for their customer service team and can be done in a couple of minutes.
For beginners, this can be much easier than adding code to WordPress and editing server files.
Simply head over to your hosting provider’s website, like Bluehost, and log in.
Then, click the ‘Chat’ icon at the bottom of the screen. You can then ask the support staff to increase the file upload size on your WordPress site.
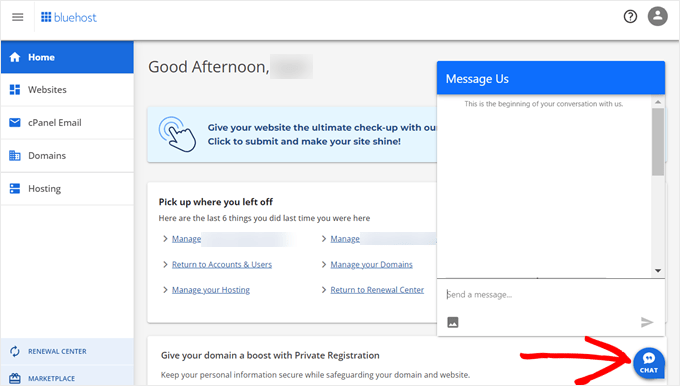
You can also reach out to support from within your hosting account dashboard.
Method 2: Create or Edit an Existing php.ini file
Another way to increase the maximum file upload size is by creating or editing a file called php.ini. This file controls a lot of settings for your WordPress hosting environment.
Most WordPress hosting providers like Bluehost have a beginner-friendly cPanel to help manage your website.
If your web host has a cPanel dashboard, then you can increase the file upload size through the built-in tools.
Note: The following is from the Bluehost cPanel. However, most shared hosting providers will have similar steps.
You will find a cPanel button at the bottom of the Hosting tab in Bluehost.
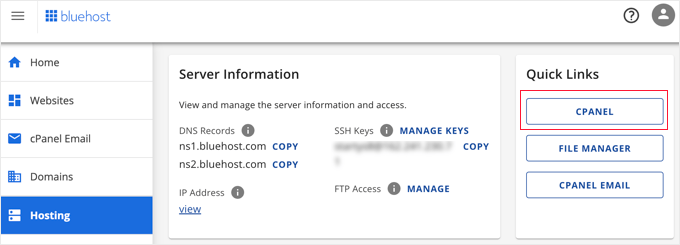
Clicking this button will open your cPanel dashboard.
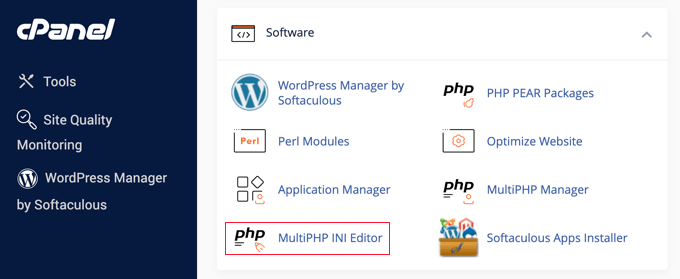
Now you need to scroll down to the Software section and click on ‘MultiPHP INI Editor’.
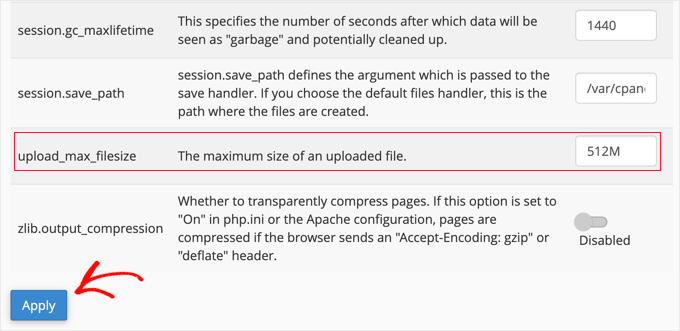
Next, scroll down to the section labeled ‘upload_max_filesize’ and enter a new maximum filesize into the box.
Then, click the ‘Apply’ button.
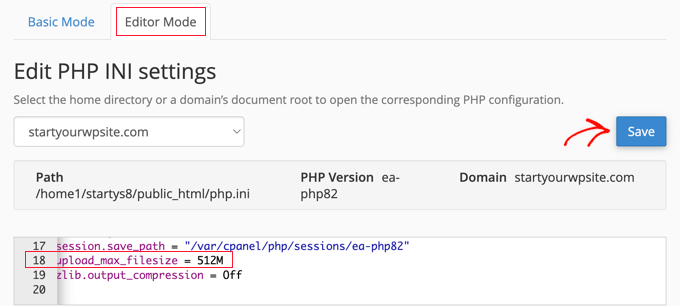
Alternatively, you can click the ‘Editor Mode’ menu tab, and then you can change the maximum file upload size directly in the editor.
You need to edit the ‘upload_max_filesize’ section to increase your file upload size.
Once you are finished, just click the ‘Save’ button.
Edit php.ini by Adding Code
If your current hosting provider doesn’t offer the cPanel option, then you’ll need to edit this file manually.
To do this, you can use an FTP client or the file manager option in your WordPress hosting control panel.
If you are using shared hosting, then you might not see the php.ini file in your hosting directory. If you don’t see one, then simply create a file named php.ini and upload it to your root folder.
Then, add the following code snippet to the file:
upload_max_filesize = 256M
post_max_size = 256M
max_execution_time = 300
You can modify the ‘256M’ limit to the file size you need for your WordPress blog.
Method 3: Add Code to Your WordPress Theme functions.php File
This method involves adding code to your functions.php file in your WordPress theme.
Instead of editing the file directly, we recommend using WPCode. It’s the best code snippets plugin that allows you to add code to your website without breaking your website.
If you haven’t done this before, then see our beginner’s guide on how to add custom code in WordPress.
First, you need to install the free WPCode plugin. For more details, see our step-by-step guide on how to install a WordPress plugin.
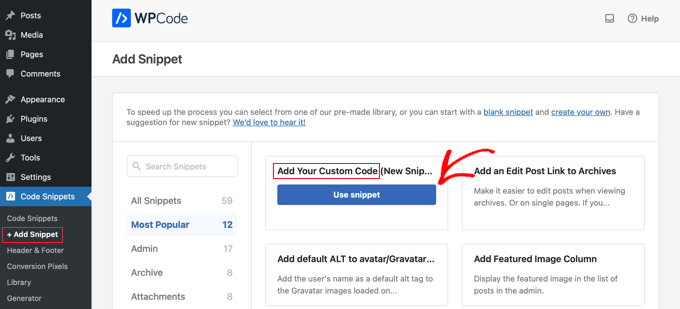
Upon activation, you should navigate to Code Snippets » + Add Snippet. You will need to hover your mouse over the ‘Add Your Custom Code’ option and then click the ‘Use snippet’ button.
On the next screen, you need to give your new snippet a name and change the code type to ‘PHP Snippet’.
Then you can copy and paste the following code snippet under ‘Code Preview’. Make sure you change ‘256M’ to the maximum file size you need:
@ini_set( 'upload_max_size' , '256M' );
@ini_set( 'post_max_size', '256M');
@ini_set( 'max_execution_time', '300' );
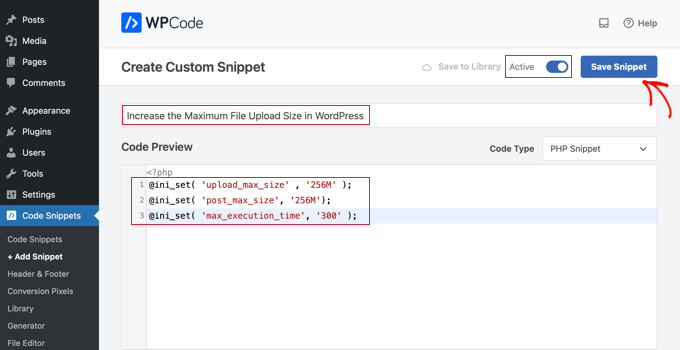
Finally, switch the toggle at the top to ‘Active’ and then click the ‘Save Snippet’ button. The code will now be executed on your website.
Method 4: Add Code to Your .htaccess File
Another way to increase the maximum file size is by modifying the .htaccess file. This file controls the high-level configuration settings for your website.
To do this, you need to log in to your website server via FTP. If you haven’t done this before, then see our guide on how to use FTP to upload files to WordPress for beginners.
After that, you need to locate your .htaccess file in your website’s root folder.

If you can’t find your .htaccess file, then it could be hidden by your file manager or FTP client. To learn more, see our guide on why you can’t find the .htaccess file on your WordPress site.
Next, you need to add the following code snippet to your .htaccess file:
php_value upload_max_filesize 256M
php_value post_max_size 256M
php_value max_execution_time 300
php_value max_input_time 300
To increase your maximum file upload size even more, simply change the ’64M’ to the size you require.
Method 5: Use a WordPress Plugin to Increase File Upload Size
Another way you can increase the maximum file upload limit is by using the WP Increase Upload Filesize plugin. If you are not comfortable adding code to WordPress, then this could be a good option for you.
The first thing you need to do is install and activate the plugin. For more details, see our guide on how to install a WordPress plugin.
Upon activation, navigate to Media » Increase Upload Limit in your WordPress admin panel.
This brings you to a screen where you can select a new file upload size in the ‘Choose Maximum Upload File Size’ drop-down.
Then, click the ‘Save Changes’ button.

Note: The maximum file upload size will be set by your hosting provider. If you need a file size limit that’s larger than the one listed in the drop-down, then you need to contact your hosting provider and ask to increase the limit.
We hope this article helped you increase the maximum file upload size in WordPress. You may also want to see our guide on how to choose the best website builder and our expert picks of the best virtual business phone number apps with free options.
If you liked this article, then please subscribe to our YouTube Channel for WordPress video tutorials. You can also find us on Twitter and Facebook.


Syed Balkhi says
Hey WPBeginner readers,
Did you know you can win exciting prizes by commenting on WPBeginner?
Every month, our top blog commenters will win HUGE rewards, including premium WordPress plugin licenses and cash prizes.
You can get more details about the contest from here.
Start sharing your thoughts below to stand a chance to win!
Manish says
I am unable to import my blogger exported xml file to wordpress.
My blogger imported xml file size is 24 mb.
Please solve this problem, i shall be thankful to you.
Hashim says
3. htaccess Method worked for me.
Thanks
John says
Has anyone ever told you that the copy and paste YOUR code all throughout your site always has the:
1: code
2: code
3: code
So it’s a bit of a edit to get it to work right when a simple copy/paste would be stressfree for your readers! Just sayin…
John Delaney says
Create php.ini file and place it in wp-admin folder, not the root. Fixes it every time.
Michael Kelley says
Thanks! This is the only thing that worked for me. Worth noting, I already had a php5.ini file in there w/ the same code, it did nothing. A tad confusing.
Mudassar says
htaccess worked
Robert says
After 2 hours of frustration, the htaccess method mentioned here worked out for my local environment.
Thank you very much.
Robin says
I change my .htaccess and put
php_value memory_limit 2G
php_value upload_max_filesize 2G
php_value post_max_size 2G
php_value max_execution_time 99999
php_value max_input_time 99999
when I go for upload a fine it shows 2GB but when I upload any file that larger then 128MB it shows HTTP error. Need help please.
Thanks
Zain Zaheer says
Set max limit to 128M instead of 2G
Robin says
I add on my .htaccess
php_value memory_limit 2G
php_value upload_max_filesize 2G
php_value post_max_size 2G
php_value max_execution_time 99999
php_value max_input_time 99999
and it shows 2GB but when I upload larger then 128M file it gives me HTTP error. can anyone help me please.
Thanks
Elisabeth Parker says
I DO NOT recommend putting that code in the Theme Functions file. I tried it and it completely blew up my site. And if you don’t know how to use FTP or the File manager to change the Functions file BACK, you’ll be very unhappy. I haven’t tried the other options but if I find something that works I’ll let you know
kennedy Odhiambo says
Hello Elisabeth,ive tried it and it has also blown up my site,i cant acces it…may i please know how you fixed it?
Caki says
Just contacted godaddy. I am using cpanel hosting through them. He added a file .user.ini in the public/html file with the following:
memory_limit = 128M
max_execution_time = 300
post_max_size = 128M
upload_max_filesize = 256M
razib ahmed says
thank you so much! it,s working for me
Tino says
I’m with Axxess and this also worked for me!
Mukhiiii says
You made my day!
Thanks
Paul Vijay says
Thanks a lots this Worked for me . I too use Godaddy Hosting, Still the Template fails to load from Online database can u help
Bob says
do you name it .user.ini or user.ini ??
Jesse says
This method worked for me! Thank you so much for sharing!!!
Craig says
in the .htaccess solution, where in the file do you enter the code, i put it at the end and got a 500 error?
Cornelius says
I heard as an alternative you could just directly upload via the ftp cpanel, but when I do that the PDF does not show up in my WP media dashboard?
WPBeginner Support says
Hi Cornelius,
You can upload a PDF file but yes you are right it will not be visible in the Media library on your WordPress site. To see a file in the media library and be able to easily add it, you would need to upload it using the built in media uploader.
Admin
Christopher Eller says
You can upload anything via FTP/SFTP and then add it to the database using a plugin like Add From Server.
Nitus says
This worked for me (as nothing else would):
– Open wp-config.php
– At the very bottom add this line:
define(‘WP_MEMORY_LIMIT’, ‘128M’);
– Save (and upload your file)
Maja says
So i’m not a developer so i dont feel like messing with php and some functional stuff.
i found from a post above php settings and all is set right, max file size is 30MB so i’m confused why i still can’t upload media bigger than 5mb.
is there a wordpress thing that i’m missing
i didn’t find anywhere place to change that,
Niall Flynn says
If you are using cPanel most of the time you edit via the PHP Version settings, you can check if you are on 5.6 or 7.0 and edit all the settings via cpanel. For me this is the only way my host has all the others locked down, but its real handy and there are simple ways to enable PHP modules and tweak any setting.
yaser says
Thanks.
This is what finally worked for me:
In wp-config, before wp-settings:
define( ‘WP_MEMORY_LIMIT’, ‘256M’ );
define( ‘WP_MAX_MEMORY_LIMIT’, ‘256M’ );
ini_set( ‘memory_limit’, ‘256M’ );
In .htaccess:
php_value memory_limit 256M
php_value upload_max_filesize 64M
php_value post_max_size 64M
php_value max_execution_time 300
php_value max_input_time 300
mohammad says
thanks man you made my day it worked
Evan Olsen says
This worked for me! Thank you!
Rudrax says
Thanks Friend It Worked!
Yna Capumpue says
How do you get to the wp-config? I mean where do you input the code itself? Thanks.
maneesh naithani says
made my day. thank you man.
Rahadian says
Thank you for this valuable post, .htaccess method works for me
Abhishek says
Thanx a lot php.ini option works thanx a lot
Sean says
Hello
I am building a woocommerce store for selling audio files. Some of my files are over 100MB so uploading straight from wordpress wont work. What I am trying to do is Upload the file to cpanel and than post that link in the downloadable product on WP. But I dont know how to do it. I view the file in cpanel and copy that link but that just takes the person to cpanel login. I dont know hot to get the link of my file in cpanel so others can download it when they buy a product?
Do you have a tutorial on this?
or can you help?
Thanks
Ian says
You would need to look more into this because you would need security for that file url, generally the file url is accessible to everything and therefore can be downloaded without making a purchase.
Larry Scott says
The second suggestion of creating a php.ini file works like a charm.
john says
Absolutely DO NOT try to enter that code into the Theme Functions file!!!!! Now I am getting error messages and can’t get to the dashboard for my site. I won’t DARE try any of their other suggestions.
WPBeginner Support says
Hi John,
You can easily edit your functions.php file using an FTP client to undo the changes you made.
Admin
Fred Preston says
Thanks. the .htaccess version worked for me. I just had to remember to show hidden files in my cpanel file manager.
John says
Just wanted to say thanks. I’ve been able to solve three wordpress related issues in one day, all with help from this website. Kudos on the good work.
WPBeginner Support says
Thanks John Don’t forget to join us on Twitter for more WordPress tips and tutorials.
Admin
Shameer says
Very HelpFull
David says
Thanks.
The php.ini edits helped. I had to make sure to also up the post_max size as well. I failed to edit this on first update, and nothing changed. Edit all parameters and presto. Thanks again!
Alyse says
Is there a specific place to add it in the theme functions file? The beginning? The end?
Shambo says
Modifying .htaccess file worked for me. Thanks a lot..
Celal Erdogdu says
It works, thank you.
WPBeginner Support says
You are welcome
Admin
Bentham says
Thank you so much ,option one gave me a hint
Mohsin says
.htaccess method worked for me. Thanks for this article.
Aswani Somarajan says
It was great. Very helpful! Had to upload a theme, used the second method. added a ner php.ini file and the theme is installed. Thanks a lot
John says
Thanks for helping
making the changes in the .htaccess method made the website crash
however changing the php.ini file worked for me.
Don says
or try another method like mine,
on cpanel > click the “select php version” > then click “switch to php options” > find the “upload_max_filesize” then change it whatever you want.
Aoun says
Thanks…… Its very helpful and working perfectly
Jose says
Thnxs dude, you saved my job
Md Robiul Islam says
Thanks you so much… for your comment I fix my issue after try long time.. thanks a lot…..
Miaka says
The methods in the article didnt work for me but this did! Thank you so so much, Don! Article author, hope you could edit this method as one of the solutions in your article!
DAVID says
@DON Thank you!
Rudi says
Thank you so much, I used the htaccess Method and it’s worked for me.
bob hildegard says
‘upload_max_size’ is not a php.ini variable name. it’s ‘upload_max_filesize’. that’s stated wrong in solution 1
Eric says
First thing I tried was modifying the .htaccess file. Worked for me!
sumit says
thanks a ton , u saved me
Reza says
htaccess option returns a 500 Internal Server error when reloading my website and wp admin
kashyapkumbhani says
sir i Tried all But my Xml File Not Imported Please Help me:) thank u
Trevor says
I tried your first suggestion, and apparently threw some bad code into the functions.php file and now I have lost access to my website’s dashboard, the actual website cannot be accessed by anyone, and the problem is obviously not solved.
WPBeginner Support says
Please see our guide on what to do when you are locked out of the admin area.
Admin
Aakarshit says
None of then worked ; (
Even contacted the hosting provider, no reply from them ; (
frizzy lee says
thanks .. the htacess method worked for me too .. thumbs up bro
Okie Wardoyo says
Hi, where i should put that code to my .htaccess file.
I have tried put this code to my htaccess file but it always 500 internal server error when i open my live site.
# BEGIN WordPress
RewriteEngine On
RewriteBase /
RewriteRule ^index\.php$ – [L]
RewriteCond %{REQUEST_FILENAME} !-f
RewriteCond %{REQUEST_FILENAME} !-d
RewriteRule . /index.php [L]
php_value max_input_vars 5000
php_value max_execution_time 300
php_value post_max_size 50M
# END WordPress
John Jones says
Try this:
php_value upload_max_filesize 50M
php_value post_max_size 50M
php_value max_execution_time 300
php_value max_input_time 300
Jitender Singh says
.htaccess works nicely.
subodeep ray says
thanks .htaccess works smoothly
Bukunmi says
Where exactly do I put those codes in my Theme function? because i’m kind of lost
Galuh Prasetyawan says
in Appearance -> editor, find function.php
Eóin Kilroy says
Right, but where exactly in the function file?
Manas Mitra says
Hi,
I have used the first method of adding code to child theme functions.php file, but it does not have the desired effect. In localhost, the limit is 3 MB and in shared server, the limit is 32 MB. Any idea why it is happening so?
Thanks.
Bouguezzi says
the .htaccess modification methode worked with me thx a lot
WPBeginner Support says
Glad you found it useful. Make sure you follow us Facebook to get more WordPress tips.
Admin
cathy belyea says
i have followed this even contacted my host increased my uploads to 64mb however in wordpress it still only allows 8mb.
any other suggestions please help.
Guillermo says
Same problem for wordpress 3.9 / 4 version and having a look to Chrome console or firefox I saw an error 413 of NGINX when uploading
Maybe this thread can help to nginx users