One of the most commonly asked questions on WPBeginner is how to fix the WordPress not sending email problem.
Many of our beginner-level users ask us why their contact form plugin is not sending emails or why they are not seeing any WordPress notifications.
In this article, we will show you how to fix the WordPress not sending email issue so your website can send emails more reliably and bypass the spam folder.
Why You’re Not Getting Emails From Your WordPress Site
The most common reason for emails going missing is that your WordPress hosting server is not properly configured to use the PHP mail() function.
Even if your hosting is configured to use it, many email service providers, like Gmail and others, use a variety of tools to reduce email spam. These tools try to detect that an email is coming from the location that it claims to be from.
Emails sent by WordPress websites often fail this test.
This means that when an email is sent out from your WordPress site (from a contact form plugin, admin notification, etc), it may not even make it into the recipient’s spam folder, let alone the inbox.
This is why we recommend not using WordPress to send your email newsletter.
This is also the reason why we recommend everyone to use SMTP for sending emails in WordPress.
What Is SMTP?
SMTP (Simple Mail Transfer Protocol) is the industry standard for sending emails.
Unlike the PHP mail() function, SMTP uses proper authentication, which leads to high email deliverability.
WordPress has a WP Mail SMTP plugin that configures your WordPress site to send emails using SMTP instead of the PHP mail() function.
You can use it to connect with any popular SMTP services like SendLayer, Brevo (formerly Sendinblue), Gmail (Google Workspace), Amazon SES, and more.
With that said, let’s take a look at how to fix the WordPress not sending email issue.
Video Tutorial
If you’d prefer written instructions, just keep reading. You can use the quick links below to navigate through this article:
Step 1: Install the WP Mail SMTP Plugin
Whatever SMTP service you choose, you’ll need to have the WP Mail SMTP plugin installed on your site. This lets you switch WordPress from using the built-in PHP mail() function to using your SMTP service.
First, install and activate the WP Mail SMTP plugin. If you’re not sure how, then see our step-by-step guide on how to install a WordPress plugin.
Next, click on ‘WP Mail SMTP’ in your WordPress dashboard to configure the plugin settings.
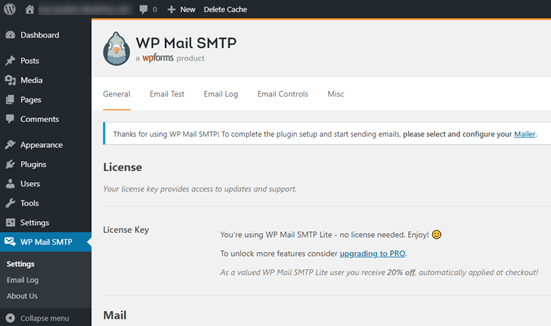
You will need to start by entering the name and business email address you want your site’s emails to come from.
Make sure you use the same email address here that you’ll be using for your SMTP mailing service.
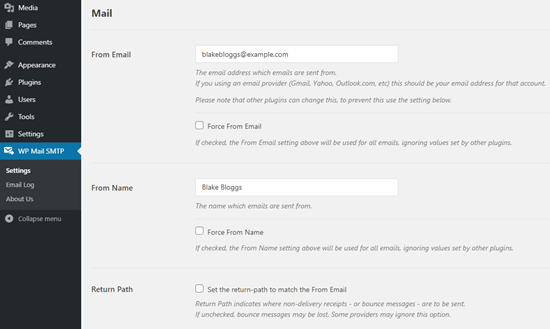
You can choose to force emails to use this name and email address, even if other plugins, like WPForms, have different settings. WP Mail SMTP will override the other plugins’ settings.
After that, you need to choose an SMTP mailing service for your site. For this tutorial, we are going to set up SMTP using SendLayer.
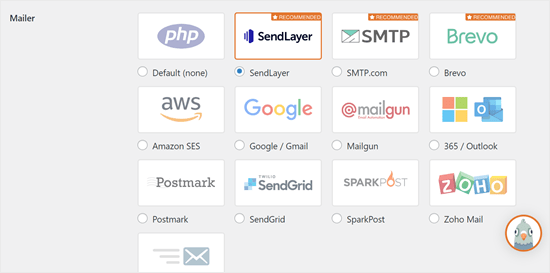
To finish setting up WP Mail SMTP, you’ll need to create an account with SendLayer. We will move on to that next and then come back to finalizing the setup on WP Mail SMTP, so make sure to keep this tab open.
Step 2: Set Up Your SMTP Mailing Service
SendLayer is a reliable email service provider. They let you send a large number of emails with high deliverability.
You can use SendLayer to send up to 200 emails for free, which is more than enough for most small websites to get started.
These could be emails from your contact form, new user account details, password recovery emails, or any other emails sent through your WordPress site.
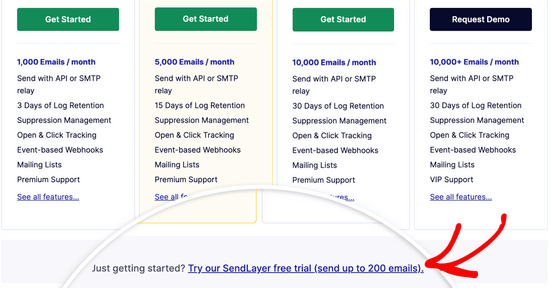
First, you’ll need to go to the SendLayer website to create an account. On the Pricing page, click on the ‘Try our SendLayer free trial (send up to 200 emails)’ link to set up your account.
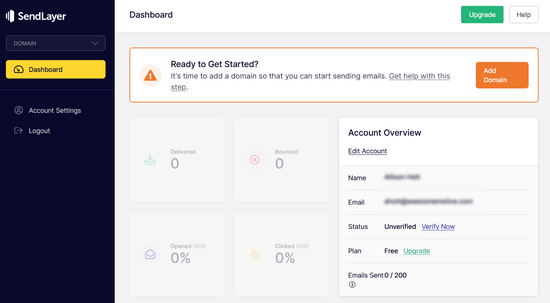
Once you’ve created an account, you’ll see your SendLayer dashboard.
Now that you have a SendLayer account, let’s set up your email provider with WordPress.
Step 3: Connect Your WordPress Website with SendLayer
Before you can send emails with SendLayer, you need to authorize your domain.
This proves to email servers that you are the confirmed owner of your sending domain and that your emails are sent from a legitimate source.
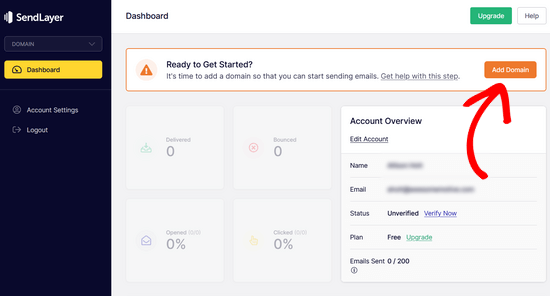
To authorize your domain, click the orange ‘Add Domain’ button from the SendLayer dashboard.
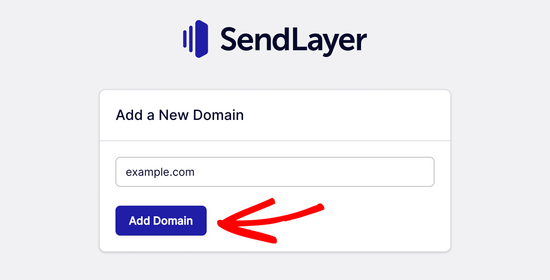
On the next page, simply type your domain name into the field provided.
Then, click on the ‘Add Domain’ button.
Note: With other mailing services like Brevo (formerly Sendinblue), you need to set up a subdomain for your website first. But SendLayer will automatically add the subdomain to the sender domain’s DNS records.
So, you don’t need to add an extra subdomain when registering the domain.
Once you’ve added your domain, SendLayer will show you 5 DNS records that you need to add to your domain’s DNS record settings.
These lines of code let SendLayer authorize your domain name.
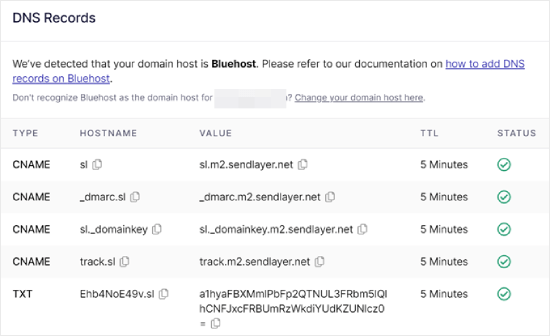
You’ll need to add these DNS records to your WordPress site. This may seem complicated, but all you need to do is copy and paste them into the right place.
For the sake of this tutorial, we will demonstrate our example using our hosting account on Bluehost.
If you are using other hosting companies or if your DNS is managed at a domain registrar like Domain.com, Network Solutions, or GoDaddy, then follow their respective instructions.
First, open up a new browser tab and log in to your WordPress hosting account. Then, find your domain’s DNS records.
In Bluehost, you do this by going to ‘Domains.’ Then, click ‘Settings’ next to the domain you’d like to connect with SendLayer.
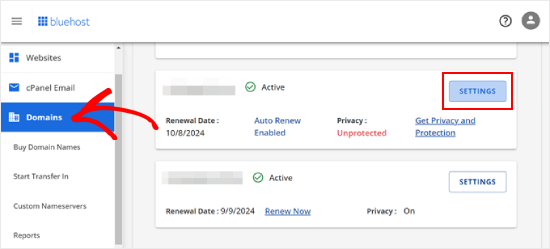
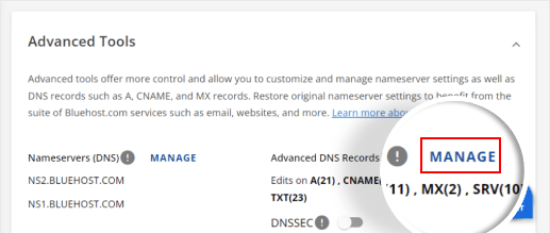
On the next page, scroll down to the ‘Advanced Tools’ section.
After that, click the ‘Manage’ button next to Advanced DNS Records.
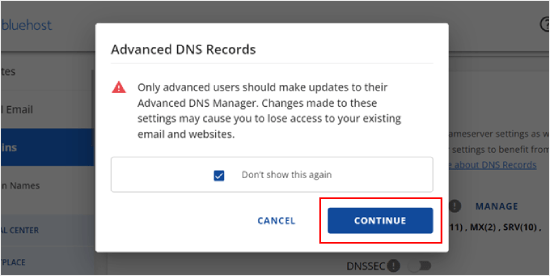
You will see a warning message saying that DNS records should be edited by an advanced user. Don’t worry about this message, as the process for this is pretty easy.
Go ahead and click ‘Continue’ to proceed.
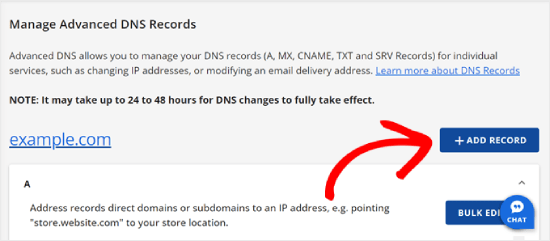
You will now arrive at the Manage Advanced DNS Records page.
To start, click the ‘+ Add Record’ button.
Now, let’s start adding the DNS records that SendLayer has provided.
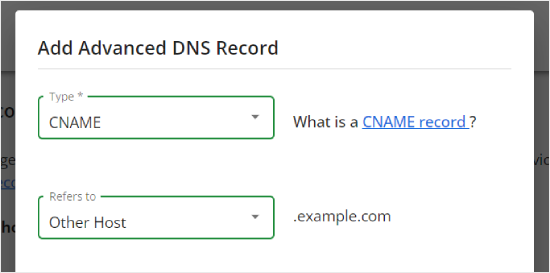
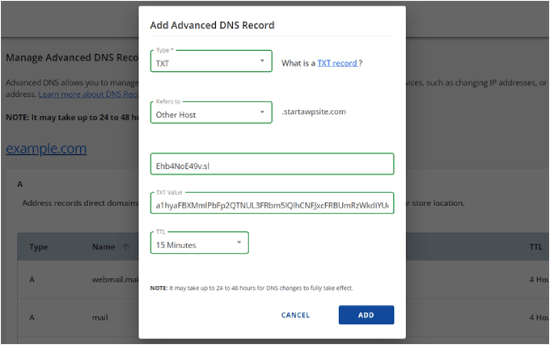
First, select the type of the DNS record. In this case, we will use CNAME for the first record.
In the ‘Refers to’ section, click ‘Other Host.’ You will pick this same option for all of your DNS records later on.
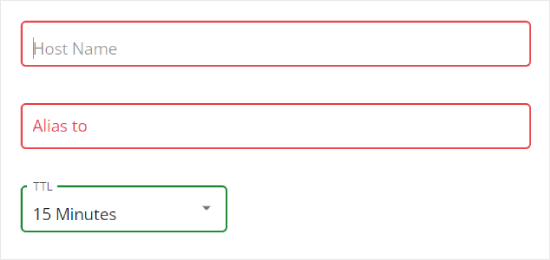
Scrolling down, you will see three fields: Host Name, Alias, and TTL.
The Host Name should be filled with the value in ‘Hostname’ provided by SendLayer. The Alias should be filled with the value in ‘Value.’ As for the TTL, you can leave it at 15 minutes.
The screenshot below shows what our screen looked like when we added our first CNAME record.
Once you’re done, just click ‘Add.’
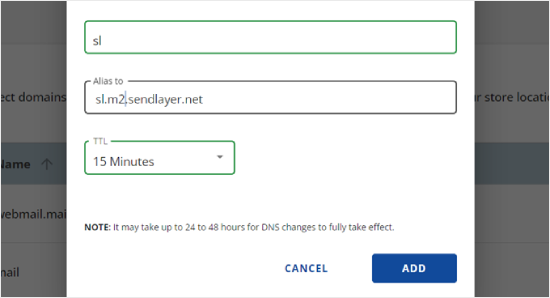
You can repeat these steps for all of the DNS records (both CNAME and TXT).
When adding the TXT record, make sure to paste the ‘Hostname’ value from SendLayer into the ‘Host Name’ field and the one from ‘Value’ into the ‘TXT Value’ field.
Here’s what it looks like:
After you’ve added your records, go back to SendLayer and check the box next to ‘I have added these DNS records and am ready to proceed.’
Then, hit the ‘Verify DNS Records’ button.
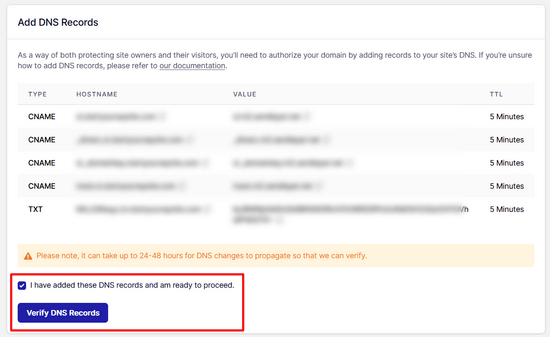
It may take 24-48 hours before SendLayer is able to verify your records. In our experience, it took several hours.
If nothing happens when you click that button, the records can’t yet be verified. You can check again later to see if they’ve been verified by going to ‘Settings’ and navigating to the ‘DNS Records & Settings’ tab from your SendLayer dashboard.
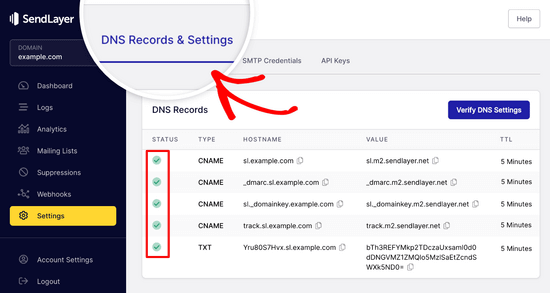
Here, you’ll find a list of all of your DNS records in one place. Once your domain has been successfully authorized, you’ll see green checkmarks next to each DNS record in the ‘Status’ column.
You can keep going with this tutorial while you wait for the authorization to take place.
Step 4: Finish Setting Up WP Mail SMTP to Use SendLayer
Let’s finish the setup. First, go to your SendLayer account to find your API key.
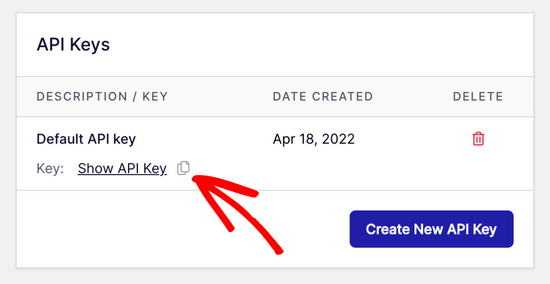
From the SendLayer dashboard, simply go to the Settings » API Keys page. Here, you’ll see a default API key that was generated when you authorized your domain in SendLayer.
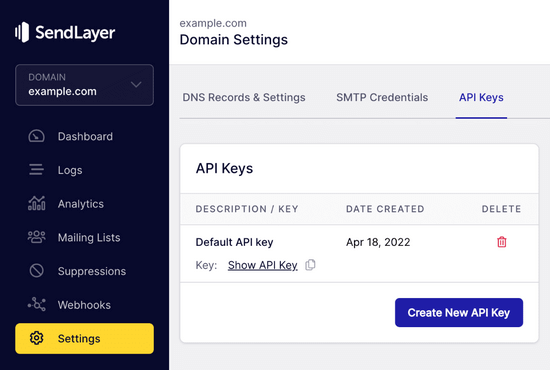
You can copy the API key from this page by clicking on the copy icon.
Like so:
With that done, you can head back to your WP Mail SMTP setup wizard tab.
Then, paste the API key where appropriate.

Congratulations. You’ve now set everything up. The final step is to send a test email to make sure everything is working.
Go to WP Mail SMTP » Tools. In the ‘Email Test’ tab, enter an email address to send an email to. This will default to the site’s admin email. Click ‘Send Email’.
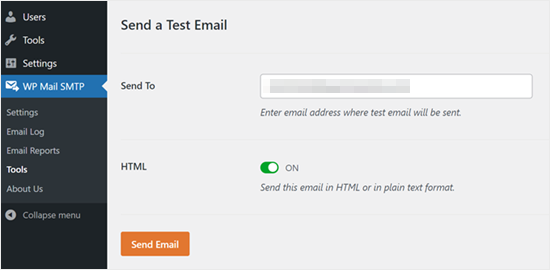
You should see the message ‘Test HTML email was sent successfully!’
Check your inbox to see whether it’s arrived. It’ll look like this:
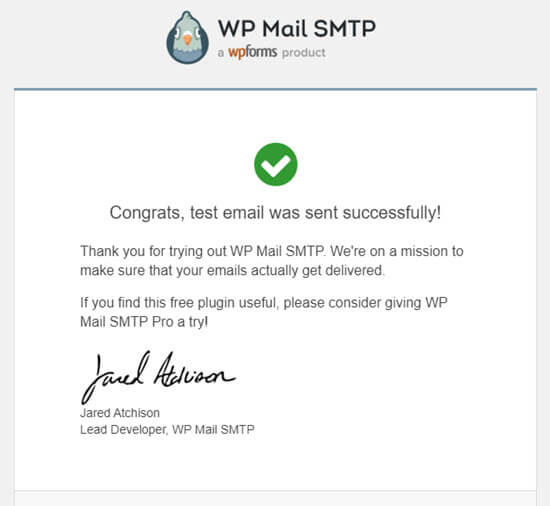
Note: If your SendLayer account isn’t yet activated, you’ll get the message: [permission_denied]: Unable to send email. Your SMTP account is not yet activated.
Alternative Ways to Fixing the WordPress Not Sending Email Issue
As you can see from the WP Mail SMTP plugin’s list of mailer options, you don’t have to use SendLayer. While it’s our top free recommendation, there are other options that you can use, including Microsoft 365, Gmail (Google Workspace), Amazon SES, etc.
Using Gmail or Google Workspace With WP Mail SMTP to Fix WordPress Emails
If you have Gmail, then you can use that to send your emails. You won’t need to enter your email login details in WordPress when you’re using the WP Mail SMTP plugin.
To use Gmail or Google Workspace, set up WP Mail SMTP as shown above, and then click the ‘Google / Gmail’ option for your mailer.
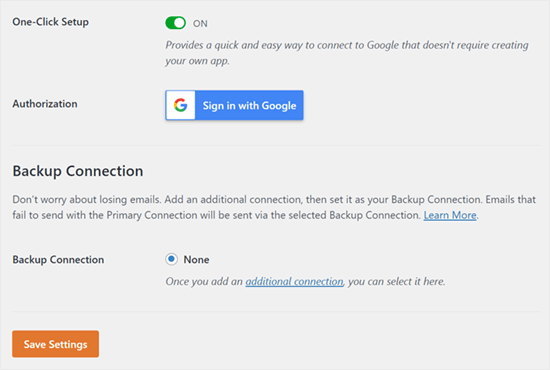
Next, you can configure the mailer settings by using WP Mail SMTP’s one-click setup.
This method doesn’t require you to create your own app, which is much easier. You only need to sign in to your Gmail account and click ‘Save Settings.’
There are a couple of key drawbacks to using your professional Gmail or Google Workspace, however.
One is that you may need to contact your web host to get them to install the right certificate to get it working.
Another is that if you change the email address in the future, you’ll need to go through the entire process again. This will include creating a new web application.
Using Microsoft 365 With WP Mail SMTP to Fix WordPress Emails
If you use Microsoft Office 365 or Outlook for your regular email account, then you can also use that to send out emails through WordPress. This isn’t a recommended option, though, because it’s less secure.
You’ll need to set up WP Mail SMTP as above, then click the ‘365 / Outlook’ option when choosing your SMTP mailer. Then, you need to register an app on Microsoft Azure so that you can fill out the fields below.
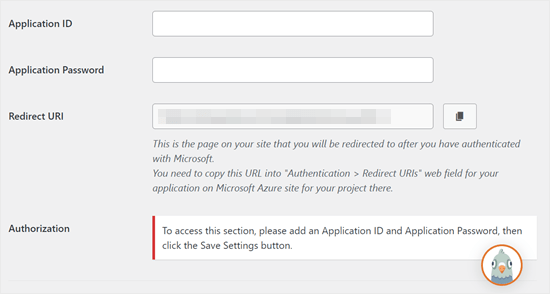
For more details, see the detailed guide on how to set up Outlook with WP Mail SMTP.
Using Amazon SES with WP Mail SMTP to Fix WordPress Emails
Amazon AWS platform has a Simple Email Service (SES) that you can use to fix the WordPress email issue.
The best part about Amazon is that it lets you send up to 62,000 emails every month for free. The downside is that the setup is a bit more challenging for beginners, which is why we don’t recommend it as our preferred option.
But as you can imagine, a lot of professionals and experts use Amazon SES for their WordPress email SMTP service, so we couldn’t write an article without mentioning it.
If you’re interested in setting up Amazon SES with WordPress, then see the full instructions on how to set up Amazon SES with WordPress.
Whatever mailer you decide to use, always remember to use the ‘Test Email’ feature to ensure that emails are being successfully sent.
You must make sure to check your inbox, too, and confirm that you’ve received the test email.
We hope this article helped you learn how to fix the WordPress not sending email issue. You may also want to see our list of the most common WordPress errors and how to fix them or our picks of the best WooCommerce email customizer plugins.
If you liked this article, then please subscribe to our YouTube Channel for WordPress video tutorials. You can also find us on Twitter and Facebook.


Syed Balkhi says
Hey WPBeginner readers,
Did you know you can win exciting prizes by commenting on WPBeginner?
Every month, our top blog commenters will win HUGE rewards, including premium WordPress plugin licenses and cash prizes.
You can get more details about the contest from here.
Start sharing your thoughts below to stand a chance to win!
Will says
My problem is that wordpress won’t send emails to or from an address that is coming from my domain name. E.g. @domain.com. But it will send from any other email address type.
Md Sajid says
i successfully setup my site, and it is working very well.
thanks for this nice and working tutorial..
i used gmail api first method..
SORRY FOR MY BAD ENGLISH
idayat says
hello, please does anyone know how can stop WordPress from sending automatic emails to blog subscribers, i want to use MailChimp but it seems i have to first disable WordPress. thank you
Lyndsay says
Great instructions! Clear, easy to follow and they work!
Iman says
Thank you so much. You have tutorial helped me fix my email problem . this was one of the best tutorials I have ever seen. every step is very well explained.
alex says
Hi, I have installed SMTP – I think right.. but I’m still not receiving emails from the contact form. I’m also not getting new order notifications. can someone please help me?
Sagar Awal says
check spam mail.
Nifemi says
I’ve completed all the steps using mailgun but when I try to send a test email to my other webmails in that same domain, they never get delivered. However it works pretty well with other emails such as gmail.
Any idea about what might be causing this issue?
WPBeginner Support says
Hi Nifemi,
Please contact Mailgun support they would be able to help you troubleshoot this.
Admin
Ron says
Is there a way to find the emails that were sent and you did not receive because of this issue?
WPBeginner Support says
Hi Ron,
Default WordPress notification emails are not stored in the database. However, if you are using a plugin which stores entries in the database then you may be able to see them.
Admin
Daniel Koo says
Instead of the Success! message, I get an error like this:
——–
Not Acceptable!
An appropriate representation of the requested resource could not be found on this server. This error was generated by Mod_Security.
——-
What is the problem?
Colin says
I’m having the exact same problem. The answer appears to lie in complicated CSS maneuvers that I hate.
Abhishek Kumar says
Thank you so much for useful tutorials.
Anthony says
Thank a lot. i followed your method 1 and it worked perfectly!
Michael Zorko says
So…this used to be my go to app. Found a similar help video from you guys a while back. Loved Mailgun – then they started changing their policy. Now, it only works for verified email addresses..unless…you put a credit card on file.
Jack Hernandez says
I’ve been having problems with admin and users (and new users) not receiving automatic notifications.
Will this also solve that issue?
Thanks
WPBeginner Support says
Hi Jack,
Yes, it would. Missing notifications are almost always caused by email issues in WordPress.
Admin
Chloe says
Hi,
I’m confused in the step of opening the cPanel in the hosting account. What is the hosting account? Is it found in WordPress? Thanks
WPBeginner Support says
Hi Chloe,
Seems like you are using WordPress.com. Please see our guide on the difference between self hosted WordPress.org vs free WordPress.com blog.
Admin
Owen says
I was having the exact same problem with e-mails not sending and these instructions were v useful. I have now fully resolved the issue – thank you very much
WPBeginner Support says
Hi Owen,
We are glad you found the instructions helpful You may also want to subscribe to our YouTube Channel for WordPress video tutorials.
Admin
Amol says
Hello,
Thank you for the topic. It helped me a lot and fixed the issue I was struggling with for last 3 days.
Regards,
Amol
Fred says
I started to use the video guide and the first step was to set up a mailgun account. I created a password and clicked the verification link in my email to complete the account. However they then wanted to text me a confirmation code to a cell phone as a second verification. I only own a landline not a cell phone and there was no workaround so it is impossible for me to use mailgun. I realize most people these days have cell phones but it seems stupid they would not allow signup via computer (or via a voice code over the phone).
Fernán says
Thank you so much! I just had some changes regarding domain settings, and this pointed me in the right way.
Pankaj Kumar says
Hi, If i am using Zoho mail for example.com for email.
Can i still use mail1.example.com and configure mx record?
Will it work or stops my email account created on zoho mail for example.com
Melinda Thome says
This worked perfectly, and solved all my WordPress email sending issues. Thank you!!
Melinda
Leo says
My wordpress send emails, but, this emails Go to Spam folder… I need a soluction. I try using codes from functions.php but does not work. My solution was install Mail Bank plugin but, I dont want this plugin. I want a simple soluction.
casey says
hello! I am having issues with my Contact page, we are not receiving new contact information in our CRM site. Can you please guide me to fix the issue?
Doron says
Hey
Thanks for the great tutorial. I’m getting
“Mailgun HTTP API Test Failure; status “Free accounts are for test purposes only. Please upgrade or add the address to authorized recipients in Account Settings.”
Do you know why or how to resolve?
(Added an “authorized user” to my acount)
Alex Cramer says
I’m having the same problem. I also don’t understand how to get to the cPanel. What am I missing?
Lawrence Ip says
Ah! When in doubt add this TXT Record. @ v=spf1 include:_spf.google.com ~all
That is, this works for Namecheap (and most likely others) when Gmail is enabled. Enjoy!
Aaron Williams says
I am having the problem that the wp_mail() function is not showing up in our functions.php document. If I read the documentation correctly, that means Gmail SMTP plugin still won’t work because it uses that function still. Every time I have tried to add the wp_mail() function it has resulted in a fatal error that kills the website and I have to remote into our server to delete the code to get the page working again. Any ideas?
WPBeginner Support says
Hey Aaron,
wp_mail function resides in the core WordPress files, so you will not find it in your theme’s functions.php file. Since it is already part of the core, you do not need to add it. Try installing Gmail SMTP plugin, and it should work.
Admin
Clare says
Hi there, so happy to have found this tutorial! Can anyone tell me if you need to use a subdomain to setup Mailgun? We have set this up using our root domain and are having some issues and I am wondering if this could be why. Any advice would be appreciated! Thanks, Clare.
Michael Halbrook says
It can cause problems if you set it up with out one from what I’ve been reading, because if you set up the MX records for MailGun with your current e-mail address it can be problematic.
Michael Tillman says
Great tutorial. I have to say the narrator has a really nice voice, nice and pleasant.
Eric says
Using Mailgun worked like a charm. Thanks!
John F says
will this fix conformation email not sending?
Callan says
Hi,
I think I found an easy workaround for this problem. When setting up form fields, instead of using the generic email field I just use a different type of field and mark it as a “required” field. That way people will know that it is a required field and still provide you with a valid email address.
I have just had the same problem with all of a sudden WordPress not sending me mail from anyone who has a gmail address. I’ve changed the field types and am again receiving emails from submitted forms.
I’d be interested to see if anyone else would try to see if this works.
Steve says
First off…very informative article…including the YouTube video on setting up the Google Apps for Work. So thank you for that!
A couple questions:
I use Mad Mimi for my email marketing…and they sent the below article out a while ago telling Gmail users to not use Gmail addresses for sending out Mad Mimi email campaigns (which is what I used to do), but instead to use a custom domain. So that’s what I did. I set up a custom “name@domain.com” address and have been using that. If I want to use the exact same “name@domain.com” address for the Google Apps for Work setup to receive notifications from my WordPress site…will this mess up stuff with the Mad Mimi emails?
Additionally, I currently have my personal Gmail setup to be able to send and receive email from the “name@domain.com” address…so how is that effected as well? Do I need to delete that stuff out of there if I go with this Google Apps for Work option to fix my issue with not receiving my WordPress notification emails?
Thank you so much in advance for any clarification on this.
Sacha Doucet says
The article and video were super helpful! Thank you!!
WPBeginner Support says
Hey Sacha,
Glad you found it useful. You may also want to subscribe to our YouTube Channel for more WordPress video tutorials.
Admin
Amy says
Just wanted to say – thank you so much for this article! Has helped me fix my forms not sure what the issue was before, if it was the server or what – but the mailgun solution worked perfectly for me.
Akinola King says
Thanks for this article.
David says
Great article! Thank you for sharing!
1) Why does the mailgun HTTP API not require a username and password like the SMTP solution does? Is it because mailgun is verifying at the DNS level (with its SPF and domain key records) and with the API — so this setup removed the need for the SMTP credentials?
2) Am I correct that these sending issues (being rejected by Google or Yahoo’s mail servers) are mostly because people are trying to send email from their WP installations but are using a personalAccount@aol.com to send email from a WP install at example.com?
3) Would mailgun allow someone to send email as personalAccount@aol.com even though the mail is coming from the WP install at example.com
Thanks for your help!
Shaun Lawson says
Thank you so much for these great instructions.
Worked for me first time.
Shaun
Lucas Shepherd says
Postman SMTP fixed my wordpress email after trying everything everyone told me to try.
Doug says
Thanks for pointing me to Postman SMTP. I too had tried several setups to no avail.
Jerry says
Thanks Lucas, Me too!
Postman SMTP solved all my email woes.. I’ve been trying to test mail function on WordPress installed on localhost under Xampp for a day or two.
I’m brand new to WordPress and I’m learning that the secret to a happy life is getting the right Plugin.. recommendations are invaluable.
meenakshi says
My cpanel is not showing Advanced DNS Zone edittor in Domain section . Wha shoud I do?
WPBeginner Support says
You can try DNS Zone Editor or ask your hosting provider for help.
Admin
Mabel says
I need help. I have successfully installed mailgun using your videio How to Fix WordPress Not Sending Email Issue, but my email notifications still do not send. Do I have to enter some code into each email template? I have no idea what I am doing.
bobby says
You should really warn people about changing the mx records. It ruined my incoming mail for 5 hours and i had to change them back.
Bobby says
I set this all up and never got an activation email from Mailgun. Pretty pathetic that an email smtp service can’t even figure out their own account activation system through….ugh….email.
I sent a support ticket in. Now, because I changed the settings on my hosting, NONE OF MY EMAIL IS WORKING. I have tried three different emails to activate the account, and none have gotten the activation email.
Luke Cavanagh says
SendGrid is the best option now, the free plan covers up to 12,000 emails a month.
https://wordpress.org/plugins/sendgrid-email-delivery-simplified/
Marco Floriano says
Amazing video, amazing tutorial. Nice solution. Perfect! Mailgun is amazing, thanks a ton guys!
Ademide says
Thank you for tutorials. I couldn’t proceed because I was having the following error “Your account is temporarily disabled. Business Verification Please contact support to resolve”. I have raised two tickets already, it doesn’t seem to be helping. Any idea what I need to do to get this resolved?
WPBeginner Support says
Mailgun has internal checks in place which may sometimes flag an innocent account as suspicious. You simply need to contact their support, they will ask you a few questions about your email usage and will unlock your account.
Admin
Wout says
Oh man thank you so much for this! You’re lifesavers! Mails from my wp-site used to end up in Spam, now they reach the inbox with no problems… One thing worth mentioning may be that the domain you set up in Mailgun doesn’t show up in WP mails to users/customers, so you don’t have to use a matching domain for your site. You can setup mail1.example.com in Mailgun for your WordPress site anotherexample.com and it works.
WPBeginner Support says
It works, but to ensure maximum delivery in the long run, it is recommended to use the same domain as your website.
Admin
Wout says
Actually I still had some issues after testing, and decided to install sendgrid plugin, and that was easier to setup and works like a charm…
Lavish says
My domain name is attached to Google Apps emails, I don’t want to mess up things. Can I instead use .org version of my domain name. I have .org and it is just parked (redirecting to .com) unused.
Thanks
Luke Cavanagh says
Just make it easy and use SendGrid. You just create a general API and then add it into the settings of the SendGrid plugin on the site you need to use it on.
Michael Story says
Hi you mention needing the shortcode for later in the video, where do you use the shortcode? Does it replace gravity forms?
Bill Frankell says
Oh man, where were you last week with this? I spent four days of vacation working all this out on my own.
However I do not see my problem listed, which was using Yahoo mail.
Been a yahoo user since 2000 so hated to give way but finally set up new gmail accounts on all my websites which changed everything. I now have those accounts all forwarding to Yahoo, each with a note in the from address telling me their source.
There may have been a way to make Yahoo work, but I didn’t find it and finally gave up. This is a better setup because it lets me set up separate mailing lists and work with mail chimp and sumo me. So far in the last week we have collected over a hundred new members on one site, the difference is that now I get to see each one as it comes in, can delete my yahoo notice and still have the record on Gmail archives.
Having said all this, this page is being bookmarked for future reference. Thanks, it was almost timely.
amit says
Sending WordPress Emails Using Gmail SMTP Servers. is it free feature
WPBeginner Support says
There are both free and paid options. The free option is less reliable than the paid option.
Admin