Are you looking to enable or activate plugins from the WordPress database?
If you cannot access your WordPress admin area and need to activate a plugin to restore your access, then you can do that from the WordPress database.
In this article, we will show you how to easily activate your WordPress plugins using the database.
When Should You Activate WordPress Plugins Using Database?
A number of common WordPress errors can prevent a website owner from accessing the WordPress admin area. In most of those situations, the user is looking to deactivate WordPress plugins without admin access.
However, in some situations, a website owner may need to activate certain plugins to restore access to their WordPress website.
For example, let’s assume an error is stopping you from accessing your WordPress dashboard, and you have found a plugin that can fix that error.
Luckily, WordPress stores the active plugin information in your WordPress database. This means you can manually enter this information directly in the database and tell WordPress to activate a plugin.
The only condition is that the plugin must be installed on your WordPress site, which means that it should be present in the plugins folder on your WordPress website.
That being said, let’s see how you can easily enable/activate a plugin using the database, step-by-step:
Step 1: Find Your Database Name Using the Hosting Control Panel
To activate your WordPress plugins using phpMyAdmin, first, you need to find out your WordPress database’s name.
To do this, log in to your web hosting dashboard. For this tutorial, we will be using Bluehost.
If you are using a different hosting company, then your WordPress hosting dashboard may look slightly different.
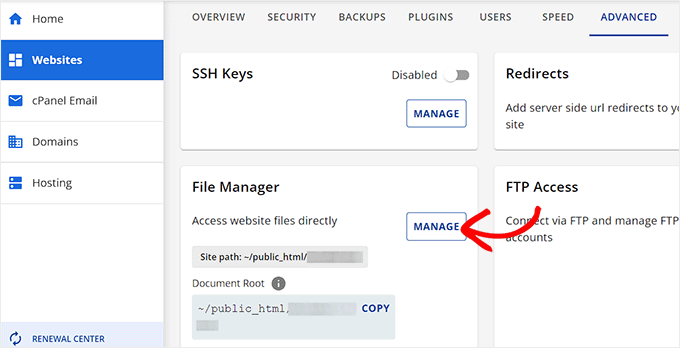
From the ‘Websites’ tab, switch to the ‘Advanced’ tab and click the ‘Manage’ button next to the ‘File Manager’ option.
This will open up the File Manager in a new window. Here, simply locate and click the public_html folder from the left column.
All the files that are stored in the public_html folder will now open up on the screen.
From here, you have to locate and click the folder with your site’s name on it from the ‘Name’ column.

Some users may instead see their WordPress files and folders installed inside the public_html folder.
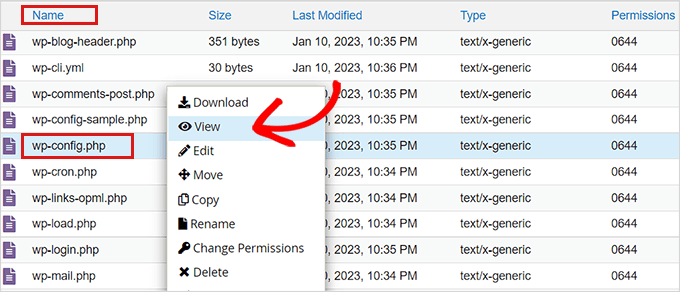
After you have opened up your WordPress site’s file, locate the wp-config.php file in the ‘Name’ section and right-click on it.
This will open up a menu where you must select the ‘View’ option.
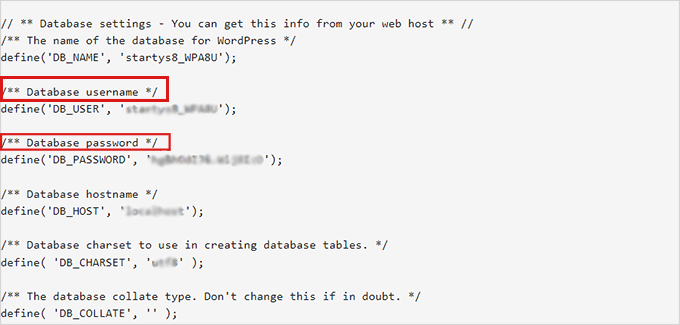
This will open up the wp-config.php file in a new window where you can locate your database details.
We recommend that you copy and paste your database details, including the username and password, into a notepad app on your computer.
Now that you’ve successfully found your database’s name, let’s move to our next step.
Step 2: Locate Active Plugins Option via phpMyAdmin
After you have found out the name of your database, you need to go back to your WordPress hosting control panel.
Once there, switch to the ‘Advanced’ tab again and scroll down to the ‘phpMyAdmin’ option. After that, click the ‘Manage’ button next to it.
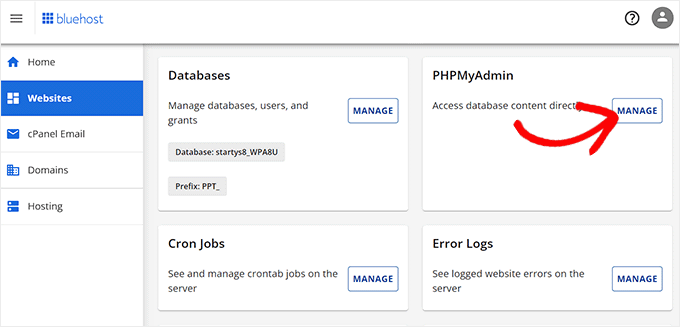
This will launch the phpMyAdmin app in a new browser tab.
Note: Before you make any kind of changes, please make sure to create a complete backup of your database. It will come in handy if anything goes wrong with the process.
Next, click the ‘Database’ tab from the navigation menu at the top of the page.
Once you’ve done that, locate your WordPress database and click on the browse button to expand it.

This will load all your WordPress database tables on the screen.
Here, you have to find the wp_options table and click browse next to it.
Note: By default, WordPress uses wp_ as the prefix for table names. Your WordPress database table may have a different table prefix.
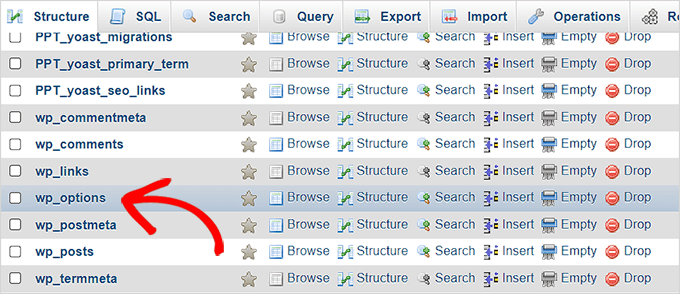
Inside the wp_options table, you’ll need to find the row where option_name is set toactive_plugins.
After that, click on the ‘Edit’ link next to it.
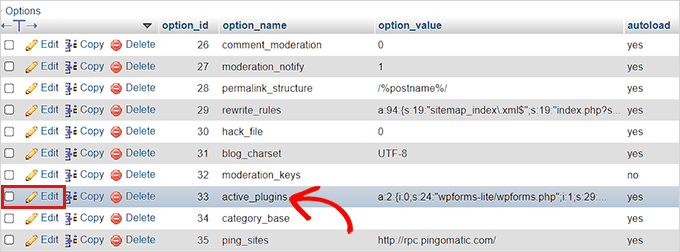
This will open up a box where you can manually enter details to activate a plugin.
Step 3: Activate a Plugin Using phpMyAdmin
WordPress stores the active plugin’s information in a special format so that it can be programmatically accessed by the software. In order to tell WordPress which plugins to activate, we will need to use that same format.
First, we will start by entering the option_value as a:1: and then opening up the curly bracket ({).
We are entering this value as 1 because we only want to activate one plugin. You can change the value to the number of plugins you plan on activating.

Next, we will be entering i:0; after the curly bracket. Here we are essentially assigning a serial number to our plugin.
Remember to always assign numbers starting from 0 instead of 1.

Next, we will be entering the number of characters present in the plugin’s name and the php file name of the plugin that we’re about to activate.
For that, we will type s:24: in the box. Keep in mind that the number of characters will differ for each plugin based on the characters in the plugin directory and file name.
For instance, we are activating WPForms in this tutorial which has 24 characters in its name, including the file name of the plugin, as stored in our file manager.

Next, you just need to type the plugin’s directory name. You can find it by visiting the /wp-content/plugins/ folder using the File Manager app.
Don’t forget to add quotation marks before typing the plugin’s directory name.

After the /, you have to enter the plugin’s file name.
To find the file name, visit File Manager again and open the folder of the plugin that you plan on activating.
From here, locate the PHP file of the plugin. This will be the plugin’s file name that you will have to add.
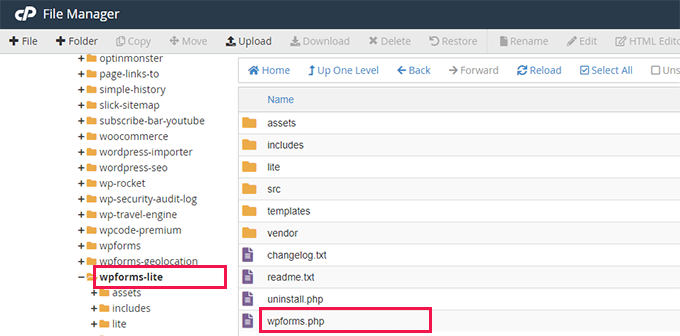
Now, go back to phpMyAdmin to type the name of the plugin, and then close the quotation marks.
After that, simply add a semi-colon (;) and close the curly brackets (}). The final value in this example would look like this:
a:1:{i:0;s:24:"wpforms-lite/wpforms.php";}
This is how it will look once you are done.

Next, simply click the ‘Go’ button to execute the command.
Now go visit your WordPress dashboard and head over to the Plugins » Installed Plugins page.
Your plugin has been successfully activated.
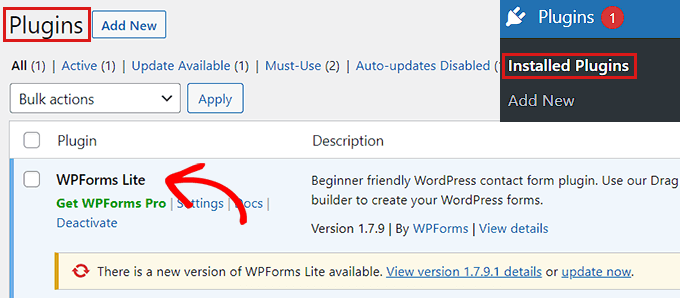
Now let’s say you want to activate two more plugins.
First, you will need to change the number of plugins. After that, you will adjust each entry for the plugin that you want to activate.
Here is an example:
a:3:{
i:0;s:47:"all-in-one-seo-pack-pro/all_in_one_seo_pack.php";
i:1;s:35:"insert-headers-and-footers/ihaf.php";
i:2;s:24:"wpforms-lite/wpforms.php";
}
Note: We have added line breaks here to make the code look more readable. You need to make sure that there are no line breaks or spaces in your code. Otherwise, it wouldn’t work.
We hope you learned how to activate a plugin using the database. You may also want to see our ultimate WordPress security guide and our top picks for the best WordPress themes for SEO experts.
If you liked this article, then please subscribe to our YouTube Channel for WordPress video tutorials. You can also find us on Twitter and Facebook.


Syed Balkhi says
Hey WPBeginner readers,
Did you know you can win exciting prizes by commenting on WPBeginner?
Every month, our top blog commenters will win HUGE rewards, including premium WordPress plugin licenses and cash prizes.
You can get more details about the contest from here.
Start sharing your thoughts below to stand a chance to win!
Jiří Vaněk says
Until now, I was only able to deactivate plugins through FTP. This is another very useful piece of knowledge. Thanks for the guide on how the same thing can be done using the MySQL database.
WPBeginner Support says
Glad our guide was helpful
Admin
Vincent says
Thanks! I used this to activate a plugin which needed to be updated in order to be activated and was behind a license wall on my staging website. Saved me a lot of hassle moving licenses around
WPBeginner Support says
Glad to hear our guide was helpful!
Admin
Charlie Sasser says
Suppose you need to temporarily disable a plugin like Wordfence that is preventing you from logging into the dashboard. Why not just change the name of the Wordfence directory to something like wordfence_tmp until you can resolve the issue? This seems much easier and less likely to cause a problem than modifying the database and serialized data. I like to keep things simple.
WPBeginner Support says
That is one option that can also be used, this is an alternative in case access to the site’s files are not available or if this method would is preferred.
Admin