Do you want to disable trackbacks and pings on your existing WordPress posts?
Trackbacks and pingbacks notify you that another blog has linked to your content and vice versa. However, spammers often abuse this feature by sending trackbacks and pings from spam websites.
In this article, we will show you how to disable trackbacks and pingbacks on your existing WordPress posts.
Why Disable Trackbacks and Pings in WordPress?
In the early days of blogging, trackbacks and pingbacks allowed blogs to notify each other about links.
Let’s imagine you write an article and link to a post on your friend’s blog. Your blog will automatically send a ping to that person’s blog.
This pingback will appear in their blog’s comment moderation queue with a link to your website. However, spammers can also use this feature to send fake trackbacks and pings, which can hurt your SEO.
Even if you are using Akismet, some of these trackbacks may still get into your WordPress moderation queue.
You can disable the trackbacks and pingbacks feature by going to Settings » Discussion in the WordPress dashboard. Then, just uncheck the box next to ‘Allow link notifications from other blogs (pingbacks and trackbacks) on new posts’.
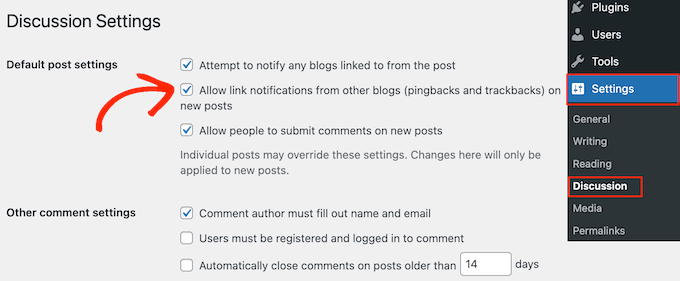
Keep in mind that this setting only disables trackbacks and pingbacks for any new articles you publish. All your old posts will still have trackbacks and pingbacks enabled.
With that in mind, let’s see how you can easily disable trackbacks and pingbacks on existing WordPress posts.
Disable Trackbacks and Pings for WordPress Posts
The easiest way to disable trackbacks and pings across your entire WordPress website is by using the bulk edit feature.
First, you will need to change the pagination settings so that all your posts appear on the same screen. To do this, go to Posts » All Posts and then click on the Screen Options button in the top right corner of the screen.

By default, WordPress shows 20 posts per page.
To change this, simply type a new number into the ‘Number of items per page’ box. Since you want to update all your WordPress blogs, we recommend typing in a high number, such as 999.
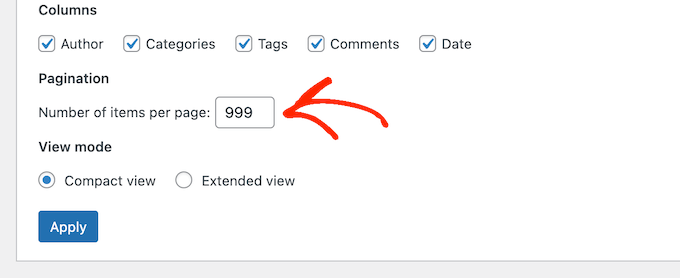
After that, click on the ‘Apply’ button to reload the post list.
Now, you can select all the posts by checking the box next to ‘Title’.
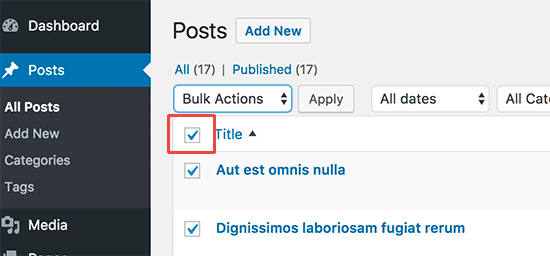
After that, open the dropdown that shows ‘Bulk Actions’ by default and select ‘Edit’.
Then, just click ‘Apply.’
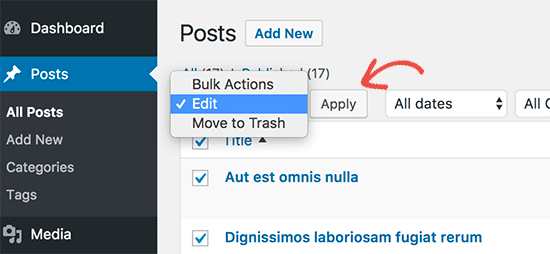
WordPress will now show the bulk edit settings for all these posts.
Simply open the ‘Pings’ dropdown menu and select ‘Do not allow’.
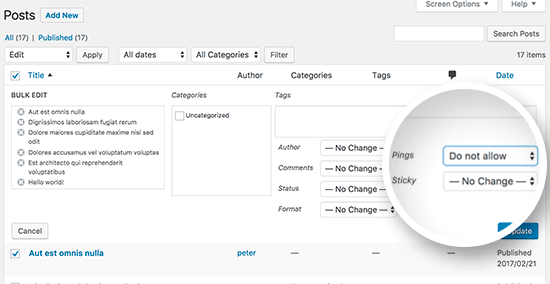
Finally, just click on the ‘Update’ button to save your changes and disable pings and trackbacks in WordPress.
If you have more than 999 posts on your WordPress blog, then you will need to visit the next page and repeat the process.
We hope this article helped you learn how to easily disable trackbacks and pings on existing WordPress posts. You may also want to see our list of the best WordPress SEO plugins and tools or our guide on how to increase your blog traffic.
If you liked this article, then please subscribe to our YouTube Channel for WordPress video tutorials. You can also find us on Twitter and Facebook.


Syed Balkhi says
Hey WPBeginner readers,
Did you know you can win exciting prizes by commenting on WPBeginner?
Every month, our top blog commenters will win HUGE rewards, including premium WordPress plugin licenses and cash prizes.
You can get more details about the contest from here.
Start sharing your thoughts below to stand a chance to win!
Oni says
Hello,
maybe i do not understand fully so please sorry this question:
1) disabling pingback and trackback from wordpress do not preserve me from someone to write them back: is it so? If yes, if someone write something that cite me i will never see (not saying that this is a problem, i’m just trying to understand).
2) Comment in approval usually are not shown in pages(is this true?): how does the comments approval queue affect SEO of a website?
WPBeginner Support says
Someone would still be able to write about and link to your site with trackbacks and pings disabled on the site you can normally use analytics tools to check for sites that are linking to your site without needing to use trackbacks and pingbacks.
Comments waiting for comment approval would not affect your site’s SEO and would not show up on the page until you approve the comment.
Admin
Moe Morales says
Thanks for this tip! It saved me a TON of time! Cheers!
WPBeginner Support says
You’re welcome, glad our guide was helpful
Admin
lin says
This did not work. It is still showing on my existing blog posts at the bottom.
I have it updated in settings and “PINGS” are turned off on all posts as well
WPBeginner Support says
Turning them off would disable them from being added, you would need to remove previous pings for what it sounds like you’re waning.
Admin
John Zimmer says
Very helpful. Clear, concise instructions that got the job done efficiently.
Thank you!
WPBeginner Support says
Glad our guide was helpful!
Admin
Zack says
Thank you for this great and detailed guide it saved me alot of stress because I was getting alot of pingbacks with this guide I was able to get it fixed.
WPBeginner Support says
Glad our guide was able to help!
Admin
Patrick Kamau says
Thank you so much for this article. I have been stressed by these pingbacks for quite a while. I had turned off them from new articles but they kept coming. Now I know it was because of the old posts. I have followed your essay steps and now I hope they will be gone forever.
Thanks.
WPBeginner Support says
You’re welcome, glad our guide could be helpful!
Admin
Steve says
I’m not sure you indicated it, but if a trackback is found in a post (or page) using your Edit method (which will now be changed to be disallowed), will it alter the date currently shown for the post (or page)? I would not want the original post date to now suddenly indicate the date I ran this Edit as this would mess up the time order of the posts.
WPBeginner Support says
Changing the trackback through the method in the article shouldn’t affect the published date for the post.
Admin
Dianne says
Thanks so much! I never knew about bulk editing. This really helped
WPBeginner Support says
Glad we could help
Admin
katie says
Hi! Is there a way to allow pingbacks but not to show them in the comments? Or does that defeat the purpose of allowing them in the first place. Sorry if that’s a silly question, new to all of this. Thanks!
WPBeginner Support says
To do that you would need to delete the pingbacks in your comments at which point we feel it would be better to prevent them altogether.
Admin
Stephanie says
I did the steps correctly but when I go back to make sure everything is saved. The “ping” section does not stay on do not allow. It goes back to how it used to be. Why?
WPBeginner Support says
You would want to start by following our troubleshooting guide below:
https://www.wpbeginner.com/beginners-guide/beginners-guide-to-troubleshooting-wordpress-errors-step-by-step/
Admin
Eduardo says
Awesome!! Thank you very much
WPBeginner Support says
You’re welcome
Admin
Timur says
Hi, how can I turn on pings on older articles?
I have a lot of articles and mention that i disable “Attempt to notify any blogs linked to from the article” and now i want this ping to my article. I turned on this option but mine nothing has changed with old posts.
Regards/
WPBeginner Support says
You would need to use the second method in the article to enable pings on the older posts
Admin
Tor says
ah, nice. I have a blog post that spammers have kept banging on for the last week. thank you!
WPBeginner Support says
You’re welcome, glad our guide could help
Admin
Babak Fakhamzadeh says
I’ve got a few thousand posts. If I set my pagesize to over 30 or so, WordPress returns a ‘page not found’ after submitting the bulk edit and waiting for a while.
I really don’t want to do this 100 times with a page size of 20.
So, is there a plugin or other method that can help me do this?
WPBeginner Support says
Sadly not one we would recommend at the moment, you may want to reach out to your host to increase your maximum execution time or try: https://www.wpbeginner.com/wp-tutorials/how-to-increase-the-maximum-file-upload-size-in-wordpress/
Admin
Babak Fakhamzadeh says
Thanks for the quick response.
Asif says
I have applied this tutorial as well as https://www.wpbeginner.com/wp-tutorials/how-disable-self-pingbacks-in-wordpress/ but still ping back comments are visible on my blog. May you please help out to get rid from them?
WPBeginner Support says
Those pingbacks are probably older and approved. You will have to find and delete them by visiting the comments page in WordPress admin area.
Admin
Jean LeFebvre says
Thank you, I followed your advice. I have worked so hard to get rid of spam in my life and I almost let it back in again because of not knowing what it was!
Wayne Shufelt says
Just wanted to say thanks for this tutorial. I got a trackback on one of me website posts the other day and was not sure about what it was. I thought it might be something I should not open so I deleted it.
I have now followed youtr instructions and shut of that capability in WordPress.
So, Thanks again,
Wayne
Barbara says
Thanks so much for this. My site was being overrun with trackbacks.
Brown Smith says
Hi, If I off trackback then will stop SEO juice pass? I’m really worried about my blog i just off it after read this post.
WPBeginner Support says
Hi Brown,
Turning off trackbacks doesn’t affect your site’s SEO.
Admin
Tim Romero says
Thanks. This was a big help.
JD Lasica says
Would be nice to know what version of WordPress this works on. I’ll upgrade because I’m not seeing the Bulk Edit option. Thanks!
WPBeginner Support says
Hello,
This tutorial was written specifically for self-hosted WordPress.org websites. Please see our guide on the difference between self hosted WordPress.org vs free WordPress.com blog.
Admin
Tony Wang says
Great article, but disabling pings on pages in bulk edit does not seem to work, there is no “ping” option. Is that true, or am I missing something? So now I need to turn off pings on every individual existing page? Just started getting a bunch of ping spam.
john says
Thanks for the explanation. Mine were already disabled as it was configured by someone else / or switched off as a default. This article explains why they are switched off. What is also useful is to know how to do a bulk edit, i’ve not used this feature before as luckily my set up was done correctly in the first place and is a modern wordpress website with up-to-date security and secure plugins and a secure server configuration that also helps. But you can never be too sure and it is worth taking this measure of disabling pingbacks etc…You should however keep your sitemaps up to date and submit them to include new articles. This is the modern method for updating search engines. Other bloggers find out about the external links to their sites and visa versa using tools such as the google webmaster tools.
Ricardo Ribeiro says
Unfortunately on the last step of this tutorial I get
Request-URI Too Large
The requested URL’s length exceeds the capacity limit for this server.
priya says
All your article I read so far seems for self hosted site. Please help me find some useful articles for my wordpress blog site.
Brian says
Hi Priya,
WordPress is a free tool to help create websites or blogs. It comes in a couple of different flavors. There is WordPress self hosted and WordPress.com, which is hosted. They are both still WordPress.
Here is an article that explains the difference:
https://www.wpbeginner.com/beginners-guide/self-hosted-wordpress-org-vs-free-wordpress-com-infograph/
If you want help with WordPress.com (hosted) specifically, here is a great starting point:
Hope this helps!
Tammi says
Exactly the solution that I was looking for, thanks WPBeginner!
Ravi sharma says
Really Awesome And Helpful Post
Christabel Hilda says
That has been helpful