Do you want to add sticky posts to custom post type archive pages?
Placing your most important custom posts at the top of the page will help your visitors find them more easily. But by default, WordPress makes the sticky functionality available for posts but not for other post types.
In this article, we will look at how to add sticky posts in WordPress custom post type archives.

Why Make WordPress Custom Posts Sticky?
If you create content for your WordPress website with a different format than a standard post or page, then you are probably already using a custom post type. For example, if you run a book review website, then you may have created a Book Reviews post type.
You may wish to place your most important content at the top of the custom post type archive. It’s one of the best ways to feature in-depth and time-sensitive content, as well as your most popular custom posts.
But while WordPress offers a sticky posts feature, this isn’t available for custom post types.
Let’s have a look at how to add a sticky feature to your custom post type archive pages.
Adding Sticky Posts in Custom Post Types
First, you’ll need to install and activate the Sticky Posts – Switch plugin. For more details, see our step-by-step guide on how to install a WordPress plugin.
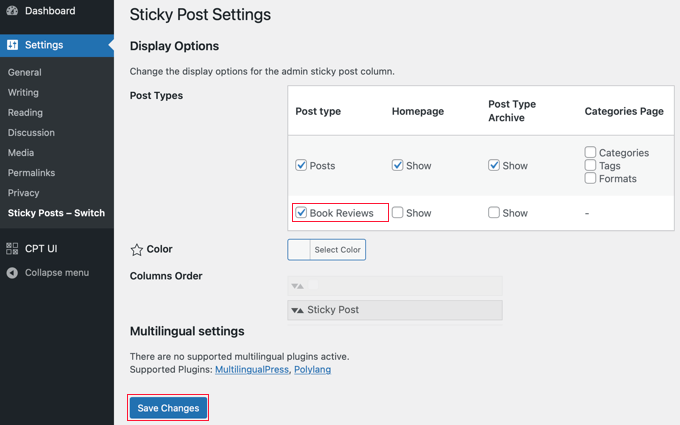
On activation, you need to visit the Settings » Sticky Posts – Switch page to configure the plugin. Simply check the box next to the custom post types that you wish to be able to make sticky.
For this tutorial, we will check the ‘Book Reviews’ post type.

After that, you need to click the ‘Save Changes’ button at the bottom of the screen.
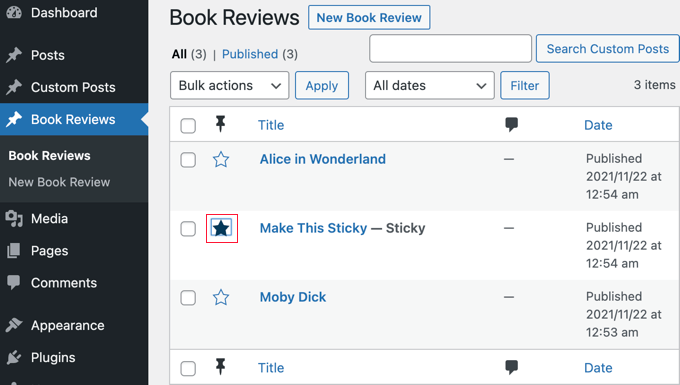
Now, when you visit the admin page for that custom post type, you will notice a new column where you can make posts sticky. All you need to do is click the star next to the posts you wish to feature.

You’ve now made the post sticky. The problem is that WordPress only shows sticky posts on the home page. Next, we will have a look at how to display sticky posts on archive pages.
Displaying Sticky Posts in Custom Post Type Archives
To display your sticky posts at the top of your custom post archive page, you need to create a new template.
To do this, you’ll need to use an FTP client or the file manager option in your WordPress hosting control panel. If you haven’t used FTP before, then you may want to see our guide on how to use FTP to upload files to WordPress.
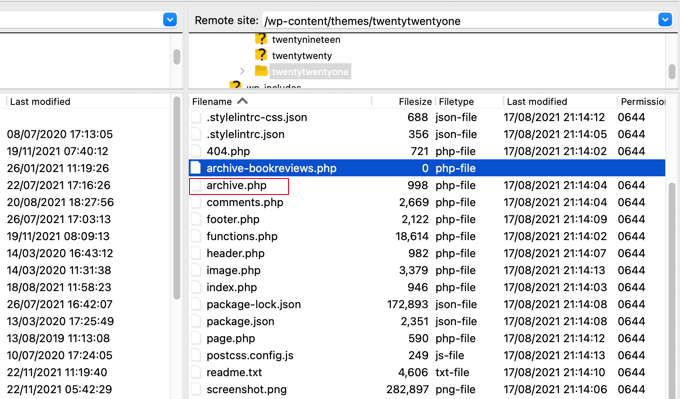
You need to access your site using your FTP client or file manager and then go to the /wp-content/themes/YOURTHEME/ folder.
For example, if you use the Twenty Twenty-One theme, then you need to navigate to /wp-content/themes/twentytwentyone/.
Next, you need to create a new file in that folder with a name like archive-POSTTYPE.php.
For example, if your custom post type slug is ‘bookreviews’, you should create a new file called archive-bookreviews.php.

After that, you need to find the file archive.php in the same folder. Simply copy the contents of archive.php and paste them into the new file you created.
The next step requires you to add code to your theme files. If you need help adding code to your site, then refer to our guide on how to add custom code in WordPress.
When you are ready, you need to add the following code to your theme’s functions.php file or a code snippets plugin like WPCode (recommended):
function wpb_cpt_sticky_at_top( $posts ) {

    // apply it on the archives only
    if ( is_main_query() && is_post_type_archive() ) {
        global $wp_query;

        $sticky_posts = get_option( 'sticky_posts' );
        $num_posts = count( $posts );
        $sticky_offset = 0;

        // Find the sticky posts
        for ($i = 0; $i < $num_posts; $i++) {

            // Put sticky posts at the top of the posts array
            if ( in_array( $posts[$i]->ID, $sticky_posts ) ) {
                $sticky_post = $posts[$i];

                // Remove sticky from current position
                array_splice( $posts, $i, 1 );

                // Move to front, after other stickies
                array_splice( $posts, $sticky_offset, 0, array($sticky_post) );
                $sticky_offset++;

                // Remove post from sticky posts array
                $offset = array_search($sticky_post->ID, $sticky_posts);
                unset( $sticky_posts[$offset] );
            }
        }

        // Look for more sticky posts if needed
        if ( !empty( $sticky_posts) ) {

            $stickies = get_posts( array(
                'post__in' => $sticky_posts,
                'post_type' => $wp_query->query_vars['post_type'],
                'post_status' => 'publish',
                'nopaging' => true
            ) );

            foreach ( $stickies as $sticky_post ) {
                array_splice( $posts, $sticky_offset, 0, array( $sticky_post ) );
                $sticky_offset++;
            }
        }

    }

    return $posts;
}

add_filter( 'the_posts', 'wpb_cpt_sticky_at_top' );

// Add sticky class in article title to style sticky posts differently

function cpt_sticky_class($classes) {
            if ( is_sticky() ) :
            $classes[] = 'sticky';
            return $classes;
        endif;
        return $classes;
                }
    add_filter('post_class', 'cpt_sticky_class');
This code moves your sticky posts to the top. If your theme is using the post_class() function, then it also adds a ‘sticky’ class so that you can style your sticky posts using CSS.
This is how the Book Reviews custom post type archive looks on our demo site. Before adding the code, the sticky post was second on the list.

You can now style your sticky posts by using .sticky class in your theme’s style.css stylesheet. Here’s an example:
.sticky {
background-color:#ededed;
background-image:url('http://example.com/wp-content/uploads/featured.png');
background-repeat:no-repeat;
background-position:right top;
}
Here’s an updated screenshot from our demo website.

Expert Guides on Sticky Posts
Now that you know how to add sticky posts to custom post type archives, you may like to see some other guides related to sticky posts in WordPress.
- How to Make Sticky Posts in WordPress (Quick and Easy)
- How to Add Sticky Posts for Categories in WordPress
- Cool Things You Can Do With Sticky Posts in WordPress
- How to Exclude Sticky Posts from the Loop in WordPress
- How to Easily Re-Order Posts in WordPress (Step by Step)
- How to Create a Sticky Floating Navigation Menu in WordPress
- How to Create a Sticky Floating Sidebar Widget in WordPress
- How to Create a “Sticky” Floating Footer Bar in WordPress
We hope this tutorial helped you learn how to add sticky posts in WordPress custom post type archives. You may also want to see our guide on how to speed up your WordPress website or our expert picks for the best WordPress survey plugins.
If you liked this article, then please subscribe to our YouTube Channel for WordPress video tutorials. You can also find us on Twitter and Facebook.


Syed Balkhi says
Hey WPBeginner readers,
Did you know you can win exciting prizes by commenting on WPBeginner?
Every month, our top blog commenters will win HUGE rewards, including premium WordPress plugin licenses and cash prizes.
You can get more details about the contest from here.
Start sharing your thoughts below to stand a chance to win!
Clare says
I got a custom post type to be “sticky” in an archive in 15 minutes following your example. Super helpful, thank you!
WPBeginner Support says
Glad to hear our guide was helpful!
Admin
rom says
Hi,
I’m banging my head right now….
I’m using this plugin, it works fine, I can see it in the admin, and on the data base, I can see it update the sticky_posts in wp_options. But, when I try to use ‘post__not_in’ => get_option(‘sticky_posts’), it doesn’t filter any thing.
So I try to var_dump(get_option(‘sticky_posts’)), and all I get is the id of the ‘normal post’, not the full list of id who I can see are in the wp_options/sticky_posts.
Which mean if I try to use is_stiky in my loop, it only work in ‘normal’ post, not in CPT, which is logic, since get_option(‘sticky_posts’) is not working properly…. Any idea how I can fix that ? it’s driving me crazy
Markus Froehlich says
You can use this Sticky Post Switch Plugin
It also enables the featuere for custom post types
Pat Ducat says
This works good however it makes it sticky on every page of a paginated archive. Is this how the built-in sticky functionality for standard posts work too?
Aaron says
How could i set this up to work with a custom taxonomy archive page?
I’ve tried adding ‘is_tax’ and ‘is_category’ instead of the is_post_type_archive() on line 4 of your function but it just breaks the page.
I’m missing something obviously but can’t seem to find it.
Any ideas?
Daniel Dropik says
Thanks. Is it possible to adapt this tutorial to display sticky posts onto a specialized page template, rather than on the archives page? If so how might I accomplish this?
WPBeginner Support says
Daniel, yes sure it can be done in a separate page template. Simply create a custom template and follow the instructions given above.
Admin
Shawn says
How do you do this for Custom Taxonomy.php instead of archives.
WPBeginner Support says
if the custom taxonomy is displaying post types with sticky posts support, then you can display it in the same manner. Instead of archive-post-type.php template, make changes in taxonomy-custom-taxonomy.php template.
Admin
Mr.Ultra says
Thanks. This is useful.
But if it’s possible not using a plugin to add sticky functionality to custom post types?
Can you share the snippet?
Anir says
Very informative, thanks for sharing. It helps a lot.
Daniel says
Really nice tut.