Are you looking for a way to change the date and time format in WordPress?
WordPress has a few default date and time formats that you can choose from. If you are not happy with these options, then you can also create a custom format for your website.
In this article, we will show you how to easily change the date and time format in WordPress.

Why Change the Date and Time Format in WordPress?
WordPress uses the date/time format to show the publication and modification dates for blog posts in the dashboard and in the content editor for scheduling content.
This format also displays the publication or updated date of pages/posts and shows when comments were posted on your WordPress website’s front end.
Different regions of the world prefer and use different structures for date and time. If you have a website that caters to an international audience, then you may want to change the date/time format in your blog posts to create a more localized experience for your users.
Moreover, displaying the date and time in your blog posts can help improve your website’s visibility by highlighting the freshness of your content more effectively.
This is because search engines are likely to rank your post higher if the content is fresh and updated. For more details, you can see our guide on content decay in WordPress.
Having said that, let’s see how to easily change the date and time format in WordPress. We will also show you how to easily display the time next to dates in WordPress posts:
How to Change the Date and Time Format in WordPress
You can easily change the date and time format using the built-in features in your WordPress dashboard.
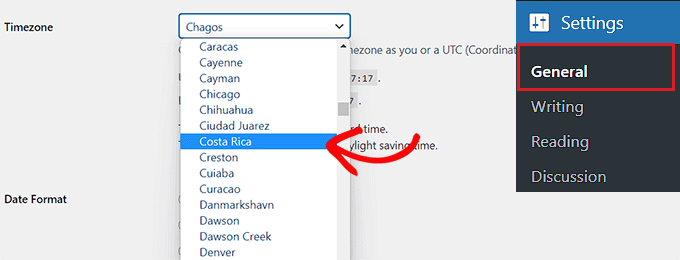
First, you must visit the Settings » General page from the WordPress admin sidebar and scroll down to the ‘Timezone’ section. Once you are there, you can choose a timezone for your website from the dropdown menu.
For example, if you live in Costa Rica, then you can select that option from the dropdown menu.
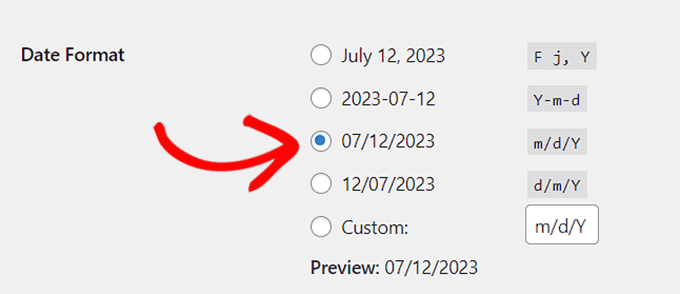
Next, you have to scroll down to the ‘Date Format’ option, where you can select a date arrangement of your liking.
These formats are based on alphabetic characters that represent a time arrangement.
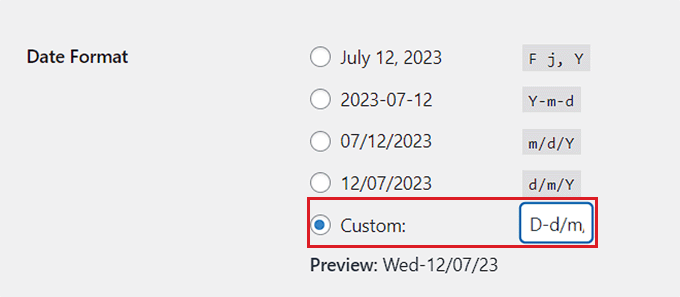
If you don’t want to use any of the available date formats, then you can create your own by choosing the ‘Custom’ option and typing characters into the box next to it.
For example, if you type the uppercase letter Y, then your date format will display the year in numeric four digits, like 2014.
Similarly, if you enter a lowercase y, it will output the year in two numeric digits, like 14.
Here is a list of some of the most commonly used date and time format characters:
M d, Y – Nov 06, 2023d M, Y – 06 Nov, 2023F jS, Y – November 6th, 2023l, F jS, Y – Thursday, November 6th, 2023H:i:s – 21:26:12
For more details, you may want to see the full list of format characters. You can use this as a guide to create your custom date arrangement.
Once you have created a format, WordPress will show you a preview of what your date will look like.
Next, head over to the ‘Time Format’ section. From here, you can choose any of the pre-made time formats.
However, if you don’t find any of the formations suitable, then you can also customize your own by choosing the ‘Custom’ option.
Once you have done that, you will also be able to see your time preview next to the ‘Preview’ option.
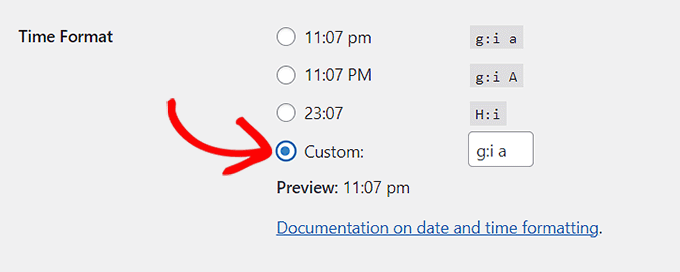
If you are unsure about the format characters, then you can simply click on the ‘Documentation on date and time formatting’ link in the ‘Time Format’ section.
Once you are done, don’t forget to click the ‘Save Changes’ button to store your settings.
Now, you can visit your WordPress website to view the change in date format in your posts.

How to Display Time Next to Dates in Your WordPress Posts
By default, WordPress does not display the publication time next to the date in your blog posts.
However, you can easily show the time by editing your WordPress theme and adding custom code to it.
Some tutorials will tell you to create a child theme to do this. However, keep in mind that the smallest error while adding the code can break your website, making it inaccessible.
That is why we recommend always using WPCode to add code to your website. It is the best WordPress code snippets plugin on the market that makes it safe and easy to add custom code.
First, you need to install and activate the WPCode plugin. For detailed instructions, you may want to see our beginner’s guide on how to install a WordPress plugin.
Note: WPCode also has a free version that you can use for this tutorial. However, upgrading to the pro plan will give you access to a cloud library of code snippets, smart conditional logic, and more.
Upon activation, head over to the Code Snippets » + Add Snippet page from the WordPress admin sidebar.
Once you are there, click the ‘Use Snippet’ button under the ‘Add Your Custom Code (New Snippet)’ option.

This will take you to the ‘Create Custom Snippet’ page, where you can start by typing a name for your code snippet. This name won’t be displayed on the front end and is only for your identification.
After that, select the ‘PHP Snippet’ option from the Code Type dropdown menu in the right corner of the screen.
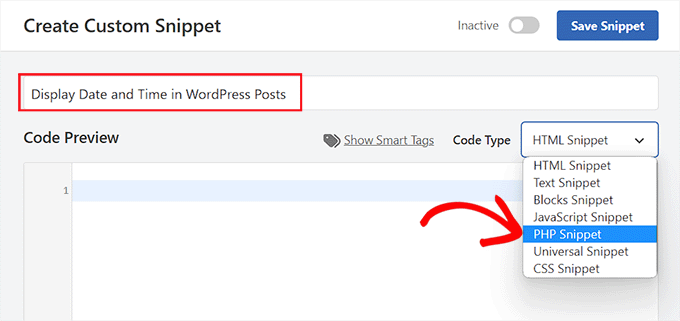
Next, simply copy and paste the following code into the ‘Code Preview’ box:
add_filter( 'pre_option_date_format', function( $date_format ) {
	if ( is_admin() ) {
		return $date_format;
	}

	return 'l, F jS, Y H:i:s';
});
Once you’ve done that, you can leave the code as it is or customize the layout for date and time by changing the values after return.
Keep in mind that you will have to use format characters to create your own custom date/time arrangement.
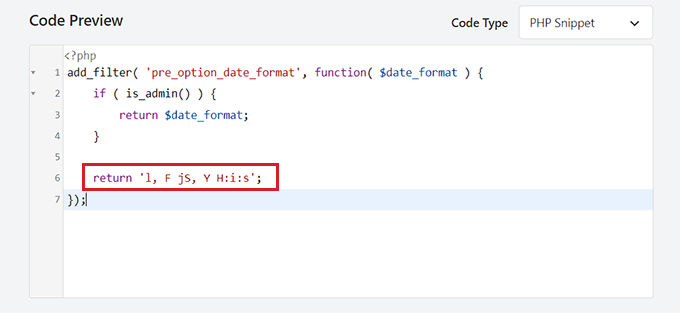
After that, scroll down to the ‘Insertion’ section and choose the ‘Auto Insert’ mode.
The custom code will be automatically executed on your website upon activation.

Finally, scroll back to the top and toggle the ‘Inactive’ switch to ‘Active’.
After that, don’t forget to click the ‘Save Snippet’ button to store your changes.
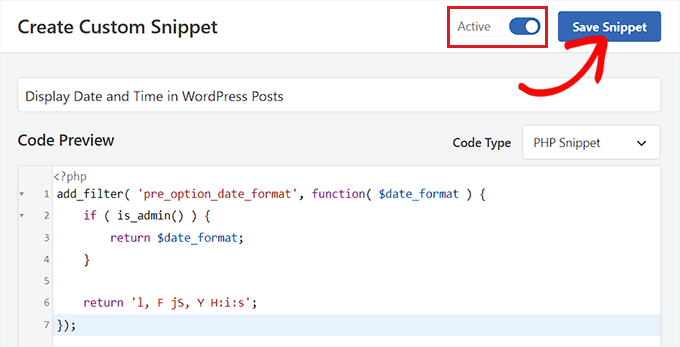
Now, you can visit your WordPress blog to view the time and date displayed in your blog posts.
Keep in mind that once you activate this code snippet, the default WordPress date and time formats won’t be displayed on your website.

Bonus: Display Today’s Date in WordPress
Apart from displaying the publication date, you can also show the current date and time on your pages and posts.
This can help enhance your post’s relevance, promote transparency, and improve the overall user experience on your website.
You can easily display the current date on your website by adding custom code using WPCode.
It is the best WordPress code snippets plugin on the market that lets you add custom code without breaking your site.
You will need to use this code snippet:
function wpb_date_today($atts, $content = null) {
extract( shortcode_atts( array(
        'format' => ''
    ), $atts ) );

if ($atts['format'] == '') {
$date_time .= date(get_option('date_format'));
}  else {
$date_time .= date($atts['format']);
}
return $date_time;
}
add_shortcode('date-today','wpb_date_today');
This code will then display the current date on your pages and post using the date and time format that you have selected on the WordPress dashboard.
For more detailed instructions, you can see our tutorial on how to display today’s date in WordPress.

We hope this article helped you learn how to easily change the date and time format in WordPress. You may also want to see our tutorial on how to remove date and time from WordPress comments and our expert picks for the best WordPress calendar plugins.
If you liked this article, then please subscribe to our YouTube Channel for WordPress video tutorials. You can also find us on Twitter and Facebook.


Syed Balkhi says
Hey WPBeginner readers,
Did you know you can win exciting prizes by commenting on WPBeginner?
Every month, our top blog commenters will win HUGE rewards, including premium WordPress plugin licenses and cash prizes.
You can get more details about the contest from here.
Start sharing your thoughts below to stand a chance to win!
Tahir Khan says
Hi, it doesn’t work in most of cases try to provide the solution what if theme is overriding the date and time Format.
Thanks
WPBeginner Support says
If your theme is overriding the date and time format, we would recommend reaching out to the support for the specific theme that you are using and they should be able to let you know if their theme has a specific styling that can be changed to fix the issue
Admin
Krishna says
How to translate date to specific language like hindi?
WPBeginner Support says
You would either set your site’s language to the language you’re wanting or reach out to your theme’s support should it not be translating correctly.
Admin
Alex Abir says
Showing false time on my WordPress theme single page.
How to Solve?
WPBeginner Support says
You would want to reach out to your theme’s support to see if it could be an error with the theme itself
Admin
Courtney Stevens says
How do I change the date format for posts? The date format for my theme is for example, October 26th, 2018 but I would like it to be October 26, 2018 without the “th” after the date. The general settings has the date format as what I want but when I look at a page with a blog post it still has the other formatting with the th. Help!
Danold says
hello, i’ve a problem.i have changed the date format as you demonstrated but when i publish an article, the date format is always in an other form, i am using peflican theme
WPBeginner Support says
Hi,
Try previewing your site with a default theme. See if that resolves the issue. If it does, then this means your theme is overriding the WordPress date format.
Admin
MUMBERE AUSBEL says
You guys are the best.
Irfan says
Thank you sooo much it help me alot
Scott says
Weird! I can not get the to show anything.
Gabriele says
Hi, if I would set the WP clock one year advance is it possibile?
Matthew Spence says
How do you fix the date? It is not the day after tomorrow.
Alice says
The current wordpress formatting is different from the one shown here. I can’t seem to even be able to find the timezine in the settings now for wordpress,
Michelle Stokes Decorator says
I don’t want to see the dates on smart phones, is there a way I can take the dates off all together so my site looks cleaner on the phones? Thanks….
WPBeginner Staff says
It will only affect the display of dates on your pages. It will not change your permalinks.
Kristine says
Will it change all my old posts too? Or only new posts going forward? I have wanted to change my format for over a year, but I have so many backlinks out there. I’m afraid it will ruin all my traffic.