Do you want to organize media uploads by user in WordPress?
If you run a multi-author website, then you may want to stop users from accessing other people’s media files. In this way, you can make sure authors don’t accidentally delete each other’s images.
In this article, we will show you how to organize media uploads by users in WordPress.
Why Restrict Author Access to Media Uploads?
If you have a multi-author WordPress blog, then your authors might upload lots of different images. This can make it difficult for an author to find the right image, or they might delete or edit another person’s media file by accident.
This can cause all sorts of problems, including poor productivity, lots of extra work for site admins and editors, and a complicated editorial workflow.
This unlimited access can also be a privacy concern. For example, if you are working on a new product or blog post idea, then other authors might see confidential images in the media library before you make a public announcement.
If you have a WordPress membership site, then contributors may even be able to access premium media files via the media library.
That being said, let’s take a look at how to restrict who can see media uploads inside your WordPress admin area. Simply use the quick links below to jump straight to the method you want to use:
Method 1: Organizing Media Uploads by Users With a Plugin (Quick and Easy)
The easiest way to restrict access to media uploads is by using the Frontier Restrict Access plugin. This free plugin checks whether a user has the edit_others_posts permission, which allows them to edit another user’s posts.
By default, WordPress grants this ability to everyone who has the site admin or editor role. If you want to change this, then you can add or remove capabilities to user roles in WordPress.
If the user doesn’t have the edit_others_posts permission, then this plugin will stop them from accessing other users’ files in the WordPress media library. This allows you to organize media uploads by users without restricting access for admins and editors.
This plugin works out of the box, and there are no settings for you to configure, so you can simply install and activate the Frontier Restrict Access plugin. For more details, see our guide on how to install a WordPress plugin.
Note: You may notice that the plugin is untested with the latest WordPress versions. That said, we have tested it ourselves, and it works fine for this tutorial.
You can read our article on whether you should use untested WordPress plugins if you have any questions. If you find newer plugins that work better for this purpose, let us know in the comments.
Method 2: Organizing Media Uploads by Users With Code (More Customizable)
The first method is quick and easy. That said, it can be quite limited, as you can only stop users without the edit_others_posts permission (site admins and editors) from accessing the media files of other users.
If you are a site administrator, there may be a situation where you may want to limit all users (except yourself) from accessing other people’s media files.
In that case, you can add custom code to your WordPress blog instead. We’ll show you two code snippets: one that restricts media file access for non-admin users and the other for users without the edit_others_posts permission.
Often, guides will ask you to add custom code to your WordPress theme. However, this isn’t recommended, as simple mistakes or typos in your code can cause common WordPress errors or even break your site completely.
That’s why we recommend WPCode.
WPCode is the best code snippets plugin used by over 1 million WordPress websites. It makes it easy to add custom code in WordPress without having to edit the functions.php file.
The first thing you need to do is install and activate the free WPCode plugin. For more details, see our step-by-step guide on how to install a WordPress plugin.
Upon activation, head over to Code Snippets » Add Snippet.
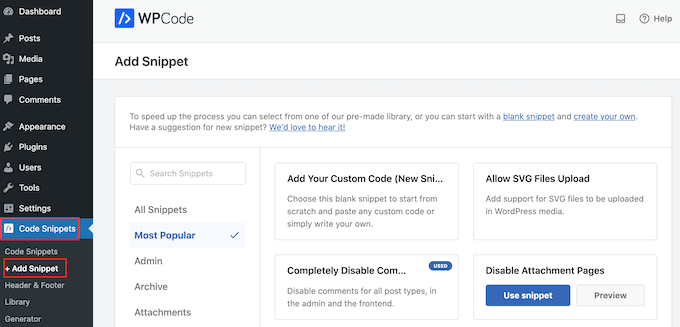
Here, you will see all the ready-made snippets you can add to your website. These include snippets that allow you to completely disable WordPress comments, upload files that WordPress doesn’t support by default, and more.
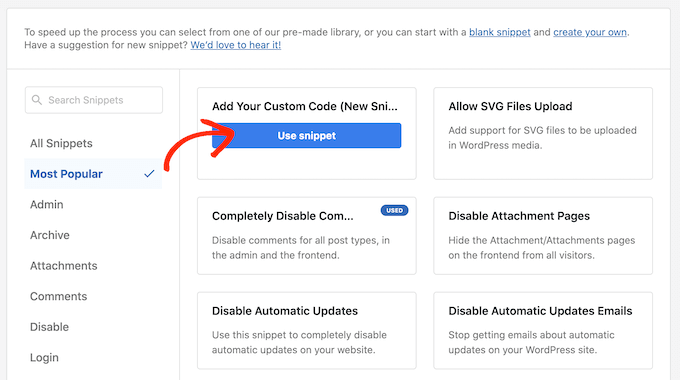
Simply hover your mouse over ‘Add Your Custom Code’ and then select ‘Use snippet.’
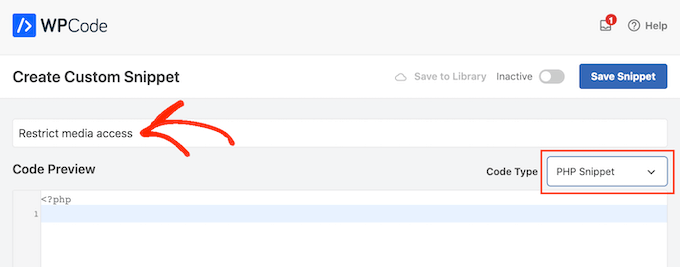
To start, type in a title for the custom code snippet. This can be anything that helps you identify the snippet in the WordPress dashboard.
After that, open the ‘Code Type’ dropdown and select ‘PHP Snippet.’
In the ‘Code Preview’ area, you can paste one of the following code snippets:
Option 1: Restricting Media File Access for Non-Admin WordPress Users
add_filter( 'ajax_query_attachments_args', 'user_show_attachments' );

function user_show_attachments( $query ) {
    $user_id = get_current_user_id();
    // Check if the current user is not an administrator
    if ( $user_id && !current_user_can('administrator') ) {
        $query['author'] = $user_id;
    }
    return $query;
}
Option 2: Restricting Media File Access for WordPress Users Without Post Editing Permissions
add_filter( 'ajax_query_attachments_args', 'user_show_attachments' );

function user_show_attachments( $query ) {
    $user_id = get_current_user_id();
    // Checks if the current user is logged in (i.e., $user_id is not 0) and does not have the capabilities to activate plugins or edit others' posts.
    if ( $user_id && !current_user_can('activate_plugins') && !current_user_can('edit_others_posts
') ) {
        $query['author'] = $user_id;
    }
    return $query;
}
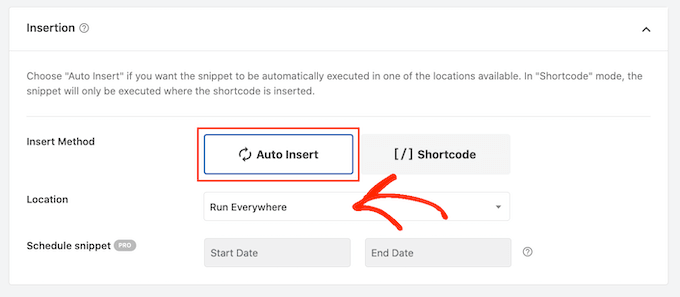
Next, just scroll to the ‘Insertion’ section. WPCode can add your code to different locations, such as after every post, on the front end only, or admin only.
To use the custom PHP code across your entire WordPress website, click ‘Auto Insert’ if it isn’t already selected. Then, open the ‘Location’ dropdown menu and choose ‘Run Everywhere.’
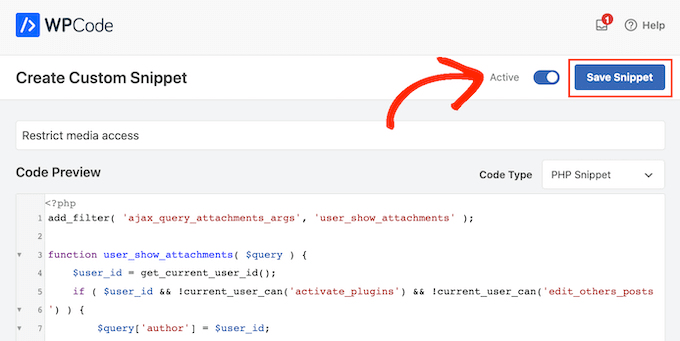
After that, you are ready to scroll to the top of the screen and click on the ‘Inactive’ toggle so it changes to ‘Active.’
Finally, click on ‘Save Snippet’ to make the PHP snippet live.
Now, users will only have access to the files they upload to the WordPress media library.
We hope this article helped you better organize media uploads by users on your WordPress site. Next, you can check out our ultimate WordPress security guide or see our expert pick of the best contact form plugins for WordPress.
If you liked this article, then please subscribe to our YouTube Channel for WordPress video tutorials. You can also find us on Twitter and Facebook.


Syed Balkhi says
Hey WPBeginner readers,
Did you know you can win exciting prizes by commenting on WPBeginner?
Every month, our top blog commenters will win HUGE rewards, including premium WordPress plugin licenses and cash prizes.
You can get more details about the contest from here.
Start sharing your thoughts below to stand a chance to win!
Joshua Owolabi says
I really enjoy all your tutorials kudos to you.
Although I am unable to use to build something due to lack of resources but you are WELDONE
WPBeginner Support says
Glad our tutorials are helpful
Admin
Teddu says
I would like users to be able to upload content, and once its approved go onto a new page. the user could then edit it once it is there.
Think, similar how airbnb let users upload photos and descriptions of their holiday homes, and it appears in a page.
do you know a plug in for this functionality?
WPBeginner Staff says
It is certainly possible but can potentially open up your site to spam, malicious hack attempts. Please see out article on how to allow users to submit posts in WordPress. You can allow users to upload media without registration.
fredtgorski says
The one thing I would really(!) love to see on media library would be the ability to search media per post and/or date of upload. Every time I need to reuse an image I uploaded for a very old post, it is painfull to find it again. Sometimes I simply give up and reupload it…
agsm says
sir , i want to design a wordpress page where user will upload some documents with following feilds (name,e-mail,title,summary and file upload) after submit , it should appear in dashboard and when admin approve it should be show on page (all listing of upload details which has been approved by admin ) , its possible,
thanks in advance!!!
Michel says
https://wordpress.org/plugins/wp-user-frontend/
Jan says
Do you also have a solution to enable visitors (non-logged-in users) to upload content?
Tony Franco says
Very nice! Thank you!!