Do you want to make a staff directory on your WordPress website?
Over the years, we’ve helped countless users build websites, and one feature that is consistently valuable is a staff directory. Whether you run a local business or a consulting firm, an employee directory allows potential clients and customers to see the faces behind your brand.
In this article, we will show you how to create a staff directory on your WordPress website.

Why Create a Staff Directory on Your WordPress Site?
Many WordPress business websites can benefit from adding an employee directory. It’s a great way to connect with your audience and build trust.
For instance, a local shop can showcase its friendly staff, making customers feel welcome. Consulting firms could highlight their team’s qualifications, convincing potential clients that they have the right skills for the job.
Even educational websites could find a staff directory useful. Think about a university website including a directory of professors with their contact information and areas of expertise. This can be a big help for students trying to find the right faculty member.
With that in mind, let’s take a look at 2 beginner-friendly ways to add a staff directory to your WordPress website. You can use the quick links below to skip to your preferred method:
Method 1: Create a Simple Staff List With SeedProd (For Small Teams)
This method is perfect if you only have up to 20 staff members and want to create a custom staff page to showcase them.
Here, we will be using SeedProd, the best WordPress plugin to design custom pages and themes. It offers much more flexibility, features, and add-ons than the default WordPress editor.
SeedProd also includes a dedicated ‘Team Member’ block, allowing you to build a visually appealing staff directory.
For more information about SeedProd’s features and pricing, check out our comprehensive SeedProd review.
Step 1: Install and Activate SeedProd
Before we begin, you’ll need to install and activate the SeedProd plugin. We will be using the Pro version in this tutorial, which unlocks additional templates and blocks, including ‘Team Member’, for our staff directory.
If you are new to installing plugins, you can read our guide on how to install WordPress plugins.
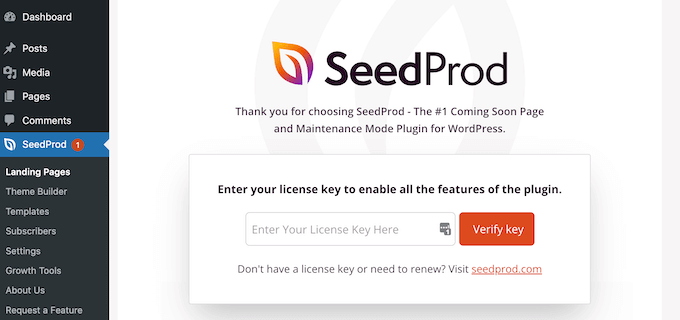
Once activated, navigate to SeedProd » Settings on your WordPress admin and enter your license key from your SeedProd account. After entering the key, click on ‘Verify key’ to activate the Pro features.
Step 2: Choose a Landing Page Template
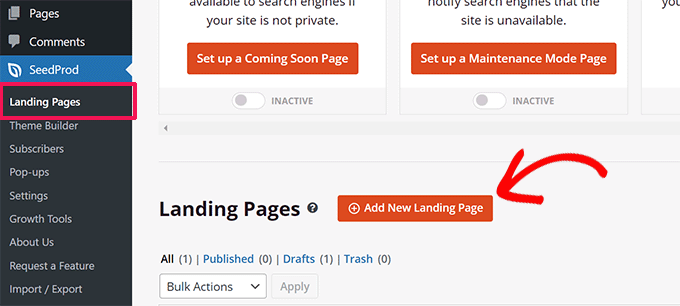
Now, let’s create a new landing page specifically for your staff directory. Head over to SeedProd » Landing Pages and click on ‘Add New Landing Page.’
SeedProd offers various pre-designed templates organized by campaign types like ‘coming soon’ or ‘404 pages.’ You can filter templates based on these categories using the tabs at the top of the screen.
Simply hover your mouse over a template to preview it and click on the magnifying glass icon for a closer look. Once you find a template you like, click the checkmark icon to select it.
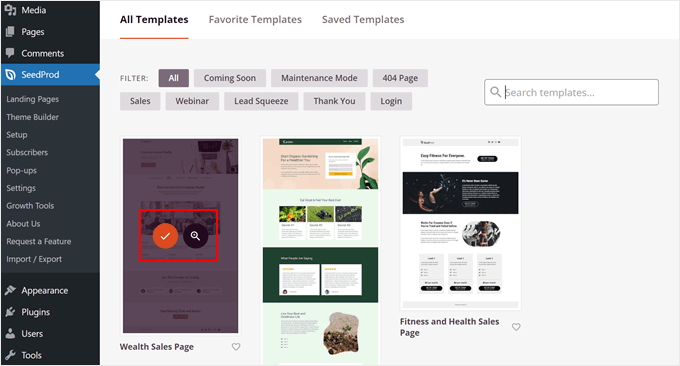
For this example, we will use the ‘Wealth Sales Page’ template and transform it into a staff member list.
Next, give your landing page a descriptive name. SeedProd will automatically generate a URL based on this title, but you can customize it to your preference.
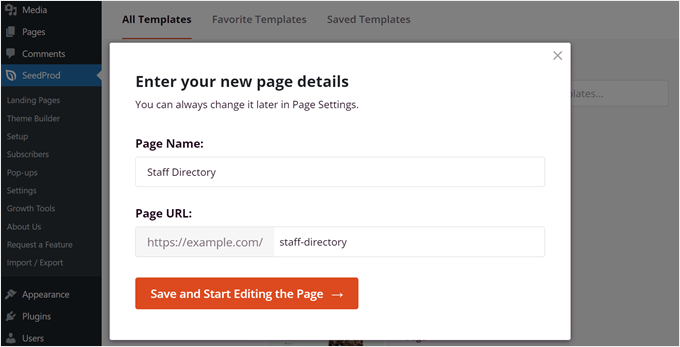
When you are happy with the page name and chosen template, simply click on ‘Save and Start Editing the Page’ to begin building your staff directory.
Step 3: Design Your Custom Page
SeedProd will now launch the drag-and-drop page builder interface. You’ll see a live preview of your front-end template on the right side and block settings on the left. Here’s where you can customize the page design according to your needs.
You can check out our guide on how to create landing pages with WordPress for a more detailed explanation of the page builder.
In this tutorial, we have changed some of the text to make the page look more like a staff directory. We have also removed some of the blocks to make room for the staff profiles.
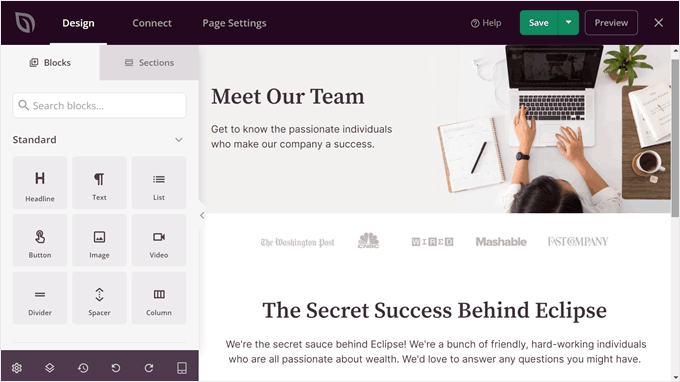
Step 4: Add and Customize the Team Member Block
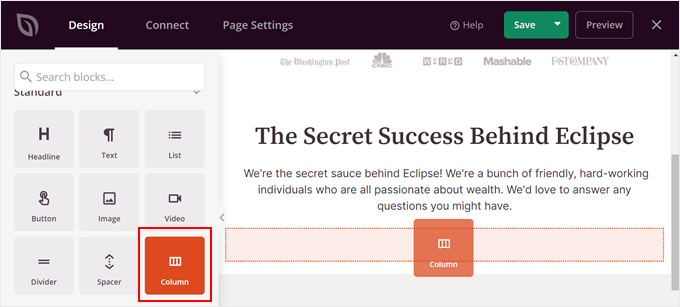
To add the staff list section, use the search bar in the block section on the left and select the ‘Column’ block. This will allow you to display multiple staff members in one place. After you find it, just drag and drop that block wherever looks best.
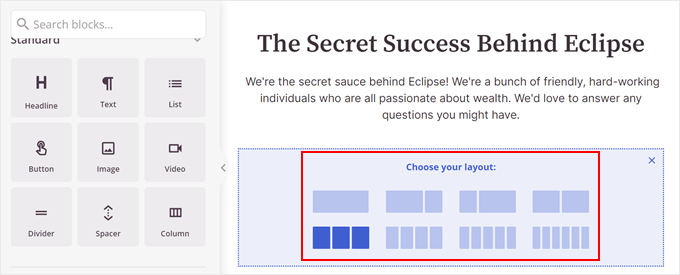
Now, pick a column layout.
This will depend on how many staff members you want to showcase.
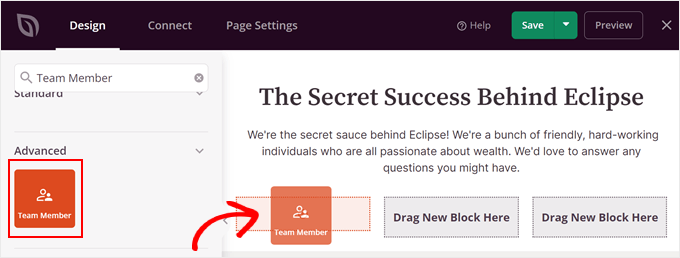
Next, look for the ‘Team Member’ block.
Simply drag and drop this block into each of the columns.
Perhaps one column won’t be enough to display all of your team members. If that’s the case, then you can simply copy and paste it.
To do that, just hover over the column block until the blue color appears around all of the blocks. Then, click the ‘Duplicate Row’ button in the toolbar.
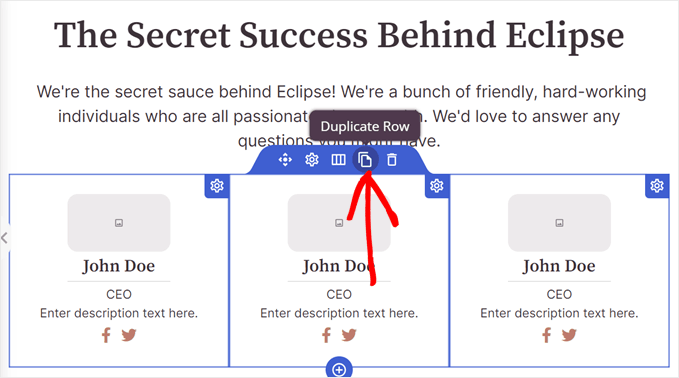
SeedProd will automatically display your duplicated row below the original one.
Now, you can start adding information for each staff member.
Let’s start by adding an image. To do this, click on a Team Member block and select ‘Use Your Own Image’ in the block settings sidebar.
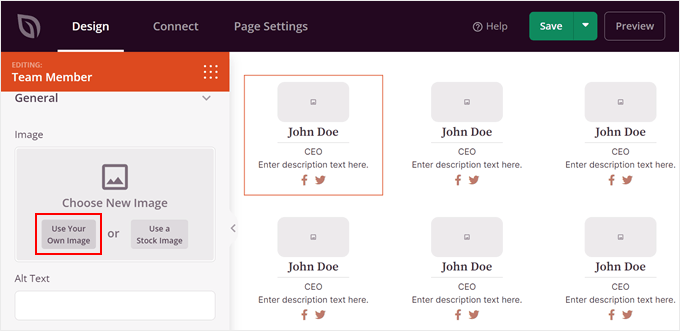
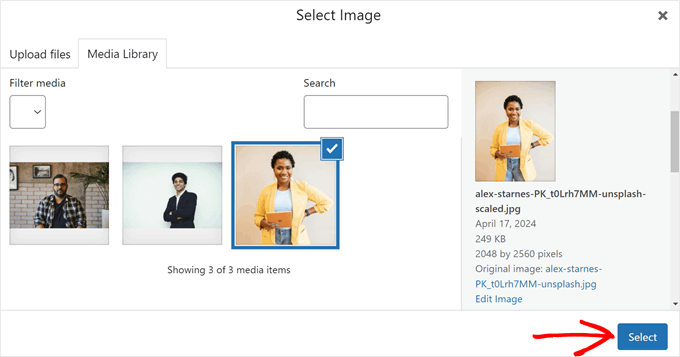
The Media Library will now open.
Go ahead and choose an image. Then, click ‘Select.’
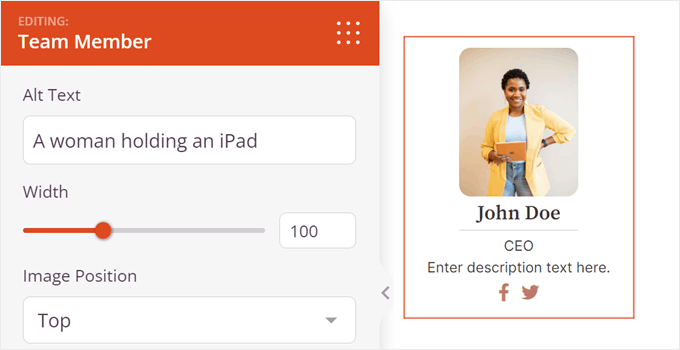
Once done, you can customize more image settings.
For example, you can insert image alt text, customize the width, and/or change the image position from top to left or right.
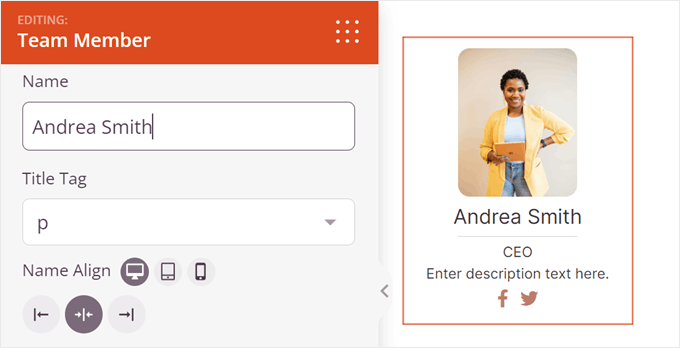
If you scroll down, you can change the default name, the title’s heading tag (like from H1 to paragraph), and name alignment.
With SeedProd, you can also adjust how the name appears depending on whether the staff directory page is viewed on mobile, desktop, or tablet.
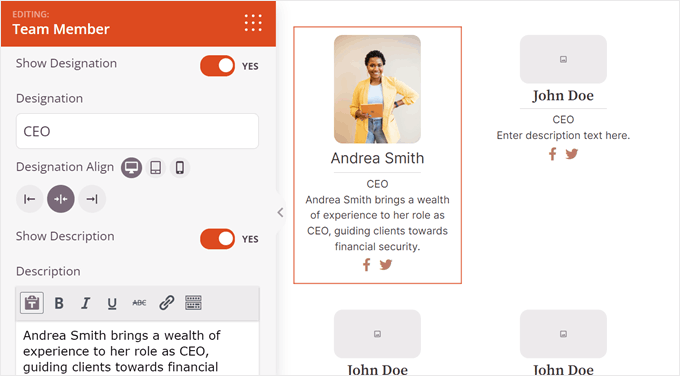
Next is designation and description.
The designation lets you insert the staff’s job title.
On the other hand, the description is where you can insert any important information about the employee. In addition to what the person does, you may also want to provide their contact information (like email address or business phone number).
Like the name, you can adjust the layout of this designation and description based on where the staff directory page is being viewed from.
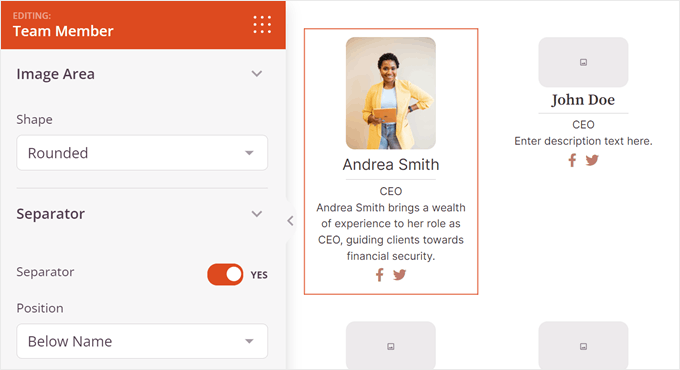
Moving down, you will find settings to customize the Team Member block’s design.
For instance, you can change the rounded borders of the image and enable a separator between the image and the person’s description.
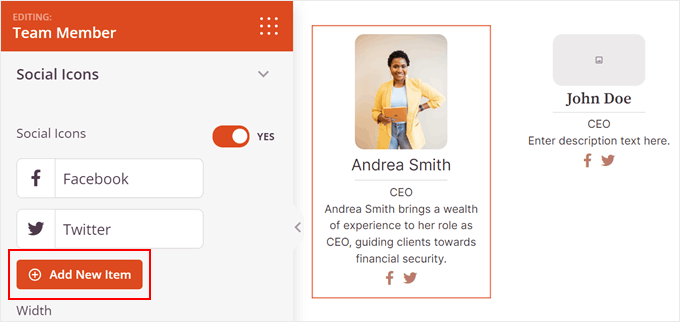
If needed, you can add the employee’s social media information. By default, SeedProd adds social icons for Facebook and Twitter, but you can also insert others that are relevant to your business, like LinkedIn.
To do that, just click ‘+ Add New Item.’
Then, you will see a list of settings to customize the social icon.
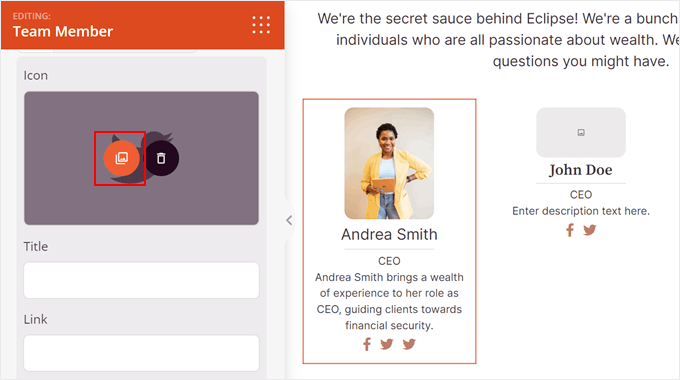
Here, click the image symbol to change the social icon.
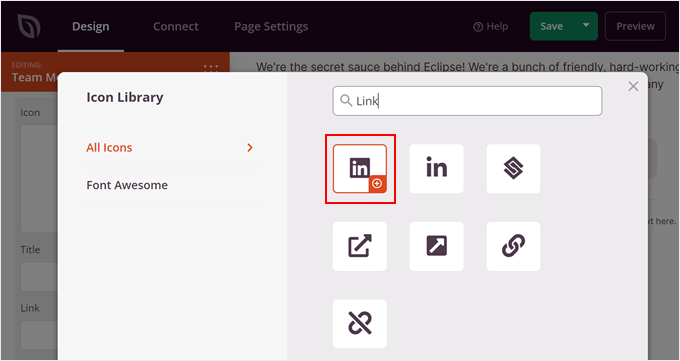
The Icon Library will now open.
Go ahead and search for your desired social media platform and click the ‘+’ button to use it.
Now, scroll a bit down to add the social media title and the person’s social link.
You can also change the icon’s colors.

At this stage, you can go down the settings sidebar.
This is where you can change all of the social icons sizing, alignment, colors, and shape.
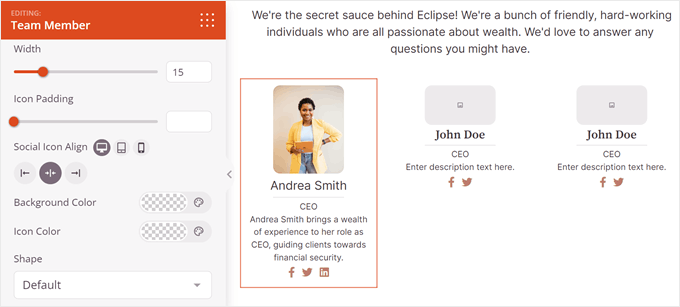
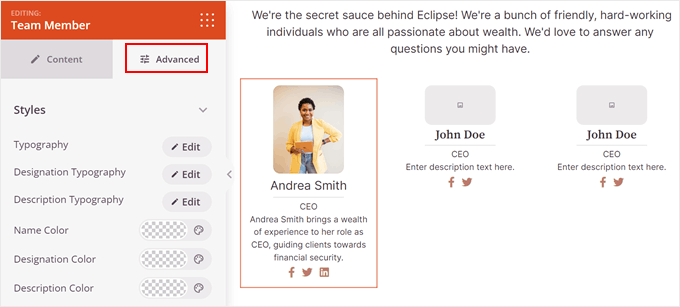
If you want to customize the Team Member block further, switch to the ‘Advanced’ tab.
This is where you will find more settings to change the block’s design. For example, you can customize the padding and margins, add a shadow effect, enable CSS animations, and more.
All you need to do next is repeat the same steps with the rest of your staff profiles.
Note: To make sure your team member list looks good, we recommend making all of your profile images the same size or ratio. You can check out our step-by-step guide on how to do basic image editing in WordPress for guidance.
When you are satisfied with the final look and feel of your staff directory page, simply click on the ‘Save’ button to save your progress.
Finally, to make your staff directory page live on your website, click on the ‘Publish’ button.
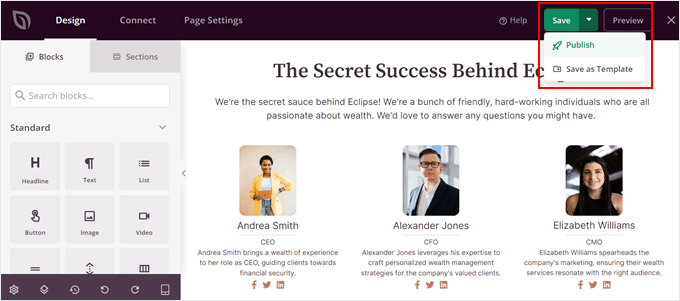
That’s it! Your staff directory is now up and running using SeedProd.
Here is what ours looks like on our demo website:

Method 2: Use Business Directory Plugin (For Large Teams)
If you have a small team, then method 1 might be enough. But for larger teams, seeing dozens of profiles on a single page can become overwhelming for visitors.
This is where a dedicated staff directory plugin comes in handy. We will be using the free version of Business Directory Plugin.
This plugin lets you create a dedicated team member directory on your WordPress website, complete with a search bar, filters, and individual profile pages for each staff member. You can also use it to create other types of directory websites.
That being said, you can also upgrade to the premium Business Directory Plugin. It will give you access to pro features like payment gateways for paid directories, premium themes, ratings/reviews, and more.
For more information, check out our review of Business Directory Plugin.
Step 1: Install and Set Up the Business Directory Plugin
First, you need to install and activate the Business Directory plugin. You can read our guide on how to install a WordPress plugin for more information.
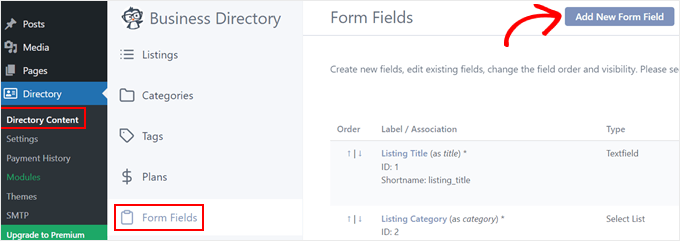
Once activated, head over to Directory » Directory Content and then ‘Form Fields.’ Here, you’ll see the pre-made fields you will use to insert your staff information later on, like descriptions, websites, phone numbers, and addresses.
These fields are a good starting point, but you can customize them further. Let’s click ‘Add New Form Field’ to create new fields.
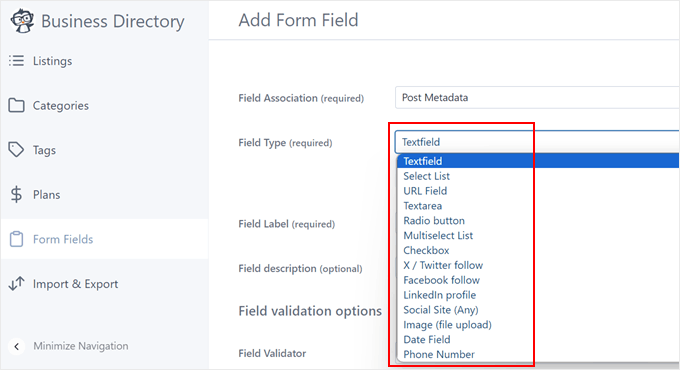
Let’s start with the Field Association. By default, the staff list plugin will leave it as Post Metadata, which means the field will appear as a custom field below the main editing area in the block editor. We will leave this option as it is.
You can also change the field type from text to radio buttons, social media links, checkboxes, and more depending on the information you want to collect.
Next, provide a clear label for each field (like ‘LinkedIn Profile’). You can also add an optional description to guide users through the process of filling it out.
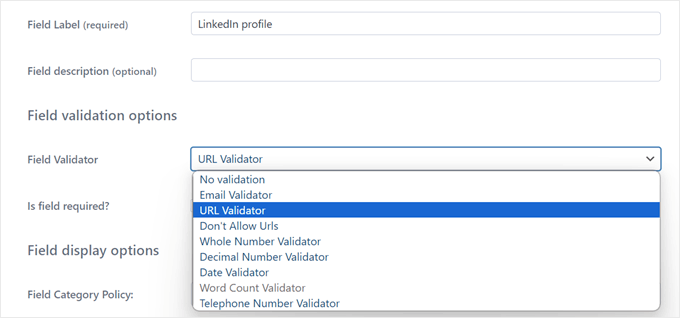
For fields requiring specific data formats, you can set a field validator to ensure accurate information is entered.
There are several options to choose from, like email addresses, URLs, and phone numbers.
Below, you can make certain fields mandatory by checking the ‘Required’ box. This can be useful for essential information.
In the ‘Field Display Options,’ you can control where the field is displayed. For example, you can choose if it applies to all directory categories or just specific ones, whether only admins can edit them, or if the field value should be hidden on the front end.
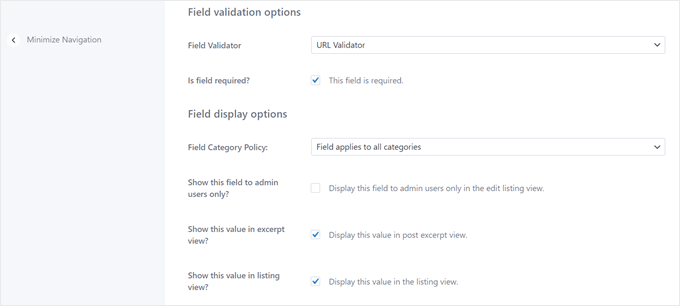
Once you’ve finished customizing the field settings, go ahead and scroll all the way down.
Then, click ‘Add Field’ to save your changes.
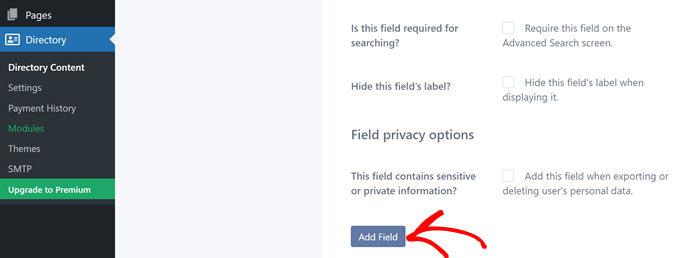
Feel free to repeat this step until you have created the fields you need for your employee directory listing.
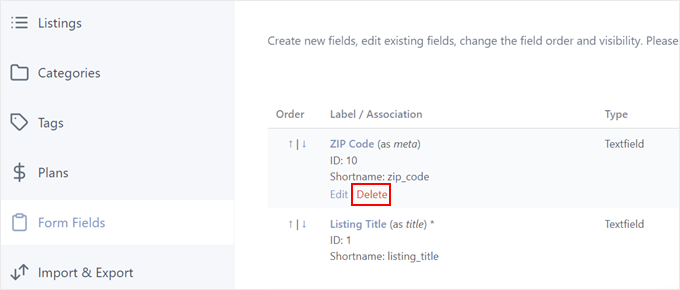
Back on the Form Fields menu, you can remove any pre-made fields that don’t apply to your staff directory.
Simply hover over the unwanted field and click ‘Delete.’
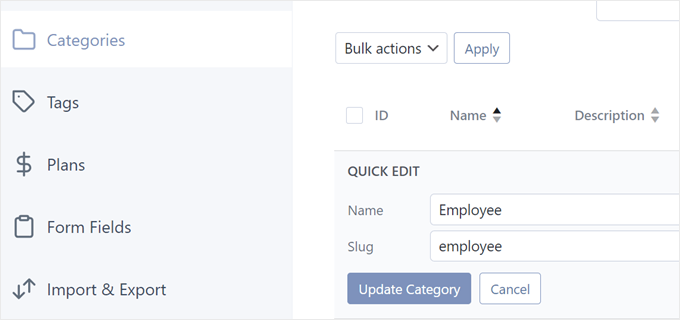
Next, head over to the ‘Categories’ tab. You’ll see a default category named ‘General.’
For our staff directory, let’s rename this to something more descriptive, like ‘Employee.’ This will categorize all your employee directory listings.
To do this, click ‘Quick Edit.’
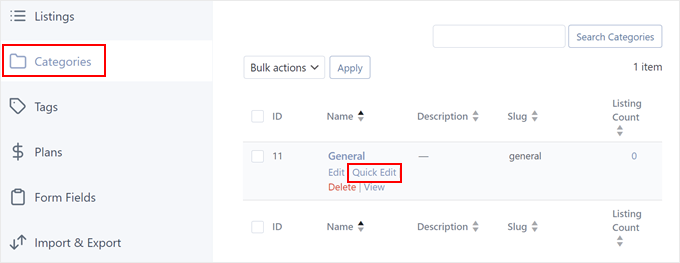
Then, change the name from General to Employee.
Don’t forget to modify the slug as well and click ‘Update Category.’
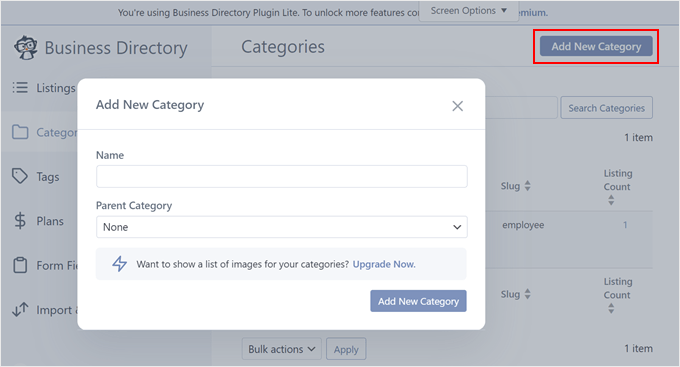
If your company has multiple departments and you want to organize your listings further, you can create different categories by clicking ‘Add New Category.’
A popup will then appear. Here, just fill out the category name and parent category (if applicable). After that, click ‘Add New Category.’
Now, switch to the ‘Plans’ tab. Since we are focusing on showcasing your team and not creating a paid business directory, you should delete any unnecessary default paid plan options.
Just hover over a plan and click ‘Delete.’
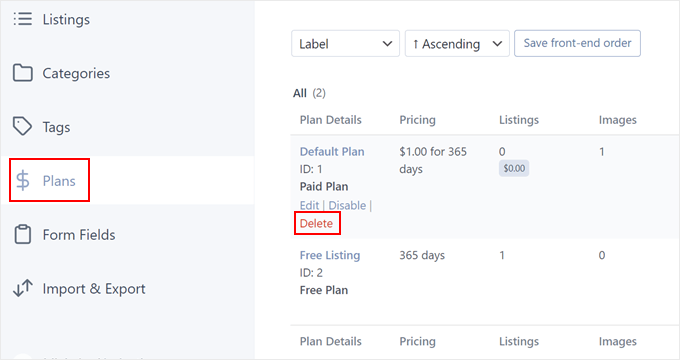
As for the Free Listing, we will just leave it as it is as we cannot delete it.
Step 2: Create Your Employee Directory Page
At some point, you might see a notification that says: “Business Directory Plugin requires a page with the [businessdirectory] shortcode to function properly. You can create this page by yourself or let Business Directory do this for you automatically.”
We recommend clicking ‘Create required pages for me’ for a quick and easy setup. This directory page will automatically adjust its design to your current WordPress theme.
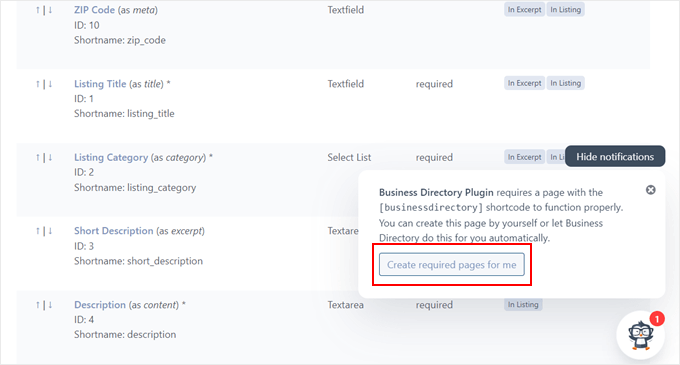
By default, the plugin will create a page named ‘Business Directory,’ which isn’t accurate for what we are creating.
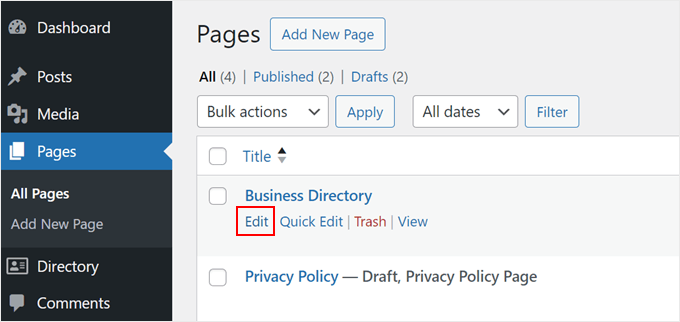
To change this page, navigate to Pages in the WordPress dashboard and find the directory page. Then, hover over it and click ‘Edit.’
In the block editor, simply rename the page to something like ‘Employee Directory’ or anything that better reflects its purpose.
You can also add additional blocks to enhance the directory page’s visual appeal. But make sure to leave the [businessdirectory] shortcode as it is.
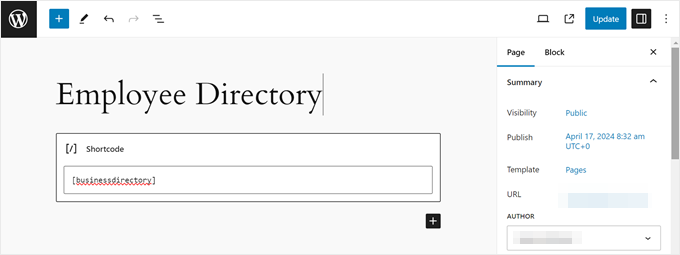
Finally, click ‘Update’ to save your changes.
Step 3: Create Your Staff Member Directory
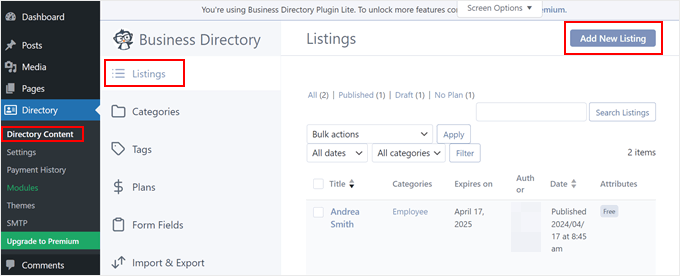
Now that everything is set up, let’s create the individual staff member listings. Go to Directory » Directory Content and open the ‘Listings’ tab. Click ‘Add New Listing’ to begin.
You’ll arrive at the block editor with custom fields from the Business Directory plugin. In the Title section, enter the staff member’s name or nickname.
In the dedicated section below, you can add a detailed description of their role and expertise. This description can be longer as it will only be displayed on their individual profile page, not in the directory.
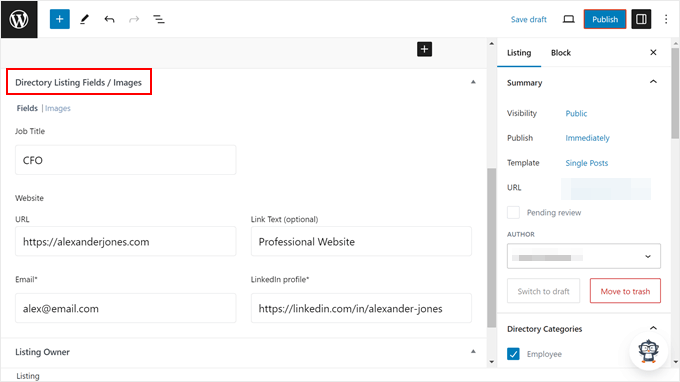
Scroll down to ‘Directory Listing Fields / Images’ and use the custom fields you created or modified earlier to fill out the staff member’s information.
This could include contact details or social media links.
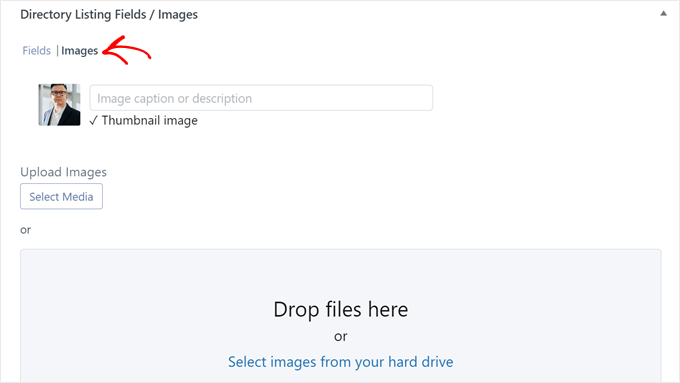
Now, switch to the ‘Images’ tab.
Here, you can upload an image for the staff member profile from your media library or computer.
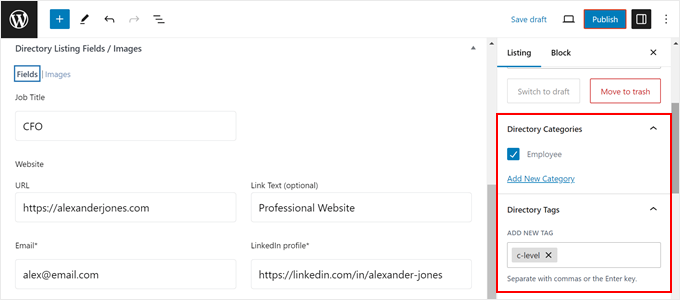
Once that is done, let’s navigate to the ‘Listing’ tab in the settings sidebar. In the ‘Directory Categories’ section, check the box next to ‘Employee’ or the category you created earlier.
You can also add additional tags if needed.
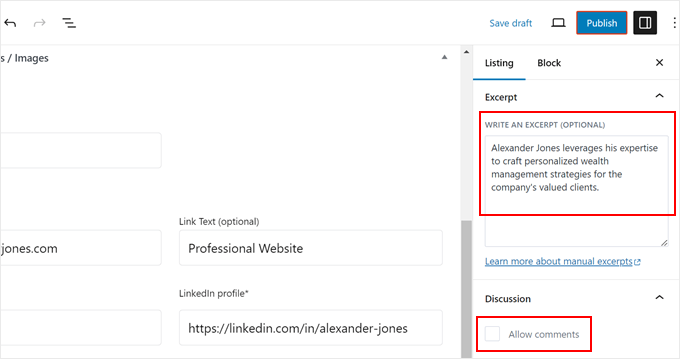
In the ‘Excerpt’ section, you can write a short yet informative description. This will appear on the main staff member directory page where all of the profiles are listed.
We also recommend disabling comments in the ‘Discussion’ section.
This is to avoid unnecessary clutter on the page, as the plugin has already added a contact form on the page by default.
In the Listing Information section, choose the ‘Free Listing’ plan and click ‘OK.’
You won’t be able to publish the listing unless you assign it a plan first.

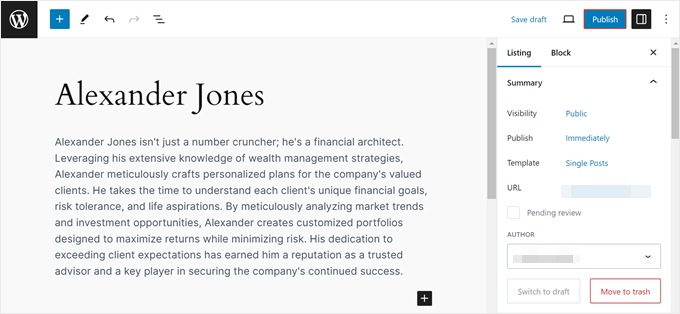
Once you are happy with everything, click ‘Publish’ to make the staff member profile live.
Simply repeat these steps to create profiles for all your team members.
Step 4: Customize the Employee Listings Page
When you preview the Employee Directory page, you’ll see a search form for filtering through employee listings.
Below is a clear and organized list of your team members.
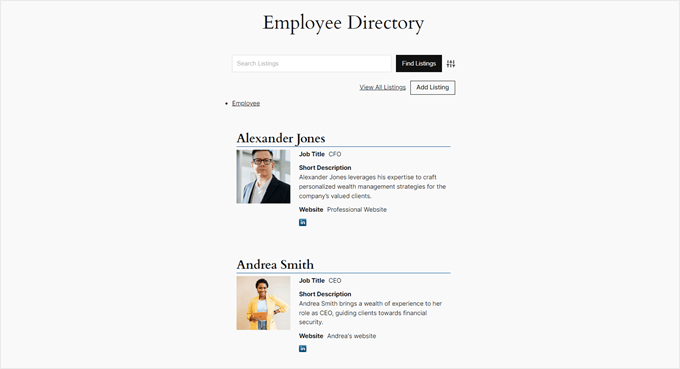
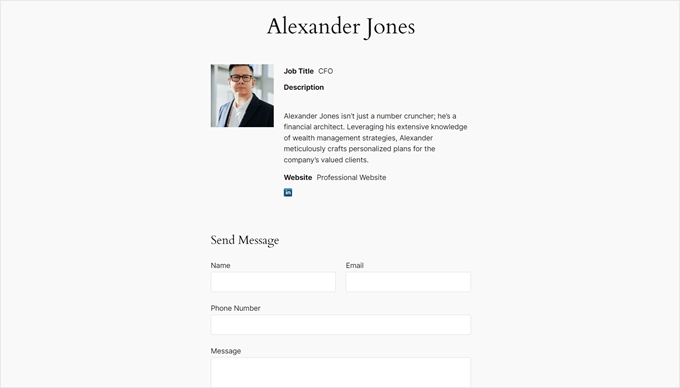
If you open a staff profile page, then you will see your employee information and a contact form for the visitor to reach out to them.
Here’s what it looks like:
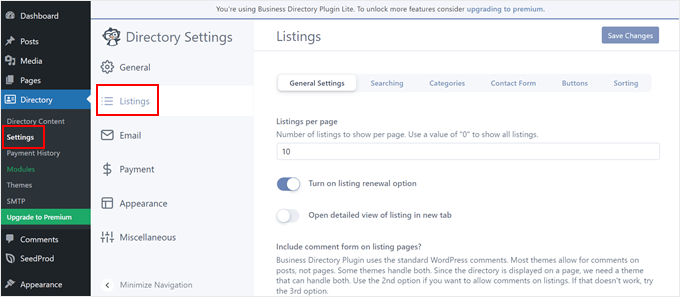
If you are not satisfied with how these pages look and want to customize them, then go to Directory » Settings in the WordPress dashboard. Then, click ‘Listings.’
Here, you can change the number of listings displayed per page, modify the search form settings, disable the comment and/or contact forms, tweak the buttons, and so on.
Don’t forget to click ‘Save Changes’ when you are done.
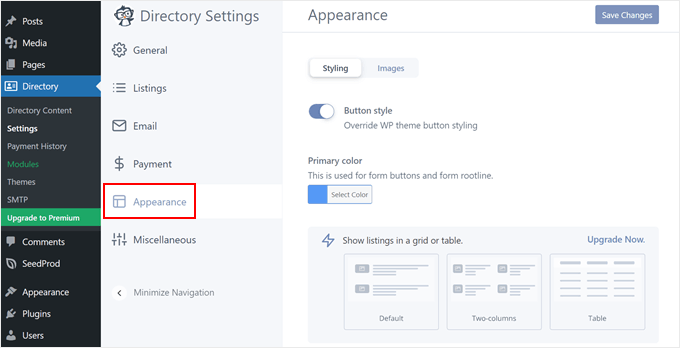
You can also navigate to the ‘Appearance’ menu.
This is where you can change the button style and primary color of the directory page. You can also install Font Awesome Icons or upgrade to a pro plan to customize the listing layout.
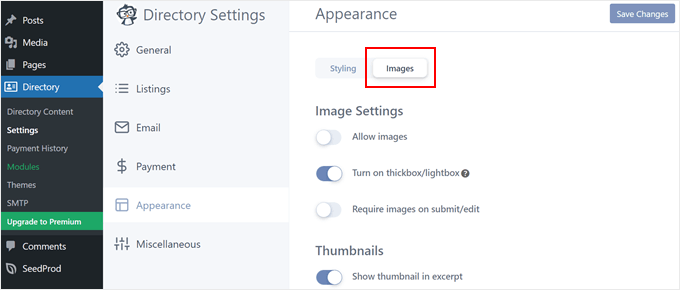
If you switch to the ‘Images’ tab, then you can change how the staff profile images look.
For example, you can turn on a lightbox effect, disable thumbnail images on the main listing page, and change the thumbnail image sizes. Again, remember to click ‘Save Changes.’
For more information about creating directories with WordPress, just check out these articles:
- How to Create a Web Directory in WordPress (Step by Step)
- How to Create a Searchable Member Directory in WordPress
- Best WordPress Business Directory Plugins
Bonus Tip: Use WPForms to Collect Your Employee Information
Whether you manage a small or large team, gathering all the necessary staff information for your directory can be a challenge. Manually getting hold of details through emails or spreadsheets can be time-consuming.
To streamline this process, we recommend using WPForms, a powerful yet user-friendly WordPress form builder plugin. It comes with a pre-built Employee Directory Form template for you to get started quickly.
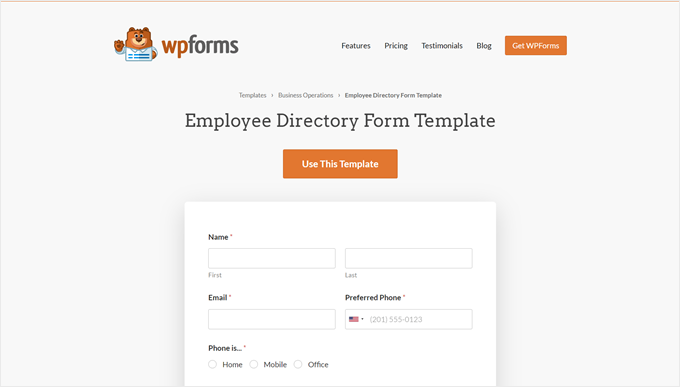
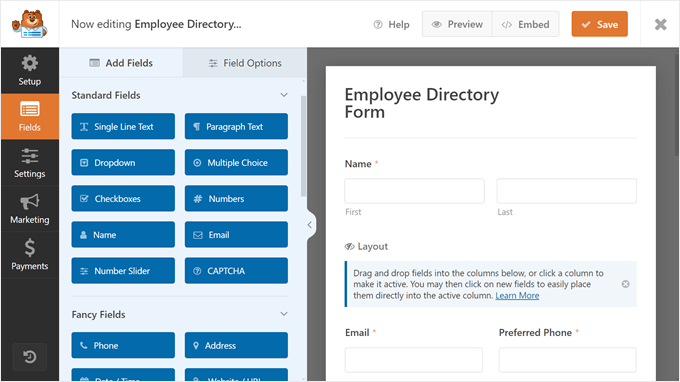
The template already includes many relevant fields, such as name, email address, phone number, department, role, and so on. You can also use the handy contact form builder to add more fields relevant to your needs.
You can choose from a variety of field types, from radio buttons and image uploads to CAPTCHA to prevent spammy form submissions.
To learn more about WPForms, you can read our full WPForms review.
We hope this article helped you learn how to make a staff directory in WordPress. You may also want to check our guide on how to create a company organization chart in WordPress or our list of the must-have WordPress plugins to grow your online business.
If you liked this article, then please subscribe to our YouTube Channel for WordPress video tutorials. You can also find us on Twitter and Facebook.


Syed Balkhi says
Hey WPBeginner readers,
Did you know you can win exciting prizes by commenting on WPBeginner?
Every month, our top blog commenters will win HUGE rewards, including premium WordPress plugin licenses and cash prizes.
You can get more details about the contest from here.
Start sharing your thoughts below to stand a chance to win!
Scott says
Will this plugin pull in already existing WP users or do they all have to be created separately?
WPBeginner Support says
You would need to manually add all of your users.
Admin
Dex Antikua says
Hi,loving the tips.
So does i mean I will create two pages ie for or team and team profile ?
Regards.
WPBeginner Support says
Correct
Admin
Aditya says
How To Arrange them in Alphabatical order
WPBeginner Support says
You would want to check the plugin’s settings for the Staff Order section for what you’re wanting.
Admin
Art Man says
Hi I was trying to follow your steps but when I go to add the Shortcode widget, I do not see a shortcode widget available. Can you please help with some more detail? Thank you!
WPBeginner Support says
Apologies, by shortcode widget, we meant shortcode block for content inside a page. For all the different methods to add a shortcode, you can take a look at our guide below:
https://www.wpbeginner.com/wp-tutorials/how-to-add-a-shortcode-in-wordpress
Admin
Wagner says
Thank’s.
WPBeginner Support says
You’re welcome
Admin
Stacey says
I have staff member pages but do not have an option to have their picture to the left of the bio on the page that lists all of the staff members. I can only add a picture to their individual page. Help!!!
CK says
Hi Great recommendation, do you know if there is a search shortcode to find details on employees. There is one listed in the admin panel But i need one on the front end.
WPBeginner Staff says
We tested it with WP 3.9.1 and it works fine.
ognapolean says
This plugin hasn’t been test with the latest version, WordPress 3.91.
Tina says
Hi, I have WP v. 3.9.1. and Simple Staff List v 1.15 plugin.
I created a person in the wp-admin. Then I used
which writes out the person. Nice, but I have a special div structure prepared for this, so it would be nice to have access to the individual parameters (name, email, phone, …), so I can place them at a correct place.
I tried the following:
also the original code without from the Templates, but it always results in a plain text as if I intended to write out “[staff_loop]” on my page. See the attachement. The person above the text is the code.
Where am I making the mistake? Thanks!
aldrien says
Hi there, i used Simple Staff List plugin in wordpress
but got error in image uploading, using Nevo theme.
can you please help me. Thank you
dorji khandu says
i have added a new field but when i view it on the page the data added in a new field does not show up……..Hep me….
Sebastian says
Pretty cool plugin
Are you planning to go on with the development of it?
Chris says
This plugin is great but absolutely falls short at one thing: Providing a competent Individual Staff Member page. To do so requires knowledge of PHP, which for something labeled as “simple”, is rather strange.
The discussion at this post: http://wordpress.org/support/topic/link-to-staff-member-page did not provide a full solution, and Peggyst did not provide a full solution either. It’s all vague and piecemeal.
I can get the information about the staff person to appear, but I cannot get it to play nice with the Twenty Thirteen (default) theme. Any idea as to what I’m doing wrong and how I can fix it? I know the solution lies SOMEWHERE in the simple.php file but, like the support thread, it’s not at all clear.
Joseph says
How can you display a single staff page? I have checked the WordPress forum for this information but every response appear too vague (or perhaps too advanced) for me. I have not been successful with every suggestion because of lack of clarity. I understand how to create the single-page.php but finding it difficult to incorporate this plugin to it.
Thank you for your help.
WPBeginner Support says
You can create a simple Page in WordPress to create a staff page.
Admin
Joseph says
Thanks for your reply but this doesn’t explain the issue. As you can see on the post here at http://wordpress.org/support/topic/link-to-staff-member-page, a lot of people are having problems creating a stand-alone staff page. I have read that forum many times and still confused on what to do.
Basically, at what point do you insert the staff loop and how do you print or output the custom post data on the page. It will be great if you can write a followup post on this as many people seem to be struggling with this same issue.
Thanks for your work.
WPBeginner Support says
Joseph, the support thread you are referring to is a discussion about creating a support staff list page, where each individual staff member has their own page. On the same thread, Peggyst has posted the solution.
Jerzy says
What’s the best (and easiest) way to add rows? I’d like to make the staff members go across horizontally instead of vertically in one column.
I’ve checked the forums, but everything they’ve been adding is a bit too advanced for my taste. I’m a WP/CSS/htmml newb.
any help would be greatly appreciated.
Thanks in advance.
WPBeginner Support says
You can do that with CSS. First use this template for your staff loop
1-click Use in WordPress
Then you can use CSS to set width, maximum height, float to left, etc. We haven’t tested it exactly but should work.
Admin
Tom says
This template for the horizontal staff display is missing a s closing “>” at the end of line 2. Correcting this adds-in the photo some people are having trouble with.
WPBeginner Support says
Thanks, fixed it.
Antonio Calabrò says
Using the loop template suggested, you can layout your staff list in two columns with the following CSS:
/* div wrapped around each staff member */
div.staff-member {
width: 40%;
}
/* “Even” staff member */
div.staff-member.even {
float: right;
clear: both;
}
/* “Odd” staff member */
div.staff-member.odd {
float: left;
}
Have fun!
ravindrasaran says
I’have facing Same Problem DAWID.
I can’t add photo into people of the company.
WPBeginner Support says
The problem may occur due to a number of reasons. You should open a support thread on the plugin’s page in WordPress plugin directory.
Admin
sam jones says
whenever i put the [simple-staff-list] in the page nohting happens in the list it doesnt show up at ll i can no idea wht im doing wrong.
WPBeginner Support says
for testing purposes try switching to a default wordpress theme. If this does not solve your problem try deactivating all plugins except simple staff list. If this resolves your problem, then there is a plugin causing the conflict.
Admin
Rich Kite says
This is really great, but I want to use this tool for a contributors page instead of “Staff”. I get emailed articles of which I post, and I would like to create a page to add in a short list of bios of all my authors whom of which have no access to my page. Any ideas? Would almost be like a form I need to fill in for each new author I guess?
Editorial Staff says
Yes, you would have to do this for each author unless you want to deal with code by pulling each author profile/description automatically.
Admin
stjamesb says
How do get the picture and the bio in 2 columns like the example? Thanks
Samedi Amba says
Just a follow up on a comment I’d written previously. How can I add more fields to the already existing ones?
Editorial Staff says
You would have to dig through the code to find the filter. Asking in the support forum to the author would be the fastest thing if you don’t like digging through the code.
Admin
Samedi Amba says
Timely! Just what I needed for a project this week. Be blessed and keep all the help coming
Upendra Shrestha says
Thanks for this info. It was really helpful. And the plugin is really good.
patty jones says
This is what I have been doing by hand, looks like I need to check this one out. Thanks for the tip!
Dawid says
Thanks! I was searching for this plugin. It will help a lot. Problem I’m facing is that I can’t add photo into people of the company. I tried to reinstall plugin, to add new people, edit old one, tried few different photos and nothing. All the time “white line”. What to do?