Do you want to add a site-specific plugin to your WordPress website?
A site-specific plugin allows you to easily add code snippets to your WordPress website without relying on your theme.
In this article, we will explain how to create a site-specific WordPress plugin and why it’s important.

What Is a Site-Specific WordPress Plugin?
A site-specific WordPress plugin is a standalone plugin that you can use to add all customization snippets that are not theme dependent.
When working on your website, you will often find WordPress tutorials asking you to add code to your theme’s functions.php file or a site-specific plugin.
WordPress doesn’t come with a site-specific plugin. You will need to create your own and then install and activate it.
Why Create a Site-Specific WordPress Plugin?
As we mentioned earlier, you will often come across tutorials showing some code that you can add to your theme’s functions.php file or a site-specific plugin.
These custom codes can be used to add new post types, taxonomies, shortcodes, and tons of hacks to improve your website.
If you add the custom code to your theme’s functions file, then it will disappear if you update or switch your theme.
You can create a child theme and use the child theme’s functions file to save your code. However, your code will still disappear if you switch themes.
A site-specific WordPress plugin allows you to easily add custom code snippets to your WordPress website and make sure they are theme-independent. It is a standalone WordPress plugin, which means it doesn’t depend on your theme, and you are free to update or switch your theme.
That being said, let’s take a look at how to easily add custom code using a site-specific plugin. We will show you two ways to do that, and you can choose the method that works best for you (hint: Method #2 is easier for beginners).
Method 1: Manually Create a Site-Specific WordPress Plugin
We know this may sound a bit geeky to beginners, but we will try to make it as simple as possible for you.
First, you need to create a new folder on your desktop and name it after your website. For example: mywebsite-plugin.
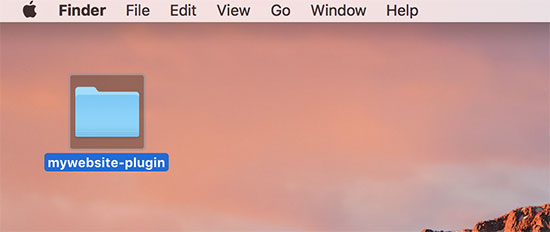
Now, open a plain text editor on your computer like Notepad or TextEdit.
You need to create a new file and save it as mywebsite-plugin.php in the plugin folder on your desktop.
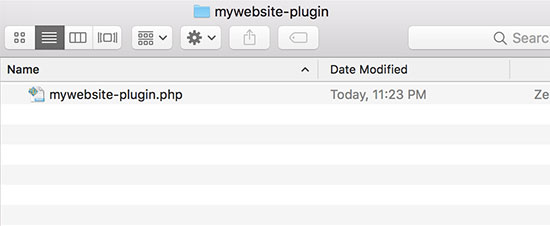
Your plugin file needs a specific header code so that WordPress can recognize it as a plugin. Go ahead and add the following code to your mywebsite-plugin.php file:
<?php
/*
Plugin Name: Site Plugin for example.com
Description: Site specific code changes for example.com
*/
/* Start Adding Functions Below this Line */

/* Stop Adding Functions Below this Line */
?>
You can replace example.com with your own domain name. Once you do that, your site-specific plugin is ready.
There are two ways to upload your site-specific plugin to your website. You can either upload it via your WordPress admin panel or use FTP.
1. Install Site-Specific Plugin From WordPress Admin Area (Recommended)
This method is easier and recommended for all users.
First, you need to create a zip file of your site-specific plugin folder.
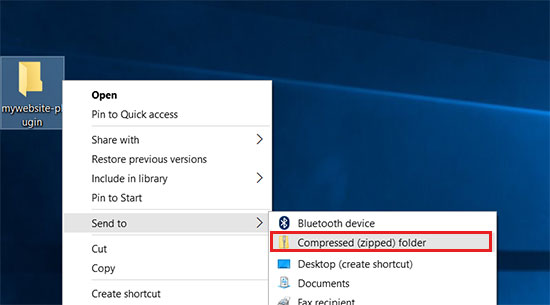
Windows users can simply right-click on the plugin folder and select Send to » Compressed (zip) folder.
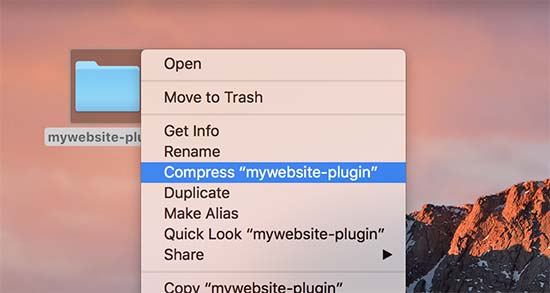
Mac users need to right-click.
Then, select “Compress mywebsite-plugin”.
Once you have the plugin’s zip file, go to the Plugins » Add New page in your WordPress admin area.
Then click on the ‘Upload Plugin’ button on the top.
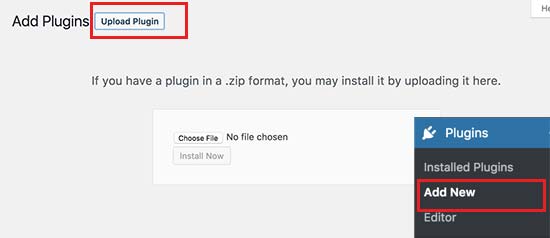
Next, click on the ‘Choose File’ button to select the zip file you created earlier, and then click on the ‘Install Now’ button.
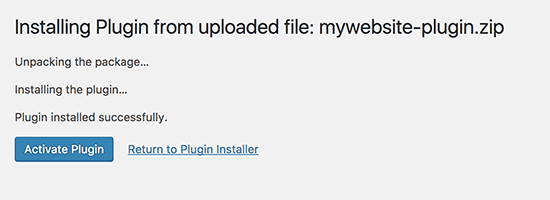
WordPress will now upload and install the plugin for you. Once it’s uploaded, you need to click on the ‘Activate Plugin’ button to start using your site-specific plugin.
2. Upload Your Site-Specific WordPress Plugin via FTP
For this method, you don’t need to create a zip file. You will be uploading the plugin via FTP.
First, you will need to connect to your website using an FTP client.
Once connected, go to /wp-content/plugins/ folder under the remote site column. Next, you need to select your site-specific plugin folder and upload it to your website.
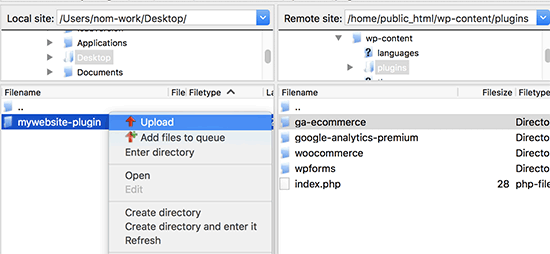
Your FTP client will now transfer your site-specific plugin folder to your WordPress website. This will install the plugin on your website.
However, you will still need to activate the plugin to start using it. You can do this by going to the ‘Plugins’ page inside your WordPress admin area and then clicking on the ‘Activate’ link below your site-specific plugin.

That’s all. Your site-specific plugin is now ready to be used.
Adding Custom Code Snippets to Your Site-Specific Plugin
There are two ways to edit your plugin and add custom code snippets to it.
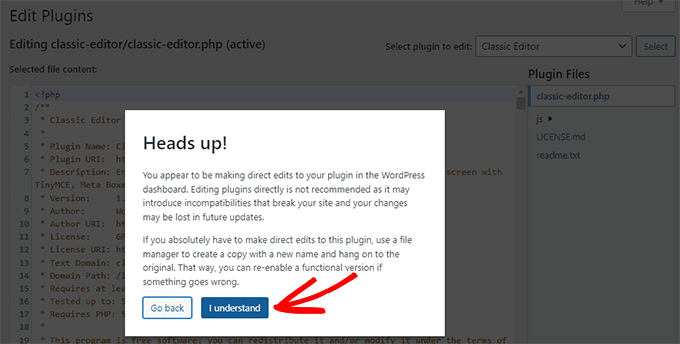
The first method is to do it via the WordPress admin area. You can go to the Plugins » Editor page.
You will see a warning message, and you need to click on the ‘I understand’ button to continue. Alternatively, if you want a safer way to edit the files, then skip to the second method below.
Next, you need to select your site-specific plugin from the drop-down menu labeled ‘Select plugin to edit.’
The editor will load your plugin file, and you will be able to add code snippets to it.
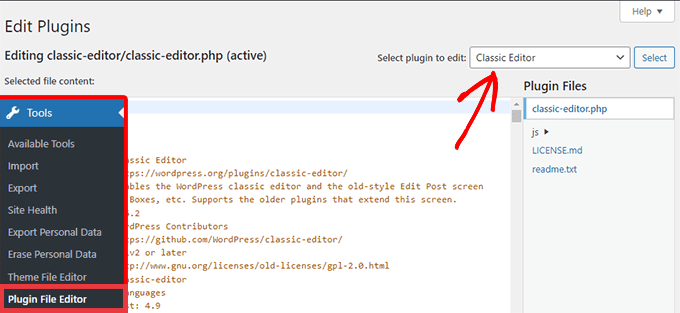
Once you are done, click on the ‘Update File’ button to save your changes.
If there is something missing in your code or it has the potential to break your website, then the plugin editor will automatically undo your changes.
However, if the editor fails, and you see the white screen of death, then you can use FTP to edit your plugin file and undo those changes.
The second method is to directly edit the plugin file using FTP. Simply go to the plugin folder using your FTP client. Right-click on the plugin file and then select ‘View/Edit’.
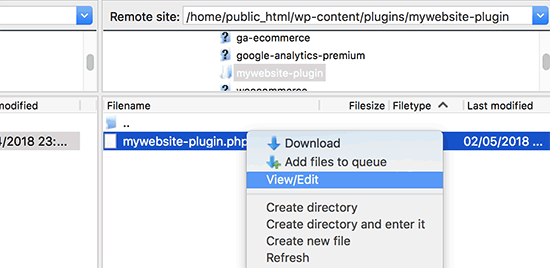
You can also download the plugin file to your computer, edit it, and then upload it back.
Method 2: Adding Custom Code Using WPCode (Recommended)
This method is a lot simpler and gives you a better way to manage your individual code snippets in WordPress using WPCode.
The first thing you need to do is install and activate the free WPCode plugin on your website. For more details, see our step-by-step guide on how to install a WordPress plugin.
Upon activation, the plugin will add a new menu item labeled ‘Code Snippets’ to your WordPress admin menu. Clicking on it brings you to a page where you will manage all your custom codes.
To add your first code snippet, click on the ‘Add New’ button.
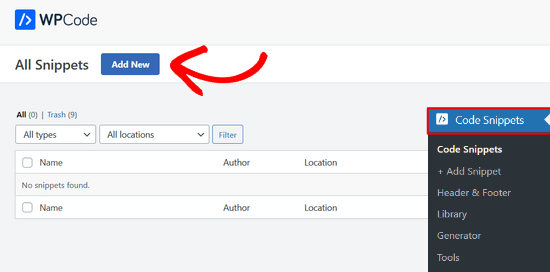
This will bring you to the ‘Add Snippet’ page. Here, you can choose a code snippet from the pre-made library or add your custom code.
To add custom code, navigate to the ‘Add Your Custom Code (New Snippet)’ option and click the ‘Use snippet’ button.
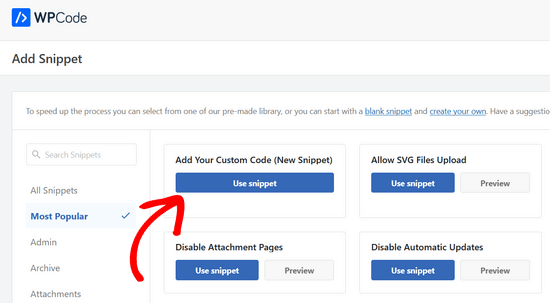
Now, you can enter a title for your custom code snippet. This could be anything that helps you identify the code.
After that, you can go ahead and paste your code snippet into the code box. You also need to select the ‘PHP Snippet’ type from the ‘Code Type’ dropdown list on the right.
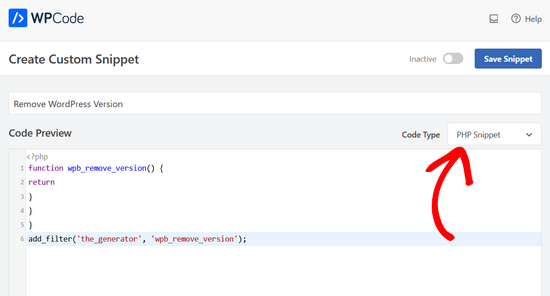
You can also add notes for the code in the ‘Basic info’ section.
You should use this area to write down what this code does, where you found it, and why you are adding it to your website. This will help the “future you” remember why the “past you” added this code.
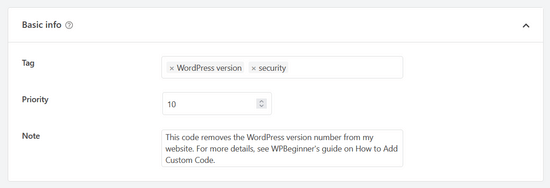
You also have the option to assign tags to your code snippets, which can help organize code snippets by topic and functionality.
The plugin also allows you to select how you want to run the code snippet. In the ‘Insertion’ section, you can select the ‘Auto Insert’ method to automatically insert and execute the code on your site.
You can choose from the admin area, front-end, or everywhere options. If you are unsure, then keep the default ‘Run Everywhere’ option.

Or, you can choose the ‘Shortcode’ method. With this method, the snippet is not automatically inserted. Once you save the snippet, you will get a shortcode that you can manually insert anywhere on your site.
You can also use the ‘Smart Conditional Logic’ section to either show or hide auto-inserted snippets based on a set of rules.
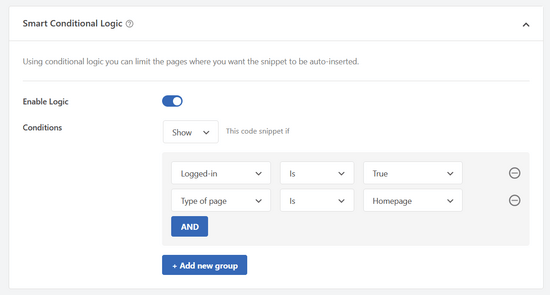
For example, you can load code snippets for logged-in users only, load PHP code snippets only on specific page URLs, show code snippets based on the type of page, and more.
Finally, you can toggle the switch from ‘Inactive’ to ‘Active’ and then click on the ‘Save Snippet’ button.
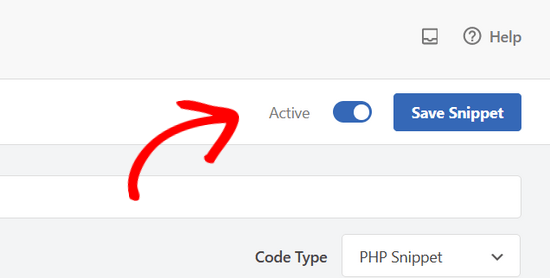
If you want to save the code snippet without activating it, then you can click on the ‘Save Snippet’ button only.
Once you have saved and activated a code snippet, it will become automatically effective on your website if that’s the insertion method you chose.
For more details, see our guide on how to easily add custom code snippets in WordPress.
We hope this article helped you learn why and how to create a site-specific WordPress plugin. You may also want to see our list of useful functions file tips and the most wanted WordPress hacks to best use your site-specific plugin.
If you liked this article, then please subscribe to our YouTube Channel for WordPress video tutorials. You can also find us on Twitter and Facebook.


Syed Balkhi says
Hey WPBeginner readers,
Did you know you can win exciting prizes by commenting on WPBeginner?
Every month, our top blog commenters will win HUGE rewards, including premium WordPress plugin licenses and cash prizes.
You can get more details about the contest from here.
Start sharing your thoughts below to stand a chance to win!
BSubra says
Is it possible to add code snippets like Google Analytics Code, Adsense code in Site Specific Pliugin. Or only possible to add codes we generally put in functions.php file.
I mean, is it possible to add codes in site-specific plugin what we generally put in Header.php file.
WPBeginner Support says
You can do that if you would like, you can also use the insert headers and footers plugin.
Admin
Bola Oussou says
hi
Thanks for this tuto
however is there a way to make this plugging(not to be visible) not in plugging list and also in a specific folder (not wp-content folder) ?
Thanls
Tor-Bjorn Fjellner says
Actually yes, there is:
Instead of placing the plugin in …/wp-content/plugins/ you put it in …/wp-content/mu-plugins/ (You may have to create that directory, if it’s not there yet.
Plugins that are placed in mu-plugins are ALWAYS run, so the only way to deactivate a MU plugin (MU currently is construed as “must use”) is to delete it (or remain the directly mu-plugins to something else…).
Judith says
Hi I tried to do the Site-specific plugin, but it is not working, I get this message “The package could not be installed. No valid plugins were found.
Plugin installation failed.”
What do I do?
WPBeginner Support says
Hi Judith,
This usually means that the plugin header information is incorrect. You can try again and make sure that your plugin header is exactly in the format displayed in the tutorial.
Admin
Jonathan Manheim says
I get this same error. I have tried maybe 10 times. Uploaded through admin and on FTP. Cannot get it to upload. I am using TextEditor to paste the code. Notice several things you don’t mention in the post that I wonder could be an issue. First, won’t let me save the file as .php. I have to save it as .php.rtf OR .rtf then go back and rename the file after it is saved.
Second, not sure what you mean by making sure the format for the plugin header is exactly the same. Should the line number be in there? If so, I can’t get that to work. If I copy and paste with the line numbers, the green vertical line doesn’t show up and there is no space between the line numbers and the code. Or am I supposed to just copy the code (without the line numbers)? Either way, I’ve tried everything I can with my current Textedit application and it will not work.
Any ideas? I can send you screen shots of exactly what I have if you would like
WPBeginner Support says
Hi Jonathan,
You will need to save file as .php. Please use a different text editor on Windows you can use Notepad or download Notepad++. On Mac, you can use TextEdit or download and install TextWrangler.
You don’t need to copy and paste line numbers.
Kacper says
In my case the issue was that the file had Unicode encoding. Changing it to ANSI fixed the issue.
Ikram says
Hi,
Good day!
Would like to know how to set a white paper in my blog post article to download it with add email address from the visitor.
Thanks, Ikram
WPBeginner Support says
Hi Ikram,
You can do that with the pro version of WPForms. You will need at least Plus plan for that. After users enter their email address and click submit you can redirect them to the download page.
Admin
Alain Fradette says
Great info! Thanks so much. I have been using WordPress for years and this little gem made it so much easier!
Abhijeet says
I have edited some code in Style.css . Will it be overwritten if i update a theme?
is it possible to create style css file in this site specific plugin?
LFreitas says
Yes, they will.
You should create a child theme and put your modifications there instead of in the original theme.
Read more: https://www.wpbeginner.com/glossary/child-theme/
dave says
White screen on publishing pages.
The code works to show child pages on a parent page using the shortcode however I am getting white screen. Anyone know why?
Tommy says
The plugin generated 3 characters of unexpected output during activation. If you notice “headers already sent” messages, problems with syndication feeds or other issues, try deactivating or removing this plugin.
Saurin says
I believe best approach to add custom code to site is child theme. No matter if we need to customize theme or not. I mad a practice to always use child theme even if there is no customization. This habit saved my time & effort many times. I dont think it is good to create extra plugin for such customization.
I believe in minimum use of plugin no matter how simple you created one.
Jason says
Which is better, site-specific plugin or Child Theme? or both?
I need to create a custom post type to add some major functionality to my site so is the plugin better or the child theme and its functions.php?
Thanks!
Josh says
The thing is, is that you’re creating the plug-in yourself, using the functions the same exact way. So the answer to your question would be that neither is better, because you should be using them WITH each other.
Josh says
Think of the site-specific plug-ins as functions that are independent of your theme.
Vickey says
How would I create a create a new plugin directory in Azure? I have WordPress running on Azure using MS SQL Server, which I activated using Project NAMI.
vishal says
not working on multisite with publisher theme can you help me this is my site and also tell me how can i remove featured image inside the post not from front page latest post
Nadia Khan says
Hi there,
You WP Beginners are rock. and I want to thank you for your Struggles for us.
Now come to the point. I have installed an theme and in that theme, there is an function that is showing wp toolbar for guests, I have tried so many times to find this function in theme files to remove this, but i can’t. So please help me to remove that toolbar, that is showing to every visitor with wordpress logo and wordpress’s own link to their website. Screen Shot is attached.
Manuel says
Does something like this work for plugins too? Im finding that I am making a few changes to plugins that I add to my site….many times deleting certain lines of code I dont want. I’m assuming that after I update that plugin, all my changes will be erased. How can I avoid this?
Elizabeth says
Hi, thanks for the post. I’m getting an error when I activate the plugin for some reason:
Parse error: syntax error, unexpected ‘*’, expecting identifier (T_STRING) on line 9
Any ideas what I’ve done wrong?
Thanks!
WPBeginner Support says
Hi Elizabeth,
There is an unexpected asterisk sign in the code on line 9 which is blocking the php script. Edit the file again and copy the code exactly as it is shown above. Make sure that you don’t copy line numbers in the code click on the Copy button at the top right corner of the code snippet box
.
Admin
Steven Denger says
I tried naming the new folder as you did in the example but I got an error that said something in the way of you cannot use a name like this. This Instruction may be helpful to some – but it is very difficult and confusing to me and does not help at all. As I said – you need to explain this down to the fine details or otherwise these tutorals will not help. The name of this site is wp BEGINNER – and that is what I am. You project these tutorals to the more experienced.
I guess I will have to start going elswhere to get beginners instructiions because, most of time, wp beginner is not helpful – it is more like a techs only club.
Steven Denger says
How do you get to the /wp-content/plugins/yoursitename-plugin/ in wordpress and upload a file there? I am lost on the first line of instruction. You guys always assume that we know these things in your instructions but they are not clear enough.
I went to cpanel and opened up the wpcontent > plugins – and it shows a list of plugins – but I am lost from this point. How do I go about uploading a file in here? I am a beginner – and you guys seem to always explain things like your instructing experienced techs. I am not but I go to WP Beginner to try to learn. It is usually difficult to follow your instructions and I end up having to go somewhere else in google search to find things explained down to a beginners level.
If you want to be more helpful try breaking things down a little more simple.
Manuel says
Hey Steven,
I know the feeling! I’m far from a expert with wordpress and I pretty much live on google searches and this site trying to learn. I know a little bit and was able to get this to work. Send me your email and I’ll send you the steps with screenshots. I havent tested putting actual code into the plugin so we’ll see if that works….but I was able to see the newly created plugin on my admin page
Steven Denger says
thank you manuel
NiceRazer says
Hello, can you please tell me how to do that to? I’ve tried finding posts that would help me with this same prob but still didnt found it.
JoAnn Chateau says
Thank you for the great advice and simple how-to instructions. I easily created a Site-Specific WordPress Plugin for my site and enabled shortcodes for widgets. Now I have less worry when changing themes, and I didn’t need to install another plugin. Again, thanks!
george says
hi i followed the instruction on how to make a site plugin for my site. ive uploaded it but cant see it in my list of plugins.
any ideas why?
Dawn says
I cannot find where the folders live in the plug in directory. I tried searching for: /wp-content/plugins/yoursitename-plugin/ (with my site name).
Kara says
Never mind, I figured it out and got it activated. My hosting server was acting up, must have timed out or something…cheers!
Kara says
I followed your instructions but i don’t know how to activate it. It doesn’t show in my list of plugind in my wp-admin. Can you help?
Sheyejinkazama says
Thank you. Thank you so so much.
Molly says
How do you get the plugin to “Network Activate” on a multi-site?
Stephanie says
I’m getting the same error as Sonya above. Does anyone have a fix?
Parse error: syntax error, unexpected T_LNUMBER in /home/statisu0/public_html/wp-content/plugins/statisticshowto-plugin/statisticshowto.com-plugin.php on line 10
WPBeginner Support says
your plugin file name contains .com in it. It should be statisticshowto.php instead.
Admin
Susan says
Hi again. I’ve been reading through all of the comments above and, while some show your answer and resolution to the problem, many don’t. So it’s hard for me to learn from how others resolved their problems! Anyway, here’s what I’m wondering: if by following the instructions in this post to create a folder within my “plugins” folder, how will I be able to see my new site-specific plugin file?
For example, I followed the instructions to create a folder called susansinthegarden-plugin. Then I put my plugin code in a file called susansinthegarden-plugin.php. I can’t see the plugin when I go to plugins on my dashboard.
Is this because the new plugin text file exists in a sub-folder under “plugins”? I can’t figure out what I’m missing but really need to resolve this. Is there anyone out there who can help me? Thanks so much!
WPBeginner Support says
No. Please make sure that your plugin’s header area is properly formatted.
Admin
emy says
Hi,
What is a plugin header and how do I format it?
WPBeginner Support says
Hey Emy,
The plugin header is the part that tells WordPress that this file should be treated as a plugin. It also tells WordPress the name of the plugin, version, and other information.
In the code shown above, the header part begins right after the first line and ends at line 5. It contains plugin’s title and description.
Susan says
OK, I resolved my program. Not being a code-writer, I didn’t realize that there was a separate header to wrap around the code I was borrowing. Duh. Thanks for your help.
Susan says
I followed your instructions to create a folder under wp-content/plugins etc. and put the file containing the code into that folder but I can’t see my new plugin when I go to my dashboard and look under plugins. Did I miss a step? Thanks in advance for your help!
Edgar Ramirez says
Hello
I created the directory and the php file but i cannot see the plugin at all
/wp-content/plugins/yoursitename-plugin/
Open a blank file and save it as “yoursitename-plugin.php”
dont see it on the dashboard plugin list and neither in the Plugin>editor
Can you please help me
Sonia Lacasse says
Never mind! Looks like I found the problem. Thanks for your awesome work!
Sonia Lacasse says
When I try to activate the plugin, I get the following error message:
Plugin could not be activated because it triggered a fatal error.
Parse error: syntax error, unexpected ’06’ (T_LNUMBER) in /var/www/domain/wp-content/plugins/ETK-PLUGIN/ETK-PLUGIN.php on line 10
Can you please help?
Thanks!
Catherine Argyros says
hi there, when i put this in the directory
I received this error message
The plugin generated 2 characters of unexpected output during activation. If you notice “headers already sent” messages, problems with syndication feeds or other issues, try deactivating or removing this plugin.
but my plug in is activated….. please help me understand what is going on?
thank you
WPBeginner Support says
Most probable cause for this error could be an empty space after the last ?> closing tag.
Admin
error message says
wonderful, thats exactly what the problem was. Thank you for helping me create my first plugin!
WPBeginner Support says
Glad to help
xin a day says
“All you have to do is create a new folder in the plugins directory. Example: /wp-content/plugins/yoursitename-plugin/
Open a blank file and save it as “yoursitename-plugin.php”
Put the following code in the file:”
i hv few question on these .
1. i can’t create a folder onthe plugin directory.
2. where to open a blank file ?
3. the plugin diretory cant install that file.
thank you
Sacha says
Awesome idea! I’ve always found functions.php a pain, so this method works great!
Alan Shapiro says
This is a really useful post–thank you! Perhaps someone else asked this and I just missed it in all the comments, but: will a site-specific plugin override a function that is in the theme’s functions.php? For instance, if there is a “remove_action” in the functions.php, will the same “add_action” in the plugin take precedence?
WPBeginner Support says
Both functions.php file and site-specific plugin are treated as plugins. Functions.php file loads after plugins but they do not have precedence over eachother. This is why using the same function in both files can cause unexpected results. The best way to override pluggable code is by using hooks and filters.
Admin
Robert Masters says
I’m building a plugin at the moment for a multisite network and I need certain functionality available only in specific sites, so this is a perfect article for me right now.
I have one question though…..how do I name the site plugin folder for a site that is created as a subdomain? Example: subdomain.mainsite.com would it be subdomain-mainsite-plugin or just subdomain-plugin?
Hope this makes sense, question based on your tutorial.
hans says
very good. when you create a second instance don’t forget do give the “register and load” function an own name, like i did
Eric Ellis says
That’s great. I always figured it was pretty simple. Thank you for the information.
Jide says
Nice one there. Kindly update the post to inform readers that after activating the plugin, they will have to click on the “edit” link on the plugins page, to add their codes.
Most newbies might not know this…
WPBeginner Support says
Actually we do not recommend editing plugins and themes from WordPress admin area. Instead, we would recommend editing your plugins in a text editor via FTP client. This way in case of an error you would be able to quickly fix it without losing access to admin area for too long.
Admin
Mark Holland says
Thank you thank you thank you!! This has solved an issue that’s been puzzling me for weeks – and now solved in less than 1 minute.
Can’t express how grateful I am for you sharing your knowledge – thanks again!
Luca says
Thank you for the advice! But now I’m confused: what’s the difference between this method and the plugin “Code Snippet”? Is the result the same? Or do they accomplish the same thing in a different way?
Malcolm says
Three years later this post is still giving – It’s changed the way I think about customising wordpress – Thank you!
I tried this today and created a a site-specific-plugin with code to hide the wordpress menu bar for non-admins, and to add my latest post to a ‘Current issue’ menu item. Both worked perfectly.
But the third snippet I added to the plugin failed to work. When I copied the code to the child theme’s functions.php it worked as expected.
Can you explain why this would happen?
I’m trying to modify the effect of the plugin “Restricted Site Access” by allowing access to more than a single page. The code I tried in my site specific plugin and the functions.php was:
//
add_filter( ‘restricted_site_access_is_restricted’, ‘my_restricted_check’ );
function my_restricted_check( $is_restricted ) {
global $wp;
if (
$wp->query_vars[‘pagename’] == ‘contact’ ||
$wp->query_vars[‘pagename’] == ‘subscribe’ ||
$wp->query_vars[‘name’] == ‘aplr-2013-volume-21-number-2’
)
$is_restricted = false;
return $is_restricted;
}
Any advice or comment would be welcome. I’m confused!
harklord says
after trying this. My site is opening blank… Please help.. Av tried deleting the files i created but still blank
WPBeginner Staff says
Make sure that your stored the plugin’s php file in /wp-content/plugins/ folder and not in your theme directory.
Mohammed Amine says
Fixed, actually it is necessary to add that php comment in the php file, or else it wont appear on the admin panel.
That php comment is used to show the discription of the plugin in the admin panel.
Paolo Bergomi says
Hello,
This is Paolo, i am building my website and theme with WP last edition 4.1.1.
i Am trying to learn custom type fields and I found your website very useful. i hav ea issue, though: even if following this post i created the folder my theme plugin and with the related file .php you mentioned here, for the site specific plugin, copy all in localhost using WAMP server. i opened then my dashboard, went to plugins but my new plugin dont appear. what is going on? did i miss anything? thanks
paolo
WPBeginner Staff says
You can try and fit your modifications in site-specific plugin by using filters. However, since you had to edit specific files we doubt that all your edits can be implemented in a site-specific plugin using filters. In that case you should make those changes into a child theme. All your custom CSS should also go into your child theme’s stylesheet. You can also use your site-specific plugin to enqueue a custom stylesheet.
Bas van der Linden says
Hmm, looks like my last post went missing while registering for this annoying disqus plugin.
Anyways:
At first I’d like to thank you for sharing this information.
Secondly I do have several questions regarding this post.
1) Is it possible to also make site specific plugins for other .php’s where I’ve added some codes?
Such as front-page.php post-page.php and post-archives.php
2) Is it possible to do something like this for .css codes?
I run genesis as framework(Parent theme) and a child-theme that I’ve downloaded.
Now since there are no grand-child theme’s in wordpress I’ve made my alterations in the child-theme’s folder
This includes a lot of different .css edits, Is there a way to make site specific .css files/plugins like this, so I can maintain the origional child-theme (and perform an update if any updates are released)?
3) When I create a site-specific plugin to change the footer and activate it, I will see both the origional footer and my own footer on the site.
Is there a way to go around this?
My plugin looks like this:
Once again thank you for sharing this information on site-specific plugins, and I hope to hear soon from you guys.
Chelsey says
Thank you for your patience… I’m still trying to figure out how to ‘create a new folder to plugins directory’
Rodney Lacambra says
Hi Chelsey. Consider this guide:
Go to “File Manager”. It will take you to “/public_html” directory. Click on “wp-content >> plugins” . This is where you will “create” a folder called “yoursitename-plugin”. After that, create a file using some text editor(notepad++), paste the code given above and save the file as “yoursitename-plugin.php”. Upload it to “yoursitename-plugin” folder and activate it in your wordpress admin area. Easy as that!
Hope it helps you a lot.
Regards,
NomadTech
Benjamin Mukasa says
This is a great post. I followed the instructions but the plugin is not appearing in my plugin list.
Paolo Bergomi says
me same..where did we make wrong? thanks in advance for any tips to solve this
WPBeginner Staff says
yes you can use it for multiple functions.
WPBeginner Staff says
Your code seems to be correct. Here is what you can do:
Make sure you have saved the plugin file in the /wp-content/plugins/ directory.
Make sure that your plugin file name is correct. We recommend using yoursitename.php format. For example if your domain name is black-circles then your plugin file name should be black-circles.php
SteveMTNO says
I originally had the plugin file (bc-plugin.php) in its own directory called blackcircles/wp-content/plugins/bc-plugins. That didn’t work.
Then I tried moving the bc-plugin.php file from that folder to the blackcircles/wp-content/plugins folder. Still doesn’t show up in my admin panel.
Do I have to “enable” it first before it shows up or something?
Confused….
WPBeginner Staff says
If the file is correctly placed in your plugins folder then you will see it in your WordPress admin area under Plugins. If you see your plugin there, then you will have to click on the activate link below the file to activate the plugin.
Did you try renaming the file to something else?
SteveMTNO says
Tried renaming it 3 times – none of them show up….
I must be doing something wrong (or not doing something that I should be doing)…
SteveMTNO says
So can I use this one site-specific plugin for multiple functions, or is it best to do something similar to this for each one?
Michael Cuomo says
I’m having a similar issue with mine. I’ve created a site specific plugin to create a custom content type, but the custom content type is not showing up in my admin panel underneath pages like it should.
SteveMTNO says
I posted this yesterday, but it seems to have vanished…
Anyway, I followed the instructions above, but can’t see the site-specific plugin in my admin panel.
Here’s a link to my code:
http://pastebin.com/fbeGr8gh