Do you want to learn how to do live blogging in WordPress?
Live blogging is a form of blogging that lets you cover live events on your site and provide updates to your readers in real time.
In this article, we will show you how to easily add live blogging in WordPress, step-by-step.

Why Do Live Blogging in WordPress?
Live blogging is when you create a single blog post and add real-time updates during an event. This lets you add new content to your WordPress blog as the event unfolds while keeping all the updates in a central place.
Bloggers and news sites commonly use it to broadcast updates from technology conferences, sporting events, election updates, and other blogging niches.
For example, if you run a CrossFit gym, then you could provide real-time live blogging coverage of the CrossFit games. Or, if you run a gaming website, then you could cover eSports matches and tournaments in real-time.
This is a fun way to engage your readers and keep them coming back to your WordPress website for updates.
That being said, let’s show you how you can do live blogging in WordPress. Here is a summary of the steps we will cover:
Step 1: Install the 24liveblog Plugin
The easiest way to do live blogging in WordPress is by using the 24liveblog plugin.
It offers a forever-free plan that includes features like social media integration, real-time statistics, audio/video recording, and much more.
First, you need to install and activate the 24liveblog plugin. For details, see our beginner’s guide on how to install a WordPress plugin.
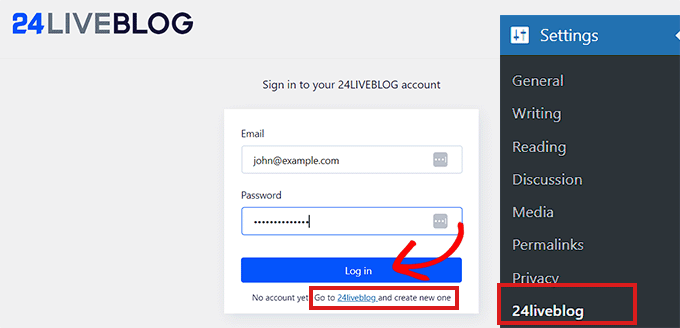
Upon activation, visit the Settings » 24liveblog page from the WordPress admin sidebar. Here, you must enter your 24liveblog account details if you already have an account.
However, if you haven’t created an account yet, simply click the ’24liveblog’ link under the ‘Log in button.
Step 2: Create Your 24liveblog Account
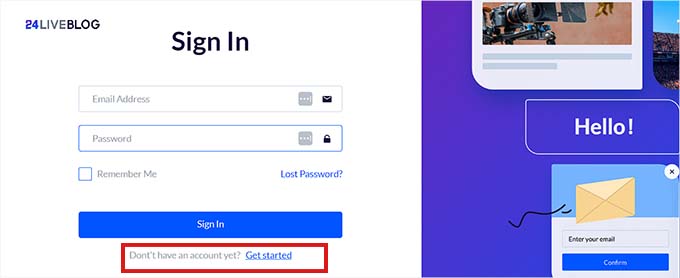
Clicking on the sign-up link will take you to the 24liveblog website.
Once you are there, click on the ‘Get Started’ link at the bottom of the screen to create an account.
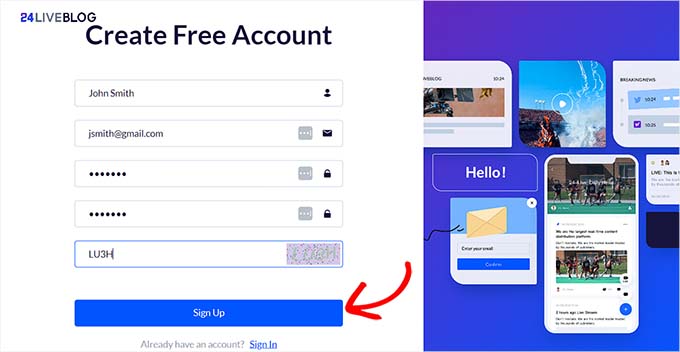
This will open up a ‘Create Free Account’ prompt.
Now, you need to type a username and password and then enter your email address.
After that, click the ‘Sign Up’ button to set up an account.
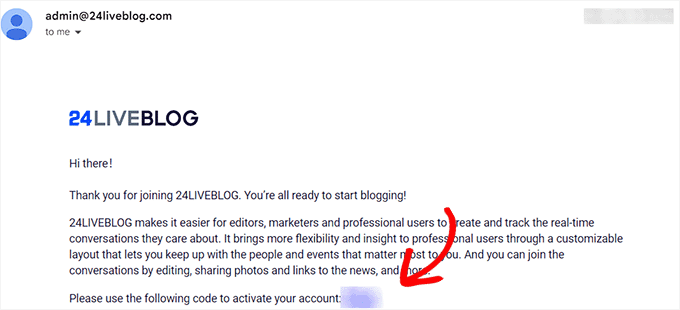
Once you do that, you will receive an email from 24liveblog containing a verification code.
You need to copy that code from the email.
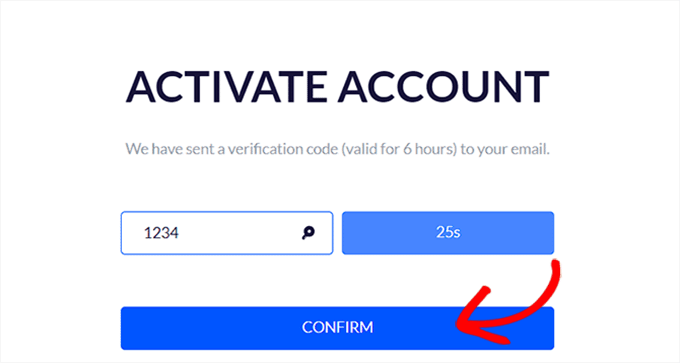
Now, go back to the 24liveblog website and paste the verification code.
After that, click the ‘Confirm’ button to activate your account.
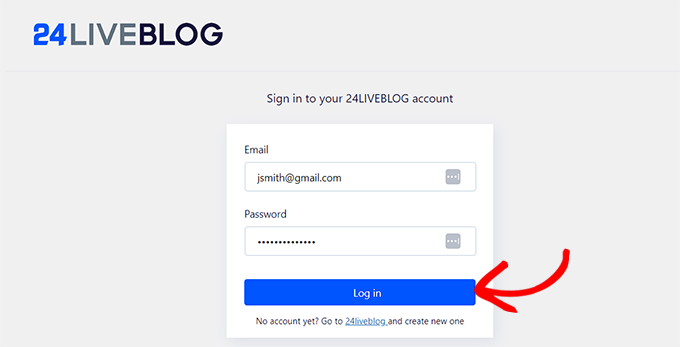
Now that your account has been set up, head back to the Settings » 24liveblog page from the WordPress admin sidebar and enter your email and password.
After entering these details, go ahead and click on the ‘Log in’ button.
You have now successfully connected your WordPress website to the 24liveblog platform.
Step 3: Add a New WordPress Post for Live Blogging
The next step is to create a post for live blogging.
To do this, visit the Posts » Add New screen from the WordPress dashboard.
Once you are there, simply expand the ‘Summary’ panel in the right column and check the permalink of the post.
You will need the page URL when creating your live blog event later.
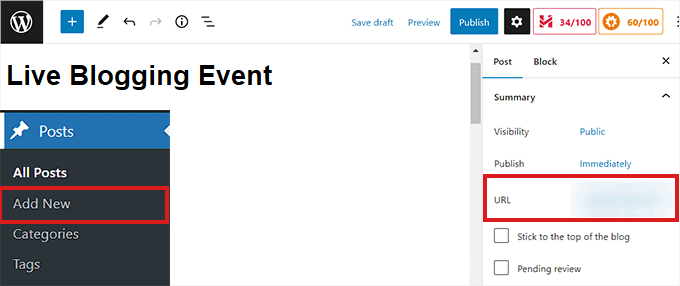
After that, click the ‘Save Draft’ button at the top right corner of the screen to save your post.
Step 4: Create Your First Live Blog Event
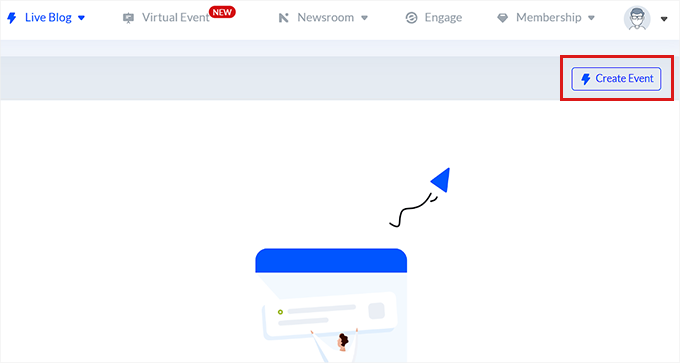
To create your first live blog event, head over to your account page on the 24liveblog website.
From here, you must switch to the ‘Live Blog’ tab from the top. Next, click on the ‘Create Event’ button.
Now, you will see a new screen that displays a list of events that you can choose from.
Simply click on the ‘Live Blog’ option.
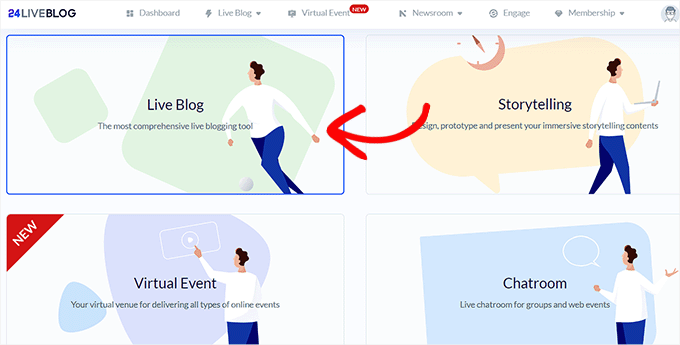
Next, you will be directed to a new page to fill in your live blog details. You can start by entering the title and description for the live event.
After entering these details, you can also select a ‘Start Time’ for your blog. You also need to choose a category and add tags as needed.
You can even display a countdown timer on your website by toggling the ‘Countdown’ switch to active.
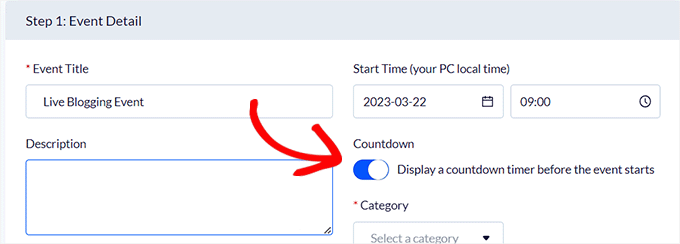
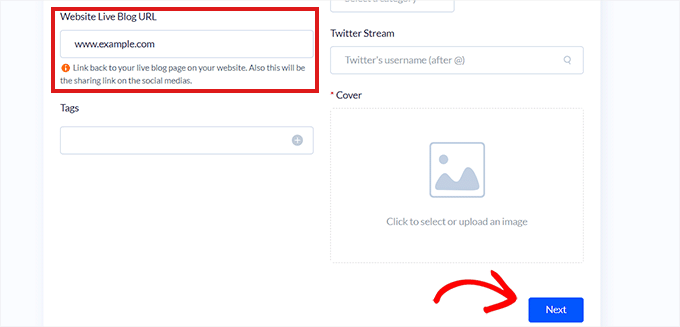
Once you have done that, just paste the WordPress blog post URL in the ‘Website Live Blog URL’ box. Make sure to add the link to the blog post where you will cover the live event.
You can also add an image for your live blog in the ‘Cover’ section.
Once you are satisfied with your selections, click on the ‘Next’ button to continue.
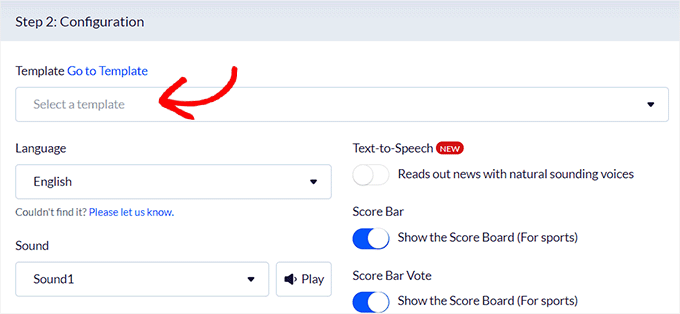
On the next screen, you can choose a template, language, real-time sports score updates, and time format for your live blog.
After configuring the settings, click the ‘Next’ button to move forward.
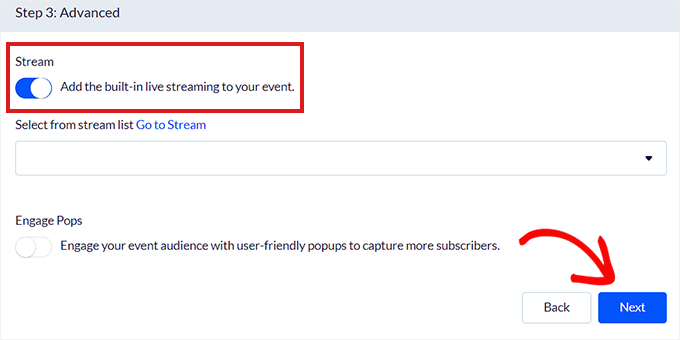
Here, you can toggle the switch for ‘Stream’ and ‘Engage Pops’ if you want to turn on live streaming and popups to grow your email list.
However, we will be leaving the default settings as they are. After making your choices, click on the ‘Next’ button.
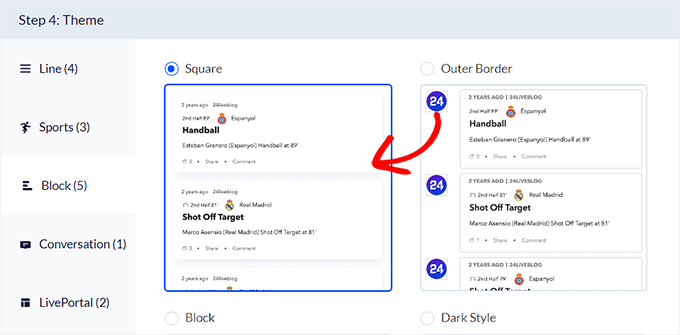
This will take you to a new page where you have to choose a theme for your live blog.
24liveblog offers numerous themes to display live blog entries. Simply choose a theme that looks good for the type of event you are covering.
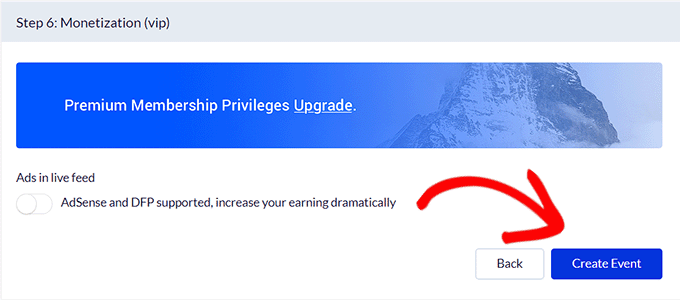
In step 4, there will be some premium settings that won’t be available for free users. You can skip them by clicking on the ‘Next’ button.
Finally, click on the ‘Create Event’ button to create your live blog event.
Step 5: Add the Live Blogging Feature to Your WordPress Blog Post
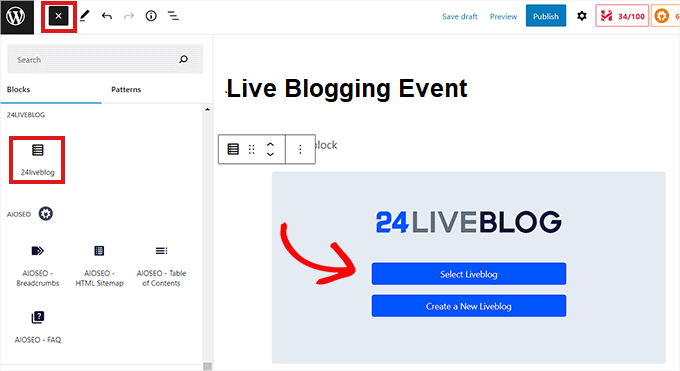
Now, you must add the 24liveblog block to the blog post you created earlier.
To do this, click the ‘Add Block’ (+) button at the top left corner of the screen to open the block menu. From here, find and add the 24liveblog block to the editing interface.
After that, click on the ‘Select Liveblog’ button in the block itself.
Clicking on it will bring up a popup showing live blog events you created in your 24liveblog account.
Click on the ‘Add’ button next to the live blog you created earlier.
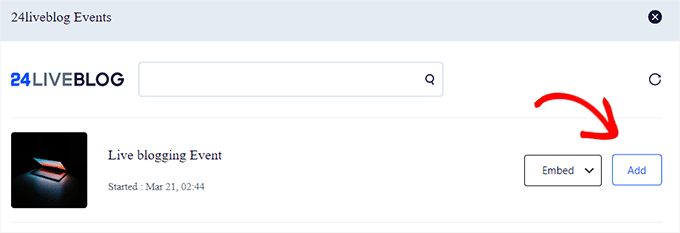
You have now successfully added the live blog to your WordPress post. Just click the ‘Publish’ button at the top of the editor to save the post.
Next, you need to visit the published blog post on your WordPress website. If you enabled a countdown timer during the live blog setup, then you will now see the timer counting down to the event start time.

Step 6: Start Live Blogging
When it is time for your event to begin, simply edit the blog post where you added the live blog block.
From here, select the ’24liveblog’ block and click the ‘View’ button.
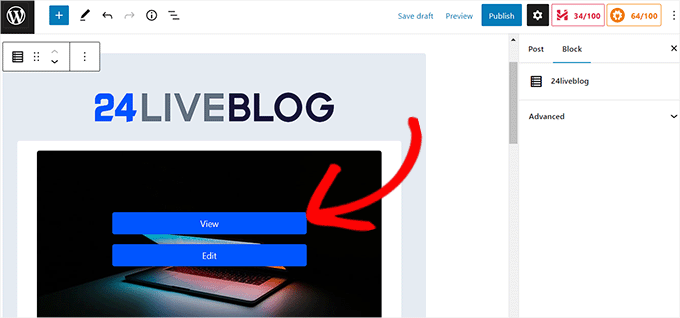
This will direct you to your 24liveblog account page.
You can now start live blogging, and your content will automatically be added to the live blogging post on your WordPress website.
Simply enter your post content and then click the ‘Add Post’ button.
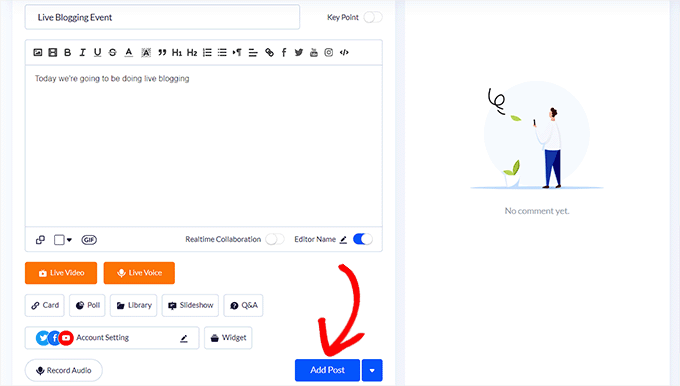
You can also record live audio, add a slideshow, add video content, Q&A, polls, and images to your post.
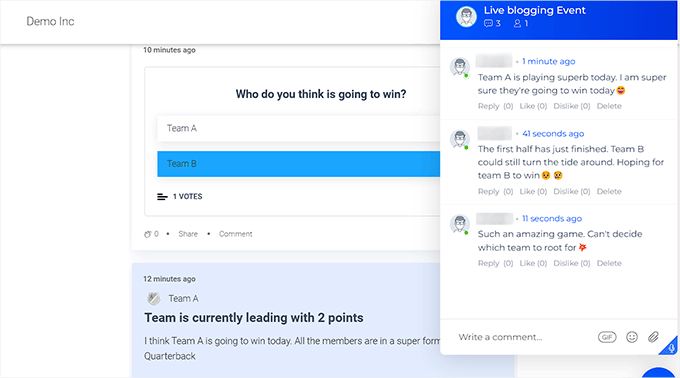
Your visitors can comment on each event update you publish and also chat with each other in the live chat window.
Note: The 24liveblog plugin doesn’t store your live blogging posts in the WordPress database. This means that the live blogging posts you create using the plugin will be stored on the 24liveblog website.
This is how the live blogging blog post looked on our demo website.
Bonus: Add a YouTube Live Stream in WordPress
Apart from live blogging, you can also add a YouTube live stream on your website. This will allow users to interact with you in real time and boost user engagement. Plus, it can boost your site’s SEO and bring more traffic.
To add a YouTube live stream, you must install and activate the YouTube Feed Pro plugin by Smash Balloon because it is the best WordPress YouTube plugin on the market.
Upon activation, visit the YouTube Feeds » All Feeds page from the WordPress dashboard and click the ‘Add New’ button. This will take you to a new screen where you must select the ‘Live Streams’ option as your feed type.
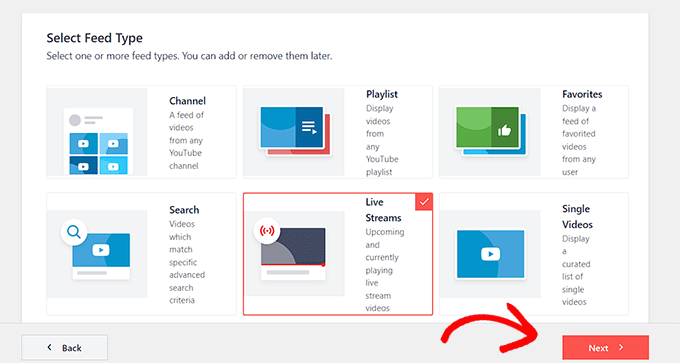
After that, you will need to add your YouTube account’s API key and source code for your channel to add live stream.
To get this code, open your YouTube channel and simply copy the text after ‘/channel/’ or ‘/user/’ in the URL at the top.
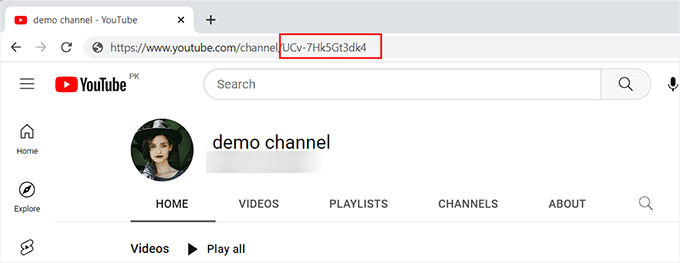
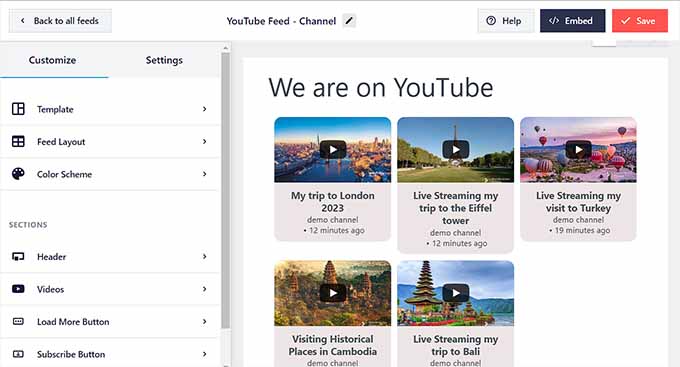
Next, paste the code into the YouTube Feed Pro field. After that, the feed editor will be launched on your screen you can choose a layout for the live stream feed, add colors of your choice, create buttons, and so much more.
For details, you can see our tutorial on how to embed a YouTube playlist in WordPress. Once you are satisfied, just click the ‘Save’ button at the top to store your settings.
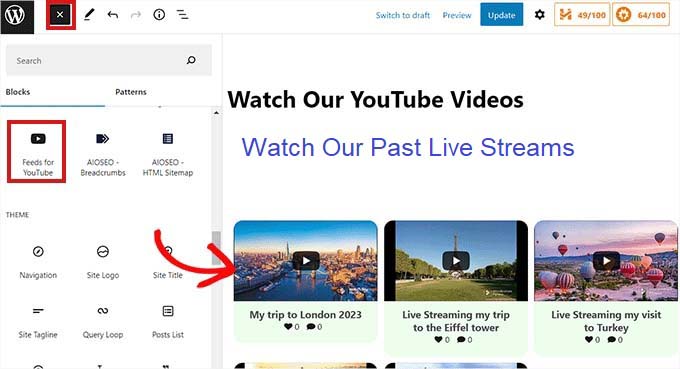
You can now open the page where you want to add the YouTube live stream and click the ‘Add Block’ (+) button. Then, embed the ‘Feeds For YouTube’ block on the page.
You have now successfully added a YouTube live-stream video. For more information, see our tutorial on how to embed a YouTube live stream in WordPress.
We hope this article helped you learn how to do live blogging in WordPress. You may also want to see our guide on how to easily embed Instagram in WordPress and our article on how to export email addresses from WordPress comments to grow your email list.
If you liked this article, then please subscribe to our YouTube Channel for WordPress video tutorials. You can also find us on Twitter and Facebook.


Syed Balkhi says
Hey WPBeginner readers,
Did you know you can win exciting prizes by commenting on WPBeginner?
Every month, our top blog commenters will win HUGE rewards, including premium WordPress plugin licenses and cash prizes.
You can get more details about the contest from here.
Start sharing your thoughts below to stand a chance to win!
Francis Roberts says
This is great, i was actually looking for way to do this mostly during this election. Thanks for this
WPBeginner Support says
You’re welcome, glad our guide was helpful
Admin